
Are you wondering how to take the screen off an iPhone 5? Whether you need to replace a cracked screen or want to access the internal components of your device, removing the screen of an iPhone 5 can be a delicate task that requires precision and a few specialized tools.
In this article, we will guide you through the step-by-step process of removing the screen from your iPhone 5. We will cover everything from the tools you’ll need to the precautions you should take to ensure a successful screen removal without damaging your device. So, if you’re ready to learn how to take the screen off an iPhone 5 and give your smartphone a new lease on life, let’s dive in!
Inside This Article
- Reasons to Remove the Screen of an iPhone 5
- Tools Needed for Removing the Screen
- Step-by-Step Guide to Removing the Screen of an iPhone 5
- Troubleshooting Tips for Screen Removal
- Conclusion
- FAQs
Reasons to Remove the Screen of an iPhone 5
There are several reasons why you might need to remove the screen of your iPhone 5. Whether you’re looking to replace a cracked or shattered screen, fix unresponsive touch functionality, or even upgrade to a newer screen model, removing the screen is a necessary step in the process. By removing the screen, you gain access to the internal components of the device, allowing for repairs or replacements as needed.
One common reason for screen removal is to replace a damaged or cracked screen. Accidents happen, and dropping your iPhone 5 can result in a shattered or broken screen. By removing the screen, you can replace it with a new one, restoring the visual integrity of your device and ensuring a clear and crisp display.
Another reason to remove the screen is to fix unresponsive touch functionality. If your iPhone 5’s touch screen is not responding properly, it may be necessary to remove the screen and check for any loose connections or damaged components. By doing so, you can address the issue and restore the touch functionality of your device.
Additionally, removing the screen is often required when upgrading to a newer model or replacing it with a higher-quality screen. Whether you’re looking to enhance the display resolution, improve color accuracy, or add features like True Tone technology, removing the old screen allows for a smooth transition to a new and upgraded display.
Tools Needed for Removing the Screen
If you’re planning to remove the screen of your iPhone 5, it’s important to ensure you have the right tools for the job. Here are the essential tools you will need to successfully remove the screen:
1. P2 Pentalobe Screwdriver: This specialized screwdriver is used to remove the two tiny screws located at the bottom of the iPhone 5. These screws secure the screen in place and must be removed before you can proceed with the screen removal process.
2. Suction Cup: A suction cup is needed to lift the screen away from the body of the iPhone 5. The suction cup creates a vacuum seal, allowing you to pull up on the screen without damaging it or the internal components.
3. Small Plastic Pry Tool: This tool is used to carefully pry open the iPhone 5 and separate the screen from the body. It helps to have a couple of plastic pry tools of different sizes to have more flexibility during screen removal.
4. Tri-point Y000 Screwdriver: The tri-point Y000 screwdriver is needed to remove the screws that secure the battery connector and other internal components. Some versions of the iPhone 5 may require this specialized screwdriver, so it’s best to have it on hand.
5. Tweezers: Tweezers can be handy for handling small screws or connectors during the screen removal process. They provide better control and precision when working with delicate components.
6. Microfiber Cloth: It’s important to have a microfiber cloth to clean the screen and remove any fingerprints or smudges before reassembling the iPhone 5. A clean screen ensures optimal visibility and performance.
7. Adhesive Strips: Depending on the condition of the adhesive holding the screen in place, you may need adhesive strips to reseal the screen after replacing it. These adhesive strips help ensure a secure and reliable bond between the screen and the body of the iPhone 5.
Remember, having the right tools is crucial for a successful screen removal process. It’s best to invest in high-quality tools to prevent any damage to your iPhone 5 and ensure the screen removal goes smoothly.
Step-by-Step Guide to Removing the Screen of an iPhone 5
Removing the screen of an iPhone 5 may seem like a daunting task, but with the right tools and careful guidance, it can be done successfully. Here is a step-by-step guide to help you through the process:
-
Power off your iPhone 5 by holding down the power button and sliding it to the right. Disconnect any cables that may be attached to the device.
-
Use a fine-pointed pentalobe screwdriver to remove the two screws located on either side of the charging port at the bottom of the device. These screws secure the screen to the frame.
-
Place a suction cup near the home button of your iPhone 5. Gently pull up the suction cup to create a small gap between the screen and the frame.
-
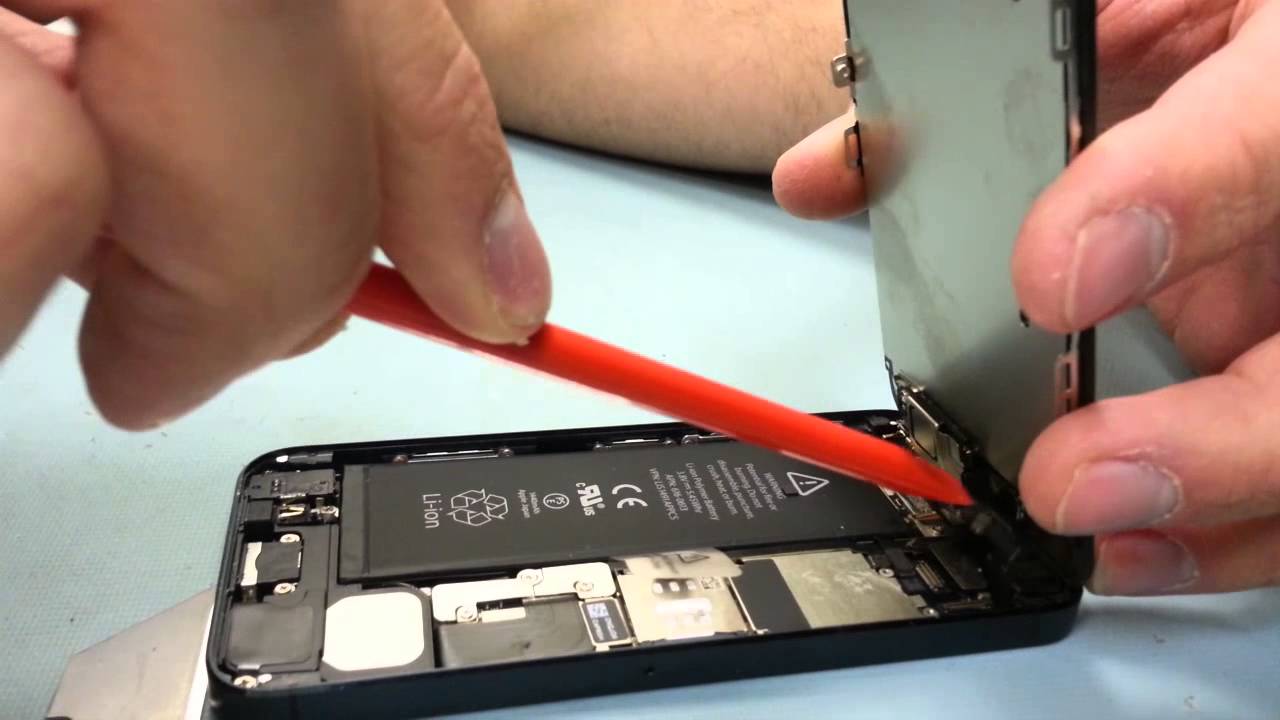
Insert a plastic opening tool into the gap created by the suction cup. Carefully slide the tool around the edges of the iPhone, separating the screen from the frame. Be cautious not to apply too much pressure or use excessive force.
-
Once you have loosened the screen from the frame, carefully lift the screen by holding onto the suction cup. Slowly tilt the screen up at an angle, being mindful of the cables connecting the screen to the device.
-
Locate the cable connectors on the top of the device. Using a plastic opening tool, gently disconnect the cables by lifting the connectors straight up from their sockets.
-
With the cables disconnected, you can now fully remove the screen from your iPhone 5. Set the damaged screen aside and keep it in a safe place for any necessary repairs or replacements.
It is highly recommended to follow this guide precisely and exercise caution throughout the process to avoid any further damage to your iPhone 5. If you are unfamiliar or uncomfortable with performing these steps yourself, it may be best to seek professional assistance from an authorized service provider.
Troubleshooting Tips for Screen Removal
Removing the screen of an iPhone 5 can be a delicate process, and sometimes issues may arise along the way. If you encounter any problems during the screen removal process, don’t worry! We have compiled a list of troubleshooting tips to help you overcome common obstacles and successfully complete the task.
1. Stuck or Unresponsive Screws: If you find that the screws holding the screen in place are stuck or unresponsive, try applying gentle but firm pressure while turning the screwdriver. If this doesn’t work, you can use a small amount of heat to loosen the screws. Be cautious not to overheat the device and damage any internal components.
2. Damaged or Broken Tools: It’s not uncommon for tools to break or become damaged during the screen removal process. If this happens, be sure to have spare tools on hand before starting the procedure. Additionally, consider investing in high-quality tools to avoid such issues in the future.
3. Adhesive Residue: After removing the screen, you might find some adhesive residue on the device or the screen itself. To remove this sticky residue, you can use isopropyl alcohol (at least 70% concentration) and a microfiber cloth. Gently apply the alcohol to the affected areas and wipe away the residue with the cloth.
4. Disconnected Cables: While removing the screen, you may accidentally disconnect some cables inside the device. If this occurs, carefully reconnect the cables to their respective connectors on the logic board. Make sure to align the connectors properly and apply gentle pressure to secure them in place.
5. Touch Screen or Display Issues: If you experience touch screen or display issues after reassembling the device, double-check that all cables are properly connected. If the problem persists, try resetting the device or contacting a professional technician for further assistance.
6. Difficulty Reassembling the Device: After successfully removing the screen, reassembling the device can sometimes be a bit tricky. Take your time and ensure that all components are aligned correctly before applying pressure to snap them back into place. If necessary, refer to a guide or seek professional help.
Remember, it’s essential to exercise caution and patience during the screen removal process. If you encounter any major difficulties or feel unsure about proceeding, it’s always best to seek assistance from a trained technician or a reliable repair service.
Conclusion
In conclusion, removing the screen from an iPhone 5 may seem like a complex task, but with the right tools, patience, and understanding of the process, it can be done successfully. By following the steps outlined in this guide, you can safely detach the screen from your iPhone 5, whether it’s to replace a broken display, perform a repair, or simply clean the device. Remember to exercise caution, take your time, and refer to reputable resources for additional assistance if needed.
By taking the screen off your iPhone 5, you open up a world of possibilities for maintenance and repairs that can extend the life of your device. Whether you’re a DIY enthusiast or a professional technician, knowing how to remove the screen is a valuable skill to have. Just make sure to be careful and mindful of every step to avoid causing any additional damage to your device.
Now that you’re equipped with the knowledge and confidence to take on this task, go ahead and give it a try! With practice, you’ll become more comfortable with the process and gain the ability to tackle other phone repairs as well. Good luck, and happy fixing!
FAQs
1. Can I take the screen off an iPhone 5 by myself?
2. What tools do I need to take off the screen of an iPhone 5?
3. Is it difficult to replace the screen of an iPhone 5?
4. Can I use a hairdryer to remove the screen of an iPhone 5?
5. Are there any risks involved in taking off the screen of an iPhone 5?