
If you’ve ever found yourself fumbling through a sea of printed tickets, desperately trying to find the right one for entry into an event, then you know just how frustrating it can be. But fear not, because mobile ticket transfers are here to save the day! With the rise of digital technology, mobile ticketing has become increasingly popular, offering convenience and peace of mind to event-goers everywhere.
In this article, we’ll explore how to mobile transfer tickets, providing you with step-by-step guidance on the process. From downloading the necessary apps to transferring tickets to friends and family, we’ll cover everything you need to know to make your next event experience seamless and hassle-free. So, grab your smartphone and let’s dive into the world of mobile ticket transfers!
Inside This Article
- Overview
- Step 1: Download the Ticket Transfer App
- Step 2: Sign In to Your Account
- Step 3: Select the Event and Tickets to Transfer
- Step 4: Choose the Recipient and Confirm Transfer
- Troubleshooting Tips
- Conclusion
- FAQs
Overview
In today’s digital age, mobile phones have become an integral part of our lives. From communication to entertainment, these devices offer a wide range of features and functionalities. One such feature that has gained immense popularity is the ability to transfer tickets seamlessly via mobile devices. Whether you’re attending a concert, sporting event, or any other live performance, mobile ticket transfer provides a convenient and hassle-free way to share tickets with friends and family.
The process of mobile ticket transfer involves using a dedicated app or platform to transfer the ticket from one device to another. This eliminates the need for printing physical tickets or relying on traditional methods of ticket distribution. With just a few simple steps, you can easily transfer tickets to anyone, regardless of their location.
Not only does mobile ticket transfer offer convenience, but it also promotes sustainability by reducing the need for paper tickets. Additionally, it eliminates the risk of lost or stolen tickets, as the entire process is carried out digitally. It’s a win-win situation for both ticket holders and recipients.
Whether you’re a seasoned mobile user or a newbie, mobile ticket transfer is a user-friendly process that can be done with ease. In the following steps, I will guide you through the process of transferring tickets using a mobile ticket transfer app.
Step 1: Download the Ticket Transfer App
Downloading the ticket transfer app is the first step towards seamlessly transferring your mobile tickets. To ensure a smooth and hassle-free experience, follow these simple instructions:
1. Open your mobile phone’s app store. Whether you’re using an Android or iOS device, you can find the app store pre-installed or available for download.
2. Search for the ticket transfer app. Look for the official app provided by the ticketing platform or event organizer. It should have the app name clearly displayed.
3. Tap on the “Download” or “Get” button. Once you have located the ticket transfer app, simply click on the appropriate button to start the download process. This may take a few moments, depending on your internet connection speed.
4. Wait for the app to install. Once the download is complete, the app will automatically install on your mobile phone. You may see a progress bar indicating the installation progress.
5. Launch the ticket transfer app. After the installation is complete, locate the app on your phone’s home screen or in the app drawer. Tap on the app icon to open it.
6. Log in to your account. To proceed with transferring your mobile tickets, you will need to sign in to your ticketing platform or event organizer account. Enter your login credentials, such as your email address and password, to access your account.
Now that you have successfully downloaded the ticket transfer app and logged in to your account, you are ready to move on to the next step: signing in to your account.
Step 2: Sign In to Your Account
Once you have downloaded the Ticket Transfer app, you will need to sign in to your account in order to proceed with transferring your tickets. Signing in ensures that you have the necessary permissions and access to the tickets you want to transfer.
To sign in, open the Ticket Transfer app on your mobile device and click on the “Sign In” button. If you already have an account, simply enter your email address or username and your password. If you don’t have an account yet, you will need to create one by clicking on the “Sign Up” button and providing the required information.
After entering your credentials, click on the “Sign In” button to proceed. The app will then verify your account details and log you into your account. If you encounter any issues during the sign-in process, double-check that your email address or username and password are entered correctly.
If you have forgotten your password, you can select the “Forgot Password” option on the sign-in screen. The app will provide instructions on how to reset your password so you can regain access to your account.
It’s important to ensure that you sign in using the correct account associated with the tickets you want to transfer. If you have multiple accounts or are unsure which one to use, you can refer to your ticket confirmation email or contact customer support for assistance.
Once you have successfully signed in, you are now ready to proceed to the next step, where you will select the event and tickets that you wish to transfer to another person.
Step 3: Select the Event and Tickets to Transfer
Now that you have downloaded the ticket transfer app and signed in to your account, it’s time to move on to the next step: selecting the specific event and tickets you want to transfer. This step ensures that you are transferring the correct tickets to the intended recipient.
Start by navigating to the “Transfer Tickets” section within the app. This section will typically be easily accessible from the main menu or a designated transfer tab. Once you’re there, you will likely see a list of all the events for which you have available tickets.
Take a moment to browse through the list and find the event for which you want to transfer tickets. You can typically sort the events by date or search for a specific event if there are a lot of tickets in your account. Once you have located the desired event, click or tap on it to proceed.
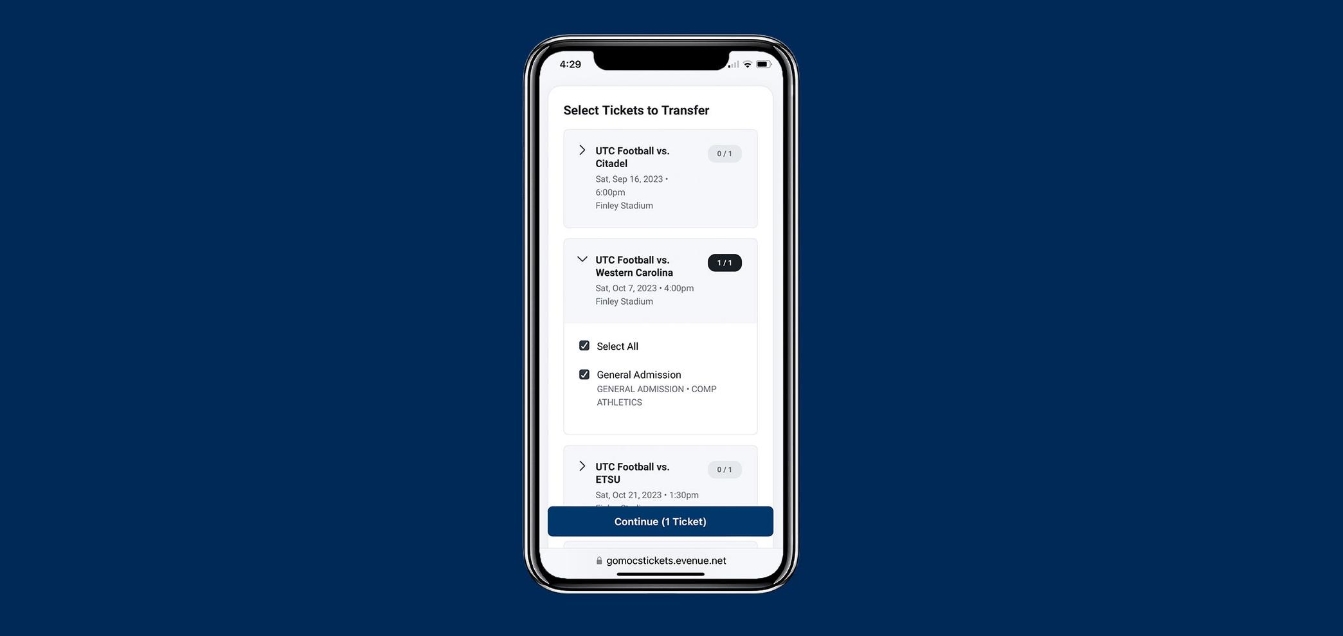
Next, you will be presented with a list of tickets associated with the selected event. This list will include details such as seat numbers, ticket types, and any special instructions. Take a careful look at the available tickets and select the ones you want to transfer by checking the corresponding boxes or tapping on them.
If you have multiple tickets for the event and want to transfer them all, most ticket transfer apps will have a “Select All” option to make the process faster. Simply click or tap on this option, and all tickets for the selected event will be automatically chosen for transfer.
Once you have selected the desired tickets, review your choices one more time to ensure that you have selected the correct ones. Double-check the seat numbers, ticket types, and any other relevant details. It’s always a good practice to be thorough before initiating the transfer.
With the event and tickets selected, you are now ready to move on to the next step of choosing the recipient and confirming the transfer. But before we do that, let’s explore some troubleshooting tips to help you handle any potential issues that may arise during the ticket transfer process.
Step 4: Choose the Recipient and Confirm Transfer
Once you have selected the tickets you wish to transfer, it’s time to choose the recipient and confirm the transfer.
This step is crucial in ensuring that your tickets end up in the right hands. Here’s how you can go about it:
- Enter the recipient’s details: Start by entering the email address or mobile number of the person you want to transfer the tickets to. Make sure to double-check the information to avoid any errors.
- Add a personalized message: While not mandatory, adding a personalized message can make the transfer more meaningful. It could be a simple note wishing your recipient an enjoyable event or any other message you’d like to convey.
- Review the details: Take a moment to review the recipient’s details and the message you’ve included. Ensure that everything is accurate and reflects your intentions correctly.
- Confirm the transfer: Once you are satisfied with the recipient’s details and the message, click on the “Confirm Transfer” button or a similar option to complete the process.
After confirming the transfer, a notification will be sent to the recipient, informing them about the ticket transfer. They will receive instructions on how to accept the transfer and claim the tickets.
It’s worth noting that some ticket transfer apps or platforms may have additional steps or verification processes in place to ensure the security and authenticity of the transfer. These steps are designed to protect both the sender and the recipient, ensuring a smooth and secure ticket transfer experience.
Remember, once the transfer is confirmed, the tickets will be removed from your account and become the recipient’s responsibility. Ensure that you have chosen the right recipient, as transfer requests are typically non-reversible.
By following these simple steps, you can securely choose the recipient and confirm the transfer of your tickets, allowing the recipient to enjoy the event hassle-free.
Troubleshooting Tips
Transferring mobile tickets can sometimes be a smooth process, but there may be instances where issues arise. Here are some troubleshooting tips to help you overcome common obstacles:
1. Check your internet connection: Ensure that you are connected to a stable and reliable internet connection. Poor internet connectivity can cause transfer errors or delays. Switching to a different network or connecting to Wi-Fi can help resolve this issue.
2. Update your ticket transfer app: Make sure that you have the latest version of the ticket transfer app installed on your mobile device. Developers frequently release updates to fix bugs and improve performance. Simply visit the app store and check for any available updates.
3. Verify the recipient’s email or phone number: Double-check that you have entered the correct email address or phone number of the recipient. It’s crucial to ensure accuracy to prevent any transfer issues. Providing incorrect contact information can result in the transfer not reaching the intended recipient.
4. Confirm that the recipient can receive mobile tickets: Some venues or events may have specific requirements for ticket delivery. Make sure to check if the recipient’s device supports mobile ticketing or if they have any specific instructions for accepting transferred tickets. Contact the event organizer or venue for assistance if needed.
5. Clear cache and cookies: If you experience any technical glitches or errors during the transfer process, clearing your app’s cache and cookies can often resolve the issue. This action will refresh the app and remove any temporary data or corrupted files that may be interfering with the transfer.
6. Restart your device: Sometimes, a simple reboot can do wonders. Restart your mobile device and try the ticket transfer process again. This action can help resolve any software-related issues that might be affecting the transfer functionality.
7. Contact customer support: If you have followed all the troubleshooting steps but still encountering difficulties, reach out to the customer support team of the ticket transfer app or the event organizer. They will be able to provide you with further assistance and troubleshoot specific issues related to your account or the transfer process.
Remember, troubleshooting tips can vary depending on the specific app or platform you are using for ticket transfers. It’s always recommended to refer to the app’s support documentation or reach out to their customer support for personalized guidance.
Conclusion
In conclusion, the process of mobile ticket transfer offers a convenient and efficient way to manage your event tickets. With just a few simple steps, you can securely transfer tickets to your friends, family, or other attendees, ensuring that everyone can enjoy the event hassle-free.
By leveraging the power of mobile technology, ticket transfer has become more accessible and user-friendly than ever before. Whether it’s a concert, sports event, or theater show, mobile transfer allows for seamless sharing and eliminates the need for physical ticket exchanges.
Remember to always check the transfer policy of the ticket provider or the event organizer before initiating the process. Each platform may have its own specific requirements and guidelines for mobile ticket transfers.
So, next time you have extra tickets or want to share the experience with others, consider utilizing the convenience and simplicity of mobile ticket transfer. It’s a game-changer in the world of event attendance and ensures that no one misses out on the fun.
FAQs
1. Can I transfer mobile tickets to another person?
Yes, you can transfer mobile tickets to another person. Most event ticketing platforms nowadays allow for easy ticket transfers. Simply follow the instructions provided by the platform or app to transfer the tickets to someone else’s mobile device.
2. How do I transfer mobile tickets?
To transfer mobile tickets, you typically need to have the event ticketing app installed on your mobile device. Open the app and navigate to the tickets you want to transfer. Look for the “Transfer” or “Send” option and follow the steps to enter the recipient’s information. Once the transfer is complete, the recipient will receive the tickets on their mobile device.
3. Are there any limitations when transferring mobile tickets?
While transferring mobile tickets is generally a straightforward process, there may be some limitations depending on the event or platform. For example, some events may have restrictions on ticket transfers within a certain time frame or only allow transfers to specific individuals. It’s always a good idea to check the event or ticketing company’s policy regarding ticket transfers before attempting to transfer your mobile tickets.
4. Can I transfer mobile tickets if I bought them from a third-party seller?
In most cases, you should be able to transfer mobile tickets even if you bought them from a third-party seller. However, it’s important to ensure that the ticketing platform or app used by the seller supports ticket transfers. If you’re unsure, reach out to the seller or the platform’s customer support for guidance on transferring the tickets.
5. What happens if the recipient of the transferred mobile tickets cannot attend the event?
If the recipient of the transferred mobile tickets cannot attend the event, they may have the option to transfer the tickets to someone else or return them to you. The specific options available will depend on the event and ticketing platform’s policies. It’s best to communicate with the recipient and the ticketing platform to determine the best course of action in such cases.