
Are you a proud owner of an Apple Watch? If so, you’re probably eager to pair it with your iPhone to unlock its full potential. Pairing your Apple Watch with your iPhone is a simple and straightforward process that will allow you to enjoy the seamless integration between the two devices. From receiving notifications on your wrist to tracking your fitness goals, the Apple Watch and iPhone work together to enhance your daily life. In this article, we will guide you through the step-by-step process of pairing your Apple Watch to your iPhone, ensuring that you can take full advantage of the amazing features that this dynamic duo has to offer. So, grab your iPhone and let’s get started on this exciting journey of connectivity and convenience!
Inside This Article
- Overview of Pairing Apple Watch to iPhone
- Step 1: Ensure Compatible Devices
- Step 2: Update Software on iPhone and Apple Watch
- Step 3: Bring Devices Close Together
- Step 4: Open Apple Watch App on iPhone
- Step 5: Tap “Start Pairing” on Apple Watch
- Step 6: Align Animation on iPhone with Apple Watch
- Step 7: Set Up Apple Watch on iPhone
- Step 8: Create a Passcode
- Step 9: Choose Apple Pay and Siri Settings
- Step 10: Select App Installations
- Step 11: Sign in to Apple ID
- Step 12: Choose Wrist Preference
- Step 13: Enable Location Services
- Step 14: Complete Apple Watch Pairing Process
- Conclusion
- FAQs
Overview of Pairing Apple Watch to iPhone
Pairing your Apple Watch to your iPhone is a straightforward process that allows you to access all the features and functionalities of your smartwatch. By connecting these two devices, you can receive notifications, track your fitness, control music, make calls, and much more. In this article, we will provide a step-by-step guide to help you pair your Apple Watch to your iPhone effortlessly.
To ensure a successful pairing process, it is important to have compatible devices. Your Apple Watch should be compatible with your iPhone model. It is recommended to check the Apple website for the list of compatible devices.
Once you have verified compatibility, make sure to update the software on both your iPhone and Apple Watch. This ensures that you have the latest features and bug fixes, enhancing the overall performance of your devices.
Next, bring your iPhone and Apple Watch close together. Keep them within a few inches of each other to establish a strong and reliable connection. The proximity between the devices is crucial for successful pairing.
Open the Apple Watch app on your iPhone. This app allows you to manage and customize your Apple Watch settings. Make sure you have the app installed on your iPhone before proceeding with the pairing process.
On your Apple Watch, tap on “Start Pairing” when prompted. This initiates the pairing process and prepares your Apple Watch to connect with your iPhone.
Align the animation displayed on your iPhone screen with the pattern displayed on your Apple Watch. This ensures that the devices are synchronized and ready for pairing.
Set up your Apple Watch on your iPhone by following the on-screen instructions. This includes selecting your language, confirming your location, and choosing to set up the device as new or restore from a previous backup.
Create a passcode for your Apple Watch. This adds an extra layer of security and protects your personal data in case the watch gets lost or stolen. Choose a passcode that you can easily remember but not too obvious.
Customize your Apple Pay and Siri settings. Apple Pay allows you to make contactless payments using your Apple Watch, and Siri enables voice commands and hands-free interactions. Adjust these settings according to your preferences.
Select the apps you want to install on your Apple Watch. You can choose to install all the apps that are compatible with your watch or manually select specific ones. Installing apps on your watch allows you to access their features directly from your wrist.
Sign in with your Apple ID on your iPhone. This allows you to sync your Apple Watch with your iCloud account, ensuring that all your data and preferences are seamlessly integrated across your devices.
Choose your wrist preference, whether you wear the watch on your left or right wrist. This helps optimize the positioning of the display and controls for comfortable usage.
Enable location services on your Apple Watch. This allows apps that require location data to function properly. You can choose to enable location services always or only while using the app.
Once you have completed these steps, you have successfully paired your Apple Watch to your iPhone. Enjoy the seamless integration and explore the myriad of features available on your wrist.
Step 1: Ensure Compatible Devices
Before you begin the process of pairing your Apple Watch to your iPhone, it’s important to ensure that both devices are compatible with each other. Apple Watch is designed to work with iPhones that support the latest version of iOS.
To check if your devices are compatible, make sure that your iPhone is running on iOS 14 or later. You can do this by going to the “Settings” app on your iPhone, then tapping on “General” and selecting “Software Update.” If there is an available update, follow the prompts to download and install it.
It’s also necessary to ensure that your Apple Watch is compatible with your iPhone. The Apple Watch Series 3 or later models are compatible with iPhones running on iOS 14 or later. If you have an older Apple Watch, make sure it is updated to the latest version of watchOS that is compatible with your iPhone’s iOS.
By ensuring that both your iPhone and Apple Watch are running on the required software versions, you can be confident that they will work seamlessly together and have access to all the latest features and functionalities.
Step 2: Update Software on iPhone and Apple Watch
Before you can successfully pair your Apple Watch to your iPhone, it is crucial to ensure that both devices are running the latest software updates. Updating the software on your iPhone and Apple Watch helps to minimize any compatibility issues and ensures a smooth pairing process.
To update the software on your iPhone, follow these steps:
- Connect your iPhone to a Wi-Fi network.
- Go to the Settings app on your iPhone.
- Scroll down and tap on “General.”
- Select “Software Update.”
- If an update is available, tap on “Download and Install.”
- Agree to the terms and conditions and wait for the update to complete.
After updating the software on your iPhone, it’s time to update the software on your Apple Watch. Here’s how:
- Place your Apple Watch on its charger and make sure it is connected to Wi-Fi.
- Launch the Apple Watch app on your iPhone.
- Tap on the “My Watch” tab at the bottom of the screen.
- Select “General.”
- Tap on “Software Update.”
- If an update is available, tap on “Download and Install.”
- Enter your passcode if prompted and agree to the terms and conditions.
- Wait for the update to complete. Your Apple Watch may restart during the process.
Keep in mind that the software update process may take some time, depending on the size of the update and your internet connection speed. It is essential to have a stable Wi-Fi connection and sufficient battery life on both your iPhone and Apple Watch to avoid any interruptions during the update.
Once you have updated the software on both devices, you can proceed to the next step in the pairing process to connect your Apple Watch to your iPhone.
Step 3: Bring Devices Close Together
In order to successfully pair your Apple Watch with your iPhone, it is crucial to bring the devices close together. This ensures a strong and stable Bluetooth connection between the two devices, facilitating seamless communication and synchronization.
Start by placing your Apple Watch and iPhone next to each other on a flat surface. Make sure there are no obstructions between them, such as walls or large objects, that could interfere with the Bluetooth signal.
If your Apple Watch is on your wrist, take a moment to remove it and place it next to your iPhone. This will ensure that the devices are in close proximity and can establish a secure connection for pairing.
It’s worth noting that the Apple Watch and iPhone need to be within a reasonable distance for the initial pairing process. While the exact range can vary, it is generally recommended to keep the devices within a few feet of each other during this step.
Bringing the devices close together also helps to expedite the pairing process. By minimizing the distance between the Apple Watch and iPhone, the devices can quickly exchange information and complete the necessary setup steps.
Remember, maintaining a strong Bluetooth connection between your Apple Watch and iPhone is important not only during the pairing process but also for ongoing functionality. This connection allows the devices to stay synchronized, ensuring that you receive notifications, track activity, and use various features seamlessly.
So, take a moment to bring your Apple Watch and iPhone close together, ensuring a solid Bluetooth connection before moving on to the next step in the pairing process.
Step 4: Open Apple Watch App on iPhone
Once you have ensured that your devices are compatible and have updated their software, it’s time to open the Apple Watch app on your iPhone. This app is essential for pairing and managing your Apple Watch.
To locate the Apple Watch app, swipe down on your iPhone’s home screen and type “Apple Watch” in the search bar. Tap on the app when it appears in the search results.
Alternatively, you can also find the Apple Watch app by navigating through your iPhone’s app library or looking for the icon with a green wallpaper and a silhouette of an Apple Watch.
Before launching the app, make sure your Apple Watch and iPhone are in close proximity to each other. Keeping them close allows for a smoother and faster pairing process.
When you open the Apple Watch app, you will be greeted with a welcome screen. This screen will provide you with information about the app’s features and capabilities.
Proceed by tapping on the “Start Pairing” button. This will initiate the process of pairing your Apple Watch with your iPhone.
At this point, it’s important to note that both your Apple Watch and iPhone should be charged to ensure an uninterrupted pairing process.
The Apple Watch app will guide you through various steps to complete the pairing. Follow the on-screen instructions and continue to the next steps to set up your Apple Watch and personalize its settings.
Remember to keep your Apple Watch app open on your iPhone throughout the pairing process. If you accidentally exit the app, you can reopen it and resume the pairing process.
By opening the Apple Watch app on your iPhone and following the provided instructions, you are one step closer to enjoying the full functionality of your Apple Watch.
Step 5: Tap “Start Pairing” on Apple Watch
Once you have ensured that both your iPhone and Apple Watch are compatible and the software is up to date, it’s time to initiate the pairing process. This step is crucial for establishing a connection between the devices and enabling seamless communication.
To begin, navigate to the Apple Watch app on your iPhone. The app icon features a silhouette of an Apple Watch on a black background. Tap on the icon to launch the app and open the main interface.
Now, it’s time to focus on your Apple Watch. On the watch face, you will see a message with the text “Start Pairing.” Simply tap on this message to initiate the pairing process.
As you tap the “Start Pairing” message, your Apple Watch will display an animation consisting of a swirling pattern. This animation is crucial as it allows your iPhone to recognize your Apple Watch and establish a secure connection.
Make sure to hold your iPhone close to your Apple Watch and align the animation displayed on the iPhone with the one on your watch. This alignment ensures a smooth and successful pairing process.
Once the alignment is complete, the Apple Watch app on your iPhone will prompt you to follow the on-screen instructions to continue the pairing process. Simply follow the prompts and proceed with the setup.
It is important to note that pairing the Apple Watch may take a few minutes, so please be patient during this step. The devices need to exchange information and establish a secure connection, ensuring a seamless experience for you as the user.
Once the pairing process is complete, you will be able to fully utilize all the features and functionalities of your Apple Watch, enhancing your mobile experience and extending the capabilities of your iPhone.
Now that you have successfully tapped “Start Pairing” on your Apple Watch and completed this crucial step, you are one step closer to enjoying the convenience and functionality that comes with pairing your Apple Watch to your iPhone.
Step 6: Align Animation on iPhone with Apple Watch
Once you have successfully opened the Apple Watch app on your iPhone, it’s time to align the animation on your iPhone screen with the Apple Watch display. This step is crucial for establishing a seamless connection between the two devices.
When prompted, you will see a small animation displayed on the Apple Watch screen. At the same time, the Apple Watch app on your iPhone will instruct you to position your iPhone’s camera viewfinder over the animation.
Make sure to hold your iPhone steady and align the animation within the camera viewfinder. It may take a few seconds for the iPhone to recognize and sync with the Apple Watch display.
While aligning the animation, be mindful of any reflections or obstructions that may interfere with the camera’s view. Ensure that your iPhone is held at a comfortable distance from the Apple Watch to allow for clear recognition of the animation.
Keep in mind that both devices need to remain stationary during this process to maintain an accurate alignment. This ensures that the information between the devices is accurately transferred, leading to a successful pairing.
Once the animation is aligned and recognized by your iPhone, the pairing process will continue. You will proceed to the next steps to complete the setup and customization of your Apple Watch.
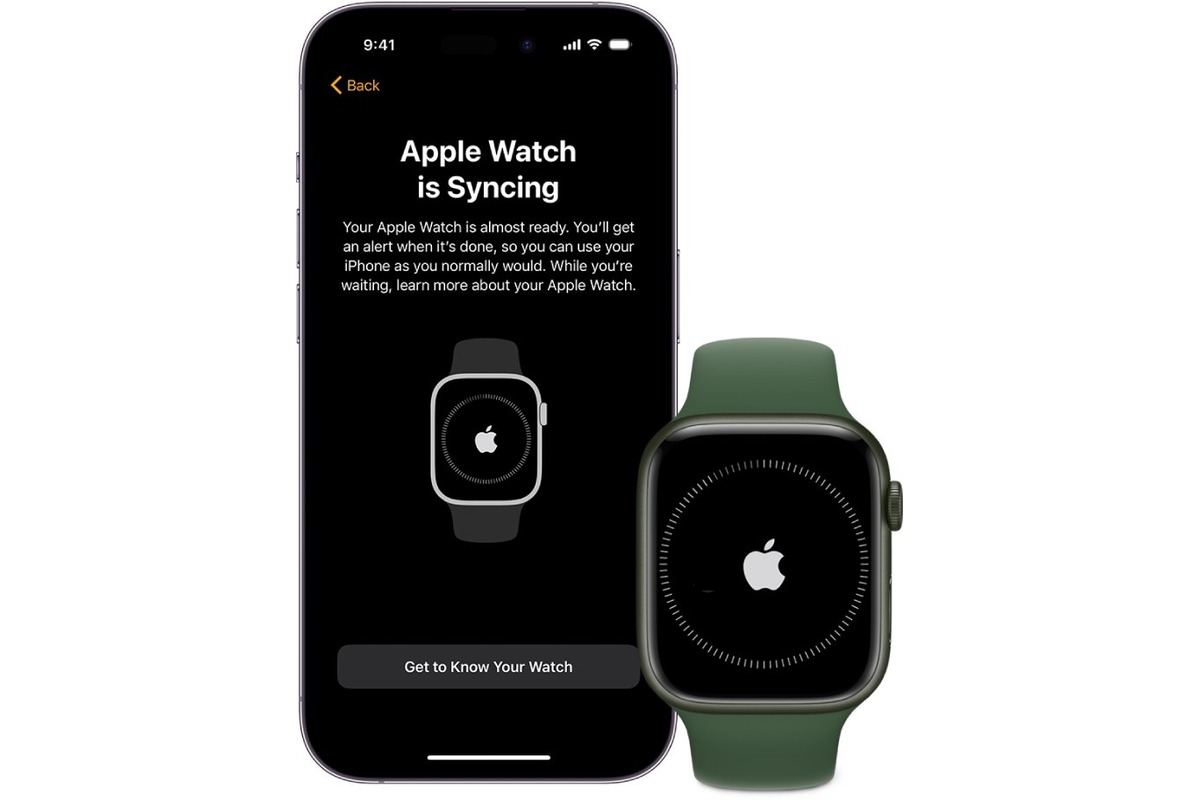
Step 7: Set Up Apple Watch on iPhone
Congratulations! You’ve successfully paired your Apple Watch with your iPhone. Now it’s time to set up your Apple Watch and customize it to your preferences. To get started, follow these simple steps:
1. On your iPhone, you’ll see a prompt asking if you want to set up your Apple Watch. Tap “Continue” to proceed.
2. Next, you’ll be prompted to choose whether you want to set up your Apple Watch as a new device or restore it from a previous backup. If this is your first Apple Watch or if you want to start fresh, select the “Set Up as New Apple Watch” option.
3. After selecting your preferred option, the setup process will begin. You may be asked to sign in with your Apple ID and agree to the terms and conditions. Follow the on-screen prompts to complete these steps.
4. As part of the setup process, you’ll come across a screen where you can choose to enable or disable various features, such as activating Siri, enabling Handoff, and more. Take your time here to select the options that suit your needs and preferences.
5. After customizing your settings, your Apple Watch will begin syncing with your iPhone. This may take a few minutes, so be patient. During this time, it’s important to keep your Apple Watch and iPhone close together to ensure a smooth sync.
6. Once the syncing is complete, you’ll be prompted to create a passcode for your Apple Watch. This passcode adds an extra layer of security and protects your personal information. Choose a passcode that’s easy for you to remember but difficult for others to guess.
7. After setting up your passcode, you’ll have the option to enable Apple Pay on your Apple Watch. This allows you to make quick and secure payments using your watch. If you’re interested in using Apple Pay, follow the on-screen instructions to set it up.
8. Lastly, you’ll be prompted to choose the apps you want to install on your Apple Watch. You can either choose to install all apps automatically or manually select the ones you want. Keep in mind that not all iPhone apps are available on Apple Watch.
That’s it! You’ve successfully set up your Apple Watch on your iPhone. Now you can explore the various features and functionalities that the watch has to offer. Enjoy your new wearable device and make the most out of its capabilities!
Step 8: Create a Passcode
Creating a passcode for your Apple Watch is an essential step to ensure the security and privacy of your device. A passcode adds an extra layer of protection, preventing unauthorized access to your personal data and maintaining your confidentiality.
Here’s how you can create a passcode for your Apple Watch:
- On your Apple Watch, navigate to the Settings app by pressing the Digital Crown.
- Scroll down and tap on “Passcode”.
- Select “Turn Passcode On”.
- Enter a passcode of your choice using the on-screen keypad.
- Re-enter the passcode to confirm.
Keep in mind that the passcode should be something that you can easily remember but difficult for others to guess. Consider using a combination of numbers, letters, and symbols to make it more secure.
Once you have set up your passcode, it will be required every time you put on your Apple Watch or take it off your wrist. This ensures that even if your watch gets lost or stolen, your data remains protected from unauthorized access.
If you ever forget your passcode, you can reset it by unpairing and re-pairing your Apple Watch with your iPhone. However, this will erase all the data on your watch, so make sure to regularly back up your device to avoid losing any important information.
By creating a passcode for your Apple Watch, you can have peace of mind knowing that your personal information is secure. Take a few moments to set up a strong and memorable passcode— it’s a small step that goes a long way in safeguarding your privacy.
Step 9: Choose Apple Pay and Siri Settings
Once you’ve successfully paired your Apple Watch with your iPhone, it’s time to move on to Step 9: choosing the Apple Pay and Siri settings. These settings are crucial for customizing your Apple Watch experience and maximizing its functionality.
First, let’s dive into Apple Pay. This feature allows you to make secure payments directly from your wrist, without the need for your iPhone or wallet. To set up Apple Pay on your Apple Watch, you’ll need to follow a few simple steps.
Start by opening the Apple Watch app on your iPhone and navigating to the “My Watch” tab. From there, scroll down and select “Wallet & Apple Pay”. Here, you can add the credit or debit cards you want to use with Apple Pay on your watch.
Simply tap on “Add Credit or Debit Card” and follow the on-screen instructions to input your card details. You may need to verify your card with your bank or credit card provider to complete the process. Once your cards are added, you’re all set to make hassle-free payments right from your Apple Watch.
Next, let’s move on to configuring your Siri settings. Siri is Apple’s intelligent voice assistant, and it plays a crucial role in your Apple Watch experience. It allows you to control your watch through voice commands, making tasks quicker and more convenient.
To set up Siri on your Apple Watch, go to the “My Watch” tab in the Apple Watch app on your iPhone. Scroll down and select “Siri” from the available options. Here, you can enable or disable Siri on your watch by toggling the switch.
Additionally, you can customize Siri’s language and voice feedback settings. If you prefer a specific language for Siri or want to change the voice feedback, simply tap on the respective options and make your desired selections.
With Siri enabled on your Apple Watch, you can now ask questions, send messages, set reminders, and perform various other tasks simply by speaking into your watch. It’s a powerful feature that truly enhances the hands-free experience on your wrist.
By taking the time to choose your Apple Pay and Siri settings, you’ll optimize the functionality of your Apple Watch and tailor it to your preferences. With Apple Pay, you can make quick and secure payments with just a flick of your wrist, while Siri allows you to navigate your watch effortlessly using voice commands. So go ahead, explore the possibilities and make the most of your Apple Watch.
Step 10: Select App Installations
Once you have successfully paired your Apple Watch with your iPhone, it’s time to choose which apps you want to install on your wearable device. This step allows you to personalize your Apple Watch and tailor it to your specific needs and preferences.
To select the app installations, follow these simple steps:
- On your iPhone, open the Apple Watch app.
- Navigate to the “My Watch” tab at the bottom of the screen.
- Scroll down to the section labeled “Installed on Apple Watch”.
- Here, you will see a list of compatible apps that are available to be installed on your Apple Watch.
- Review the list and choose the apps you want to install by toggling the switch next to each app.
- Keep in mind that not all iPhone apps have a corresponding Apple Watch version. Only the apps that are optimized for Apple Watch will appear on this list.
- If you don’t see a particular app that you want to install, it means that app doesn’t have a version specifically designed for Apple Watch.
- Once you have made your selections, the chosen apps will begin to install on your Apple Watch. The installation process may take some time depending on the number of apps and your internet connection speed.
- After the apps are installed, they will appear as icons on the home screen of your Apple Watch.
It’s important to note that you can always add or remove apps from your Apple Watch later on. Simply go back to the Apple Watch app on your iPhone and repeat the steps above to manage your app installations.
By selecting the app installations that are most relevant to you, you can customize your Apple Watch experience and have easy access to the features and functionalities you use the most.
Step 11: Sign in to Apple ID
Once you have successfully paired your Apple Watch to your iPhone, the next step is to sign in to your Apple ID. Your Apple ID is the key to accessing and managing all of your Apple services, including iCloud, the App Store, and more. By signing in with your Apple ID, you’ll be able to unlock the full potential of your Apple Watch.
To sign in to your Apple ID on your Apple Watch, follow these simple steps:
- On your Apple Watch, tap on the “Settings” app. It’s represented by a gear icon.
- Scroll down and select “Passwords & Accounts”.
- Tap “Add Account”.
- Select “Apple ID”.
- Enter your Apple ID credentials, including your email address and password.
- If you have two-factor authentication enabled, you may be prompted to enter a verification code that’s sent to your trusted devices.
- Once successfully signed in, your Apple ID will be associated with your Apple Watch.
Signing in to your Apple ID on your Apple Watch is essential for accessing your personalized settings, syncing your data, and using the various features and apps available. It ensures a seamless experience across multiple Apple devices and provides a secure gateway to your digital world.
Remember, if you don’t have an Apple ID, you will need to create one. This can be done directly on your Apple Watch or through the Apple ID website on your iPhone or computer.
By signing in to your Apple ID on your Apple Watch, you’ll be ready to explore the vast range of apps, receive notifications, track your fitness goals, and much more. Get ready to experience the full potential of your Apple Watch and make the most out of your wearable technology!
Step 12: Choose Wrist Preference
Once you’ve completed the initial setup and configuration steps of pairing your Apple Watch to your iPhone, you’ll be prompted to choose your wrist preference. This step is important as it determines which side of your wrist you’ll be wearing your Apple Watch on.
When it comes to selecting your wrist preference, you have two options: “Left” and “Right”. The choice you make will depend on your personal preference and which wrist feels most comfortable for you to wear the watch on.
To make your selection, simply tap on the preferred wrist option displayed on the screen. The Apple Watch will then adjust the orientation of the display accordingly, ensuring a seamless user experience. Don’t worry if you change your mind later – you can always go to the Apple Watch settings and change the wrist preference at any time.
Choosing the right wrist preference is crucial in terms of comfort, ease of use, and functionality. It determines the orientation of the watch’s display, making it easy for you to read the time and interact with the various features and apps. It’s recommended to choose the wrist preference that feels most natural to you, as this will enhance your overall Apple Watch experience.
Once you’ve made your selection, simply follow the on-screen instructions to proceed to the next step of the pairing process. The Apple Watch will guide you through additional setup options and preferences, ensuring that it is tailored to your individual needs.
Now that you’ve chosen your wrist preference, you’re one step closer to fully pairing your Apple Watch to your iPhone. With the display orientation adjusted to your preferred wrist, you can comfortably wear and utilize all the amazing features and functionalities that the Apple Watch has to offer.
Step 13: Enable Location Services
Enabling Location Services on your Apple Watch is essential for certain apps to function properly and provide you with accurate location-based information. Here’s how you can enable it:
-
After completing the previous steps, you will be prompted to enable Location Services on your Apple Watch. This feature allows apps to access your location data when needed.
-
Select “Enable Location Services” when prompted on your Apple Watch screen. This will open the Location Services settings on your paired iPhone.
-
On your iPhone, you can choose to enable Location Services for all apps or specify which apps can access your location. Tap on “Settings” from the Home screen to proceed.
-
Scroll down and tap on “Privacy” to access the Privacy settings.
-
Next, tap on “Location Services” to view and manage the location settings for your apps.
-
You will see a list of apps that have requested access to your location. By default, the setting is set to “While Using the App” for most apps.
-
If you want to allow an app to access your location even when it’s not in use, select “Always”. Otherwise, choose “While Using the App” to restrict access to only when the app is active.
-
For apps that don’t require your location, you can set them to “Never” to disable location access completely.
-
Review the list of apps and their location access settings and adjust them according to your preferences.
-
Once you have customized the Location Services settings, you can return to your Apple Watch and continue enjoying the full functionality of location-aware apps.
Enabling Location Services on your Apple Watch ensures that you can make the most of location-dependent features like map navigation, fitness tracking, weather updates, and more. However, it’s important to note that enabling Location Services may consume battery power, so it’s a good idea to keep it enabled only for the apps that you truly need.
Step 14: Complete Apple Watch Pairing Process
After following the previous steps to pair your Apple Watch to your iPhone, you are now in the final stage of completing the pairing process. This step will ensure that your devices are fully synced and ready to use together seamlessly.
Once the setup is complete, you will see a message on your iPhone and Apple Watch indicating that the pairing process is finished. This means that your Apple Watch is now successfully connected to your iPhone and ready to enhance your mobile experience.
At this point, you can explore the various features and functionalities that the Apple Watch offers. From receiving notifications and messages, tracking your fitness activities, to controlling music and making payments with Apple Pay, your Apple Watch opens up a world of possibilities right at your wrist.
Make sure to familiarize yourself with the settings and customization options available on both your iPhone and Apple Watch. You can adjust preferences such as display brightness, notifications, watch faces, and more to personalize your Apple Watch experience.
It is recommended to download and install any desired apps on your Apple Watch that align with your preferences and lifestyle. With a vast selection of apps available on the Apple App Store, you can enhance your productivity, stay connected, and enjoy entertainment on the go.
Keep in mind that new updates and features are regularly released for both the iPhone and Apple Watch. Ensure that you have automatic software updates enabled so that you can take advantage of the latest enhancements and fixes.
Remember to keep your Apple Watch and iPhone in close proximity to maintain a stable Bluetooth connection. This will ensure that your devices stay synchronized, allowing you to enjoy the full functionality of your Apple Watch.
Now that you have successfully paired your Apple Watch to your iPhone, it’s time to start enjoying the convenience and functionality that comes with this powerful wearable device. Embrace the world on your wrist and make the most out of your mobile experience with Apple Watch!
Conclusion
In conclusion, pairing your Apple Watch to your iPhone is a simple process that allows you to unlock the full potential of your device. By following the steps outlined in this article, you can seamlessly connect your iPhone and Apple Watch, enabling you to access your notifications, track your fitness goals, and much more. The Apple Watch provides a range of features and functionalities that complement your iPhone experience, making it a must-have accessory for tech-savvy individuals. So, whether you are a fitness enthusiast, a professional on the go, or simply someone who enjoys staying connected, don’t miss out on the convenience and innovation that comes with pairing your Apple Watch to your iPhone.
FAQs
- Can I pair my Apple Watch to an iPhone?
- How do I pair my Apple Watch to my iPhone?
- Ensure that both your Apple Watch and iPhone are charged and in close proximity to each other.
- On your iPhone, open the Watch app.
- Tap on “Start Pairing” and follow the prompts on the screen.
- Hold your iPhone’s camera over the animation that appears on your Apple Watch until your Apple Watch is paired successfully.
- Follow the remaining instructions to set up your Apple Watch, including selecting your language, setting a passcode, and choosing which features to sync with your watch.
- Once the setup is complete, you’ll be able to enjoy the full range of features offered by your Apple Watch.
- Can I pair multiple Apple Watches to the same iPhone?
- What if I want to pair my Apple Watch with a new iPhone?
- Back up your old iPhone and restore the backup to your new iPhone.
- On your new iPhone, open the Watch app.
- Tap on “Start Pairing” and follow the prompts on the screen.
- When prompted, select the option to restore from a backup and choose the backup that includes your Apple Watch data.
- Follow the remaining instructions to complete the pairing process between your Apple Watch and new iPhone.
- What if I want to unpair my Apple Watch from my iPhone?
- On your iPhone, open the Watch app.
- Go to the “My Watch” tab.
- Tap on your Apple Watch at the top of the screen.
- Tap on the “i” icon next to your Apple Watch.
- Select the option “Unpair Apple Watch” and confirm your decision.
- Once the unpairing process is complete, your Apple Watch will be disconnected from your iPhone.
Yes, Apple Watch is specifically designed to be paired with an iPhone. By connecting your Apple Watch to your iPhone, you unlock a multitude of features and functionalities that add convenience and efficiency to your daily life.
To pair your Apple Watch to your iPhone, follow these steps:
Yes, you can pair multiple Apple Watches to the same iPhone. Each Apple Watch will have its own unique pairing and can be connected to the same iPhone. This allows you to use different Apple Watches for different activities or switch between them as desired.
If you are switching to a new iPhone and want to pair your existing Apple Watch with your new device, follow these steps:
If you need to unpair your Apple Watch from your iPhone, follow these steps: