
So, you’ve just gotten your hands on the sleek and stylish Apple Watch, and you’re excited to start using it. But before you can fully take advantage of all its amazing features, you need to set it up and pair it with your iPhone. Don’t worry, though – the process is quick and straightforward. In this article, we’ll guide you step-by-step through the setup process for Apple Watch and show you how to seamlessly pair it with your iPhone. Whether it’s your first time using an Apple Watch or you’re upgrading to a newer model, this comprehensive guide will ensure that you’re up and running in no time. So, let’s dive in and get started with the setup of your Apple Watch!
Inside This Article
- Step 1: Check compatibility
- Step 2: Update your iPhone
- Step 3: Power on the Apple Watch
- Step 4: Bring your devices close together
- Step 5: Pair your Apple Watch with your iPhone
- Step 6: Set up Apple Pay and other features
- Step 7: Customize your Apple Watch settings
- Step 8: Explore and Enjoy Your Apple Watch
- Conclusion
- FAQs
Step 1: Check compatibility
Before setting up your Apple Watch and pairing it with your iPhone, it’s essential to ensure compatibility between the two devices. This ensures a smooth and effortless setup process. Here are the compatibility requirements to consider:
- Make sure your iPhone is running on the latest version of iOS. Apple Watch is compatible with iPhone 6s or later models that have iOS 14 or later.
- Your Apple Watch model should be compatible with your iPhone’s operating system. You can find the list of compatible Apple Watch models on Apple’s official website.
- Ensure that your iPhone has sufficient storage space to accommodate the Apple Watch app and any necessary updates.
- Double-check that your iPhone is connected to a stable Wi-Fi or cellular network.
By confirming these compatibility requirements, you can proceed confidently with the setup process, knowing that your devices are suitable for pairing.
Step 2: Update your iPhone
Before you can pair your Apple Watch with your iPhone, it’s crucial to ensure that your iPhone is running the latest version of iOS. Updating your iPhone not only ensures compatibility but also provides you with the latest features and security improvements.
To update your iPhone, follow these simple steps:
- Connect your iPhone to a Wi-Fi network.
- Go to the “Settings” app on your iPhone. You can find it on your home screen.
- Scroll down and tap on “General.”
- Next, tap on “Software Update.” If an update is available, you will see a notification.
- Tap on “Download and Install.” Depending on the size of the update, this process may take a few minutes or longer.
- Once the update is downloaded, tap on “Install.”
- Follow the on-screen prompts and enter your passcode, if required.
- Wait for the update to complete. Your iPhone will restart during this process.
Once your iPhone is updated to the latest version of iOS, you’ll be ready to move on to the next step of the Apple Watch setup process.
Step 3: Power on the Apple Watch
Now that you have checked the compatibility of your Apple Watch and updated your iPhone, it’s time to power on your Apple Watch and get it ready for pairing. This step is essential for the successful setup of your new device.
To power on your Apple Watch, locate the side button, positioned below the Digital Crown on the right side of the device. Press and hold the side button until the Apple logo appears on the screen. This indicates that your Apple Watch is powering on.
It may take a few seconds for the device to start up. Be patient and keep holding the side button until the Apple logo is displayed. Once the logo appears, you can release the button. Your Apple Watch is now powered on and ready for the next step.
The power-on process ensures that your Apple Watch is fully functional and can pair with your iPhone seamlessly. It also establishes the connection between the hardware and software components of the device, allowing for a smooth user experience.
It’s important to note that if your Apple Watch doesn’t power on even after pressing and holding the side button, it might be due to a low battery. In this case, connect your Apple Watch to its magnetic charging cable and wait for a few minutes. Once the battery has sufficient charge, repeat the power-on process.
Remember, the power-on step is a crucial part of setting up your Apple Watch. By following this simple procedure, you can ensure that your device is ready to be paired with your iPhone and start enjoying the wonderful features it has to offer.
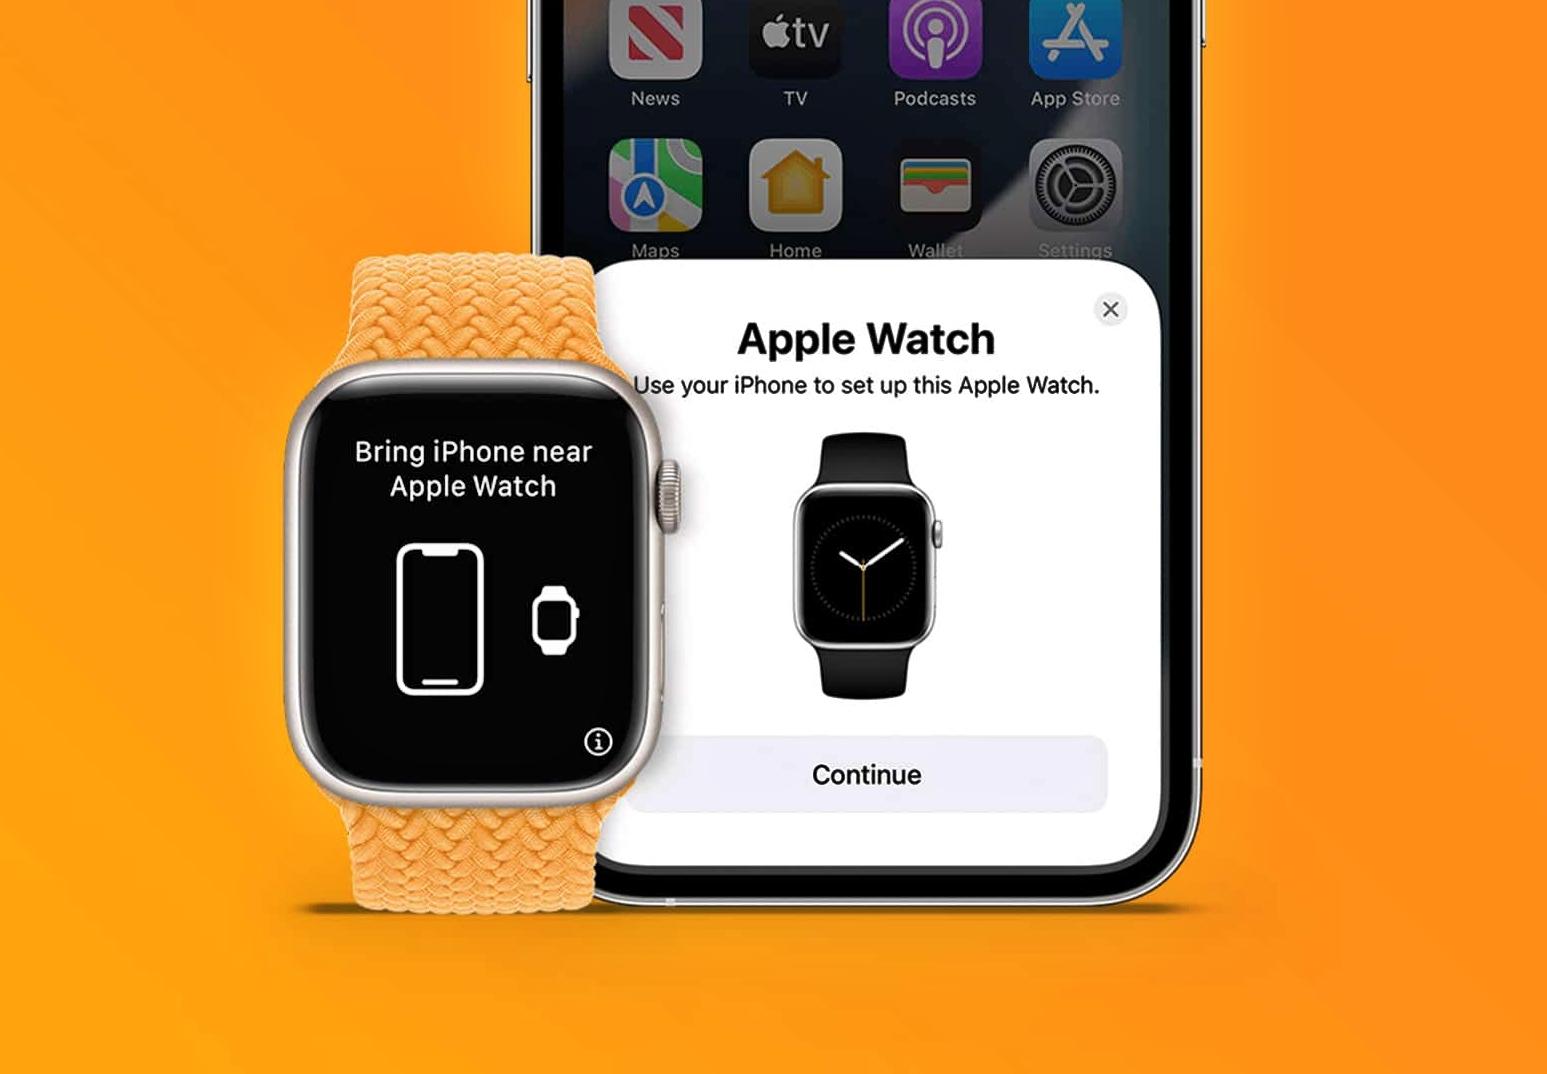
Step 4: Bring your devices close together
Once you have successfully updated your iPhone and powered on your Apple Watch, it’s time to bring the two devices close together to initiate the pairing process. This step is crucial for establishing a secure and stable connection between your Apple Watch and iPhone.
To bring your devices close together, hold your Apple Watch and iPhone near each other. Make sure that they are within a few inches of each other to ensure a strong Bluetooth connection. Avoid any obstructions between the devices, such as walls or other electronic devices, as they can interfere with the pairing process.
It’s important to note that during the pairing process, your iPhone may display a message asking if you would like to pair your Apple Watch. Simply tap “Pair” to proceed with the pairing process. Your iPhone will then begin communicating with your Apple Watch, exchanging necessary information and settings.
Additionally, you should ensure that both devices have sufficient battery power. It is recommended to have at least 50% battery power on both your iPhone and Apple Watch to avoid any interruptions during the pairing process.
As the devices are brought close together, you may notice a pairing animation on your Apple Watch screen. This animation indicates that the pairing is in progress and helps to verify that your devices are successfully communicating with each other.
Once the devices are successfully paired, you will receive a notification on your iPhone and a confirmation on your Apple Watch. This notification will indicate that the pairing process is complete, and you can proceed to the next steps to set up additional features and customize your Apple Watch settings.
Remember, the pairing process may take a few minutes, so be patient during this step. It is important not to interrupt the pairing process or move your devices too far apart until the pairing is completed.
By bringing your devices close together and following the prompts on your iPhone and Apple Watch, you will ensure a seamless and successful pairing experience. This step is an essential part of setting up your Apple Watch, as it establishes the connection between your devices and allows them to work together harmoniously.
Step 5: Pair your Apple Watch with your iPhone
Now that you’ve powered on your Apple Watch, it’s time to pair it with your iPhone. This step is crucial as it allows your devices to communicate and share information seamlessly. Here’s how to get started:
1. Open the Apple Watch app on your iPhone. If you can’t find it, don’t worry! It’s likely already installed on your device, as it comes preloaded with the latest iOS versions.
2. Tap on the “Start Pairing” button. Your iPhone will display a unique animation that your Apple Watch needs to scan.
3. Position your Apple Watch so that the animation appears within the viewfinder on your watch screen. Make sure the iPhone’s camera is aligned with the pattern on your watch.
4. Once your Apple Watch recognizes the pattern, it will authenticate and pair with your iPhone. This process may take a few moments, so be patient.
5. After a successful pairing, you’ll see a message on your iPhone stating that your Apple Watch has been paired and synced. You can now proceed to set up your Apple Watch and explore its features.
It’s worth noting that if you’ve previously backed up an Apple Watch, you can choose to restore from a backup during the pairing process. This option allows you to transfer your settings, apps, and data onto your new watch, making for a seamless transition.
Pairing your Apple Watch with your iPhone enables essential features like notifications, messaging, and health tracking to work harmoniously between the two devices. It’s a vital step to unleash the full potential of your Apple Watch.
Step 6: Set up Apple Pay and other features
Once you have successfully paired your Apple Watch with your iPhone, it’s time to explore some of the incredible features it has to offer. One such feature is Apple Pay, which allows you to make quick and secure payments directly from your wrist.
To set up Apple Pay on your Apple Watch, follow these simple steps:
- Open the Wallet app on your iPhone. This is where you can add your credit or debit cards to Apple Pay.
- Add your cards. Tap on the plus icon to add a new card. You can either enter the card details manually or use your iPhone’s camera to scan the card.
- Verify your cards. Depending on your bank, you may need to provide some additional information to verify your card. Follow the on-screen instructions to complete the verification process.
- Enable wrist detection. To use Apple Pay, you need to enable wrist detection on your Apple Watch. Go to the Apple Watch app on your iPhone, tap on “Passcode,” and toggle on the option for wrist detection.
- Select your default card. If you have multiple cards added to Apple Pay, you can choose a default card for quick and easy payments. Open the Wallet app on your iPhone, tap on your desired card, and select “Make Default.”
Now that you have set up Apple Pay on your Apple Watch, you can easily make payments at supported stores by double-pressing the side button and holding your Apple Watch near the contactless reader. You can also make payments within apps that support Apple Pay without needing to enter your card details each time.
In addition to Apple Pay, your Apple Watch offers a range of other exciting features that you can explore and customize. Here are some of the key features:
- Notifications: Receive and respond to notifications straight from your wrist.
- Activity tracking: Keep track of your fitness activities, set goals, and monitor your progress.
- Heart rate monitoring: Monitor your heart rate and receive alerts for high or low heart rates.
- Music: Control your music playback and listen to your favorite tunes on the go.
- Apps: Explore and download a wide range of apps from the App Store designed specifically for the Apple Watch.
To customize these features, simply navigate to the Apple Watch app on your iPhone and explore the various settings available. You can choose which apps send notifications to your watch, set fitness goals, adjust heart rate thresholds, and much more.
Now that you have successfully set up Apple Pay and customized your Apple Watch features, it’s time to fully enjoy the convenience and versatility that your Apple Watch brings to your everyday life.
Step 7: Customize your Apple Watch settings
Once you have successfully paired your Apple Watch with your iPhone, it’s time to make it truly yours by customizing its settings. This will allow you to personalize your device and optimize it according to your preferences and needs.
Here are some key areas you can customize:
- Watch face: Start by selecting a watch face that suits your style and provides the information you want at a glance. You can choose from a wide range of options such as analog, digital, modular, and more. Additionally, you can customize the color scheme, complications, and complications placement on the watch face.
- Notifications: Manage the notifications that appear on your Apple Watch by selecting which apps can send alerts to your wrist. This allows you to control the types of notifications you receive and prevent unnecessary interruptions.
- App layout: Arrange the apps on your Apple Watch’s home screen according to your preference. You can organize them in a grid format or list view, making it easy to access your most frequently used apps.
- Glances: Customize the glances that appear when you swipe up from the bottom of your Apple Watch. Glances provide quick summaries of information from your favorite apps, such as weather updates, calendar events, and fitness metrics.
- Complications: Take advantage of complications, which are small widgets that can display information from various apps on your watch face. Customize the complications to show data that is most relevant to you, such as current weather conditions, heart rate, or upcoming events.
- Haptic settings: Adjust the haptic feedback settings to control the intensity of the vibrations you feel on your wrist when receiving notifications or interacting with your Apple Watch.
- Accessibility: Apple Watch offers a range of accessibility features to ensure that everyone can use and enjoy the device. Customize features such as text size, bold text, grayscale mode, and more, to enhance visibility and usability.
By personalizing these settings, you can make your Apple Watch more functional and tailored to your specific needs. Experiment with different combinations and options to find the perfect setup that matches your style and enhances your overall Apple Watch experience.
Step 8: Explore and Enjoy Your Apple Watch
Now that you have set up your Apple Watch and paired it with your iPhone, it’s time to explore all the amazing features and capabilities of this innovative device. Here are some tips to help you get started:
1. Customize your watch face: Your Apple Watch allows you to choose from a variety of watch faces, ranging from classic analog designs to vibrant digital displays. You can personalize your watch face by adding complications, which are small snippets of information such as weather, calendar events, or fitness data. Simply swipe left or right on the watch face to browse through the available options and choose the one that suits your style and needs.
2. Install apps: The Apple Watch is compatible with numerous apps that can enhance your daily activities and streamline your tasks. From fitness and health-tracking apps to productivity and entertainment apps, there is something for everyone. You can browse and install apps directly from your Apple Watch, or use your iPhone to search and download apps from the App Store. To access your installed apps, simply press the Digital Crown and navigate through the App Grid.
3. Stay connected: With your Apple Watch, you can receive notifications, calls, and messages directly on your wrist. You can easily customize which apps send notifications to your watch and choose whether to receive alerts with sounds or vibrations. To manage notifications, open the Watch app on your iPhone, go to the ‘My Watch’ tab, and select ‘Notifications’. From there, you can enable or disable notifications for each app and customize their settings.
4. Track your fitness: One of the key features of the Apple Watch is its fitness tracking capabilities. You can use the built-in Workout app to track a variety of activities such as running, cycling, swimming, and more. The Apple Watch also measures your heart rate, counts your steps, and tracks your sleep patterns. To view and analyze your fitness data, open the Fitness app on your iPhone and explore the different sections such as Activity, Workouts, and Trends.
5. Use Siri: Your Apple Watch comes with Siri, Apple’s virtual assistant, which can help you perform various tasks using just your voice. You can activate Siri by either saying “Hey Siri” or pressing and holding the Digital Crown. Siri can send messages, make phone calls, set reminders, provide directions, and much more. It’s a convenient way to interact with your watch without having to use the touch screen.
6. Explore additional features: The Apple Watch is packed with additional features that can enhance your daily life. From Apple Pay for making secure payments with just a tap of your wrist to the ECG app for monitoring your heart health, there is a wide range of capabilities to explore. You can access these features by swiping up from the bottom of the watch face to access the Control Center and accessing the corresponding apps or settings.
7. Take care of your Apple Watch: To ensure the longevity and optimal performance of your Apple Watch, it’s important to take good care of it. Avoid exposing it to extreme temperatures, water, or excessive impact. Clean the watch regularly with a soft, lint-free cloth to remove any dirt or smudges. Additionally, consider investing in protective cases or screen protectors to safeguard your device from scratches or accidental damage.
By following these tips, you can fully explore and enjoy the capabilities of your Apple Watch. Whether it’s staying connected, tracking your fitness, or accessing additional features, your Apple Watch is designed to enhance your daily life and provide you with a seamless and convenient experience.
Conclusion
Setting up an Apple Watch and pairing it with your iPhone is a simple and straightforward process. With just a few easy steps, you can enjoy the full functionality of your Apple Watch and take advantage of all the exciting features it offers. From receiving notifications, tracking your fitness activities, to downloading and accessing apps, your Apple Watch is a powerful companion that enhances your everyday life.
Remember to follow the instructions provided by Apple and ensure that your iPhone and Apple Watch are compatible with each other. By taking the time to properly set up your Apple Watch, you’ll unlock a new level of convenience and connectivity.
So, go ahead and get started with your Apple Watch setup. Enjoy the seamless integration between your iPhone and the wearable technology that will revolutionize the way you stay connected and stay in control, right on your wrist.
FAQs
Here are some frequently asked questions about setting up your Apple Watch and pairing it with your iPhone:
1. How do I set up my Apple Watch?
Setting up your Apple Watch is a straightforward process. First, make sure your iPhone is updated to the latest version of iOS. Then, ensure that your Apple Watch is charged by placing it on the magnetic charger. Once your Apple Watch is charged, turn it on by pressing and holding the side button until the Apple logo appears. Follow the on-screen instructions on your iPhone to complete the setup process, including connecting your Apple Watch to your iPhone via Bluetooth and signing in with your Apple ID.
2. Can I pair multiple Apple Watches with one iPhone?
No, you can only pair one Apple Watch with one iPhone at a time. If you want to pair a different Apple Watch, you’ll need to unpair the existing one first. To unpair your Apple Watch, go to the Apple Watch app on your iPhone, tap on your watch, then select “Unpair Apple Watch” and confirm your selection.
3. Can I pair my Apple Watch with an Android phone?
No, Apple Watch requires an iPhone to function. It is designed to work seamlessly with iPhones, leveraging the iOS ecosystem to deliver its full range of features and functionalities. Android phone users will not be able to pair their devices with an Apple Watch.
4. What can I do if my Apple Watch won’t pair with my iPhone?
If you’re having trouble pairing your Apple Watch with your iPhone, there are a few troubleshooting steps you can try. First, make sure Bluetooth is enabled on both your iPhone and Apple Watch. Restart both devices and try pairing them again. If the issue persists, try resetting your Apple Watch by going to the Settings app on your watch, selecting “General,” and then “Reset.” Finally, if all else fails, contact Apple Support for further assistance.
5. Can I use my Apple Watch without an iPhone nearby?
While Apple Watch is designed to work in tandem with an iPhone, certain features can be used independently without an iPhone nearby. For example, if your Apple Watch has cellular connectivity, you can make phone calls, send messages, and stream music directly from your watch. However, certain features and functionalities may require an iPhone connection, such as accessing Siri, syncing data, and installing apps.