
Welcome to our comprehensive guide on how to replace a phone jack. Whether you’re experiencing a faulty connection, a crackling sound, or no dial tone at all, a damaged phone jack can be a frustrating inconvenience. Not to worry, though, because we’re here to help you through the process of replacing it.
In this article, we’ll walk you through the necessary steps, providing all the information you need to successfully replace a phone jack. We’ll cover everything from understanding the different types of phone jacks to removing the old one and installing a new one. By following our guide, you’ll have your phone line back up and running in no time!
Inside This Article
- Steps to Replace a Phone Jack
- Preparing to Replace the Phone Jack
- Removing the Old Phone Jack
- Installing the New Phone Jack
- Conclusion
- FAQs
Steps to Replace a Phone Jack
If you’re experiencing issues with your phone line, a faulty phone jack may be the culprit. Thankfully, replacing a phone jack doesn’t have to be a daunting task. With a few simple steps, you can have your phone line back up and running smoothly. Here’s a comprehensive guide on how to replace a phone jack.
- Gather the necessary tools
- Turn off the power
- Remove the old phone jack
- Disconnect the wires
- Prepare the new phone jack
- Connect the wires
- Mount the new phone jack
- Test the phone line
Before you begin, make sure you have all the tools you’ll need for the job. This includes a screwdriver, wire stripper, telephone jack kit, and a voltage tester to ensure the power is turned off.
Safety first! Start by turning off the power to the phone line to avoid any electrical mishaps. Locate the circuit breaker or fuse box and switch off the corresponding power source.
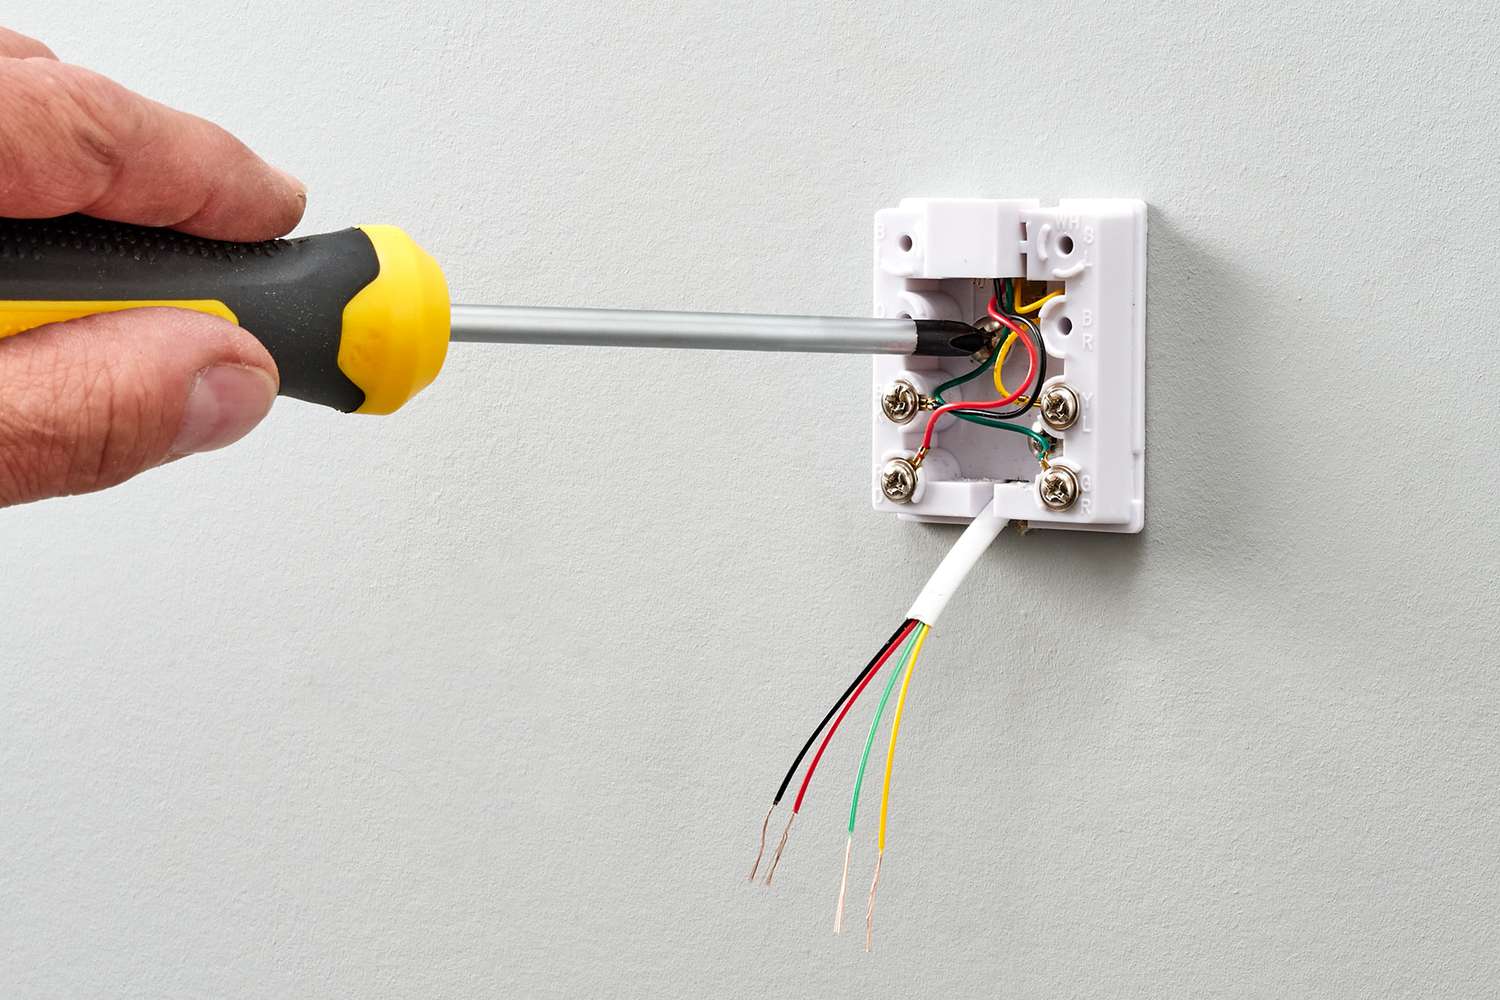
Using a screwdriver, carefully remove the screws holding the old phone jack in place. Once the screws are removed, gently pull the jack away from the wall. Take note of the wires connected to the jack and how they are configured.
Using a wire stripper, carefully strip the insulation from the ends of the wires connected to the old phone jack. Once the wires are exposed, disconnect them from the old jack. Remember to make note of the wire color-to-terminal configuration.
Take your new telephone jack kit and identify the appropriate terminals for the number of wires you will be connecting. Use the wire stripper to strip the ends of the corresponding wires, exposing the copper conductors.
With the wires prepared, it’s time to connect them to the new phone jack. Refer to your notes on the wire color-to-terminal configuration and carefully attach each wire to the respective terminal, ensuring a secure connection.
Align the new phone jack with the wall plate and gently push it into place. Use the screws provided in the telephone jack kit to secure it firmly to the wall.
Once the new phone jack is securely in place, it’s time to test the phone line. Turn the power back on and use a telephone or phone tester to check if you have a dial tone and a working connection.
By following these simple steps, you can successfully replace a phone jack and restore functionality to your phone line. Remember to always prioritize safety and consult a professional if you’re unsure about any step of the process.
Preparing to Replace the Phone Jack
Replacing a phone jack is a straightforward process, but it does require some preparation. Before you begin, make sure to gather the necessary tools and materials. This includes a screwdriver, wire strippers, a new phone jack, and possibly a voltage tester. It’s also a good idea to have a flashlight handy in case you need to work in dimly lit areas.
Next, it’s important to ensure your safety during the process. Start by turning off the power to the telephone line. If you’re not sure which breaker controls the line, you can simply unplug the telephone cord from the wall. This will prevent any electrical accidents from occurring while you work.
Once you’ve taken the necessary precautions, you can now inspect the existing phone jack. Take note of the connections and wiring configuration. Look for any signs of damage or wear, such as frayed wires or loose screws. Understanding the current setup will make it easier when it comes time to install the new phone jack.
If you’re unsure about the wiring configuration or need assistance, consult the manufacturer’s manual or seek help from a professional. It’s crucial to ensure that you’re working with the correct wires during the replacement process to avoid any potential issues with the telephone line.
Before proceeding, it’s a good idea to take a picture or make a diagram of the existing wiring connections. This will serve as a reference in case you forget how the wires were originally connected. Additionally, it’s essential to label the wires to keep track of their respective connections. Use masking tape or small stickers to mark the wires with letters or numbers.
Lastly, double-check that you have the correct replacement phone jack that matches your telephone line requirements. There are different types of phone jacks available, so ensure that you have the appropriate one for your specific setup. This will ensure compatibility and a seamless installation process.
Removing the Old Phone Jack
Before installing a new phone jack, you’ll need to remove the old one. Here are the steps to safely remove the old phone jack:
- Power off and unplug the device: Before starting the removal process, make sure to power off and unplug any devices connected to the phone jack. This will ensure your safety and prevent any damage to the equipment.
- Inspect the jack: Carefully examine the phone jack to identify any screws or clips holding it in place. Some phone jacks may be mounted with screws, while others may use clips that can be gently released.
- Remove the faceplate: Start by removing the faceplate that covers the phone jack. This is typically done by loosening the screws at the top and bottom of the faceplate. Once the screws are removed, gently pull the faceplate away from the wall to expose the wiring behind it.
- Inspect the wiring: Take a close look at the wiring configuration inside the phone jack. Pay attention to the color-coded wires and how they are connected. This will help you when installing the new phone jack.
- Disconnect the wires: Use a screwdriver or pliers to loosen the screws or clips holding the wires in place. Make sure to grip the wires close to the terminal and avoid pulling on them too forcefully. Once the screws or clips are loosened, gently remove the wires from the old phone jack.
- Remove the mounting screws or clips: If the phone jack is secured to the wall with screws, use a screwdriver to remove them. If it is held in place with clips, gently release the clips and carefully pull the old phone jack away from the wall.
Once you have successfully removed the old phone jack, you are now ready to install the new one. Refer to the next section for detailed instructions on how to install a new phone jack.
Installing the New Phone Jack
Once you have successfully removed the old phone jack, it’s time to install the new one. Follow these steps to properly install the new phone jack:
- Inspect the new phone jack: Before you begin the installation process, carefully examine the new phone jack. Ensure that all the required components are included and that there are no visible damages.
- Prepare the wires: Strip the outer insulation of the phone wires using a wire stripper. Make sure to expose enough wire for proper connection to the new phone jack.
- Identify the connection terminals: Take a close look at the new phone jack to determine the location of the connection terminals. Most phone jacks have color-coded terminals for easy identification.
- Secure the wires: Insert the exposed wires into the appropriate connection terminals of the phone jack. Typically, there are terminals for the red and green wires, which are used for phone line connection.
- Tighten the terminal screws: Once the wires are inserted into the connection terminals, use a screwdriver to tighten the terminal screws. This ensures a secure and reliable connection.
- Attach the phone jack to the wall: Position the new phone jack over the mounting screws on the wall. Gently push the phone jack inwards and secure it by tightening the mounting screws.
- Test the connection: After installing the new phone jack, it’s essential to test the connection. Connect a phone or a phone-line tester to the newly installed phone jack and check for a dial tone.
- Secure the phone jack cover: Once the connection is tested and working properly, attach the cover to the phone jack. This provides a clean and professional look to the installation.
By following these steps, you can easily install a new phone jack and ensure a seamless phone line connection. If you encounter any difficulties or are unsure about any step, it’s best to consult a professional technician for assistance.
Replacing a phone jack may seem like a daunting task, but with the right knowledge and tools, it can be a straightforward process. By following the steps outlined in this guide, you can successfully replace a phone jack and ensure that your phone lines are functioning properly. Remember to turn off the power, gather the necessary tools, test the line, and connect the wires correctly. Whether you are upgrading an old jack or fixing a faulty connection, replacing a phone jack can improve the performance and reliability of your phone system. With a little patience and attention to detail, you can easily replace a phone jack and enjoy uninterrupted communication in no time.
FAQs
Here are some frequently asked questions about replacing a phone jack:
1. Why would I need to replace a phone jack?
Over time, phone jacks can become worn out or damaged, resulting in poor connectivity or even a complete loss of service. Replacing a phone jack can help to restore a reliable and clear phone connection.
2. How do I know if my phone jack needs replacing?
If you’re experiencing issues such as crackling or static on your phone line, a phone jack that won’t hold a connection, or if the wires are visibly damaged, it may be time to replace your phone jack.
3. Can I replace a phone jack myself?
Yes, replacing a phone jack is a relatively straightforward task that you can do yourself. However, it’s important to have some basic understanding of electrical wiring and safety precautions. Make sure to turn off the power to the phone line and follow the manufacturer’s instructions or consult a professional for guidance if needed.
4. What tools do I need to replace a phone jack?
To replace a phone jack, you will typically need a screwdriver, wire strippers, a utility knife, electrical tape, and replacement phone jack components. It’s also helpful to have a telephone line tester to ensure proper connectivity once the replacement is complete.
5. Where can I find replacement phone jack components?
You can find replacement phone jack components at most hardware stores or electronics retailers. Additionally, you can also purchase them online from various reputable sellers. Be sure to choose a phone jack that matches the wiring configuration of your existing setup.