
In the ever-evolving world of cell phones, iPhones have been at the forefront of innovation. With each new update, Apple introduces exciting features that enhance the user experience. One such feature is Live Photos, which captures a few seconds of video before and after you take a photo, bringing your memories to life in a unique way.
But did you know that you can also take Live Photo selfies on an iPhone? This intriguing feature allows you to not just capture a still image but also create short video snippets of yourself. It adds a fun and dynamic element to your selfies, making them more engaging and memorable.
In this article, we will guide you step-by-step on how to take Live Photo selfies on your iPhone. We will explore different techniques and provide useful tips to help you make the most of this feature. So, grab your iPhone and let’s dive into the world of Live Photo selfies!
Inside This Article
- Enabling Live Photos on iPhone
- Accessing the Camera app
- Taking a Live Photo selfie
- Customizing Live Photo settings
- Conclusion
- FAQs
Enabling Live Photos on iPhone
Live Photos is a fantastic feature on the iPhone that brings your pictures to life by capturing a few seconds of video before and after you take a photo. This creates a dynamic and immersive experience, allowing you to relive your precious moments.
To enable Live Photos on your iPhone, follow these simple steps:
1. Open the Settings app on your iPhone.
2. Scroll down and tap on “Camera”.
3. In the Camera settings, find the “Preserve Settings” section and tap on “Preserve Camera”.
4. Toggle on the “Live Photo” option by tapping on the switch next to it. The switch should turn green.
That’s it! You have successfully enabled Live Photos on your iPhone. Now, whenever you use the camera, Live Photos will be automatically enabled, ready to capture those magical moments.
Accessing the Camera app
One of the first steps in taking a live photo selfie on your iPhone is accessing the Camera app. The Camera app is a built-in feature on your iPhone that allows you to capture photos and videos. To open the Camera app, simply locate the camera icon on your home screen and tap on it. Alternatively, you can also swipe left from your lock screen to instantly open the Camera app.
Once you have opened the Camera app, you will be presented with the different camera modes available on your iPhone. These camera modes include Photo, Video, Portrait, and more. To switch to the front-facing camera, which is essential for taking selfies, simply tap on the camera icon with rotating arrows located at the top right corner of the screen. This will toggle the camera from the rear-facing mode to the front-facing mode.
Now that you have accessed the Camera app and switched to the front-facing camera, you are ready to take a live photo selfie on your iPhone. The Camera app offers various features and settings that enhance your selfie-taking experience. Let’s explore how to capture a live photo selfie in the next section.
Taking a Live Photo selfie
Taking a Live Photo selfie on your iPhone allows you to capture moments with movement and sound, bringing your photos to life. Follow these simple steps to capture a Live Photo selfie:
- Open the Camera app on your iPhone.
- Tap the camera switch icon to switch to the front-facing camera.
- Position yourself in the frame and get ready to take the selfie.
- Tap on the shutter button to capture the Live Photo.
- You will see a small thumbnail of the Live Photo appearing on the bottom left corner of the screen. This indicates that the Live Photo has been successfully captured.
By default, Live Photos capture 1.5 seconds of footage before and after you press the shutter button. This feature allows you to capture the moments just before and after the photo, adding an extra layer of depth and movement to your selfies.
If you want to further customize the look of your Live Photo selfies, you can explore the additional options available:
- Choose a different Key Photo: Live Photos automatically select a Key Photo, but you can change it to a different frame if you prefer. Open the Live Photo in your Photos app, tap “Edit,” and swipe through the frames to choose the perfect Key Photo.
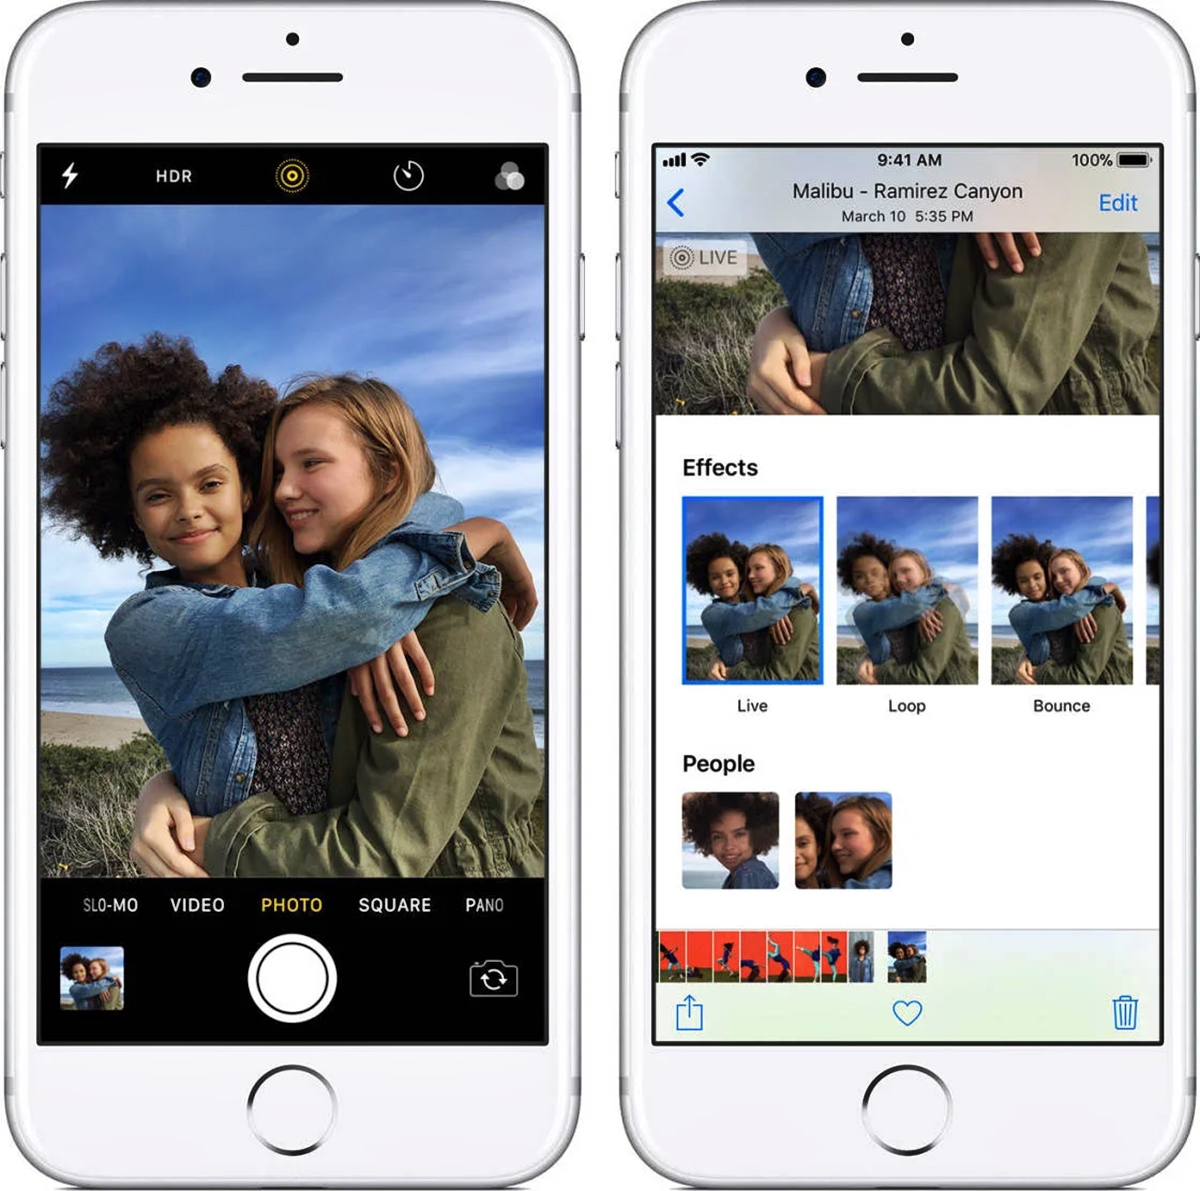
- Add fun effects: With the iOS 15 update, Apple introduced new effects to enhance your Live Photos. You can add looping, bouncing, or long exposure effects to give your Live Photo selfie a unique touch.
- Disable Live Photos: If you decide that you no longer want to capture Live Photos, you can disable the feature entirely. Simply tap on the yellow Live Photos icon on the camera screen to turn it off. The icon will turn white, indicating that Live Photos are disabled.
With the ability to capture Live Photo selfies, you can create stunning and dynamic images that go beyond the traditional static pictures. Experiment with different poses, expressions, and settings to truly bring your selfies to life.
Customizing Live Photo settings
When taking a Live Photo selfie on your iPhone, you have the ability to customize the settings to suit your preferences. Here are a few options you can explore:
1. Choose between Live, Loop, and Bounce: By default, Live Photos are captured in the Live mode, which captures a few seconds of video before and after the photo. However, you can change the playback style to Loop or Bounce. Loop continuously plays the Live Photo like a GIF, while Bounce creates a fun effect by playing the Live Photo in a back-and-forth motion.
2. Set the Live Photo as your Lock Screen wallpaper: To enjoy your Live Photo selfie every time you unlock your iPhone, you can set it as your Lock Screen wallpaper. Simply go to Settings > Wallpaper > Choose a New Wallpaper, and select the Live Photo from your Camera Roll. Make sure to choose “Live Photo” when prompted and set it as your Lock Screen wallpaper.
3. Disable sound in the Live Photo: If your Live Photo selfie includes sound, but you prefer a silent playback, you can easily turn off the audio. Simply open the Live Photo in the Photos app, tap the speaker icon in the top left corner of the screen, and the sound will be muted.
4. Edit the Live Photo: If you’re not completely satisfied with how your Live Photo selfie turned out, you can make adjustments using the built-in editing tools in the Photos app. You can crop the photo, apply filters, adjust brightness and contrast, and even trim the length of the Live Photo. To edit the Live Photo, open it in the Photos app, tap Edit, and make the desired changes.
5. Share as a Live Photo: When sharing your Live Photo selfie with friends and family, you can keep the Live Photo effect intact by sharing it as a Live Photo. Simply select the Live Photo from your Camera Roll, tap the share button, choose the sharing method (e.g., Messages, Mail, AirDrop), and make sure the “Live” option is selected. This way, the recipient can experience the full Live Photo effect when viewing it.
These are just a few examples of how you can customize the Live Photo settings to enhance your selfie-taking experience on your iPhone. Feel free to explore these options and experiment with different settings to create unique and captivating Live Photo selfies.
Conclusion
In conclusion, taking a live photo selfie on your iPhone is a fun and creative way to capture the moment and add more life to your images. With the advanced technology and features available on the latest iPhone models, such as the iPhone 13, you can easily toggle the live photo mode and capture stunning selfies with motion and sound.
Whether you want to capture a spontaneous smile, a fun action shot, or a memorable moment with friends or family, the live photo selfie feature is a valuable tool at your fingertips. It allows you to relive the moment by preserving the subtle movements, expressions, and sounds that bring the photo to life.
Next time you want to capture a selfie that goes beyond a static image, remember to activate the live photo mode on your iPhone and let the camera work its magic. Embrace the dynamic and immersive experience that a live photo selfie offers, and share those moments with your loved ones to make the memories even more engaging and unforgettable.
FAQs
Q: Can I take a live photo selfie on my iPhone?
A: Absolutely! Taking live photo selfies on your iPhone is a fun and easy way to capture memorable moments. Let me walk you through the steps to do it:
- Open the Camera app on your iPhone.
- Select the front-facing camera (usually indicated by an icon that looks like a silhouette of a person).
- In the Camera app, locate the Live Photos button. It typically appears as a series of concentric circles.
- Tap the Live Photos button to enable it. You’ll notice it turns yellow when activated.
- Now, aim the camera at yourself and tap the shutter button to take a live photo selfie.
You can view and enjoy your live photo selfies by accessing the Photos app on your iPhone.
Q: Can I edit live photo selfies after taking them on my iPhone?
A: Yes, you can edit your live photo selfies on your iPhone. Here’s how:
- Open the Photos app on your iPhone.
- Find the live photo selfie you want to edit and tap on it to open it.
- At the bottom of the screen, you’ll see multiple editing options. Tap on “Edit.”
- From here, you can make adjustments to the photo, such as cropping, applying filters, adjusting exposure, and more.
- Once you’re satisfied with the edits, tap “Done” to save the changes.
Remember, editing live photo selfies enhances your creativity and allows you to add your personal touch to the captured moment.
Q: Can I change the live photo settings on my iPhone?
A: Yes, you can customize the live photo settings on your iPhone to suit your preferences. Here’s what you need to do:
- Go to the Settings app on your iPhone.
- Scroll down and tap on “Camera.”
- Under the Camera settings, you’ll find “Preserve Settings.” Tap on it.
- Enable the “Live Photo” option by sliding the toggle to the right.
- Now, whenever you take a live photo selfie, your chosen settings will be preserved.
Customizing the live photo settings ensures that your iPhone captures live photos exactly the way you want them.
Q: Can I share live photo selfies with others who don’t have iPhones?
A: Yes, you can share live photo selfies with others, even if they don’t have iPhones. Keep the following in mind:
- When you share a live photo selfie via text message or email, it will automatically be converted into a still image.
- You can also use social media platforms like Facebook or Instagram to share your live photo selfies. However, they will be converted to regular photos on these platforms.
- If you want to share the full live photo experience with someone who has an iPhone, you can use AirDrop. Simply select the live photo selfie and tap on the share icon, then select the person you want to share it with via AirDrop.
Remember, even if others can’t experience the live aspect of the photo, they can still enjoy the captured moment as a regular still image.
Q: Will taking live photo selfies drain my iPhone’s battery faster?
A: While taking live photo selfies can have a slight impact on your iPhone’s battery life, it is not significant. Apple devices are designed to efficiently handle live photo capture. Plus, you can always customize the live photo settings, as mentioned earlier, to fine-tune the usage and preserve battery life. So, go ahead and capture those memorable live photo selfies without worrying too much about battery drain.