
Transferring photos from one iPhone to another can be a convenient and hassle-free process, especially when you want to upgrade to a new device or share pictures with friends and family. With advancements in technology, transferring photos has become easier than ever before. Whether you want to transfer a few cherished memories or a whole album, there are multiple methods available to make the photo transfer seamless.
In this article, we will explore various techniques to transfer photos from iPhone to iPhone. Whether you prefer using iCloud, iTunes, or third-party apps, we will guide you through the step-by-step process. So, if you’re ready to learn how to transfer photos effortlessly, let’s dive into the different methods and find out which one suits your needs the best.
Inside This Article
- Introduction
- Method 1: Using iCloud Photos
- Method 2: Using AirDrop
- Method 3: Using iTunes
- Method 4: Using Third-Party Apps
- Conclusion
- Conclusion
- FAQs
Introduction
When you upgrade to a new iPhone, one of the first things you might want to do is transfer your precious photos from your old iPhone to your new one. After all, your photos capture memories that are irreplaceable. Thankfully, there are several methods available to help you easily transfer your photos from one iPhone to another. In this article, we will explore four different methods that you can utilize to make this transition seamless and hassle-free.
Whether you’re switching to a new iPhone, or simply want to share your photos with a friend or family member, these methods will enable you to transfer your photos with ease. You don’t have to worry about losing any of your precious moments in the process.
Before we delve into the specific methods, it’s important to note that all these methods require both iPhones to be connected to a stable Wi-Fi network. So, make sure that both devices are connected before you proceed with the transfer process. Now, let’s explore the four methods that will allow you to transfer photos from your old iPhone to your new one.
Method 1: Using iCloud Photos
One of the most convenient ways to transfer photos from one iPhone to another is by using iCloud Photos. iCloud Photos allows you to store your photos and videos in the cloud, making them accessible from any of your devices.
Before you can transfer photos using iCloud Photos, make sure that both iPhones are connected to the internet and signed in to the same iCloud account. Additionally, ensure that you have sufficient iCloud storage to accommodate the photos you want to transfer.
Here are the steps to transfer photos from one iPhone to another using iCloud Photos:
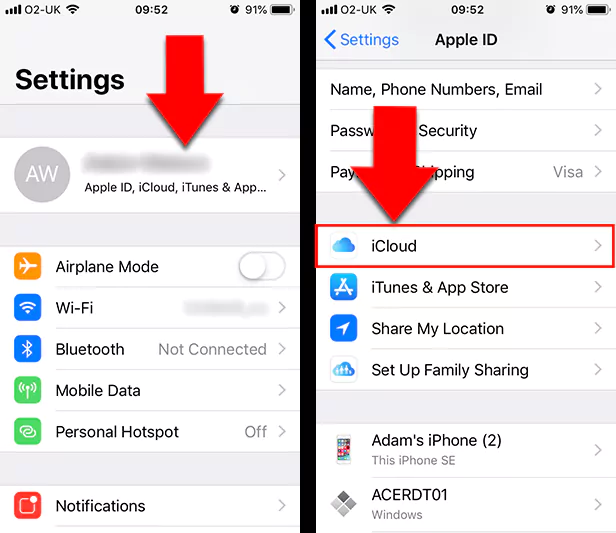
- On your source iPhone, go to “Settings” and tap on your name at the top of the screen.
- Select “iCloud” and then tap on “Photos”.
- Enable the toggle for “iCloud Photos” to sync your photos to the cloud.
- Wait for the syncing process to complete. This may take some time, depending on the size of your photo library and the speed of your internet connection.
- Now, on your destination iPhone, repeat the same steps to ensure that iCloud Photos is turned on.
- Once the syncing process is finished, you should see the photos from your source iPhone in the Photos app on your destination iPhone.
It’s important to note that using iCloud Photos will only transfer your photos, not other data such as contacts, messages, or apps. Additionally, if you have a large photo library, syncing them to iCloud may consume a significant amount of your cellular data. To avoid this, it’s recommended to connect to a Wi-Fi network before initiating the transfer.
Overall, using iCloud Photos is a seamless and hassle-free method to transfer photos between iPhones. It provides a convenient way to access your photos across devices and ensures that all your memories are safely backed up in the cloud.
Method 2: Using AirDrop
If you’re looking for a quick and effortless way to transfer photos from one iPhone to another, AirDrop is the perfect solution. AirDrop utilizes Bluetooth technology to create a direct peer-to-peer connection between two Apple devices, allowing for seamless file sharing.
Here’s how you can use AirDrop to transfer your photos:
- Ensure that AirDrop is enabled on both iPhones. To do this, swipe up from the bottom of the screen to open the Control Center. Tap on the AirDrop icon and select “Contacts Only” or “Everyone” depending on your preference. This determines who can see your device when using AirDrop.
- On the iPhone from which you want to transfer photos, open the Photos app and select the photos you wish to transfer.
- Tap on the “Share” icon, which looks like a box with an arrow pointing upwards.
- From the list of sharing options, locate and select the name of the iPhone to which you want to transfer the photos. The receiving device should be nearby and have AirDrop enabled.
- A notification will appear on the receiving iPhone, asking if they want to accept the photos. The user can choose to either accept or decline the transfer.
- If the receiving user accepts the transfer, the photos will be wirelessly sent from the sender’s iPhone to the receiver’s iPhone via AirDrop. The receiving device will automatically save the photos to the Photos app.
AirDrop is not only convenient but also ensures that your photos are transferred securely and privately, as the connection is encrypted. However, keep in mind that AirDrop requires both devices to be in close proximity to one another with Bluetooth and Wi-Fi enabled.
One common issue that users may encounter when using AirDrop is that the receiving device might not appear on the sender’s device. If you face this problem, make sure that both devices are configured to use the same AirDrop settings (Contacts Only or Everyone) and that they are within range of each other.
AirDrop is a fantastic method for transferring photos between iPhones, especially if you’re in the same location and need to quickly share images. It eliminates the need for cables or additional apps, making it a hassle-free way to transfer your cherished memories.
Method 3: Using iTunes
If you prefer to use a more traditional method to transfer photos from your iPhone to another iPhone, you can rely on iTunes. iTunes is a desktop application developed by Apple that allows you to manage and sync your iOS devices.
Here’s how you can use iTunes to transfer photos from one iPhone to another:
- Connect your source iPhone to your computer using a Lightning cable.
- Launch iTunes on your computer. If you don’t have iTunes installed, you can download it from the Apple website.
- Once iTunes is open, click on the device icon that appears in the upper left corner of the iTunes window. This will take you to the device management page.
- In the left sidebar, click on “Photos”.
- Check the box next to “Sync Photos” to enable photo syncing.
- Select the folder or album from which you want to transfer the photos. You can choose to sync your entire photo library or specific albums.
- Click on the “Apply” or “Sync” button to start the photo transfer process.
Once the syncing process is complete, disconnect the source iPhone from your computer and repeat the steps above to connect the target iPhone. Make sure to select the same folder or album to sync the photos onto the target iPhone.
Using iTunes to transfer photos can be a slightly longer process compared to some of the other methods mentioned. However, it provides a reliable way to manage and transfer your photos, especially if you have a large photo library or want to organize your photos in a specific way.
Importantly, keep in mind that iTunes uses photo syncing, which means that any existing photos on the target iPhone may be replaced by the transferred photos. Therefore, it’s crucial to have a backup of the target iPhone’s photos in case you want to preserve them.
Overall, using iTunes to transfer photos from one iPhone to another can be a great option if you’re looking for a comprehensive way to manage your photo library and want to have control over which photos are transferred.
Method 4: Using Third-Party Apps
If you’re looking for an alternative method to transfer photos from your old iPhone to a new one, you can consider using third-party apps. These apps often come with additional features and options that may suit your specific needs.
There are various third-party apps available in the App Store that can help you transfer your photos easily. Some of the popular options include:
- Google Photos: This app allows you to upload your photos to the cloud and access them on any device. Simply install the app on both your old and new iPhone, sign in with your Google account, and enable the automatic backup feature. Once the photos are uploaded, you can access them on your new iPhone by signing in and syncing the photos.
- Dropbox: Dropbox is a cloud storage service that offers seamless photo syncing across devices. Install the Dropbox app on both your old and new iPhone and sign in with your account. Upload your photos to a specific folder in Dropbox on your old iPhone and wait for them to sync. Then, on your new iPhone, open the Dropbox app and access the synced photos.
- OneDrive: Microsoft’s OneDrive app is another great option for transferring photos. Install the app on both devices, sign in with your Microsoft account, and enable the camera upload feature. This will automatically sync and upload your photos to the cloud. On your new iPhone, sign in to OneDrive and access the synced photos.
- PhotoSync: PhotoSync is a dedicated photo transfer app that allows you to transfer photos between different devices wirelessly. Install the app on both your old and new iPhone and follow the on-screen instructions to establish a connection between the devices. You can then select the photos you want to transfer and initiate the transfer process.
Before using any third-party app, make sure to read reviews and check their compatibility with your iPhone models and operating system version. Additionally, be cautious of any potential charges or limitations that may come with using these apps.
With the help of third-party apps, you can easily transfer your photos from your old iPhone to a new one without the need for iCloud or cables. Explore the different options available and choose the one that suits your preferences and requirements.
Conclusion
In conclusion, transferring photos from one iPhone to another is a breeze with the various methods available. Whether you choose to use iCloud Photos, AirDrop, iTunes, or third-party apps, you have options that cater to your specific needs and preferences.
Using iCloud Photos provides a seamless and automatic way to sync your photos across devices. It ensures that your photos are always up to date and easily accessible. Simply enable the iCloud Photos option in your device settings, and your photos will be uploaded to the cloud and available on your new iPhone.
If you prefer a more direct and instantaneous transfer method, AirDrop is an excellent choice. With AirDrop, you can quickly send photos from one iPhone to another without the need for an internet connection. Just make sure that AirDrop is enabled on both devices, and you’re ready to share your photos with a simple tap.
For those who prefer a traditional approach, iTunes offers a reliable way to transfer photos. By connecting your old iPhone to your computer, you can sync your photos to iTunes and then restore them onto your new iPhone. This method may take a bit more time and requires a computer, but it provides a secure and reliable transfer process.
If you prefer more flexibility and customization, third-party apps like Google Photos or Dropbox can be great alternatives. These apps allow you to back up and sync your photos across multiple devices, making it easy to transfer photos from one iPhone to another. Simply install the app on both devices, upload your photos to the cloud, and they’ll be available on your new iPhone.
Regardless of the method you choose, it’s important to ensure that your photos are backed up before transferring them. This will prevent any potential data loss and give you peace of mind knowing that your cherished memories are safely stored.
In the end, transferring photos from your old iPhone to a new one doesn’t have to be a complicated process. With these methods at your disposal, you can effortlessly transfer and preserve your precious memories on your new device. So go ahead, explore the options available, and enjoy the convenience of having your favorite photos right at your fingertips.
Conclusion
Transferring photos from an iPhone to another iPhone is a simple and straightforward process that allows you to seamlessly migrate your cherished memories to your new device. By utilizing various methods such as iCloud, iTunes, or third-party apps, you can easily transfer your photos in just a few clicks.
Whether you prefer the convenience of wireless syncing through iCloud, the flexibility of using iTunes, or the versatility of third-party apps, the ultimate goal remains the same – moving your photos from one iPhone to another with ease.
Remember to consider factors such as available storage space, internet connection, and security when deciding on the best method for transferring your photos. Additionally, regularly backing up your photos and utilizing cloud storage services can help ensure the safety and accessibility of your precious memories.
With these methods at your disposal, you can confidently switch to a new iPhone without the fear of losing your valuable photos. Embrace the seamless transition and continue capturing new memories on your upgraded device.
FAQs
Q: Can I transfer photos from one iPhone to another without using iCloud?
A: Yes, there are several ways to transfer photos from one iPhone to another without using iCloud. You can use AirDrop, iTunes, or third-party apps like iMazing or AnyTrans.
Q: How can I transfer photos using AirDrop?
A: To transfer photos using AirDrop, make sure both iPhones have AirDrop enabled. Open the Photos app on the source iPhone, select the photos you want to transfer, tap the Share button, and choose the destination iPhone from the AirDrop recipients.
Q: Can I transfer photos from iPhone to iPhone using iTunes?
A: Yes, you can transfer photos from iPhone to iPhone using iTunes. Connect the source iPhone to your computer, open iTunes, select the device, go to the “Photos” tab, choose the albums or folders you want to transfer, and then sync the photos to the destination iPhone.
Q: Are there any third-party apps to transfer photos between iPhones?
A: Yes, there are many third-party apps available that can help you transfer photos between iPhones. Some popular options include iMazing, AnyTrans, and Google Photos. These apps offer additional features and flexibility compared to the built-in methods.
Q: Can I transfer photos from iPhone to iPhone using Google Photos?
A: Yes, you can transfer photos from iPhone to iPhone using Google Photos. Install the Google Photos app on both iPhones, sign in with the same Google account, upload the photos from the source iPhone to Google Photos, and then download them on the destination iPhone.