
Are you looking for a hassle-free way to transfer the contents of your SD card to your iPhone? Look no further! In this article, we will guide you through the process of transferring files from an SD card to your iPhone using simple and easy-to-follow steps.
With the ever-increasing storage capacity of mobile phones, it’s common for many iPhone users to rely on external memory cards to store media files such as photos, videos, and documents. However, when it comes to accessing those files on your iPhone, it might not be as straightforward as inserting the SD card into a card reader.
Whether you want to transfer photos from your digital camera’s SD card to your iPhone, or you have important documents stored on your SD card that you need for work or personal purposes, we’ve got you covered. Follow our step-by-step guide and you’ll be able to easily transfer your SD card contents to your iPhone in no time!
Inside This Article
- How To Transfer SD Card To iPhone
- Overview
- Method 1: Using a Lightning to SD Card Camera Reader
- Method 2: Using a Third-Party File Transfer App
- Method 3: Using a Computer and iTunes
- Conclusion
- FAQs
How To Transfer SD Card To iPhone
Transferring files from an SD card to your iPhone can be a convenient way to access and manage your media on-the-go. Whether you want to transfer photos, videos, or documents, there are multiple methods you can use. In this article, we will explore three different ways to transfer files from an SD card to your iPhone.
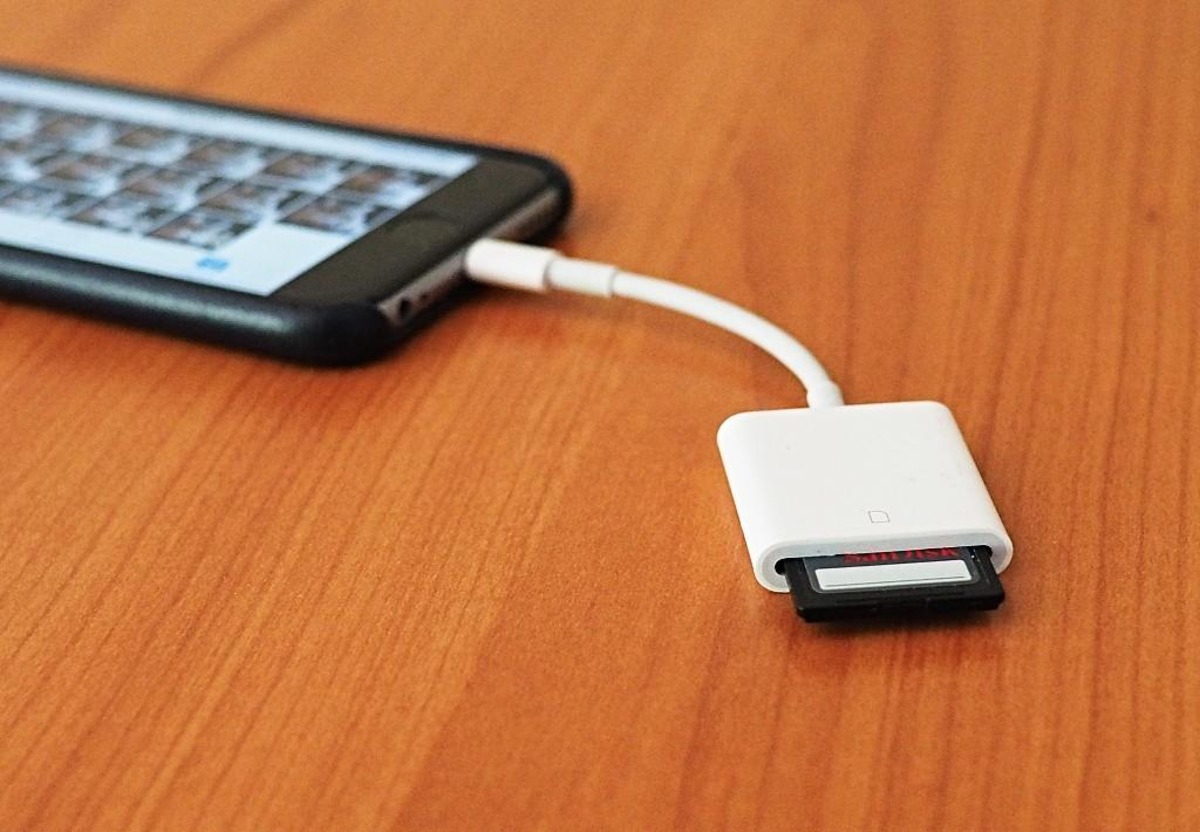
Method 1: Using a Lightning to SD Card Camera Reader
The easiest and most straightforward method to transfer files from an SD card to your iPhone is by using a Lightning to SD Card Camera Reader. This accessory plugs directly into your iPhone’s Lightning port and provides a slot for you to insert your SD card. Once connected, your iPhone will automatically recognize the SD card and display the contents within the Files app.
To transfer files, simply select the files you want to transfer, then tap the “Share” button. From here, you can choose to save the files to your iPhone, iCloud Drive, or any other cloud storage service linked to your device. This method is ideal for transferring photos and videos from a digital camera or a drone directly to your iPhone.
Method 2: Using a Third-Party File Transfer App
If you don’t have a Lightning to SD Card Camera Reader, or if you want more control over the file transfer process, you can use a third-party file transfer app. There are many apps available on the App Store that allow you to transfer files from an SD card to your iPhone wirelessly.
One popular app is “FileBrowser” which enables you to connect to an SD card reader via Wi-Fi or Bluetooth. Once connected, you can browse the contents of your SD card and easily transfer files to your iPhone’s internal storage or cloud storage services. These apps often offer additional features like file organization, media playback, and cloud integration.
Method 3: Using a Computer and iTunes
If you have access to a computer with iTunes installed, you can transfer files from an SD card to your iPhone using the traditional method of syncing with iTunes. First, connect your iPhone to the computer using a USB cable. Open iTunes and select your device. Go to the “Files” tab and check the box for “Sync with this iPhone over Wi-Fi.”
Next, insert the SD card into your computer using an SD card reader. Within iTunes, click on the “File Sharing” section and select the app you want to transfer files to. From here, you can simply drag and drop the files from the SD card to the app’s document area. Once the transfer is complete, disconnect your iPhone from the computer and open the app to access the transferred files.
These three methods provide different options for transferring files from an SD card to your iPhone. Choose the method that suits your needs and preferences the best. Whether you prefer the convenience of a Lightning to SD Card Camera Reader, the wireless capabilities of a file transfer app, or the familiarity of using iTunes, you can easily transfer files and enjoy your media on your iPhone.
Overview
Transferring data from an SD card to an iPhone can be a bit challenging since iPhones do not have a built-in SD card slot. However, there are several methods available to accomplish this task. In this article, we will explore three different methods that you can use to transfer data from your SD card to your iPhone.
Method 1 involves using a Lightning to SD Card Camera Reader. This handy accessory connects directly to your iPhone’s lightning port and allows you to transfer photos, videos, and other files from your SD card to your iPhone with ease.
Method 2 utilizes a third-party file transfer app. There are various apps available on the App Store that are specifically designed for this purpose. These apps provide you with a user-friendly interface and the ability to import and manage your files from the SD card on your iPhone.
Method 3 requires the use of a computer and iTunes. By connecting your iPhone to your computer, you can use iTunes to import the files from your SD card to your computer. Once the files are on your computer, you can then sync them with your iPhone using iTunes.
Each of these methods has its own advantages and suitability depending on your specific needs and preferences. In the following sections, we will dive deeper into each method, providing step-by-step instructions to help you successfully transfer data from your SD card to your iPhone.
Method 1: Using a Lightning to SD Card Camera Reader
If you want to transfer data from your SD card to your iPhone, one of the easiest and most convenient methods is by using a Lightning to SD Card Camera Reader. This handy accessory allows you to directly connect your SD card to your iPhone and transfer photos, videos, and other files in a matter of minutes.
To get started, you’ll need to have the Lightning to SD Card Camera Reader, which can be purchased from the Apple Store or other retail outlets. Once you have the reader, follow these simple steps:
- Insert your SD card into the SD Card Camera Reader. Make sure it is securely inserted.
- Connect the Lightning end of the reader to the Lightning port on your iPhone.
- Your iPhone will automatically detect the SD card and launch the Photos app.
- In the Photos app, you’ll see a new “Import” option at the bottom of the screen. Tap on it.
- By default, all the photos and videos on the SD card will be selected for import. If you want to import only specific files, you can tap on them to deselect them.
- Once you’ve made your selection, tap on the “Import X Selected” button. The X represents the number of selected files.
- Wait for the transfer to complete. The time it takes will depend on the number and size of the files being transferred.
- After the transfer is complete, you can choose to keep or delete the files on the SD card.
It’s important to note that the Lightning to SD Card Camera Reader only supports certain file formats, such as JPEG and RAW image files, as well as standard video formats. If you have files in other formats, you may need to convert them before transferring them to your iPhone.
This method is not only convenient but also allows you to free up space on your SD card for more photos and videos. Plus, you can easily access and view the transferred files directly on your iPhone.
So, if you’re looking for a quick and hassle-free way to transfer data from your SD card to your iPhone, using a Lightning to SD Card Camera Reader is an excellent option to consider.
Method 2: Using a Third-Party File Transfer App
If you’re looking for an alternative method to transfer files from your SD card to your iPhone, you can consider using a third-party file transfer app. These apps offer a convenient way to transfer and manage files between different devices, including your SD card and iPhone. Let’s walk through the steps to use this method.
1. Download a Third-Party File Transfer App: Start by browsing the App Store and finding a reliable file transfer app that suits your needs. Some popular options include FileMaster, Documents by Readdle, and iFile. Make sure to check user reviews and ratings to ensure the app is trustworthy.
2. Install the App: After selecting the app, download and install it on your iPhone. Open the app and grant the necessary permissions if prompted.
3. Connect the SD Card: Depending on the app, you will either need to connect your SD card directly to your iPhone using a compatible SD card reader or connect it to a computer and enable file sharing.
4. Transfer Files: Once your SD card is connected, navigate to the file transfer section within the app. You will typically find options to browse your SD card and select the files or folders you wish to transfer. Select the files you want to transfer and tap on the “Transfer” or “Import” button.
5. Choose the Destination: The app will prompt you to choose where you want to transfer the files. Select your iPhone’s internal storage or a specific folder within the app where you want to save the transferred files.
6. Monitor the Transfer: The app will initiate the file transfer process, which may take some time depending on the file size and the speed of your SD card and iPhone. Keep an eye on the progress bar or any visual indicators provided by the app to monitor the transfer status.
7. Access the Transferred Files: Once the transfer is complete, you can access the transferred files within the app’s file management system. You can preview, organize, and manage the files as needed.
Using a third-party file transfer app can be a great solution for transferring files from your SD card to your iPhone, especially if you prefer a wireless method or if you don’t have access to a computer. Remember to always choose a reliable app and follow the instructions provided by the app developers for a smooth and secure file transfer process.
Method 3: Using a Computer and iTunes
If you prefer to transfer the files from your SD card to your iPhone using a computer, you can rely on the tried and true method of using iTunes. Although iTunes is primarily used for managing music and other media on your iPhone, it also allows for file transfers between devices.
Here’s how you can transfer your SD card files to your iPhone using a computer and iTunes:
- Connect your SD card to your computer using an SD card reader. Make sure your computer recognizes the SD card.
- Open iTunes on your computer. If you don’t have iTunes installed, you can download and install it from the Apple website.
- Connect your iPhone to your computer using a USB cable. Make sure your iPhone is unlocked and trust the computer if prompted.
- In iTunes, click on the device icon at the top left corner of the window to access your iPhone’s summary page.
- Click on the “File Sharing” option in the sidebar on the left. You should see a list of apps that support file sharing.
- Scroll down to the bottom of the page and click on the app where you want to transfer the files. If the app is not listed, you may need to install it from the App Store.
- Click on the “Add” button and navigate to the location where your SD card is listed under “Devices” or “My Computer”. Select the files you want to transfer and click “Open”.
- Wait for the files to upload to your iPhone. The time it takes will depend on the size of the files and the speed of your computer.
- Once the transfer is complete, disconnect your iPhone from your computer and open the app where you transferred the files. You should now see the files from your SD card on your iPhone.
Using a computer and iTunes to transfer files from your SD card to your iPhone gives you more control over the process. You can select specific files to transfer and organize them within the app of your choice. However, keep in mind that you will need a computer and a USB cable to complete the transfer.
Conclusion
Transferring your SD card to your iPhone can open up a world of possibilities. With the ability to quickly and seamlessly transfer photos, videos, and other files, you can easily expand your device’s storage and access your important data on the go. Whether you’re looking to free up space on your SD card or simply want to have all your files in one place, the process is simple and efficient.
By following the steps outlined in this article, you can successfully transfer your SD card to your iPhone without any hassle. Remember to ensure compatibility between your SD card and iPhone, as well as make use of a reliable adapter or a third-party software if needed. With a few simple steps, you’ll be able to enjoy the convenience of having all your files at your fingertips.
So, go ahead and transfer your SD card to your iPhone today. Explore the possibilities and never worry about running out of storage again!
FAQs
1. Can I transfer the content from my SD card to my iPhone?
Yes, you can transfer content from an SD card to an iPhone. However, iPhones do not have built-in SD card slots, so you will need to use an external accessory or adapter to make the transfer. There are several options available in the market that allow you to connect your SD card to your iPhone through lightning or USB-C ports.
2. What are the options for transferring SD card content to my iPhone?
There are a few different options available for transferring SD card content to your iPhone. One option is to use a lightning to SD card reader adapter, which plugs into your iPhone’s lightning port and allows you to directly insert your SD card. Another option is to use a USB-C to SD card reader adapter if you have the latest iPhone models that use USB-C ports.
3. Are there any apps that can help with transferring SD card content to my iPhone?
Yes, there are several apps available on the App Store that can assist with transferring SD card content to your iPhone. These apps usually work in conjunction with the external accessories or adapters mentioned earlier. They provide a user-friendly interface and allow you to easily manage and transfer files between your SD card and iPhone.
4. Can I transfer specific files or do I have to transfer everything from the SD card?
When transferring content from your SD card to your iPhone, you have the flexibility to choose which files you want to transfer. Depending on the app or method you are using, you can select specific files or folders to transfer, or you can transfer the entire contents of the SD card. This gives you control over the transfer process and allows you to only bring over the files you need.
5. What can I do with the transferred content on my iPhone?
Once you have transferred the content from your SD card to your iPhone, you can use it in a variety of ways. For example, you can view photos and videos, listen to music, access documents, or use any other files or applications that are compatible with your iPhone. By transferring content to your iPhone, you can have easy access to your files on the go, without the need for an SD card reader or other external devices.