
Are you struggling to find imports in the Photos app on your iPhone or iPad? Well, you’re not alone. With the ever-increasing number of photos and videos captured on our devices, locating imported files can sometimes be a challenge. But fear not, we’re here to help guide you through the process.
In this comprehensive guide, you’ll discover step-by-step instructions on how to find imports in the Photos app on your iPhone and iPad. Whether you’re looking for recently imported photos or videos, or trying to locate specific imported media files, we’ve got you covered. So, let’s dive in and unlock the secrets of managing imports in the Photos app on iOS devices.
Inside This Article
- Importing Photos from Camera
- Importing Photos from an SD Card
- Importing Photos from Other Devices
- Importing Photos from iCloud
- Importing Photos from a Camera or SD Card
- Importing Photos from a Computer or Cloud Storage
- Organizing Imported Photos into Albums
- Troubleshooting Import Issues
- Conclusion
- FAQs
How to Find Imports in the Photos App on an iPhone & iPad
Do you have an iPhone or iPad and want to know how to find your imported photos in the Photos app? Look no further! In this article, we will walk you through the process of finding your imports in the Photos app on an iPhone or iPad. Whether you have imported photos from a camera, an SD card, or other devices, we’ve got you covered.
Importing Photos from Camera
If you have recently taken photos with a camera and want to import them to your iPhone or iPad, follow these simple steps:
- Connect your camera to your iPhone or iPad using a USB cable or an adapter.
- Open the Photos app on your device.
- In the lower right corner, tap on the “Import” option.
- The Photos app will automatically detect your camera and display the imported photos in a grid.
- Select the photos you want to import by tapping on them.
- Tap the “Import Selected” button to import the selected photos to your device.
Once the import process is complete, you can find your imported photos in the “Imports” album within the Photos app.
Importing Photos from an SD Card
If you have photos stored on an SD card and want to import them to your iPhone or iPad, here’s what you need to do:
- Insert the SD card into an SD card reader or an adapter.
- Connect the SD card reader or adapter to your iPhone or iPad using the Lightning or USB-C port.
- Open the Photos app on your device.
- In the lower right corner, tap on the “Import” option.
- The Photos app will automatically detect the SD card and display the imported photos in a grid.
- Select the photos you wish to import by tapping on them.
- Tap the “Import Selected” button to import the selected photos to your device.
After the import process is finished, you can locate your imported photos in the “Imports” album within the Photos app.
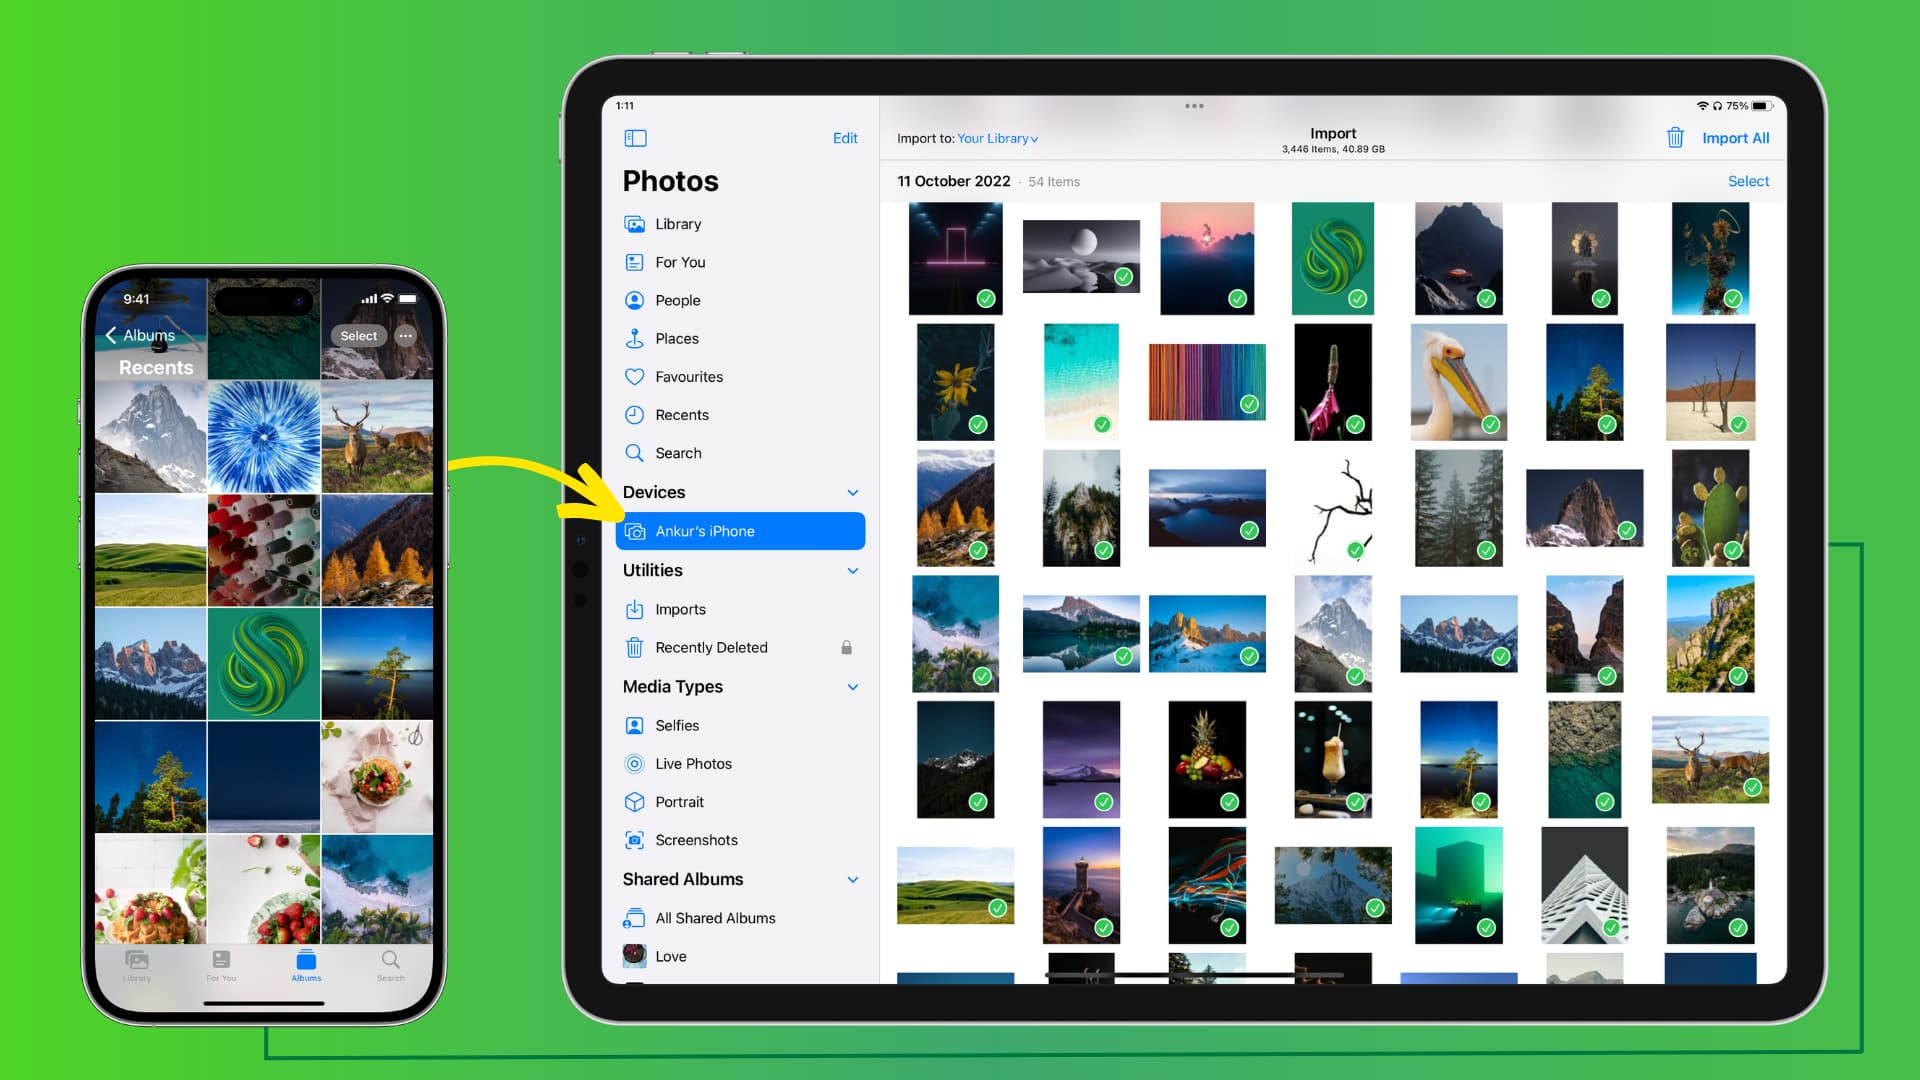
Importing Photos from Other Devices
If you have photos on other devices, such as another iPhone, iPad, or a Mac, and want to import them to your current iPhone or iPad, follow these steps:
- Ensure that the other device and your iPhone or iPad are connected to the same Wi-Fi network.
- On the other device, open the Photos app and select the photos you want to import.
- Tap the Share button, usually indicated by a square with an arrow pointing outwards.
- In the sharing options, select your iPhone or iPad from the available devices.
- On your iPhone or iPad, you will receive a notification asking if you want to import the photos.
- Tap “Import” to initiate the import process.
Once the import is complete, you can find your imported photos in the “Imports” album within the Photos app.
Importing Photos from iCloud
If you have photos stored in iCloud and want to import them to your iPhone or iPad, here’s how you can do it:
- Go to the Settings app on your iPhone or iPad.
- Scroll down and tap on your name at the top of the menu.
- Select “iCloud” from the options.
- Under “Apps using iCloud,” make sure the toggle switch next to “Photos” is turned on.
- Open the Photos app on your device.
- Your iCloud photos will automatically sync and appear in the “Imports” album.
That’s it! Now you know how to find your imported photos in the Photos app on an iPhone or iPad. Whether you have imported photos from a camera, an SD card, other devices, or iCloud, you can easily locate them in the “Imports” album. Enjoy organizing and viewing your precious memories!
Importing Photos from a Camera or SD Card
One of the key features of the Photos app on an iPhone or iPad is the ability to import photos directly from a camera or an SD card. This convenient functionality allows you to easily transfer your photos onto your Apple device and organize them within the Photos app. Here’s a step-by-step guide on how to import photos from a camera or SD card:
Step 1: Connect your Camera or SD Card
Begin by connecting your camera or SD card to your iPhone or iPad using the appropriate cable or adapter. If you’re connecting a camera, make sure it’s turned on and set to the appropriate mode for transferring photos. If you’re using an SD card, ensure that it’s securely inserted into the SD card slot or adapter.
Step 2: Open the Photos App
Once your camera or SD card is connected, unlock your iPhone or iPad and locate the Photos app on your home screen. Tap on the app icon to open it.
Step 3: Access the Import Screen
Within the Photos app, you should see a “Import” tab at the bottom of the screen. Tap on it to access the import screen, where you can view all the available photos on your camera or SD card.
Step 4: Select Photos to Import
In the import screen, you will see thumbnails of all the photos on your camera or SD card. Scroll through the photos and tap on each one that you want to import. Selected photos will have a blue checkmark icon on them. You can also tap on the “Select All” option at the top of the screen to import all the photos at once.
Step 5: Choose Import Destination
After selecting the photos you want to import, scroll to the bottom of the screen. You will see the option to choose an album or create a new album for storing the imported photos. Tap on the desired album or create a new one by tapping on the “New Album” option.
Step 6: Start Importing
Once you’ve chosen the import destination, tap on the “Import All” or “Import Selected” button at the bottom right corner of the screen. The Photos app will now start importing the selected photos from your camera or SD card to the chosen album on your device. The progress will be displayed on the screen, and you can monitor the import process.
Step 7: Complete the Import
Once the import process is complete, you will see a confirmation message on the screen. You can now disconnect your camera or SD card from your iPhone or iPad.
Step 8: View and Organize Imported Photos
To view and organize the imported photos, navigate to the album you selected during the import process. Open the album and you will find all the imported photos there. From here, you can further organize the photos by adding captions, editing them, or creating additional albums.
Importing photos from a camera or SD card to the Photos app on your iPhone or iPad is a seamless process that allows you to easily access and enjoy your captured memories. Whether you’re a professional photographer or an avid traveler, this feature provides a hassle-free way to quickly transfer photos to your iOS device.
So, next time you want to import your photos, follow this step-by-step guide and make the most out of the Photos app on your iPhone or iPad!
Importing Photos from a Computer or Cloud Storage
If you have photos stored on your computer or cloud storage, you can easily import them into the Photos app on your iPhone or iPad. This allows you to access and organize your photos seamlessly across all your devices. Here’s how to do it:
1. Connect your iPhone or iPad to your computer using a USB cable.
2. On your computer, open iTunes or Finder (if you’re using macOS Catalina or later).
3. In iTunes or Finder, select your device and navigate to the “Photos” tab.
4. Check the box next to “Sync Photos” or select the specific folder or application from which you want to import photos.
5. Choose whether you want to sync all photos or selected albums/folders.
6. Click on the “Apply” or “Sync” button to start the syncing process.
7. Once the syncing is complete, open the Photos app on your iPhone or iPad.
8. You should see the imported photos in the “Imports” album. Tap on it to view and organize the imported photos.
Alternatively, if your photos are stored in cloud storage such as iCloud, Google Drive, or Dropbox, you can use the respective apps to import the photos to your iPhone or iPad:
1. Download and install the cloud storage app from the App Store.
2. Open the app and sign in with your account credentials.
3. Locate the photos you want to import and select them.
4. Tap on the “Share” button or the ellipsis (…) icon.
5. Choose the “Save to Files” option.
6. Select the destination folder or create a new one.
7. Tap on “Save” to import the photos to your iPhone or iPad.
8. Once imported, open the Photos app to view and organize the imported photos.
By following these simple steps, you’ll be able to import photos from your computer or cloud storage into the Photos app on your iPhone or iPad. This allows you to keep all your precious memories in one place and easily access them whenever you want.
Organizing Imported Photos into Albums
Once you have successfully imported your photos into the Photos app on your iPhone or iPad, it’s time to organize them into albums. Creating albums allows you to categorize your photos and access them quickly without scrolling through your entire photo library. Here’s how you can organize your imported photos into albums:
1. Open the Photos app on your iPhone or iPad.
2. Tap on the “Albums” tab located at the bottom of the screen.
3. To create a new album, tap on the “+” button labeled “New Album.”
4. Give your album a name and tap “Save.” You can name it based on the event, location, or any other category that makes sense to you.
5. To add photos to the album, tap on the album name and then tap on the “+” button labeled “Add Photos.”
6. Select the photos you want to add to the album from your photo library. You can tap on each photo individually or use the “Select” button to choose multiple photos at once.
7. Once you’ve selected the photos, tap “Done” to add them to the album.
8. Repeat steps 3 to 7 to create and add photos to multiple albums.
Organizing your imported photos into albums not only helps you keep them organized but also makes it easier to share specific sets of photos with family and friends. You can access your albums anytime by going to the Albums tab in the Photos app.
Remember, you can also edit and rearrange your albums by tapping on the “Edit” button in the top-right corner of the Albums tab. From there, you can drag and drop the albums to change their order or tap on the album name to rename it.
By following these simple steps, you can effectively organize your imported photos into albums and enjoy a more efficient browsing experience in the Photos app on your iPhone or iPad.
Troubleshooting Import Issues
Importing photos from your camera or SD card to the Photos app on your iPhone or iPad is usually a seamless process. However, there may be instances where you encounter import issues that prevent you from transferring your photos successfully.
If you’re facing import problems, don’t worry! There are several troubleshooting steps you can take to resolve the issue and get your photos imported smoothly. Here are some common import issues and their solutions:
- Check the connection: Ensure that your camera or SD card is securely connected to your iPhone or iPad. Sometimes, a loose connection can cause import problems. Disconnect and reconnect the device to establish a stable connection.
- Restart your device: A simple restart can often solve minor software glitches that may be interfering with the import process. Hold down the power button and slide to power off your device. After a few seconds, press the power button again to turn it back on and try importing the photos again.
- Update your device and Photos app: Outdated software can sometimes lead to compatibility issues. Make sure your iPhone or iPad, as well as the Photos app, are updated to the latest versions available. Go to Settings > General > Software Update to check for and install any available updates.
- Free up storage space: Insufficient storage space on your device can hinder the import process. Delete unnecessary photos, videos, or apps to free up space for the new imports. You can also transfer some files to an external storage device or upload them to a cloud service like iCloud to create more room on your device.
- Try a different cable or adapter: If you’re using a cable or adapter to connect your camera or SD card to your iPhone or iPad, it’s possible that the cable or adapter is faulty. Try using a different cable or adapter to see if it resolves the import issue.
- Verify file formats: Some file formats may not be compatible with the Photos app. Ensure that your photos are in a supported format, such as JPEG or HEIC. If you’re trying to import photos in a different format, you may need to convert them to a compatible format before importing.
- Reset the Photos app: If none of the above solutions work, you can try resetting the Photos app settings. Go to Settings > Photos and scroll down to the bottom. Tap on “Reset” and select “Reset All Settings.” This will not delete your photos, but it will reset the app’s preferences and settings, which may resolve the import issue.
By following these troubleshooting steps, you should be able to overcome import issues and successfully transfer your photos to the Photos app on your iPhone or iPad. If the problem persists, you may want to consider contacting Apple support for further assistance.
In conclusion, finding imports in the Photos app on an iPhone and iPad is a simple and convenient process. By following the steps outlined in this article, users can easily access their imported photos and videos and carry out various actions such as editing, organizing, and sharing. The Photos app offers a user-friendly interface and intuitive features that make it easy to navigate and manage your media files.
Whether you want to transfer photos from your computer, import from a camera, or download from cloud storage, the Photos app provides a seamless experience for keeping all your memories in one place. With its powerful search function and smart algorithms, finding specific imports becomes a breeze.
So don’t hesitate to explore the imports section of the Photos app on your iPhone or iPad. Enjoy the convenience and organization that this feature offers, and take full advantage of the amazing memories you’ve captured.
FAQs
1. How do I find imports in the Photos app on an iPhone or iPad?
To find imports in the Photos app on your iPhone or iPad, follow these steps:
- Open the Photos app on your device.
- Tap on the Albums tab at the bottom of the screen.
- Scroll down and locate the “Imports” album. Tap on it to open.
- Here you will find all the photos and videos you have imported to your device.
2. Can I delete imported photos from the Imports album?
Yes, you can delete imported photos from the Imports album in the Photos app. Simply open the Imports album, tap on the photo or video you wish to delete, and then tap on the trash bin icon. Confirm the deletion when prompted.
3. Are imported photos automatically organized into albums?
No, imported photos are not automatically organized into albums. When you import photos or videos to your iPhone or iPad, they are stored in the Imports album. To organize them further, you can create new albums and manually add photos to those albums.
4. How can I transfer imported photos from my iPhone or iPad to my computer?
To transfer imported photos from your iPhone or iPad to your computer, you can use various methods such as:
- Connecting your device to the computer with a USB cable and accessing the imported photos through the file explorer or Photos app (on Windows) or using the Photos app (on Mac).
- Using cloud storage services like iCloud, Google Drive, or Dropbox to sync and access the imported photos on your computer.
- Using third-party software or apps specifically designed for transferring photos from iOS devices to computers, such as iTunes, iMazing, or AirDrop.
5. Can I edit imported photos directly in the Imports album?
Yes, you can edit imported photos directly in the Imports album. Open the Imports album in the Photos app, select the photo you wish to edit, tap on the editing tools icon (usually represented by three horizontal sliders), and make the desired edits using the available tools and options.