
Are you in a situation where you need to un-invite someone from your Facebook event? Don’t panic! We’ve got you covered. In this article, we will guide you through the process of un-inviting someone from your Facebook event with ease. Whether it’s a change in plans, a miscommunication, or a change in guest list, we understand that circumstances may arise where you need to retract an invitation. By following our step-by-step instructions, you’ll be able to remove someone from your event and ensure a smooth and hassle-free planning process. Let’s dive in and discover how to un-invite someone from your Facebook event!
Inside This Article
- How to Un-Invite Someone from Your Facebook Event
- Accessing the Facebook Event
- Removing Someone from the Guest List
- Sending a Notification to the Un-Invited Person
- Managing Future Invitations
- Conclusion
- FAQs
How to Un-Invite Someone from Your Facebook Event
Hosting an event on Facebook can be a convenient way to invite friends, colleagues, and acquaintances to join in on the fun. However, there may be instances where you need to un-invite someone from your event. Whether it’s due to a change in plans, limited space, or any other reason, Facebook offers a simple and straightforward feature to help you handle these situations. In this article, we will guide you through the process of un-inviting someone from your Facebook event.
To successfully un-invite someone, you must first understand how the un-invite feature works on Facebook. When you un-invite someone, they will receive a notification stating that they have been removed from the event guest list. They will no longer have access to event details, updates, or be able to engage with event activities. It’s important to note that un-inviting someone does not block them or remove them as a friend on Facebook.
Now, let’s dive into the step-by-step guide on how to un-invite someone from your Facebook event:
- Accessing the Event Page: Open your Facebook account and navigate to the event page by clicking on “Events” located on the left sidebar of the homepage. Alternatively, you can search for the event in the Facebook search bar.
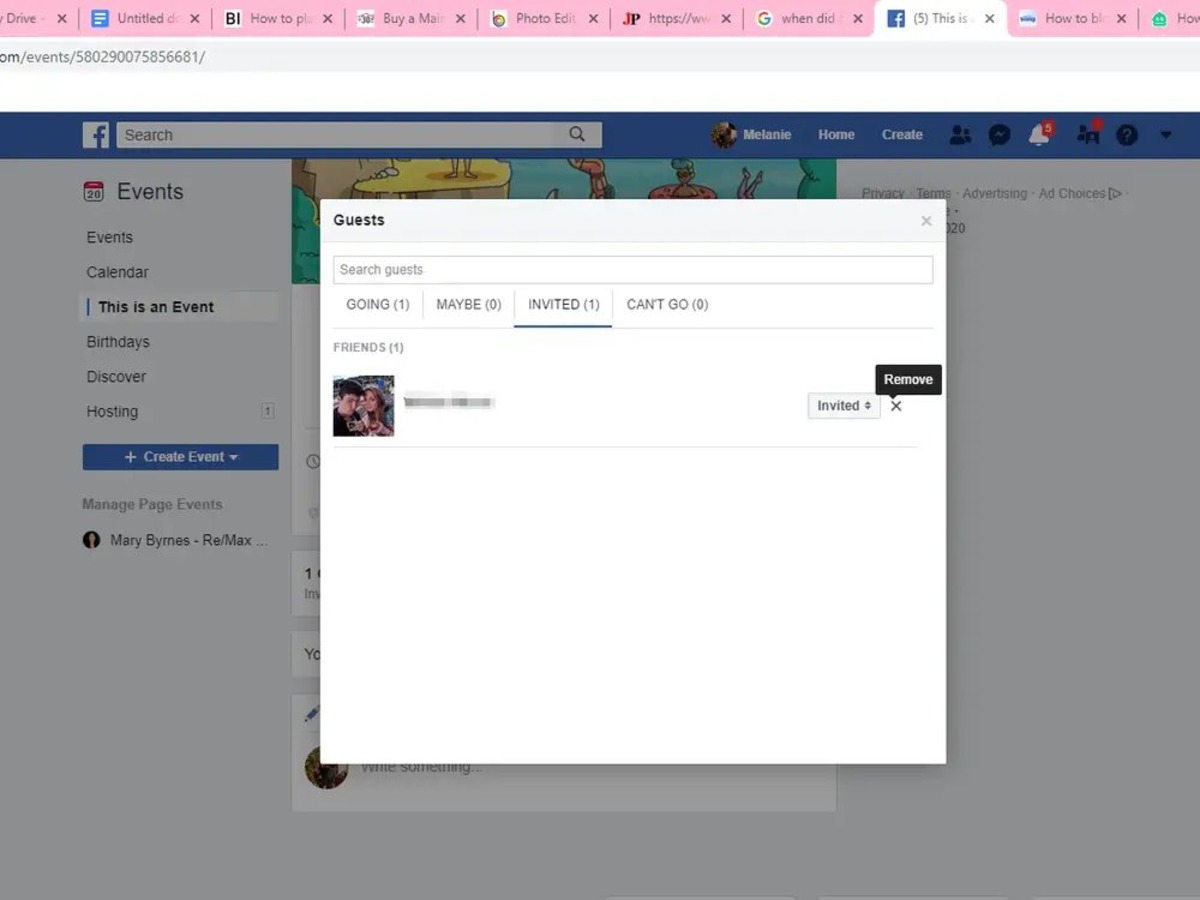
- Selecting the Guests Tab: Once on the event page, locate the “Guests” tab, usually found near the top or side of the page. Click on it to access the list of invited guests.
- Finding the Person to Un-invite: Scroll through the list of invited guests and locate the person you wish to un-invite. You can use the search bar provided on the page to quickly find their name.
- Un-inviting the Person: Once you have found the person you want to un-invite, hover your mouse over their name. A small “X” icon will appear next to their name. Click on it to un-invite them from the event. A confirmation pop-up may appear, asking you to confirm your decision. Click “Uninvite” to finalize the process.
When un-inviting someone from your Facebook event, it’s important to consider a few tips and guidelines:
- Communicate Personally with the Individual: If possible, reach out to the person you are un-inviting privately to let them know about the change in plans. This personal touch can help prevent any confusion or ill feelings.
- Explain the Reason for Un-inviting: If there is a specific reason behind un-inviting someone, it’s courteous to explain it to them. Be honest and respectful in your communication.
- Be Polite and Respectful: Un-inviting someone can be a sensitive matter, so it’s important to be polite and considerate throughout the process. Choose your words carefully and maintain a respectful tone.
Accessing the Facebook Event
To un-invite someone from your Facebook event, first, you need to access the event page. You can do this by following a few simple steps:
1. Log in to your Facebook account and navigate to your profile page.
2. On your profile page, locate the event you want to un-invite someone from. If the event is in the past, you can find it in the “Past Events” section. If the event is upcoming, it will be displayed in the “Upcoming Events” section.
3. Click on the event to open its dedicated page.
4. On the event page, you will find various options and tabs. Look for the “Guests” tab and click on it.
5. By clicking on the “Guests” tab, you will be directed to the list of people who have been invited to the event.
By successfully accessing the event page, you are now one step closer to un-inviting the person you wish to exclude from the event.
Removing Someone from the Guest List
Once you have accessed the event page and selected the Guests tab, you will be able to see a list of all the individuals who have been invited to the event. To remove someone from the guest list, simply follow these steps:
1. Find the person you want to un-invite from the event. You can use the search bar or manually scroll through the list to locate their name.
2. Once you have found the person, click on the three-dot menu icon next to their name. This will open a dropdown menu with additional options.
3. From the dropdown menu, select the “Remove from Guest List” option. You may be prompted to confirm the action.
4. After confirming, the person will be removed from the guest list, and they will no longer have access to the event details or receive any notifications.
It’s important to note that removing someone from the guest list is irreversible, so be sure to double-check before taking this action. Additionally, the person will not be notified directly that they have been un-invited, but they may notice that they no longer have access to the event.
Remember to consider any potential consequences before removing someone from the guest list. If you are unsure about un-inviting someone or if there are any conflicts, it may be better to address the issue directly with the individual rather than un-inviting them without any explanation.
Sending a Notification to the Un-Invited Person
Once you have successfully un-invited someone from your Facebook event, it is courteous to send them a notification to inform them about the change. This will help avoid any confusion or misunderstandings and maintain a clear line of communication.
To send a notification to the un-invited person:
- Go to the event page and click on the “Invite” button.
- In the search bar, type the name of the person you un-invited.
- Select their profile from the search results.
- Click on the “Message” button to open a chat window.
- Compose a polite and concise message explaining that the event details have been updated and they are no longer invited.
- Click “Send” to deliver the notification.
It is essential to maintain a respectful tone in your message and provide a brief explanation for the un-invitation. This will help alleviate any potential disappointment or confusion on the other person’s part.
Remember, sending a notification is not mandatory, but it is a considerate gesture. It shows that you value open communication and want to ensure that everyone involved is on the same page regarding the event.
Keep in mind that the person you un-invited may have already received a notification about the original invitation. Although you cannot undo this, sending a follow-up notification will help clarify the change in their status.
By taking the time to send a notification, you can maintain good social etiquette and minimize any potential negative feelings associated with the un-invitation.
Managing Future Invitations
When it comes to managing future invitations on Facebook, there are a few important factors to consider. Whether you’re organizing a recurring event or simply want to ensure a smooth guest management process, these tips will help you stay in control:
1. Review Your Guest List: Before sending out invitations for your next event, take the time to review your guest list. Make sure that the individuals you are inviting are still relevant and interested in attending. This will help you avoid the need to un-invite anyone later on.
2. Use Privacy Settings: Facebook offers privacy settings that allow you to control who can see and respond to your event invitations. Utilize these settings to ensure that only the intended audience receives your invites. This will help minimize the need for un-inviting individuals.
3. Set Clear Expectations: When creating an event, be clear about the details, expectations, and any limitations. By providing clear instructions from the start, you can help avoid misunderstandings and potential un-invitations in the future.
4. Be Mindful of Capacity: If your event has a limited capacity, make sure to keep track of the number of guests who have confirmed their attendance. Once the maximum capacity is reached, you can avoid the need to un-invite individuals by informing them that the event is at full capacity.
5. Send Invitations in Stages: Instead of sending out all your invitations at once, consider sending them in stages. This allows you to gauge the response rate and adjust your guest list accordingly. By sending invitations gradually, you can avoid the need to un-invite a large number of people if the event reaches its capacity.
6. Communicate Changes Promptly: If any changes or updates occur regarding the event, communicate them promptly to your guests. This includes changes in the date, time, location, or any other important details. By keeping your guests informed, you can minimize the chances of needing to un-invite someone due to unexpected changes.
7. Be Proactive in Handling Declines: If someone declines your invitation, take immediate action. Remove them from the guest list or make a note of their response so that you can manage your guest count effectively. This proactive approach will help you avoid last-minute un-invitations.
By following these tips and being proactive in managing your guest list, you can minimize the need for un-inviting individuals from your future Facebook events. Remember, clear communication and thoughtful planning are key to ensuring a smooth and enjoyable event for everyone involved.
Conclusion
Un-inviting someone from a Facebook event can be a delicate situation, but it is a feature that allows you to manage your guest list effectively. Whether it’s a change in plans, a personal matter, or any other reason, knowing how to un-invite someone can save you from potential conflicts or misunderstandings.
By following the steps outlined in this article, you can easily remove someone from your Facebook event without causing offense or harm to the relationship. Remember to approach the situation with empathy and honesty, and consider providing a brief explanation if necessary.
Remember, everyone’s presence at your event should contribute to a positive and enjoyable experience for all attendees. By managing your guest list properly, you can ensure that your event runs smoothly and that all participants are the right fit for the occasion.
So go ahead and confidently un-invite someone if the need arises, and enjoy your event without any unnecessary stress or complications.
FAQs
1. Can I un-invite someone from a Facebook event?
Yes, you can un-invite someone from a Facebook event. Facebook provides you with the flexibility to manage your guest list and remove any unwanted attendees.
2. How do I un-invite someone from a Facebook event on the desktop?
To un-invite someone from a Facebook event on the desktop, follow these steps:
1. Go to the event page on Facebook.
2. Click on the “Going” button or the number of attendees.
3. Locate the person you want to un-invite and click on the three-dot menu next to their name.
4. From the drop-down menu, select “Uninvite” to remove them from the guest list.
3. Can I un-invite someone from a Facebook event on mobile?
Yes, you can un-invite someone from a Facebook event on the mobile app. Here’s how:
1. Open the Facebook app on your mobile device.
2. Navigate to the event you want to manage.
3. Tap on the “Going” button or the number of attendees.
4. Find the person you wish to un-invite and tap on the three-dot menu next to their name.
5. Choose “Uninvite” from the options to remove them from the guest list.
4. Will the un-invited person be notified?
Yes, when you un-invite someone from a Facebook event, the person will receive a notification about the change. However, they will no longer have access to the event details or be included in any updates related to the event.
5. Can I re-invite someone I previously un-invited?
Yes, if you change your mind, you can re-invite someone you previously un-invited from a Facebook event. Simply follow the steps mentioned earlier for un-inviting, but this time select “Invite” instead of “Uninvite” to add them back to the guest list.