
Are you looking for a convenient way to share calendars with your friends, family, or coworkers? Look no further than the iPhone’s built-in feature for creating a shared calendar. With a shared calendar, you can easily coordinate events, appointments, and schedules with others, ensuring that everyone stays on the same page. Whether you need to plan a family vacation, schedule a team meeting, or organize a social gathering, the iPhone’s shared calendar feature provides a seamless solution. In this article, we will walk you through step-by-step instructions on how to create a shared calendar on your iPhone. So grab your iPhone, and let’s get started on maximizing the efficiency and organization of your daily life!
Inside This Article
- Overview of Shared Calendars
- Setting Up a Shared Calendar on iPhone
- Inviting Others to Share the Calendar
- Managing and Customizing the Shared Calendar
- Conclusion
- FAQs
Overview of Shared Calendars
Shared calendars offer a convenient way to collaborate and stay organized with family, friends, or co-workers. Whether you need to coordinate schedules for planning events, sharing important dates, or managing projects, a shared calendar on your iPhone can simplify the process.
With a shared calendar, you can easily view and edit appointments, events, and tasks together with other people. This ensures that everyone is on the same page and avoids conflicts or missed deadlines. Plus, it allows for seamless integration across devices, so you can access and update the calendar from your iPhone, iPad, or Mac.
Setting up a shared calendar on your iPhone is a straightforward process that can be done within a few simple steps. Once set up, you can invite others to join and start collaborating right away. Additionally, you have full control over the shared calendar, allowing you to manage and customize it according to your specific needs.
Whether you’re planning a family vacation, organizing team meetings, or simply staying connected with loved ones, a shared calendar on your iPhone is a valuable tool to streamline communication, enhance productivity, and keep everyone accountable.
Setting Up a Shared Calendar on iPhone
Having a shared calendar on your iPhone can be incredibly useful for keeping track of schedules, events, and appointments with friends, family, or colleagues. Whether you’re planning a group trip, organizing a team project, or simply want to coordinate activities with your loved ones, setting up a shared calendar on your iPhone is simple and convenient. Follow these easy steps to get started:
Step 1: Open the Calendar App
To begin, unlock your iPhone and open the Calendar app. You can typically find the app icon on your home screen.
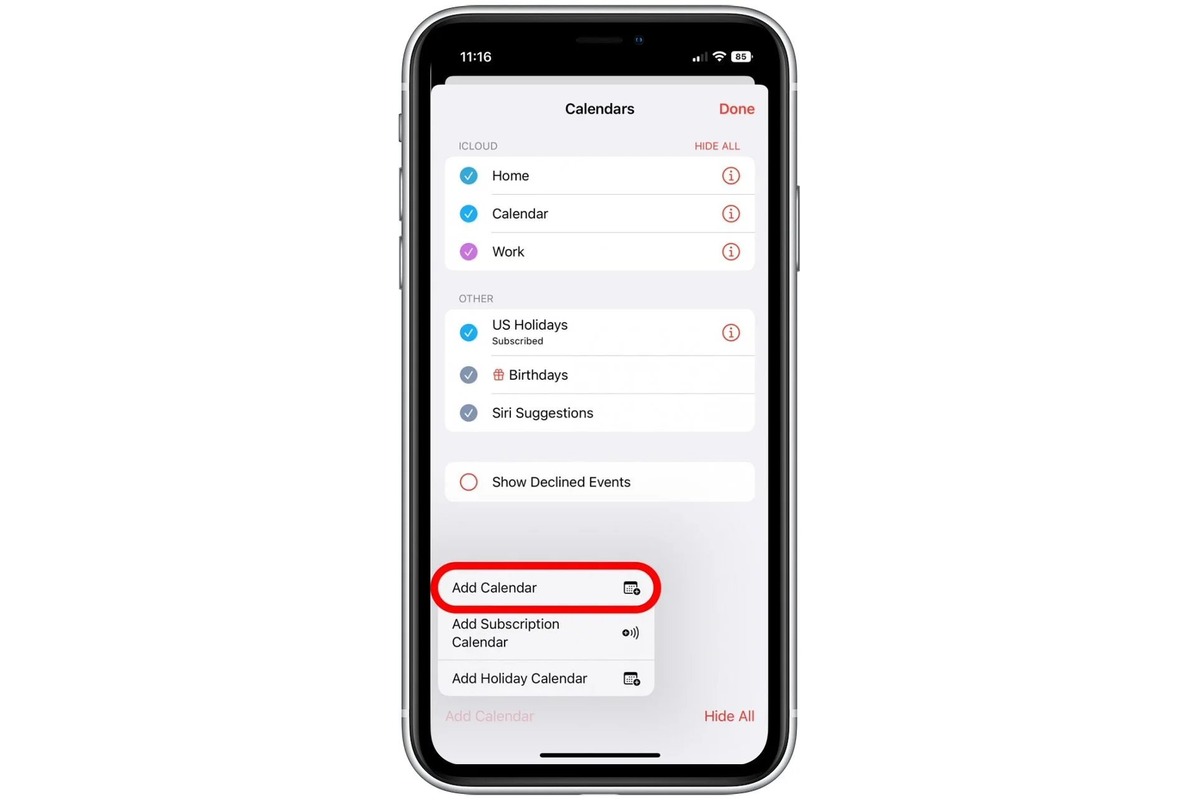
Step 2: Create a New Calendar
In the Calendar app, tap on the “Calendars” tab located at the bottom center of the screen. Next, tap on the plus (+) icon in the upper-right corner to create a new calendar.
Step 3: Give Your Calendar a Name
After tapping the plus (+) icon, a pop-up window will appear prompting you to enter a name for your new calendar. Choose a descriptive title that will help you and your collaborators easily identify the purpose of the calendar.
Step 4: Choose a Color
Once you’ve named your calendar, you will have the option to select a color for it. This allows you to differentiate it from other calendars you might have. Choose a color that is visually appealing and easy to recognize.
Step 5: Enable the “Public Calendar” Option
If you want to make your shared calendar accessible to others, enable the “Public Calendar” option. This allows anyone with the calendar’s link to view and subscribe to it. However, keep in mind that enabling this feature means that anyone with the link can access your calendar, so use caution when sharing sensitive information.
Step 6: Add Events and Invitations
Now that your shared calendar is set up, you can start adding events and invitations. To add an event, tap on the desired date and time in the Calendar app and provide the necessary details. If you want to invite others to the event, tap on the “Add Invitees” option and enter their email addresses or select them from your contacts.
Step 7: Share Your Calendar
To share your calendar with others, go back to the “Calendars” tab in the Calendar app and tap on the (i) icon next to your newly created shared calendar. From there, tap on the “Add Person” option, enter the email address or select from your contacts, and send an invitation via email.
By following these steps, you can easily set up a shared calendar on your iPhone and collaborate seamlessly with others. Whether it’s for work, school, or personal use, a shared calendar can help keep everyone on the same page and ensure that important events and appointments are never missed.
Inviting Others to Share the Calendar
One of the great features of a shared calendar on the iPhone is the ability to invite others to collaborate and share the calendar. This is incredibly helpful for coordinating events and schedules with friends, family, or colleagues. To invite others to share the calendar on your iPhone, follow these simple steps:
- Open the Calendar app on your iPhone. It’s the icon that looks like a calendar.
- Tap on the “Calendars” tab at the bottom of the screen to view all your calendars.
- Find the shared calendar you want to invite others to and tap on it to open it.
- In the upper-right corner, tap on the “Add” button. It looks like a plus sign or a person with a plus sign.
- A menu will appear with different options. Tap on “Email” or “Message” to send an invitation to the person you want to invite.
- If you choose “Email,” a new email draft will open with a pre-filled message containing the invitation and a link to the shared calendar. Simply enter the email address of the person you want to invite and tap “Send.”
- If you choose “Message,” a new text message draft will open with a pre-filled message containing the invitation and a link to the shared calendar. Enter the phone number or contact name of the person you want to invite and tap “Send.”
Once the person you invited receives the invitation, they can accept it to start sharing the calendar with you. They will be able to view and edit events, add new events, and receive notifications related to the shared calendar.
If you want to invite multiple people to share the calendar, you can repeat the above steps for each person you want to invite. Each person will receive a separate invitation and will be able to accept it individually.
If at any time you want to revoke someone’s access to the shared calendar, you can simply remove them from the list of shared participants. To do this, follow these steps:
- Open the shared calendar in the Calendar app.
- Tap on the “Calendars” tab at the bottom of the screen.
- Scroll down and find the participant you want to remove.
- Swipe left on their name and tap on the “Delete” button that appears.
- Confirm the removal by tapping “Remove” when prompted.
Removing a participant from the shared calendar will revoke their access, and they will no longer be able to view or edit events on the calendar.
Inviting others to share a calendar on your iPhone is a simple and efficient way to collaborate, coordinate, and stay organized. Whether it’s planning family events, coordinating work schedules, or organizing social activities, a shared calendar on the iPhone is a powerful tool that can help you stay connected and on top of your commitments.
Managing and Customizing the Shared Calendar
Once you have set up a shared calendar on your iPhone, you will have the ability to manage and customize it according to your preferences. Here are some tips on how to effectively manage and personalize your shared calendar:
1. Adding and editing events: To add an event to the shared calendar, simply open the Calendar app, tap on the desired date and time, and fill in the event details. You can edit or delete events in the shared calendar just like you would with your personal calendar.
2. Changing the color: By default, each shared calendar is assigned a specific color. However, you have the option to change the color to make it easier to distinguish from other calendars. Simply go to the Calendar app, tap on “Calendars” at the bottom, select the shared calendar, and choose a new color.
3. Setting reminders: To ensure that everyone stays updated on upcoming events, you can set reminders for the shared calendar. This way, everyone will receive a notification at the specified time to remind them of important events or appointments. To set a reminder, tap on the event in the shared calendar, select “Edit,” and choose the desired reminder settings.
4. Adjusting visibility: If you want to control who can see the details of the shared calendar, you can adjust its visibility settings. Go to the Calendar app, tap on “Calendars,” select the shared calendar, and toggle the “Allow Notifications” option. You can choose to allow all participants to see event details or limit visibility to only busy or free time.
5. Granting permissions: As the creator of the shared calendar, you have the ability to grant or revoke permissions for participants. If you want to allow others to add or edit events, go to the Calendar app, tap on “Calendars,” select the shared calendar, and toggle the “Allow Editing” option. You can also remove participants or resend invitations as needed.
6. Syncing with other devices: The shared calendar on your iPhone can be synced with other devices, such as iPads or Mac computers, to ensure seamless access and updates across all platforms. Simply sign in with the same Apple ID on each device and enable the synchronization option in the Calendar settings.
By effectively managing and customizing your shared calendar on iPhone, you can streamline communication and collaboration with others. Whether it’s coordinating schedules with family members, organizing team events, or planning group activities, a shared calendar can be a valuable tool for staying organized and efficient.
Conclusion
Shared calendars on your iPhone can be a game-changer when it comes to staying organized and coordinating with friends, family, or colleagues. With just a few simple steps, you can create, manage, and share calendars effortlessly.
By utilizing the built-in Calendar app or exploring third-party options, you can customize your calendar, set reminders, and even sync multiple calendars for different purposes.
Whether you need to plan events, collaborate with coworkers, or keep track of your personal schedule, having a shared calendar on your iPhone offers convenience and efficiency.
Take advantage of the power of shared calendars and never miss an important event or appointment again. Start exploring the possibilities today and experience a new level of organization and collaboration with your iPhone.
Here are some frequently asked questions about making a shared calendar on the iPhone:
FAQs
Q: Can I create a shared calendar on my iPhone?
Yes, you can create a shared calendar on your iPhone. It allows you to share events, appointments, and reminders with other users.
Q: How do I create a shared calendar on my iPhone?
To create a shared calendar on your iPhone, you can follow these steps:
- Open the Calendar app on your iPhone.
- Tap on the “Calendars” tab at the bottom of the screen.
- Click on the “Add Calendar” option.
- Enter a name for the shared calendar and choose a color.
- Toggle on the “Shared with” option.
- Enter the email addresses or names of the people you want to share the calendar with.
- Customize the sharing settings, such as allowing them to edit or view only.
- Tap on the “Add” button to create the shared calendar.
Q: Can I edit a shared calendar on my iPhone?
Yes, you can edit a shared calendar on your iPhone if you have been given permission to do so. Depending on the sharing settings, you may be able to add or modify events, change details, or delete entries.
Q: How do I invite someone to access my shared calendar on the iPhone?
To invite someone to access your shared calendar on the iPhone, you can follow these steps:
- Open the Calendar app on your iPhone.
- Tap on the “Calendars” tab at the bottom of the screen.
- Find the shared calendar you want to invite someone to.
- Tap on the “i” icon next to the calendar name.
- Scroll down to the “Shared with” section and tap on “Add Person”.
- Enter the email address or name of the person you want to invite.
- Select the appropriate sharing settings and tap on “Add” to invite them.
Q: Can I remove someone’s access to my shared calendar on the iPhone?
Yes, you can remove someone’s access to your shared calendar on the iPhone. To do so, follow these steps:
- Open the Calendar app on your iPhone.
- Tap on the “Calendars” tab at the bottom of the screen.
- Find the shared calendar you want to remove the person from.
- Tap on the “i” icon next to the calendar name.
- Scroll down to the “Shared with” section.
- Swipe left on the person’s name and tap on “Remove”.
- Confirm the removal by tapping on “OK”.
Q: How can I view a shared calendar on my iPhone?
To view a shared calendar on your iPhone, follow these steps:
- Open the Calendar app on your iPhone.
- Tap on the “Calendars” tab at the bottom of the screen.
- Scroll down to the “Other” section.
- Toggle on the shared calendar you want to view.