
Is your iPhone flashlight not working or having problems? Do not worry. It is a typical issue even Android flashlight users experience. Also, although the issue may have multiple potential causes, it might not be permanent. All you need to do is troubleshoot it through effective fixes, which we will share with you via this handy guide.
Inside This Article
- iPhone Flashlight Not Working: What Does It Mean Exactly?
- Must-Try Solutions for an iPhone Flashlight That’s Not Working
- Bonus Refresher: How to Enable the Flashlight on an iPhone
- What if the iPhone Flashlight is Still Malfunctioning?
iPhone Flashlight Not Working: What Does It Mean Exactly?
Before learning the fixes for an iPhone flashlight that is not working, let us define the problem this guide can address. That is because there are variations of it.
The “iPhone flashlight not working” issue may refer to your gadget’s flashlight not lighting up when activated or its camera flash not syncing when taking photos. Sometimes, the problem could also refer to the flashlight icon itself being inaccessible on your iPhone.
That said, you can stick to our guide no matter the issue. We have solutions that can work for each possible scenario. Thus, you can easily pick the one suitable for what you are experiencing.
Also read: iPhone Camera Not Working: What Are the Best Fixes?
Must-Try Solutions for an iPhone Flashlight That’s Not Working
There are plenty of fixes you can try when your iPhone flashlight is not working. We’ve listed them all below:
1. Close the Camera App
One of the lesser-known reasons why an iPhone flashlight is not working is the Camera app’s interference. The Camera app can control your iPhone’s flashlight while you are using it. This is because the flashlight is what the Camera app uses to enable flash photography.
As a result, having the Camera app open might interfere with regular flashlight functionalities. After all, the bulb used for the camera flash and torch-like function is the same. Thus, your iPhone might be confused with which instructions to follow. Does it follow the app’s flash settings or your current tinkering of the iPhone’s flashlight settings within the Control Center?
Thankfully, the said scenario is also the simplest problem to deal with; it only requires you to exit the app. Afterward, the issue where your iPhone flashlight is not working should disappear.
2. Reboot Your iPhone
Is your iPhone flashlight not working despite closing the Camera app? Reboot your iPhone. This is helpful because restarting your devices usually solves many different gadget issues that might have come up during use.
To do it on the latest iPhone models, simply press the power button until the gadget’s display shows a slider. Move the slider to the right side to initiate the shutdown process. Once the iPhone has shut down completely, press and hold the mentioned button once more. That will switch on the gadget. Afterward, check your iPhone’s flashlight to see if it is working or not.
3. Recharge the iPhone

Still wondering why your flashlight is not working? There might be a battery-related issue. Your iPhone could be out of juice; therefore, it cannot supply the flashlight with power. You can try to “resuscitate” your flashlight by powering up your iPhone.
4. Check for Software Updates
Your iPhone flashlight not working or its respective icon missing may be due to a software bug. Thus, updating your gadget’s operating system is another way to go. The method might not only fix the flashlight but other issues involving apps. Follow these instructions:
1. Access your iPhone’s Settings app.
2. Pick the “General” option.
3. Press “Software Update” and see whether an update is ready to install.
*If there is none, the iPhone will indicate that your device is up to date.
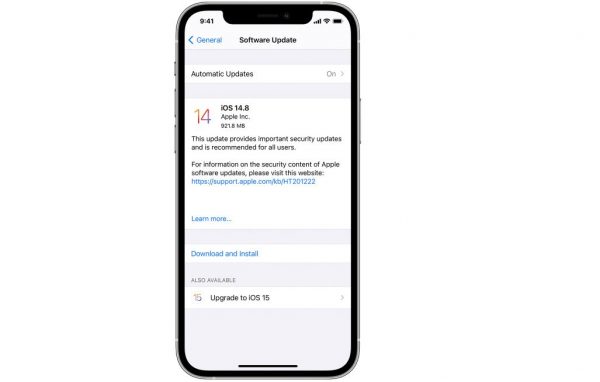
4. If a new version of the OS is available, go for “Download and Install”.
5. Wait for your gadget to finish upgrading its software.
Done already? Try using the iPhone’s flashlight again to determine if it is already functioning normally or not.
5. Revert iPhone Settings to Default
If OS updates did not remedy your iPhone flashlight that’s not working, it is time to make your iPhone revert to its default settings. Don’t worry, this reset would not cost you your data or erase your media on your iPhone. However, it will reset configurations such as those for your device’s wallpaper, alarms, networks, locations, privacy, and more. For this fix, do these:
1. Access the Settings app.
2. Press the option labeled “General”.
3. Hit “Reset”, then “Reset All Settings”.
4. Tap “Confirm” for your iPhone’s settings to return to their default state.
Once this is over, you may try to use your flashlight again and see if the problem no longer persists.
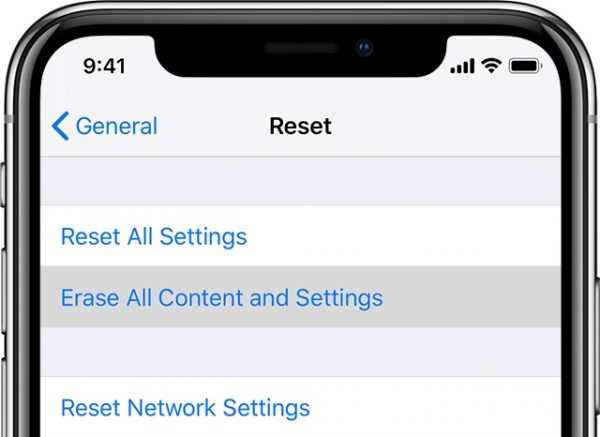
6. Restore Previous iPhone Backup
If the “iPhone flashlight not working” issue remains unsolved, you would just wish you could revert to when your iPhone was functioning smoothly. That can be done, but only if you have a backup of your gadget’s data. Here’s how to retrieve an iCloud or iTunes backup you have:
On iCloud
1. Confirm that your iPhone has been backed up on iCloud first.
*Head to Settings > iCloud > Manage Storage > Backups > This iPhone (shows backup size, date, other relevant information)
2. Once backup availability is verified, go back to the Settings app’s main interface.
3. Hit “General” to access the submenu.
4. From there, choose “Reset”.
5. Find and pick “Erase All Content and Settings”.
6. Tap on “Erase Now” and provide your passcode as needed.
7. Hit “Erase iPhone” afterward and input your Apple ID.
8. Hit “Erase” afterward.
9. Wait for the progress bar to be completed, then log in to iCloud.
10. Access the pane where “Apps & Data” is.
11. Hit the “Restore from iCloud Backup” option.
12. Pick the file to restore and do what the onscreen prompts tell you to do.
On iTunes
1. On your PC, head to the iTunes app.
2. Link your iPhone to the PC via a USB cable.
3. Click the top-left iPhone icon of the iPhone Summary section.
4. Head to the “Backups” pane.
5. Hit “Restore Backup”, then the file you need and its “Restore” option.
6. Enter your Apple ID to start the backup recovery process.
Restoring your iPhone’s backup via iTunes only transfers your data and settings. However, it does not redownload the apps, music, and photos you once had. To restore those, you will have to redownload everything you purchased and installed manually.
7. Restore iPhone’s Factory State
No backup or fine with your iPhone reverting to its out-of-the-box state? If yes, one of your remaining options for fixing your iPhone flashlight is a factory reset. Keep in mind that this fix will take a while and affect all your settings and data, so this must be a last resort.
The aftermath of a factory reset is the loss of all your configurations, information, media, and files on your iPhone. Only iOS and the pre-installed apps will remain. Thus, back up everything on your iPhone before doing the reset. For that, you may rely on our tutorials for making an iCloud backup or iPhone backup using a hard drive.
If you have a backup already, you can already perform a factory reset. Here’s a walkthrough to refer to:
1. Head to your gadget’s Settings interface.
2. From it, pick “General” then “Reset”.
3. Hit “Erase All Content and Settings”.
4. Provide your passcode once prompted.
5. Press “Erase” on the warning screen that follows to trigger a restart.
Once done, it will take a while before your iPhone wakes up. When the gadget already boots up in a fresh state, you can try using the iPhone flashlight again to see if it works.
8. Fix the Camera Flash

We’ve already discussed solutions that work for the regular flashlight functions and the universal ones. But what else can be done if the camera flash is not performing well? As mentioned earlier, we’ve got most scenarios covered, so here are some recommendations regarding that.
One is to remove anything that is covering the flash. It may be the case or film on your iPhone that is blocking the light.
If that does not help, use the Camera app to toggle flash settings. Swipe upward and tap the flash button you see on the screen. Afterward, choose a different setting or turn the flash on and off. You can then keep the configuration where your camera flash works fine.
Bonus Refresher: How to Enable the Flashlight on an iPhone
The Do-It-Yourself troubleshooting methods discussed best go with double-checking whether your iPhone flashlight is already working or not. Without the correct process, though, you would not know if the fixes work. So, if you are new to the iPhone or forgot a bit about how to enable the gadget’s flashlight function, this section is for you.
As a refresher or beginner’s tutorial, here is how to enable and configure the flashlight on your iPhone:
Ask Siri
Commanding Siri is one of the few good ways to turn on your iPhone’s flashlight. This method is handy if you have to do things hands-free. Say, you are having trouble turning on your iPhone’s flashlight because your hands are oily or dirty. Just give Siri a quick command, and your iPhone’s flashlight should immediately turn on.
To do this, say “Hey Siri” followed by a command to turn on your flashlight. It could either be in the form of a statement or question. Hence, both “Will you turn on my flashlight?” and “Turn on my flashlight” will work.
Do know that this method will only work if the “Hey Siri” setting is on. If you haven’t set it up, you can do so through these steps:
1. Navigate to your iPhone’s Settings app.
2. Search for and hit the “Siri & Search” option.
3. Toggle the “Listen for ‘Hey Siri’” and “Allow Siri When Locked” choices.
*The former will trigger Siri to set up and will prompt a voice recognition training to begin.
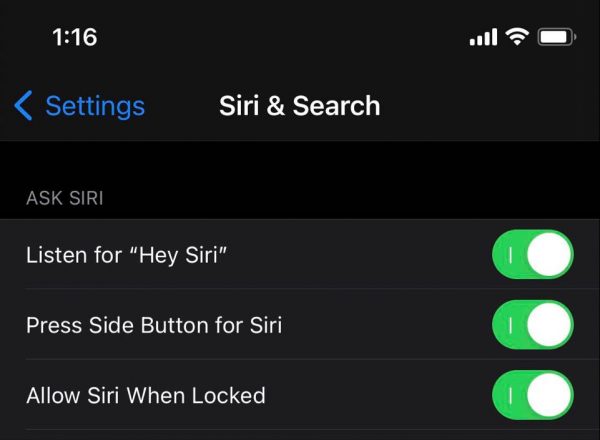
4. Next, tap “Continue” and comply with the instructions the iPhone displays.
5. Press “Done” to complete the process.
Do you know you can enable “Hey Siri” when your gadget’s screen is facing downward or covered? If you prefer to use the voice assistant that way, head to the Settings app. Then, go to “Accessibility.” Press “Siri” and move the slider for “Always Listen for Hey Siri” to the opposite direction.
Also read: ‘Hey Siri’ Not Working: How to Fix Your Voice Assistant
Via Control Center
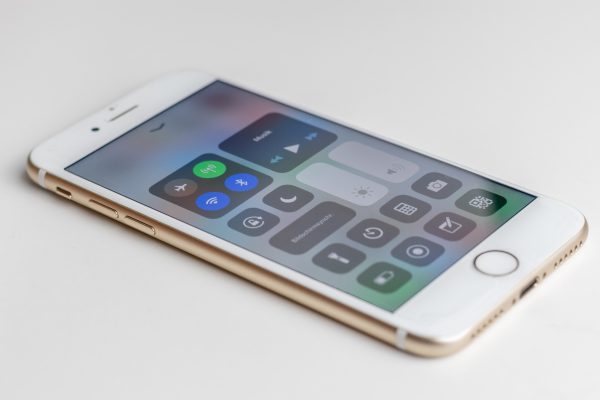
Don’t need voice control for your iPhone’s flashlight? Activate the flashlight via the Control Center on your Apple gadget instead. You can accomplish this with any iPhone, whether it supports Face ID or integrates the Home button. However, do note that the methods for devices with Face ID and those that do not have it are different. We’ll discuss both below.
With Face ID
If you have an iPhone or iPad that uses Face ID, you can open the Control Center through a gesture. To do this, swipe down from the top-right part of your display. Afterward, press the flashlight icon to use the flashlight. If your device is locked, you may press and hold the flashlight icon on the bottom-left portion of the display.
Apart from this, you can also increase or decrease the intensity of the light through the Control Center. Simply repeat the same gesture, but this time, long-press on the flashlight icon. Afterward, swipe up or down on the slider or tap on the intensity you want.
With Home Button
On an iPhone that integrates a Home button, drag your finger from the bottom to the middle of the home interface. Doing that will reveal the gadget’s Control Center. Afterward, the steps are the same: tap the flashlight icon to toggle the gadget’s light on or off. Likewise, you can press and hold the icon and swipe the slider to increase or decrease the intensity.
Via iPhone Camera
Lastly, you can enable the flashlight on your iPhone through the Camera app’s flash. To accomplish this, just launch the Camera app and swipe up or tap the up arrow on top. Then, tap the flash icon and select “On” to make the camera’s flash always on.
If you are in video mode, swipe up from the record button and look for the flash icon. Afterward, press it then tap “On.” That will turn the flash on, and it will remain on as long as you are in video mode — even if your camera is not recording.
Keep in mind that the flash option is only available in certain camera modes, including Cinematic, Slo-Mo, and Video. It is not something you can turn on in Panorama or Time-Lapse modes.
What if the iPhone Flashlight is Still Malfunctioning?
Even if the solutions are already done, the “iPhone flashlight not working” problem might persist. Also, you might be unable to test the flashlight after the fixes if there are other errors. If so, the culprits may be hardware-related.
In the said scenarios, ask for assistance from Apple Support or a certified technician. Note that getting a certified technician instead of a regular one is important if your gadget is still under warranty. This way, you may have your iPhone repaired for free.
Get Your iPhone Flashlight to Work Now
The iPhone’s flashlight might have a basic function, but it is very important as an emergency and photography tool. That’s why it remains a staple feature on mobile phones and causes you to worry when malfunctioning. Fortunately, there are many ways to get an iPhone flashlight that’s not working back to its normal state. You now know all the DIY fixes, thanks to this guide. So, fix your iPhone flashlight now, and feel free to share with us the solutions that were effective on your end!