
In today’s fast-paced digital world, cell phones have become an integral part of our lives. With advancements in technology, smartphones have evolved to offer a myriad of features and capabilities. One such feature is the ability to expand storage with a micro SD card. The Sony Xperia 1, a flagship smartphone by Sony, is known for its exceptional performance, stunning display, and top-notch camera. If you are a proud owner of the Sony Xperia 1 and are looking to optimize your storage capacity, formatting a micro SD card is a crucial step. But fret not! In this article, we will guide you through the process of formatting a micro SD card on your Sony Xperia 1, ensuring that you make the most of your smartphone’s storage capacity.
Inside This Article
- Sony Xperia 1: How to Format a Micro SD
- Why Format a Micro SD Card
- Precautions before Formatting
- Step-by-Step Guide to Format a Micro SD Card on Sony Xperia 1
- Troubleshooting Tips for Formatting Issues
- Conclusion
- FAQs
Sony Xperia 1: How to Format a Micro SD
If you own a Sony Xperia 1 and are looking to expand your storage capacity, formatting a micro SD card is the way to go. With a micro SD card, you can store more photos, videos, and files on your device. In this article, we will guide you through the process of formatting a micro SD card on your Sony Xperia 1, ensuring that you can utilize the additional storage space effectively.
Before we proceed with the formatting process, it’s important to note that formatting a micro SD card will erase all data stored on it. Therefore, it is crucial to back up any important files or data that you want to keep before proceeding. Once you have taken the necessary precautions, follow the steps below to format your micro SD card.
Step 1: Preparing your Xperia 1 for Formatting
To begin the formatting process, you need to ensure that your Sony Xperia 1 is prepared for the task. Here’s what you need to do:
- Insert the micro SD card into the designated slot of your Xperia 1.
- Go to the Settings menu by swiping down from the top of the screen and tapping the gear icon.
- Scroll down and select the “Storage” option.
- Under the “Storage” menu, you will see the option “SD Card.” Tap on it to access the micro SD card settings.
Step 2: Formatting the Micro SD Card on Xperia 1
Now that your Xperia 1 is ready, follow these steps to format the micro SD card:
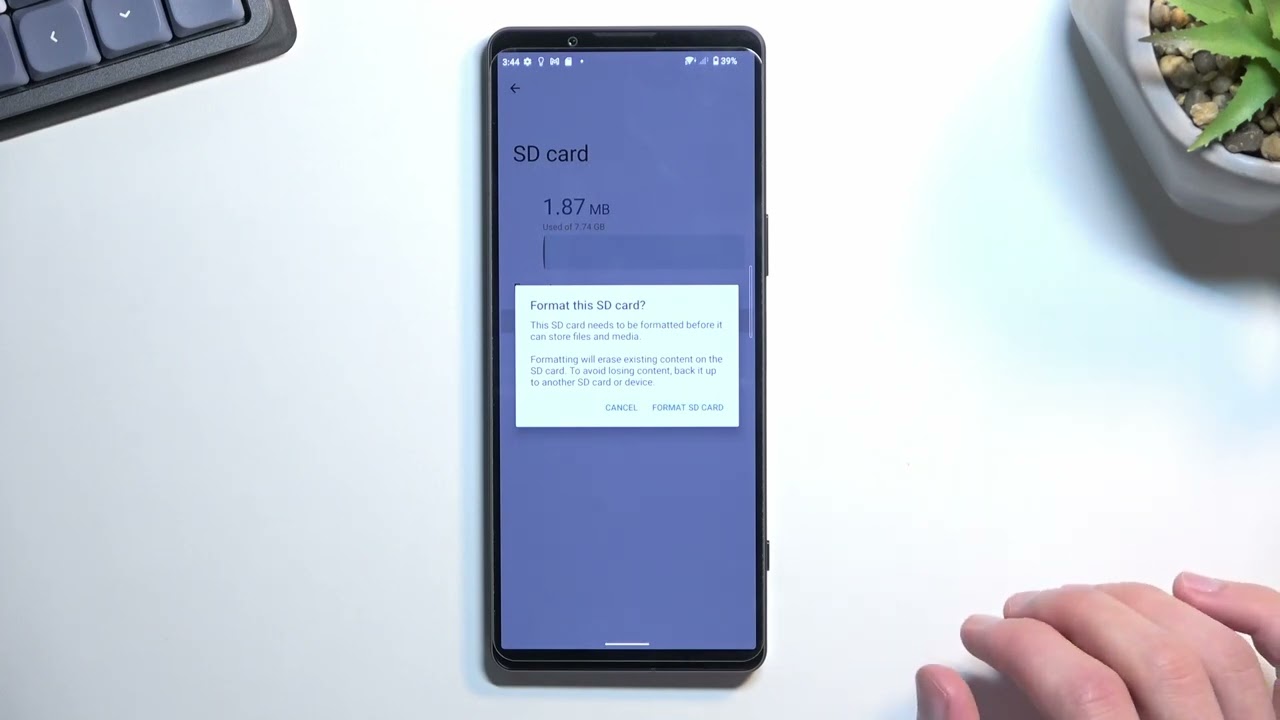
- Once you are in the micro SD card settings menu, look for the option “Format SD Card” or “Erase SD Card.” Tap on it.
- A warning message will appear, informing you that formatting the micro SD card will erase all data. If you have already backed up your important files, tap “Format” or “Erase” to proceed with the formatting process.
- The formatting process will begin, and it may take a few minutes to complete, depending on the size of your micro SD card.
- Once the formatting is done, you will see a confirmation message indicating that the micro SD card has been successfully formatted.
Step 3: Safely Ejecting the Micro SD Card from Xperia 1
After formatting the micro SD card, it is important to follow the proper procedure to safely eject it from your Xperia 1. Here’s what you need to do:
- Return to the “Storage” menu in the Settings app.
- Tap on the “SD Card” option to access the micro SD settings.
- Scroll down and tap on the “Unmount” or “Eject” option to safely remove the micro SD card from your Xperia 1.
- Once you receive a notification that it is safe to remove the SD card, gently push it out of the slot.
And there you have it! By following these steps, you can easily format a micro SD card on your Sony Xperia 1. Remember to always back up your important files before formatting, as the process will erase all data on the card. Enjoy the expanded storage capacity and make the most out of your Xperia 1!
Why Format a Micro SD Card
Formatting a micro SD card may seem like an unnecessary step, especially if it’s new or you’re using it for the first time. However, there are several reasons why formatting a micro SD card is important:
Firstly, formatting helps to optimize the card’s performance. Over time, a micro SD card can accumulate fragmented data and unnecessary files, which could slow down its read and write speeds. By formatting the card, you can remove these fragments and ensure that the card operates at its maximum potential.
Secondly, formatting a micro SD card can help to fix any compatibility issues with your device. Different devices may use different file systems, and formatting the card to match the required file system for your device ensures seamless compatibility and smooth functioning.
Thirdly, formatting a micro SD card is crucial for data security. When you format a card, you erase all existing data, including personal files, documents, and any potential malware or viruses. This is particularly important if you’re selling or giving away your micro SD card, as it ensures that your sensitive data doesn’t fall into the wrong hands.
Lastly, formatting a micro SD card can resolve various errors and issues that may occur during usage. Sometimes, files may become corrupted or the card’s file system may become damaged, resulting in errors or read/write failures. By formatting the card, you can effectively eliminate these problems and restore the card to its optimal state.
Precautions before Formatting
Before you proceed with formatting your micro SD card on your Sony Xperia 1, it is important to take some precautions to ensure a smooth and successful process.
Here are a few important steps to follow:
1. Back up your data: Formatting your micro SD card will erase all the data stored on it. Therefore, it is crucial to back up any important files or data to another device or cloud storage before proceeding with the formatting.
2. Check for compatibility: Ensure that the micro SD card you are planning to format is compatible with your Sony Xperia 1. Check the user manual or the manufacturer’s website for information about the supported types and capacities of micro SD cards.
3. Remove the micro SD card from other devices: If you have been using the micro SD card on another device, make sure to remove it from that device before attempting to format it on your Sony Xperia 1. This will prevent any potential conflicts or data corruption.
4. Charge your Xperia 1: It is always a good idea to have your Xperia 1 fully charged or at least have a sufficient battery level before starting the formatting process. This will help prevent any interruption during the process due to a low battery.
5. Ensure stable power supply: Make sure you are in a place with a stable power supply or consider connecting your Xperia 1 to a power source during the formatting process. Any power interruptions can lead to errors or data corruption.
By following these precautions, you can minimize the risk of data loss or any potential issues that may arise during the formatting process. Once you have taken these steps, you can now proceed with formatting your micro SD card on your Sony Xperia 1.
Step-by-Step Guide to Format a Micro SD Card on Sony Xperia 1
Formatting a micro SD card on your Sony Xperia 1 is a straightforward process that allows you to prepare the card for use and optimize its performance. Whether you’re using a new micro SD card or want to erase all the data on your existing card, follow these simple steps to format it on your Xperia 1.
Step 1: Preparing your Xperia 1 for Formatting
Before you begin the formatting process, make sure to safely eject the micro SD card from your Xperia 1 if it is currently inserted. To do this, go to the Settings menu on your Xperia 1, tap on “Storage,” and then select “Unmount” or “Eject” for the micro SD card.
Step 2: Formatting the Micro SD Card on Xperia 1
Now that your Xperia 1 is prepared, you can proceed with formatting the micro SD card. Here’s how:
- Insert the micro SD card into the designated slot on your Xperia 1. Make sure it is inserted securely and correctly.
- Go to the Settings menu on your Xperia 1 by swiping down from the top of the screen and tapping the gear icon.
- Scroll down and tap on “Storage.”
- Under the “Portable storage” section, you will see the name of your micro SD card. Tap on it.
- On the next screen, you will see the option to “Format” the micro SD card. Tap on it.
- A confirmation message will appear, warning you that all data on the micro SD card will be erased. If you have already backed up any important data, tap “Format” to proceed with the formatting process.
- Wait for the Xperia 1 to format the micro SD card. The duration may vary depending on the size of the card.
- Once the formatting is complete, you will see a message indicating that the micro SD card has been formatted successfully.
Step 3: Safely Ejecting the Micro SD Card from Xperia 1
After formatting the micro SD card, it’s important to safely eject it from your Xperia 1 to avoid any potential data corruption or damage. Follow these steps to safely remove the micro SD card:
- Go to the Settings menu on your Xperia 1 by swiping down from the top of the screen and tapping the gear icon.
- Scroll down and tap on “Storage.”
- Under the “Portable storage” section, you will see the name of your micro SD card. Tap on it.
- Tap on the three-dot menu icon in the top-right corner of the screen.
- Select “Unmount” or “Eject” to safely remove the micro SD card from your Xperia 1.
- Once the micro SD card has been safely ejected, you can remove it from the slot.
By following these simple steps, you can easily format a micro SD card on your Sony Xperia 1. Remember to backup any important data before formatting the card to prevent data loss. Enjoy the enhanced storage capacity and improved performance that a formatted micro SD card can provide for your Xperia 1!
Troubleshooting Tips for Formatting Issues
Formatting issues can sometimes occur when trying to format a micro SD card on your Sony Xperia 1. If you encounter any problems during the formatting process, here are some troubleshooting tips to help you resolve them:
1. Check for Compatibility: Ensure that the micro SD card you are trying to format is compatible with your Sony Xperia 1. Refer to the device’s user manual or the manufacturer’s specifications to verify the supported formats and capacities.
2. Verify the Card’s Condition: Before formatting, examine the micro SD card for any physical damage or signs of wear and tear. If the card looks damaged or scratched, it may be causing formatting issues. In such cases, consider replacing the micro SD card.
3. Restart Your Xperia 1: Sometimes, a simple device restart can resolve formatting issues. Turn off your Sony Xperia 1, remove the micro SD card, wait for a few seconds, and then reinsert the card. Power on your device and attempt the formatting process again.
4. Clear Cache Partition: Clearing the cache partition on your Sony Xperia 1 can help in resolving formatting issues. To do this, turn off your device and then press and hold the Power button and Volume Up button simultaneously until the device vibrates. Release the buttons, and a menu will appear. Use the Volume Down button to navigate to “Wipe Cache Partition” and press the Power button to select it. After the process completes, restart your device and try formatting the micro SD card again.
5. Use a Different Adapter: If you are formatting the micro SD card using an adapter, try using a different adapter. It is possible that the adapter may be faulty or not compatible with your Xperia 1, resulting in formatting issues.
6. Format on Different Device: If all else fails, attempt formatting the micro SD card on a different device. This could be a computer or another smartphone that supports the same micro SD card format. Once the card is successfully formatted on another device, reinsert it into your Sony Xperia 1 and check if it works properly.
7. Seek Professional Help: If none of the above troubleshooting tips work and you are still unable to format the micro SD card, it may be beneficial to seek assistance from a professional technician or contact Sony customer support for further guidance.
By following these troubleshooting tips, you should be able to overcome any formatting issues you encounter while formatting a micro SD card on your Sony Xperia 1. Remember to always handle micro SD cards with care and ensure they are compatible with your device to avoid complications in the future.
In conclusion, formatting a micro SD card in your Sony Xperia 1 is a simple and straightforward process that can greatly enhance your device’s storage capabilities. Whether you’re looking to expand your phone’s storage capacity or optimize its performance, formatting a micro SD card is an essential step. Not only does it allow you to organize your data more efficiently, but it also ensures compatibility and prevents any potential glitches or errors.
By following the steps outlined in this article, you can easily format a micro SD card on your Sony Xperia 1. Remember to back up any important data before formatting, as it will be erased during the process. With your micro SD card properly formatted, you can enjoy increased storage space for all your files, photos, videos, and apps on your Sony Xperia 1.
So, go ahead and take advantage of this convenient feature offered by the Sony Xperia 1. Format your micro SD card today and unlock the full potential of your device.
FAQs
1. Can I use a 64GB micro SD card with the Sony Xperia 1?
Yes, you can use a 64GB micro SD card with the Sony Xperia 1. The device supports expandable storage of up to 512GB, so a 64GB card is well within its capacity. Simply insert the micro SD card into the provided slot, and you can start using it to store photos, videos, music, and other files.
2. How do I format a micro SD card on the Sony Xperia 1?
To format a micro SD card on the Sony Xperia 1, follow these steps:
- Open the “Settings” app on your device.
- Select “Storage & memory” from the options.
- Tap on “SD card.” If you have more than one SD card, choose the specific card you want to format.
- Scroll down and tap on “Format” or “Format as internal” if you want to use the SD card as internal storage.
- Confirm the formatting process and wait for it to complete.
Formatting will erase all data on the micro SD card, so make sure to back up any important files before proceeding.
3. Can I use a micro SD card from another phone with the Sony Xperia 1?
Yes, you can use a micro SD card from another phone with the Sony Xperia 1 as long as it meets the device’s compatibility requirements. The Sony Xperia 1 supports micro SD cards up to 512GB in capacity, so ensure that your card fits within this limit. Additionally, you may need to format the card to be recognized by the Xperia 1, which can be done through the device’s settings as mentioned in the previous answer.
4. Is it possible to transfer apps to a micro SD card on the Sony Xperia 1?
Unfortunately, the Sony Xperia 1 does not support the option to transfer apps to a micro SD card. However, you can use the micro SD card to store media files such as photos, videos, and music. This can help free up internal storage space on the device, allowing you to install and use more apps without running into storage limitations.
5. How do I safely remove a micro SD card from the Sony Xperia 1?
To safely remove a micro SD card from the Sony Xperia 1, follow these steps:
- Go to the “Settings” app on your device.
- Select “Storage & memory.”
- Tap on “SD card” and choose the specific card you want to remove.
- Scroll down and tap on “Unmount” or “Eject.”
- Wait for the confirmation message and remove the micro SD card carefully from the card slot.
It is crucial to unmount the SD card before physically removing it from the device to prevent data corruption or loss.