
Welcome to our tip of the day series, where we provide you with useful tricks and hacks to enhance your mobile phone experience. In today’s edition, we will be exploring one of the standout features of iOS 8 – the manual exposure option in the camera. With this powerful tool, you can take your photography skills to the next level by gaining full control over the exposure settings of your iPhone’s camera. Gone are the days of being limited by auto-exposure; now, you can adjust the exposure to perfectly capture those tricky lighting scenarios or add an artistic touch to your photos. In this article, we will walk you through how to access and utilize the manual exposure feature on your iOS 8 device, so you can take stunning photos like a pro. So, let’s dive in and explore the world of manual exposure in iOS 8!
Inside This Article
- Tip #1: Accessing Manual Exposure
- Tip #2: Adjusting Exposure Levels
- Tip #3: Locking Exposure and Focus
- Tip #4: Using Exposure Compensation
- Conclusion
- FAQs
Tip #1: Accessing Manual Exposure
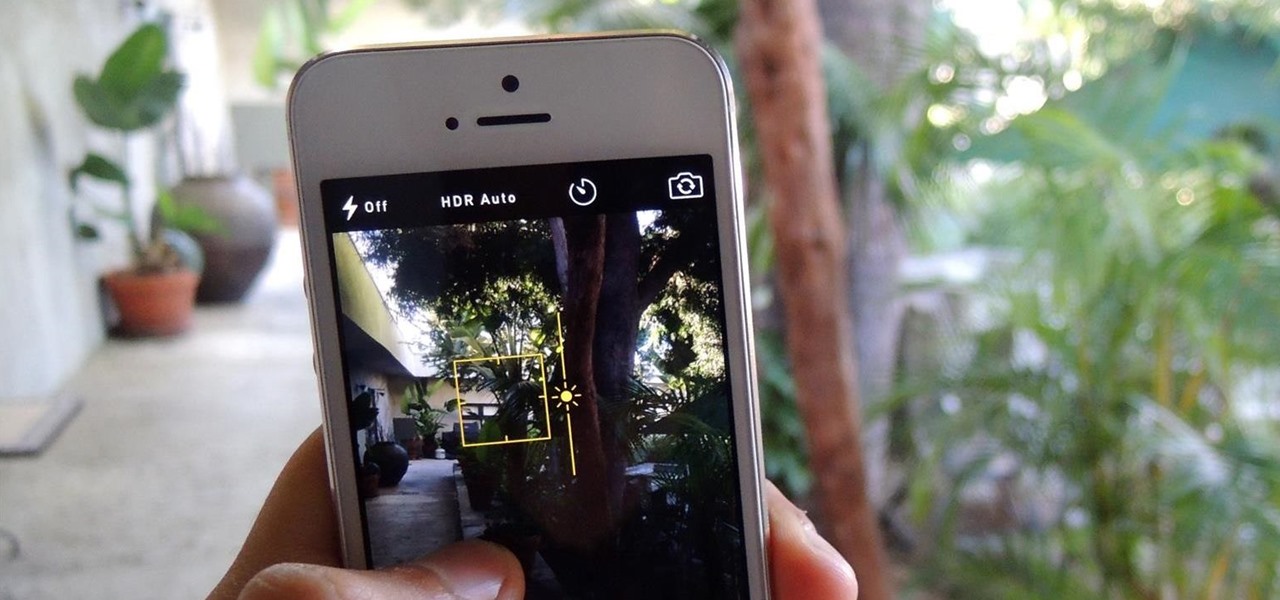
One of the great features of iOS 8 is its manual exposure control in the camera app. This allows you to have more control over the exposure settings and capture better photos in challenging lighting conditions. Accessing the manual exposure feature is quite simple, and in this tip, we’ll show you how to do it.
First, open the camera app on your iPhone or iPad running iOS 8. You will see the viewfinder, with various options at the bottom of the screen. Look for the “+” icon that resembles a sun. This is the exposure control button, and tapping on it will enable the manual exposure settings.
Once you tap on the exposure control button, you will notice a yellow square appearing on the screen. This is the exposure reticle. By default, the camera will automatically set the exposure based on the lighting conditions. However, with manual exposure, you have the option to adjust the exposure value according to your preference.
To adjust the exposure, simply swipe up or down on the screen. Swiping up will increase the exposure, making the image brighter, while swiping down will decrease the exposure, making the image darker. As you swipe, you will see the exposure value changing in real-time, allowing you to preview the effect before capturing the photo.
Keep in mind that using manual exposure may be particularly useful in situations where the auto mode struggles, such as backlit subjects or scenes with high contrast. It gives you the flexibility to customize the exposure to achieve the desired result.
Once you have set your preferred exposure value, you’re ready to take your photos with the manual exposure settings. Simply compose your shot, tap the shutter button, and capture your image. The camera will use the adjusted exposure value for that specific shot.
That’s it! Now you know how to access manual exposure on your iOS 8 device. Experiment with different exposure values to discover the perfect balance for your photos and take full advantage of this powerful feature that iOS 8 has to offer.
Tip #2: Adjusting Exposure Levels
One of the key features of iOS 8’s Camera app is the ability to manually adjust exposure levels. This allows you to have more control over the brightness and darkness of your photos, resulting in better overall image quality. Here’s how you can adjust exposure levels on your iPhone or iPad:
1. Launch the Camera app on your device. Make sure you are in Photo or Square mode.
2. Tap on the area of the screen where you want to set the exposure. This will bring up the focus and exposure box.
3. Once the focus and exposure box appears, you’ll notice a small sun icon to the right of it. This is the exposure slider.
4. To adjust the exposure level, simply slide your finger up or down on the screen. Sliding up will increase the exposure, making the image brighter. Sliding down will decrease the exposure, making the image darker.
5. As you slide your finger, you’ll see the exposure level changing in real-time. This allows you to fine-tune the exposure based on your preferences.
6. Keep in mind that adjusting the exposure level will only affect the current photo you’re about to take. It won’t change any previously taken photos or affect future photos unless you adjust the exposure level again.
7. Once you’re satisfied with the exposure level, tap the shutter button to capture the photo. You can then review the photo in the Photos app to see how the exposure adjustment has affected the image.
Adjusting exposure levels can be particularly useful in situations with challenging lighting conditions. For example, if you’re taking a photo with a bright background, you can decrease the exposure to prevent the background from being overexposed. On the other hand, if you’re capturing a subject in a low-light environment, you can increase the exposure to ensure that the subject is clear and well-lit.
By mastering the art of adjusting exposure levels in iOS 8’s Camera app, you can take your photography skills to the next level and capture stunning images with optimal lighting.
Tip #3: Locking Exposure and Focus
When capturing the perfect shot with your iPhone’s camera, it’s essential to have control over both exposure and focus. One way to achieve this is by using the “Lock” feature, available in iOS 8’s camera settings. By locking the exposure and focus, you can ensure consistent and precise results, especially in challenging lighting conditions or when shooting moving subjects.
To lock the exposure and focus, follow these steps:
- Open the Camera app on your iPhone.
- Compose your shot and tap on the area where you want to set focus.
- Once the focus is locked, you will see a yellow square or a small yellow sun icon indicating that the focus lock is activated.
- To lock the exposure, tap and hold on the screen until you see the AE/AF Lock indicator appear.
By locking both the exposure and focus, you ensure that these settings will not change unless you decide to disable the lock. This is particularly useful when you want to maintain consistent exposure throughout a series of shots or when shooting in dynamic environments.
Remember, the exposure and focus lock may not be suitable for every situation. If there are significant changes in lighting conditions or if your subject moves, you may need to unlock and readjust to achieve the desired results.
The “Lock” feature is a powerful tool that empowers you to take full control of your iPhone’s camera. Experiment with locking the exposure and focus to capture stunning photos with precise levels of brightness and sharpness.
Tip #4: Using Exposure Compensation
If you want to have more control over the exposure settings of your photos, then the Exposure Compensation feature in iOS 8’s Manual Exposure mode is perfect for you. This feature allows you to adjust the exposure level, making your photos brighter or darker according to your preference.
To access the Exposure Compensation feature, start by opening the camera app on your iOS 8 device. Once the app is open, tap on the screen to bring up the focus and exposure reticle. Next, scroll up or down on the screen to adjust the exposure slider. Moving the slider to the right will increase the exposure, making the photo brighter. Conversely, moving it to the left will decrease the exposure, resulting in a darker photo.
Using the Exposure Compensation feature can come in handy in various situations. For example, if you’re taking a photo in a bright environment and you want to avoid overexposure, you can use the exposure compensation to darken the image slightly. On the other hand, if you’re shooting in a low-light condition and want to capture more light, you can increase the exposure to brighten up the photo.
One of the advantages of using the Exposure Compensation feature is that it allows you to fine-tune the exposure without affecting the focus or other settings. This means you can adjust the exposure level without worrying about losing the focus point or changing other camera settings like white balance or shutter speed.
It’s important to note that exposure compensation is a feature that is commonly found in advanced camera settings. However, iOS 8 brought this feature to the camera app, making it accessible and easy to use for anyone with an iOS device.
By mastering the use of exposure compensation, you can elevate the quality of your photos and have more control over the final image. Whether you’re a seasoned photographer or just a casual snap-happy user, experimenting with exposure compensation can help you capture the perfect shot in any lighting condition.
Conclusion
In conclusion, iOS 8’s Manual Exposure feature is a powerful tool that allows users to take control of their camera settings and capture stunning photos. By adjusting the exposure levels manually, users can achieve the perfect balance of light and shadows, resulting in well-exposed images with accurate colors and details. Whether you’re a professional photographer or just someone who loves taking photos, this feature is definitely worth exploring.
With its intuitive interface and easy-to-use controls, iOS 8 makes it simple for anyone to experiment with manual exposure and enhance their photography skills. So the next time you’re out capturing moments with your iPhone or iPad, don’t forget to give Manual Exposure a try. You might be surprised by the incredible shots you can achieve!
FAQs
1. Can I use manual exposure in the Camera app on iOS 8?
Absolutely! With the new iOS 8 update, Apple introduced the manual exposure feature in the Camera app. This allows you to take more control over the exposure settings of your photos, giving you the ability to adjust various parameters such as ISO, shutter speed, and white balance.
2. Where can I find the manual exposure option in the Camera app?
To access the manual exposure feature, simply open the Camera app on your iOS 8 device. Once you are in photo mode, tap on the yellow sun icon that appears on the screen. This will bring up the exposure slider along with other options like HDR, flash, and timer.
3. How does the manual exposure feature work?
The manual exposure feature in the Camera app allows you to adjust the exposure settings in real-time by using the exposure slider. By sliding your finger left or right on the screen, you can control the brightness of your photo. This can be especially useful in challenging lighting situations where the camera’s automatic exposure might not give you the desired results.
4. Does manual exposure affect the overall image quality?
No, using the manual exposure feature in the Camera app does not affect the overall image quality. It simply gives you more control over the exposure settings, allowing you to capture photos with the desired brightness and balance. However, it’s important to note that extreme adjustments to exposure settings may result in some loss of detail in certain areas of the photo.
5. Can I use manual exposure in all camera modes on iOS 8?
The manual exposure feature is available in both photo and video modes on iOS 8. However, it’s important to check the specific camera app you are using, as third-party camera apps may have different features and options. Additionally, certain older iPhone models may have limited manual exposure capabilities compared to newer models.