
Are you a proud owner of both a wireless Beats headphones and an Android phone? If so, you may be wondering how to connect these two devices for an immersive audio experience on the go. Thankfully, the process of connecting your wireless Beats to your Android phone is quite straightforward. In this article, we will guide you through the steps to connect your wireless Beats headphones to your Android phone effortlessly. Whether you’re using Beats Solo Pro, Powerbeats Pro, or any other wireless Beats model, we’ve got you covered. Get ready to enjoy your favorite music, podcasts, and more with enhanced sound quality by following our simple instructions. So, let’s dive in and discover how to connect wireless Beats to your Android phone.
Inside This Article
- Step 1: Turn on your Wireless Beats
- Step 2: Activate Bluetooth on your Android phone
- Step 3: Pair your Wireless Beats with your Android phone
- Step 4: Test the connection
- Troubleshooting Tips
- Conclusion
- FAQs
Step 1: Turn on your Wireless Beats
Before you can connect your Wireless Beats to your Android phone, you need to make sure they are turned on. Here’s how to do it:
1. Locate the power button on your Wireless Beats. It is usually located on one of the ear cups.
2. Press and hold the power button for a few seconds until you see the indicator light turn on. This light indicates that your Wireless Beats are now powered on.
3. Release the power button and wait for a few seconds until you hear a chime or the indicator light starts flashing. This signifies that your Wireless Beats are in pairing mode and ready to connect to your Android phone.
It’s important to note that the exact steps may vary depending on the model of your Wireless Beats. Refer to the user manual for specific instructions if needed.
Once your Wireless Beats are turned on, you can proceed to the next step of connecting them to your Android phone.
Step 2: Activate Bluetooth on your Android phone
Once you have turned on your Wireless Beats, the next step is to activate the Bluetooth function on your Android phone. Bluetooth is a wireless technology that allows devices to connect and communicate with each other over short distances.
Activating Bluetooth on your Android phone may vary slightly depending on the model and version of the operating system. However, the general process remains the same. Here are the steps to activate Bluetooth on most Android phones:
- Swipe down from the top of the screen to access the notification shade.
- Look for the Bluetooth icon and tap on it. This will open the Bluetooth settings.
- If the Bluetooth icon is not visible in the notification shade, you may need to expand the quick settings menu by swiping down with two fingers or by tapping on the “More” option.
- In the Bluetooth settings, toggle the switch to turn on Bluetooth. The switch will change color or show as “On” when Bluetooth is activated.
Once Bluetooth is activated on your Android phone, it will start scanning for nearby devices. Your Wireless Beats should appear in the list of available devices. However, before you can connect them, make sure your Wireless Beats are in pairing mode. Refer to the manufacturer’s instructions to enable pairing mode if needed.
Activating Bluetooth on your Android phone is a simple and straightforward process. By following these steps, you will be ready to connect your Wireless Beats and enjoy wireless audio on your Android device.
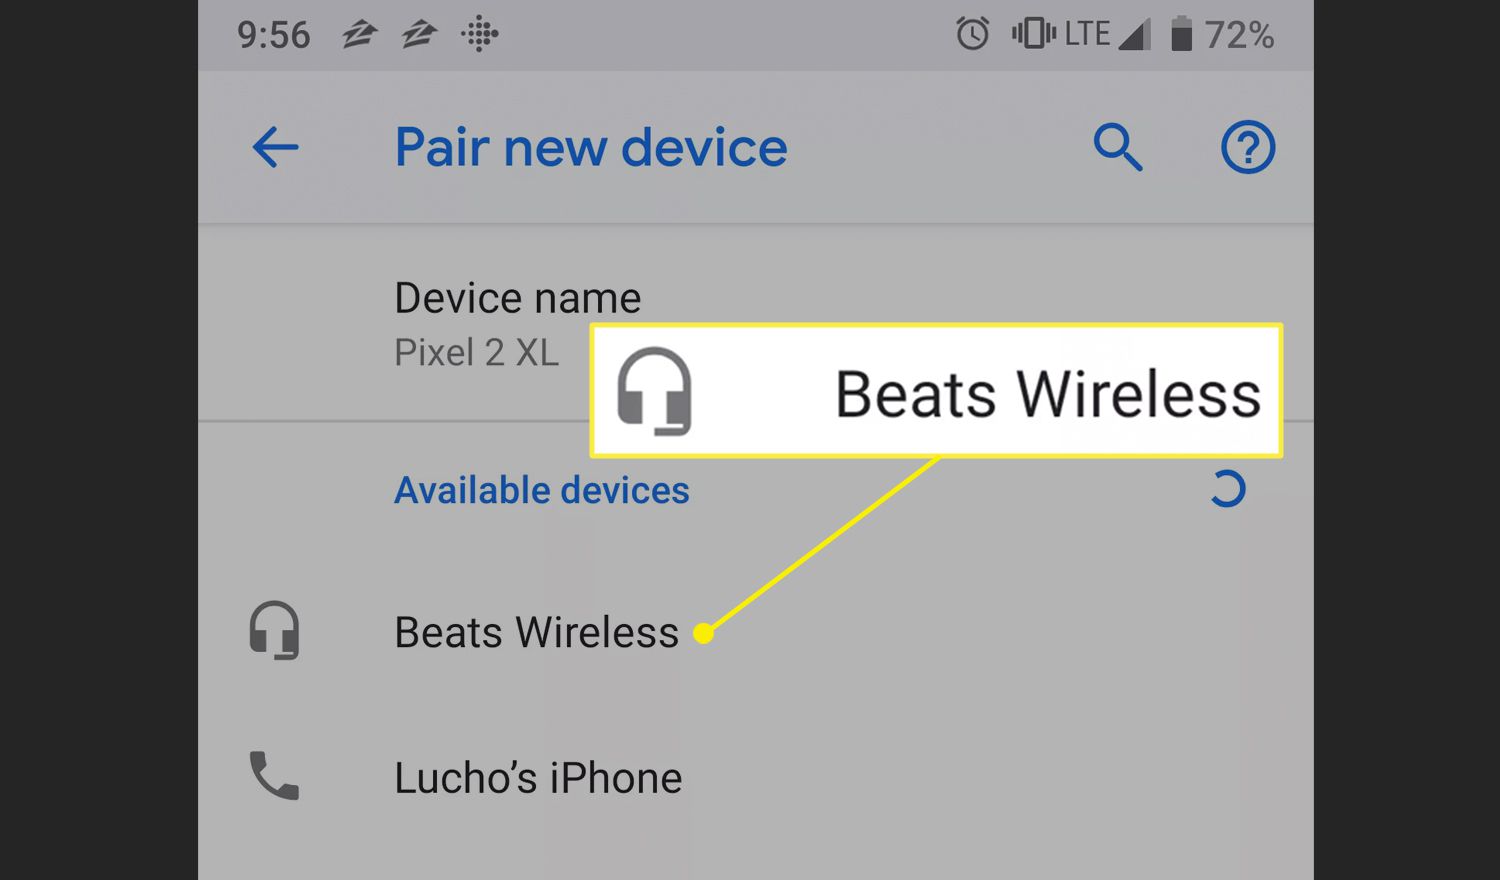
Step 3: Pair your Wireless Beats with your Android phone
Once you have activated the Bluetooth on your Android phone, it’s time to pair your Wireless Beats with it. Follow these simple steps to establish the connection:
1. Open the Bluetooth settings on your Android phone. This can usually be found in the Settings menu or by swiping down from the top of the screen and tapping on the Bluetooth icon.
2. In the Bluetooth settings, make sure that the Bluetooth toggle is turned on. This will activate the Bluetooth functionality on your phone and allow it to discover nearby devices.
3. On your Wireless Beats, locate the Power button and press and hold it until the LED light starts flashing. This indicates that your Beats are now in pairing mode and ready to connect.
4. In the Bluetooth settings on your phone, tap on the option to “Scan for devices” or “Add new device”. This will prompt your Android phone to search for available Bluetooth devices in the vicinity.
5. After a few seconds, your Wireless Beats should appear in the list of available devices on your phone’s screen. Tap on the name of your Beats to initiate the pairing process.
6. Your Android phone will then attempt to establish a connection with your Wireless Beats. During this time, you may be prompted to enter a pairing code. Check the user manual or documentation that came with your Beats to find the specific code for your device.
7. Once the pairing process is complete, you will receive a notification on your Android phone confirming the successful connection. At this point, you can start using your Wireless Beats to enjoy your favorite music or take calls wirelessly.
Remember to keep your Beats and your Android phone within close proximity for a stable and uninterrupted connection. If you experience any issues during the pairing process, refer to the user manual for troubleshooting steps or contact the manufacturer for further assistance.
Congratulations! You have now successfully paired your Wireless Beats with your Android phone. Get ready to experience the freedom and convenience of wireless audio!
Step 4: Test the connection
Once you have successfully paired your Wireless Beats with your Android phone, it’s time to test the connection. Testing the connection will ensure that your headphones are properly connected and ready to use.
To test the connection, follow these steps:
- Put on your Wireless Beats and make sure they are turned on.
- Open the music app or any other media app on your Android phone.
- Select a song or video to play.
- Adjust the volume on your Wireless Beats using the volume controls on the headphones or the volume buttons on your Android phone.
- Listen to the audio through your Wireless Beats. If you can hear the sound clearly without any distortion or interruptions, congratulations! Your Wireless Beats are successfully connected to your Android phone.
If, on the other hand, you experience any issues during the testing process, here are a few troubleshooting tips:
- Check if your Wireless Beats are fully charged. Low battery levels can affect the performance of your headphones.
- Make sure your Android phone’s Bluetooth is enabled and in range of your Wireless Beats.
- Try unpairing and re-pairing your Wireless Beats with your Android phone.
- Restart your Android phone and try connecting again.
- If the problem persists, consult the user manual or contact the customer support of your Wireless Beats for further assistance.
Testing the connection is crucial to ensure that your Wireless Beats are functioning properly. Once you have confirmed the successful connection, you can enjoy your favorite music, movies, or videos with high-quality sound on your Android phone.
Troubleshooting Tips
If you are experiencing issues connecting your wireless Beats to your Android phone, don’t panic! Here are some troubleshooting tips to help you get things back on track:
1. Restart both your Beats and your Android phone. Sometimes, a simple restart can resolve connectivity issues.
2. Make sure that Bluetooth is enabled on your Android phone. Go to the settings menu and look for the Bluetooth option. Ensure that it is turned on.
3. Ensure that your Beats are in pairing mode. Refer to the user manual or the manufacturer’s website for instructions on how to put your specific model of Beats into pairing mode.
4. Check that your Beats are charged. Low battery levels can cause connection problems. Connect your Beats to a power source and let them charge for a while before attempting to pair them again.
5. Clear the Bluetooth cache on your Android phone. Go to the settings menu, select “Apps & Notifications,” choose “See all apps,” and find the Bluetooth app. Tap on it, then select “Storage & Cache” and clear the cache.
6. Unpair any previously connected devices. If your Beats were previously connected to another device, make sure to unpair them from that device before attempting to pair them with your Android phone.
7. Keep your Beats and your Android phone in close proximity. Ensure that there are no obstacles or interference between the devices that could weaken the Bluetooth signal.
8. Update the firmware on your Beats and your Android phone. Check for any available firmware updates for both devices and install them if necessary, as updates often include bug fixes and performance improvements.
9. If none of the above tips work, try resetting your Beats to factory settings. Refer to the user manual or the manufacturer’s website for instructions on how to reset your specific model of Beats.
If you have tried all of these troubleshooting tips and are still unable to connect your wireless Beats to your Android phone, it may be worth contacting the manufacturer’s support team for further assistance.
Conclusion
Connecting wireless Beats headphones to your Android phone is a simple process that allows you to enjoy wireless freedom while listening to your favorite music or taking calls. By following the step-by-step instructions and making sure your headphones are in pairing mode, you’ll be able to establish a seamless connection in no time.
With the convenience of wireless technology, you can now enjoy the freedom of movement without the hassle of tangled wires. Whether you have Beats Solo Pro, Powerbeats Pro, or any other wireless Beats headphones model, the process remains relatively the same.
Remember to keep your headphones charged and ensure that your Android device supports Bluetooth connectivity. Once connected, you can experience high-quality audio and hands-free functionality with ease. So go ahead, connect your wireless Beats to your Android phone and immerse yourself in a world of wireless sound.
FAQs
1. Can I connect wireless Beats headphones to an Android phone?
Yes, you can connect wireless Beats headphones to an Android phone. Beats headphones use Bluetooth technology to connect to devices, including Android phones. Simply ensure that your Android phone has Bluetooth functionality enabled, put your Beats headphones in pairing mode, and follow the Bluetooth pairing process on your Android phone to establish a connection.
2. How do I put my Beats headphones in pairing mode?
To put your Beats headphones in pairing mode, follow these steps:
- Make sure your headphones are turned off.
- Press and hold the power button for a few seconds until the LED indicator on the headphones starts blinking.
- Release the power button to enter pairing mode.
3. How do I enable Bluetooth on my Android phone?
Enabling Bluetooth on an Android phone may vary slightly depending on the device model and Android version. Generally, you can do it by following these steps:
- Open the Settings app on your Android phone.
- Scroll down and tap on “Connections” or “Bluetooth & device connections.”
- Toggle on the Bluetooth switch. It may appear as an on/off slider or a simple toggle button.
4. What if my Beats headphones are not connecting to my Android phone?
If your Beats headphones are not connecting to your Android phone, here are a few things you can try:
- Make sure Bluetooth is enabled on your Android phone and that it is within range of your headphones.
- Put your Beats headphones in pairing mode again and try reconnecting.
- Restart your Android phone and try connecting again.
- If none of the above steps work, check if there are any firmware or software updates available for your Beats headphones and update them if necessary.
5. Can I use my Beats headphones with multiple Android devices?
Yes, you can use your Beats headphones with multiple Android devices. Once your headphones are paired with one Android device, you can simply disconnect them from that device and connect them to another Android device using the Bluetooth pairing process. Keep in mind that most headphones can only be connected to one device at a time, so you will have to disconnect from the first device before connecting to the second one.