
Are you tired of dealing with tangled wires on your desk? If so, then a wireless mouse may be the solution for you. Wireless mice offer the freedom to move around without the limitations of a wired connection. However, what if you don’t have a USB receiver to connect your wireless mouse? Don’t worry, there are still ways to connect your mouse without a USB receiver, and in this article, we will guide you on how to do just that. Whether you misplaced your USB receiver or your mouse doesn’t come with one, we have you covered. Let’s dive in and explore different methods to connect a wireless mouse without a USB receiver.
Inside This Article
- Pairing a Wireless Mouse with Bluetooth Technology
- Using a Wireless Mouse with Infrared Connection
- Connecting a Wireless Mouse through a Nano Receiver
- Configuring a Wireless Mouse via a built-in Wireless Adapter
- Conclusion
- FAQs
Pairing a Wireless Mouse with Bluetooth Technology
Pairing a wireless mouse with Bluetooth technology is a convenient and hassle-free way to connect your mouse to your device without the need for an additional USB receiver. Bluetooth-enabled devices, such as laptops, tablets, and smartphones, can easily connect to a compatible wireless mouse with just a few simple steps.
To begin the pairing process, make sure that your wireless mouse is turned on and in pairing mode. This can usually be done by pressing and holding the pairing button on the mouse for a few seconds until the LED light starts blinking.
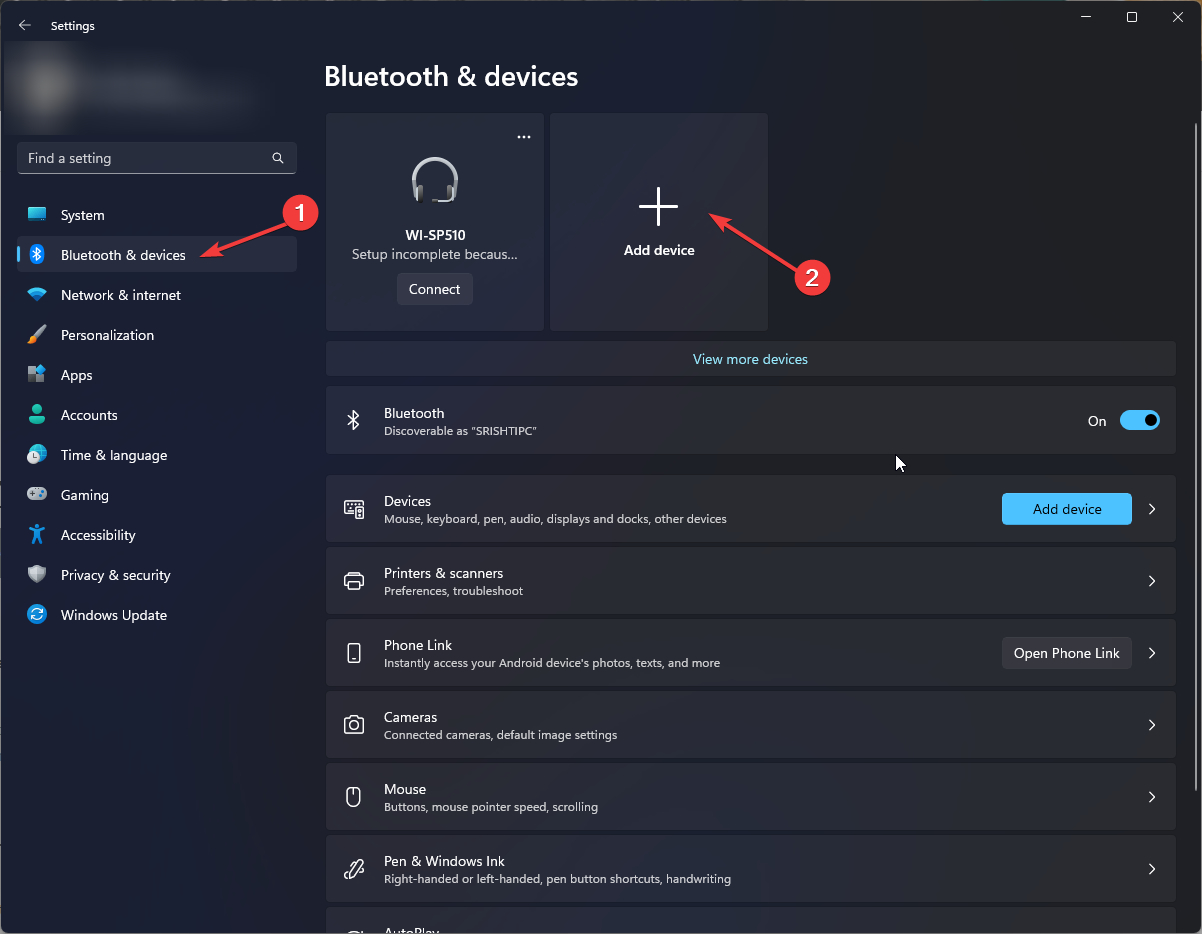
Next, on your device, navigate to the Bluetooth settings menu. This can typically be found in the system settings or the control panel, depending on the operating system you are using.
Once you are in the Bluetooth settings menu, ensure that Bluetooth is enabled on your device. Then, click on the option to add a new device or scan for devices. Your device will begin searching for available devices nearby.
When your device detects the wireless mouse, it will display the mouse as an available device. Select the mouse from the list of available devices to initiate the pairing process.
At this point, your device and the wireless mouse will establish a secure Bluetooth connection. Depending on the device, you may be prompted to enter a passcode to complete the pairing process. Follow the on-screen instructions to enter the passcode and complete the pairing.
Once the pairing is successful, your device will recognize the wireless mouse, and you can start using it immediately. The mouse should now move the cursor on your screen, and you can enjoy the convenience and freedom of a wireless mouse without the need for a USB receiver.
Please note that the specific instructions for pairing a wireless mouse with Bluetooth technology may vary depending on the device and operating system you are using. It is always recommended to refer to the user manual or support documentation provided by the manufacturer for detailed instructions on the pairing process.
Using a Wireless Mouse with Infrared Connection
Wireless mice with infrared connection are a convenient option for those who want to eliminate the need for cables and USB receivers. These mice use infrared technology to establish a connection between the mouse and the computer. Infrared transmits signals using light waves, allowing for seamless communication between the mouse and the computer.
To use a wireless mouse with infrared connection, you will need to ensure that your computer is equipped with an infrared receiver. Most modern laptops and some desktop computers have built-in infrared receivers, but if your computer doesn’t have one, you may need to purchase an external infrared receiver.
Once you have confirmed that your computer has an infrared receiver, follow these steps to connect your wireless mouse:
- Ensure that your wireless mouse has fresh batteries. Infrared mice rely on battery power to function properly, so make sure you have inserted new batteries or fully charged rechargeable ones.
- Turn on your wireless mouse. Look for the power switch or button located on the underside of the mouse, and slide it to the “On” position.
- Activate the infrared receiver on your computer. This step may vary depending on your computer model, so consult the user manual or look for an infrared icon on your keyboard or system tray. Typically, you will need to press a specific key combination or access the settings to enable the infrared receiver.
- Align the infrared sensor on the wireless mouse with the infrared receiver on your computer. This is crucial for a successful connection. Make sure there are no obstructions between the mouse and the receiver.
- Wait for the computer to recognize the wireless mouse. It may take a few seconds for the connection to be established. Once connected, the mouse cursor should respond to your movements.
It’s important to note that infrared connections have a limited range and require a clear line of sight between the mouse and the receiver. Make sure there are no objects blocking the path between the two. Additionally, infrared mice may not be as responsive or accurate as other wireless mouse options, so it’s worth considering your specific needs and preferences before opting for an infrared mouse.
Connecting a Wireless Mouse through a Nano Receiver
If your wireless mouse doesn’t have built-in Bluetooth capability, then it most likely uses a nano receiver for wireless connectivity. A nano receiver is a small USB device that you plug into your computer’s USB port to connect the mouse wirelessly.
To connect your wireless mouse through a nano receiver, follow these steps:
- Locate the nano receiver that came with your mouse. It is usually small and can be found in the battery compartment of the mouse or packaged separately.
- Insert the nano receiver into an available USB port on your computer. It will be recognized automatically by your operating system.
- Turn on your wireless mouse by flipping the switch or pressing the power button. Some mice have a small button on the bottom that you can press to initiate the connection process.
- Wait for the computer to recognize the mouse. This may take a few seconds as the operating system installs the necessary drivers for the mouse to function properly.
- Once the mouse is recognized, it should start working immediately. You can move the mouse cursor across the screen to confirm that it is functioning correctly.
If the mouse doesn’t work right away, you may need to sync it with the nano receiver. Look for a small sync button on the mouse or the receiver. Press the sync button on the receiver first and then on the mouse. This will establish a connection between the two devices.
Keep in mind that different mouse models may have slightly different instructions, so it’s a good idea to consult the specific instructions provided by the manufacturer.
Overall, connecting a wireless mouse through a nano receiver is a quick and straightforward process. Just plug in the receiver, turn on the mouse, and you’re ready to go. Say goodbye to tangled wires and enjoy the freedom that a wireless mouse provides.
Configuring a Wireless Mouse via a built-in Wireless Adapter
A built-in wireless adapter provides a convenient way to connect a wireless mouse to your device without the need for a separate USB receiver. This technology allows for seamless communication between your mouse and computer, making it an easy and hassle-free setup process.
Here’s a step-by-step guide on how to configure a wireless mouse via a built-in wireless adapter:
- Ensure compatibility: Before proceeding, make sure that your device is equipped with a built-in wireless adapter. Most modern laptops and desktop computers come with this feature, but it’s always good to double-check the specifications or consult the user manual.
- Power on the mouse: Start by turning on your wireless mouse. Look for the power switch on the underside or sides of the mouse and toggle it to the “on” position. If your mouse uses batteries, make sure they are inserted correctly.
- Access your device’s settings: Next, navigate to the settings menu on your device where you can manage wireless connections. This may vary depending on your operating system, but commonly, you can find it in the system preferences, control panel, or taskbar.
- Enable Bluetooth: If your built-in wireless adapter supports Bluetooth, ensure it is enabled. Look for the Bluetooth settings and switch it on. This step may require you to input a password or PIN if it’s your first time setting up a Bluetooth device.
- Put the mouse in pairing mode: Once Bluetooth is enabled, put your wireless mouse into pairing mode. Typically, this involves pressing and holding a dedicated pairing button on the mouse or following specific instructions provided in the user manual. Check the mouse’s documentation for precise details.
- Search for devices: On your computer, search for available Bluetooth devices. This process may involve clicking on “Add a Device” or “Pair a New Device” in your settings menu. Your computer will scan for nearby devices, including the wireless mouse.
- Select the mouse: Once the computer detects the wireless mouse, it should appear on the list of available devices. Click on the mouse’s name to select it and initiate the pairing process. Follow any prompts or on-screen instructions provided by your operating system.
- Complete the pairing: After selecting the mouse, your computer will finalize the pairing process. It may take a few moments for the connection to establish. Once complete, you should see a notification or confirmation message indicating that the mouse is connected and ready to use.
And there you have it! Your wireless mouse is now configured and connected via the built-in wireless adapter. You can now enjoy the freedom and convenience of using a wireless mouse without the need for an additional USB receiver. Remember, if you encounter any issues during the setup process, consult the user manual or seek assistance from the manufacturer’s support team.
Conclusion
In conclusion, connecting a wireless mouse without a USB receiver is indeed possible, thanks to the advancements in technology. By utilizing the Bluetooth feature available in many modern devices, you can easily pair your wireless mouse and enjoy the convenience of a cable-free experience.
However, it’s important to note that not all wireless mice support Bluetooth connectivity. Before attempting to connect your mouse without a USB receiver, make sure to check the specifications of your device to ensure compatibility.
Remember to follow the manufacturer’s instructions for pairing and connecting your wireless mouse. With a few simple steps, you can enjoy the freedom and flexibility that a wireless mouse offers, without the need for a USB receiver.
Whether you’re a student, professional, or casual user, using a wireless mouse can greatly improve your productivity and efficiency. Say goodbye to tangled cables and hello to seamless control with a wireless mouse — a must-have accessory for any computer user!
FAQs
Q: Can I connect a wireless mouse without a USB receiver?
A: Yes, you can connect a wireless mouse without a USB receiver using Bluetooth technology. Many modern laptops and desktops come with built-in Bluetooth functionality, allowing you to pair your wireless mouse directly with your device.
Q: How do I connect a wireless mouse without a USB receiver?
A: To connect a wireless mouse without a USB receiver, follow these steps:
1. Ensure that your computer has built-in Bluetooth or you have a Bluetooth dongle.
2. Put your wireless mouse into pairing mode. Refer to the manufacturer’s instructions for specific steps.
3. Open the Bluetooth settings on your computer and search for available devices.
4. Select your wireless mouse from the list of devices and click on “Connect” or “Pair.”
5. Once the pairing is successful, your wireless mouse will be connected without the need for a USB receiver.
Q: What if my computer doesn’t have built-in Bluetooth?
A: If your computer doesn’t have built-in Bluetooth, you can use a Bluetooth dongle. A Bluetooth dongle is a small device that plugs into the USB port of your computer and provides Bluetooth functionality. Simply plug the dongle into your computer, follow the steps mentioned earlier, and you’ll be able to connect your wireless mouse without a USB receiver.
Q: Is it necessary to have a wireless mouse that supports Bluetooth to connect without a USB receiver?
A: Yes, for connecting a wireless mouse without a USB receiver, you will need a wireless mouse that supports Bluetooth technology. Bluetooth-enabled wireless mice have the capability to directly connect to your device without the need for a USB receiver. Make sure to check the specifications of your wireless mouse before attempting to connect it without a USB receiver.
Q: Can I use multiple wireless devices connected without USB receivers at the same time?
A: Yes, you can use multiple wireless devices, such as a mouse, keyboard, and headphones, connected without USB receivers at the same time. The Bluetooth technology used for these devices supports multiple connections. However, keep in mind that having multiple wireless devices connected simultaneously may drain battery life more quickly. Additionally, ensure that your computer has the necessary Bluetooth capabilities to handle multiple connections.