
Creating a wireless local area network (WLAN) is a fundamental step towards establishing a seamless and convenient internet connection in your home or office. With the ever-increasing reliance on wireless devices, it’s crucial to have a reliable and secure network that can accommodate the needs of multiple users and devices.
A wireless local area network eliminates the need for messy cables and allows for flexibility in accessing the internet from anywhere within range. Whether you’re streaming high-definition videos, conducting online meetings, or simply browsing the web, a well-designed WLAN can provide a stable and high-speed connection.
In this article, we’ll guide you through the process of creating your own wireless local area network. We’ll cover everything from choosing the right wireless router to optimizing security settings. So, let’s get started and learn how to set up a wireless network that will meet your connectivity needs efficiently and reliably.
Inside This Article
- Understanding Wireless Local Area Networks (WLANs)
- Setting up the Wireless Router
- Configuring the Wireless Network
- Adding Devices to the WLAN
- Troubleshooting Wi-Fi Connection Issues
- Conclusion
- FAQs
Understanding Wireless Local Area Networks (WLANs)
In today’s interconnected world, the need for a seamless and reliable network connection is essential. One common solution for creating a local network is a Wireless Local Area Network (WLAN). Understanding the basics of WLANs can help you set up and optimize your network for maximum efficiency.
A WLAN, also known as Wi-Fi, is a type of network that uses wireless technology to connect devices within a limited area, such as a home, office, or public hotspot. Instead of relying on physical cables, WLANs use radio waves to transmit data between devices, offering flexibility and convenience.
WLANs operate on different frequencies, commonly in the 2.4 GHz and 5 GHz bands. These frequencies provide multiple channels for data transmission and allow for simultaneous connections from various devices. The range of a WLAN can vary depending on factors such as the power of the wireless router and the presence of obstacles.
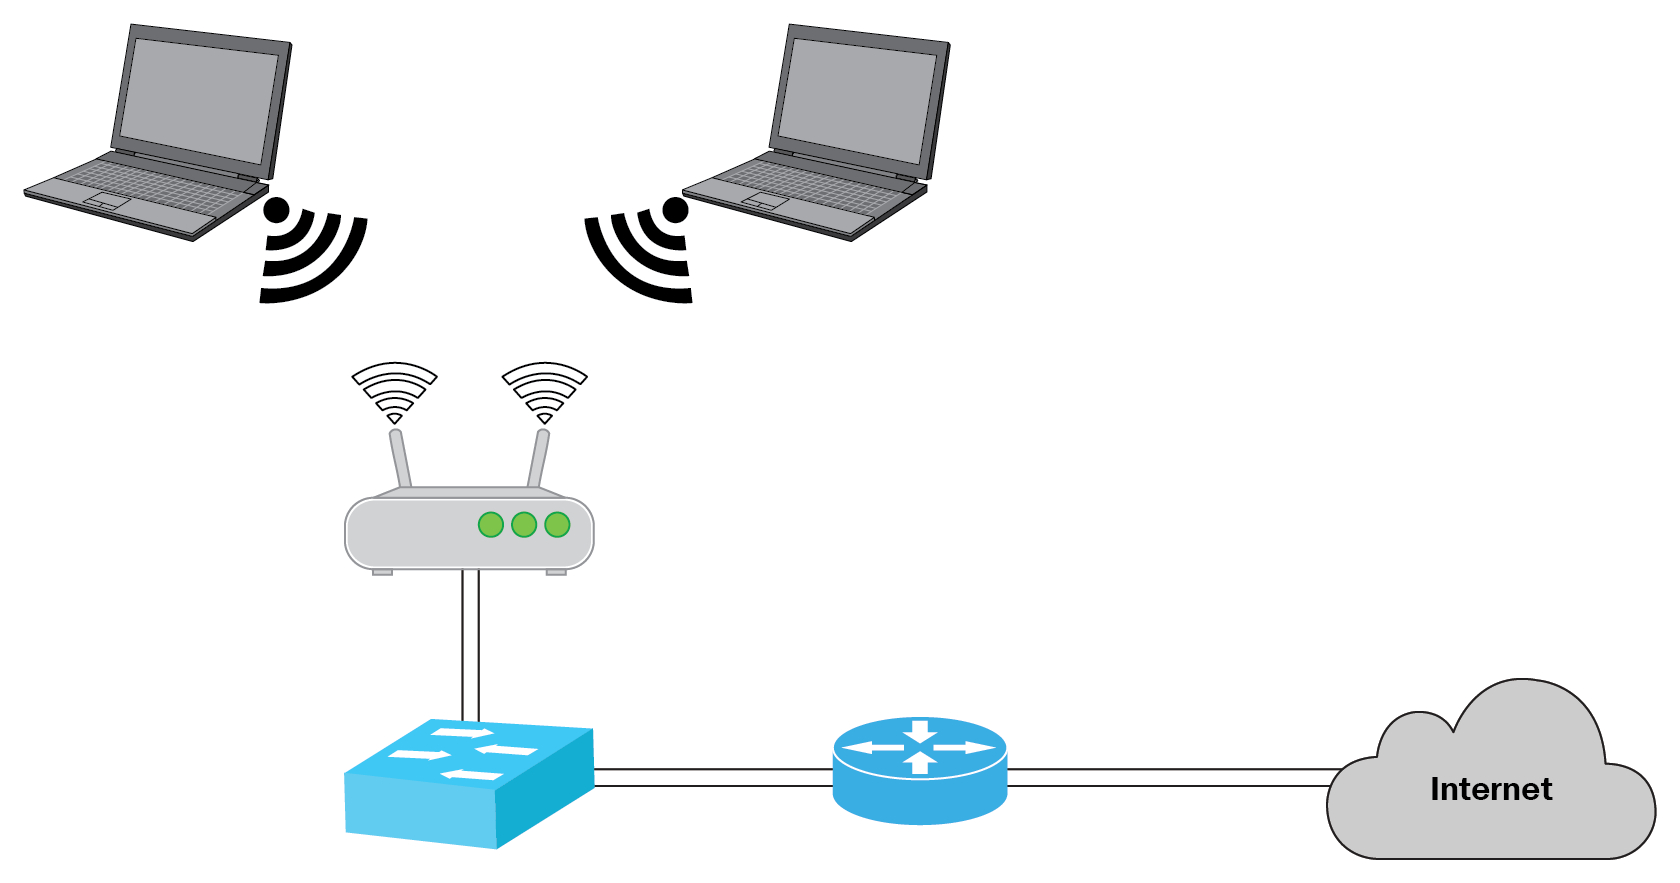
To establish a WLAN, you will need a wireless router. This device acts as the centralized hub, transmitting data between devices and providing internet access. The router converts incoming data from the modem into a wireless signal that devices can use to connect to the network.
Once you have acquired a wireless router, you will need to configure it to create your WLAN. This involves accessing the router’s settings through a web interface and setting a network name (SSID) and password. The SSID is the name that identifies your WLAN, while the password ensures that only authorized devices can connect.
Adding devices to your WLAN is a straightforward process. Most devices, such as smartphones, tablets, and laptops, have built-in Wi-Fi capabilities. Simply go to the device’s Wi-Fi settings, select your network from the list of available options, and enter the password if prompted. Once connected, the device can access the internet and communicate with other devices on the WLAN.
However, despite the convenience of WLANs, issues with the Wi-Fi connection can sometimes arise. Common problems include weak signal strength, interference from other devices, or configuration issues. By troubleshooting these issues, you can ensure a stable and reliable connection for all your devices.
Setting up the Wireless Router
Setting up a wireless router is a crucial step in creating a wireless local area network (WLAN) in your home or office. It enables you to connect multiple devices, such as laptops, smartphones, and tablets, to the internet without the need for physical cables. Follow these steps to set up your wireless router and create a secure and reliable WLAN.
1. Choose a suitable location: Select a central location for your wireless router, away from obstructions such as walls or other electronic devices. This will ensure maximum coverage and a strong signal throughout your space.
2. Connect the router to the modem: Start by connecting your wireless router to the modem provided by your internet service provider (ISP). Use an Ethernet cable to connect the WAN or Internet port on the router to the modem’s Ethernet port.
3. Power on the router: Plug the router into a power source and wait for it to power on. Make sure the power indicator light on the router is stable before proceeding.
4. Access the router’s configuration page: Open a web browser on your connected device and enter the router’s default IP address in the address bar. This is usually mentioned in the router’s user manual or can be found on the manufacturer’s website.
5. Log in to the router’s administration interface: To access the router’s administration interface, enter the default username and password provided with the router. It is highly recommended to change these default credentials to enhance security.
6. Configure the wireless settings: Once logged in, navigate to the wireless settings section. Choose a name for your network (SSID) and select the appropriate security type (such as WPA2-PSK) to secure your network. Set a strong password that combines letters, numbers, and special characters.
7. Save and apply the changes: After configuring the wireless settings, save the changes and apply them. The router may restart to apply the new settings.
8. Connect devices to your WLAN: Once the router has applied the changes, you can start connecting your devices to the WLAN. Go to your device’s Wi-Fi settings, select your network name (SSID), and enter the password. Your devices will now be connected to the WLAN and can access the internet.
9. Perform a network test: After connecting your devices, perform a network test to ensure that everything is working correctly. Check the internet speed, test connectivity on multiple devices, and ensure that you have a strong and stable Wi-Fi signal throughout your space.
By following these steps, you can easily set up your wireless router and create a reliable and secure WLAN. Enjoy the freedom of wireless connectivity and make the most out of your internet connection with a well-configured wireless network.
Configuring the Wireless Network
Once you have set up your wireless router, the next step is to configure your wireless network. This involves customizing various settings to ensure optimal performance and security. Here are some steps to help you configure your wireless network:
1. Access the Router Settings: To configure your wireless network, you need to access the router’s settings. Open a web browser and enter the default IP address of your router in the address bar. This will take you to the router’s login page. Enter the username and password to log in to the router’s admin interface.
2. Change the Network Name (SSID): The network name, also known as the Service Set Identifier (SSID), is the name of your wireless network. It is usually set to a default name by the manufacturer. Change the SSID to a unique name of your choice. This will make it easier for you to identify your network when connecting devices.
3. Set a Strong Password: It is crucial to secure your wireless network with a strong password to prevent unauthorized access. Navigate to the wireless security settings in your router’s admin interface and choose a strong and unique password. Avoid using common passwords or personal information that can be easily guessed.
4. Choose the Encryption Type: Encryption helps protect the data transmitted over your wireless network. Select the encryption type that provides the highest level of security supported by your router. The most common encryption types are WPA2 (Wi-Fi Protected Access 2) and WPA3.
5. Enable MAC Address Filtering: MAC address filtering allows you to specify which devices can connect to your wireless network. It adds an extra layer of security by only allowing devices with registered MAC addresses to access the network. Determine the MAC addresses of your devices and add them to the router’s MAC address filtering list.
6. Adjust Channel Settings: Wireless routers operate on different channels to minimize interference from other wireless networks. In your router’s settings, you can select the optimal channel for your network or set it to automatic selection mode. This will ensure that your network operates on the least congested channel.
7. Enable DHCP (Dynamic Host Configuration Protocol): DHCP automatically assigns IP addresses to devices on your network. Enable DHCP in your router’s settings to allow devices to connect and obtain IP addresses automatically. This eliminates the need to manually configure IP addresses for each device.
8. Save and Apply Settings: Once you have made the necessary adjustments, save the changes and apply the settings in your router’s admin interface. The router will reboot to apply the new configurations. Wait for the router to restart and reconnect to the network.
Configuring your wireless network properly ensures smooth and secure connectivity for all your devices. Take the time to customize the settings and implement strong security measures to protect your network and data.
Adding Devices to the WLAN
Once you have set up your wireless local area network (WLAN) by configuring your wireless router, the next step is to add devices to the network. Whether it’s a smartphone, tablet, laptop, or other wireless-enabled device, connecting them to your WLAN is a straightforward process.
To add a device to your WLAN, follow these simple steps:
- Ensure that the device you want to add has a Wi-Fi feature and is turned on.
- On the device, go to the settings menu and locate the Wi-Fi or wireless network settings.
- The device will scan for available networks. Wait for the list of networks to populate.
- Select your WLAN network from the list. It might be listed by its network name (SSID) or be similar to the router’s brand name.
- If your WLAN is password-protected, you will be prompted to enter the network password. Type the password correctly and click connect or join.
- Wait for the device to establish a connection with the WLAN. Once connected, you will see the Wi-Fi signal strength icon in the device’s status bar or settings panel.
Repeat these steps for each device you want to connect to the WLAN. Remember that most routers have a limit on the number of devices that can be connected simultaneously, so make sure to check your router’s specifications if you’re planning to connect multiple devices.
Some routers also offer advanced features like MAC address filtering, where you can specify specific devices that are allowed to connect to the WLAN. This can be useful if you want to restrict access to your network or enhance its security.
Adding devices to your WLAN allows you to enjoy the convenience of wireless connectivity throughout your home or office. Whether it’s for browsing the internet, streaming media, or accessing cloud-based services, a well-connected WLAN makes it all possible.
So go ahead and connect your devices to your WLAN and experience the freedom and flexibility of a wireless network!
Troubleshooting Wi-Fi Connection Issues
Having a stable and reliable Wi-Fi connection is essential in today’s digital age. However, there may be times when you encounter issues with your Wi-Fi connection that can disrupt your online activities. Here, we will discuss some common Wi-Fi connection problems and provide troubleshooting steps to help you resolve them.
1. Slow or weak Wi-Fi signal: If you’re experiencing slow internet speeds or a weak Wi-Fi signal, start by checking the placement of your router. Ensure that it is placed in a central location, away from obstructions such as walls or large objects. You can also try repositioning the router’s antennas or investing in a Wi-Fi range extender to improve coverage.
2. Interference from other devices: Interference from devices like cordless phones, microwaves, or neighboring Wi-Fi networks can impact your Wi-Fi signal. Try moving your router away from these potential sources of interference or changing the channel on your router’s settings to find a less congested frequency.
3. Incorrect network password: Are you unable to connect to your Wi-Fi network? Double-check that you are entering the correct password. If you’re unsure, you can try resetting the router to its factory settings and setting up a new network password.
4. Outdated router firmware: Router firmware updates often contain bug fixes and performance improvements. Check the manufacturer’s website or the router’s administration page to see if there are any firmware updates available. Updating the firmware can help resolve connectivity issues.
5. Device compatibility: Some older devices may have compatibility issues with newer Wi-Fi standards. If you’re having trouble connecting a specific device to your Wi-Fi network, check if the device supports the network’s frequency and security protocol. Upgrading the device’s firmware or using a Wi-Fi adapter may help resolve compatibility problems.
6. Network congestion: If you notice that your Wi-Fi connection becomes slow during specific times of the day, it could be due to network congestion. Many users connected to the same network can strain the bandwidth. Consider upgrading your internet plan or implementing quality of service (QoS) settings on your router to prioritize certain devices or activities.
7. Resetting network settings: When all else fails, you can try resetting your network settings. This process will restore the router to its default settings and erase any custom configurations. Refer to the router’s manual or website for instructions on how to perform a factory reset.
Remember, troubleshooting Wi-Fi connection issues can be a trial-and-error process. It may take a combination of these steps to address the problem successfully. If you’re still experiencing difficulties, contacting your internet service provider (ISP) or the router manufacturer’s customer support can provide additional assistance.
By following these troubleshooting tips, you can overcome common Wi-Fi connection issues and enjoy a seamless online experience.
Conclusion
Creating a wireless local area network (WLAN) is an essential skill for anyone seeking seamless connectivity and mobility. With the right knowledge and equipment, you can easily set up a WLAN in your home or office.
By following the steps outlined in this guide, including choosing the right router, configuring the network settings, and securing your WLAN, you can enjoy fast and reliable wireless internet access. Whether you need to connect your various devices, share files, or stream media, a well-designed WLAN will provide you with the convenience and flexibility you desire.
Remember to regularly update your router’s firmware and keep your network security protocols up to date to protect against potential threats. With proper maintenance, your WLAN will continue to serve you well for years to come.
Now that you have the knowledge to create your own WLAN, take this opportunity to enhance your connectivity and embrace the wireless world. Enjoy the freedom that a well-constructed WLAN provides!
FAQs
1. What is a wireless local area network (WLAN)?
A wireless local area network (WLAN) is a network that enables devices to connect to the internet or other devices wirelessly, using radio waves instead of physical cables. It allows for flexible and convenient connectivity, allowing users to access the internet or share files within a specific area, such as a home, office, or public space.
2. How does a WLAN work?
A WLAN relies on a wireless router or access point to transmit and receive data between devices. The router connects to the internet through an internet service provider (ISP) and creates a wireless network by broadcasting radio signals. Devices with compatible wireless adapters, such as laptops, smartphones, or tablets, can then access the network and communicate with each other or connect to the internet.
3. What equipment do I need to set up a WLAN?
To set up a WLAN, you will need a wireless router or access point that supports Wi-Fi connectivity. Additionally, devices such as laptops, smartphones, or tablets that have built-in or external Wi-Fi adapters are required to connect to the network. It is important to ensure that the devices and router are compatible with the same Wi-Fi standards (e.g., 802.11n or 802.11ac) for optimal performance.
4. How can I secure my WLAN?
To secure your WLAN, you can take several measures. Firstly, you should change the default administrator username and password of your wireless router to prevent unauthorized access. Secondly, enable Wi-Fi network encryption, such as WPA2 (Wi-Fi Protected Access II), to encrypt the data transmitted over the network. Lastly, it is recommended to use a strong and unique network password and periodically updating it to enhance security.
5. What is the range of a WLAN?
The range of a WLAN can vary depending on several factors, including the type of wireless router or access point, the environment (e.g., presence of walls or obstacles), and interference from other electronic devices. Generally, a WLAN can cover an area ranging from a few meters to several hundred meters, enabling connectivity within a home, office, or small-scale public areas. However, range extenders or additional access points can be used to expand the coverage area if needed.