
Gaming on a PC has become increasingly popular, allowing gamers to enjoy a wide variety of titles with superior graphics and customization options. While mouse and keyboard are the go-to peripherals for PC gaming, many players prefer the comfort and familiarity of a controller, like the wireless PS4 controller. However, connecting a wireless PS4 controller to a PC can be a bit tricky if you’re not familiar with the process.
In this article, we will guide you through the steps to seamlessly hook up a wireless PS4 controller to your PC. Whether you’re interested in playing sports, action, or racing games, having a controller in your hand can enhance your gaming experience. So, let’s dive in and learn how to make it happen!
Inside This Article
- Step 1: Check Compatibility
- Step 2: Install the Necessary Software
- Step 3: Connect the PS4 Controller to PC via Bluetooth
- Step 4: Configure the Controller Settings
- Step 5: Test the Controller Connection
- Troubleshooting Tips
- Conclusion
- FAQs
Step 1: Check Compatibility
Before attempting to connect your wireless PS4 controller to your PC, it’s important to ensure that your controller and PC are compatible. Checking compatibility is essential in order to have a smooth and successful connection process.
The first thing you need to do is determine whether your PC has built-in Bluetooth capability. Most modern laptops and desktop computers are equipped with Bluetooth technology, but it’s always a good idea to double-check. Go to the settings or control panel on your PC and search for the Bluetooth section. If you can find Bluetooth settings, it means your PC has Bluetooth support.
Next, you’ll need to verify that your PS4 controller is compatible with PC connection. Not all models of PS4 controllers are designed to work with PCs without additional software or adapters. The easiest way to check compatibility is to look for the model number on the back of your controller. If you see “CUH-ZCT1” or “CUH-ZCT2,” it means your controller is compatible with PC connection.
If your controller’s model number is different, don’t worry. There are still options available to connect your controller to your PC, such as using third-party software or a USB adapter. Research the specific model of your controller online to find out the best method for connecting it to a PC.
Additionally, make sure that your PC meets the minimum system requirements for using a wireless PS4 controller. Generally, the requirements are quite modest, with most machines easily meeting them. However, it’s worth mentioning that older or low-end PCs may struggle with controller connectivity or experience input lag.
By checking compatibility before starting the connection process, you can ensure that you have all the necessary components and avoid frustration during the setup. Once you’ve confirmed compatibility, you’re ready to move on to the next step and install the required software.
Step 2: Install the Necessary Software
Before you can connect your wireless PS4 controller to your PC, you will need to install the necessary software. There are a couple of popular software options available that will allow you to do this.
One of the most widely used programs is DS4Windows. This software is specifically designed for connecting PS4 controllers to PC and provides a user-friendly interface. You can download DS4Windows for free from the official website.
Once you have downloaded the DS4Windows file, navigate to the location where it was saved and double-click the file to run the installation wizard. Follow the prompts to install the software on your PC.
After the installation is complete, launch DS4Windows. You will be prompted to choose where to save the profiles and settings for your controllers. The default location is recommended, but you can choose a different folder if you prefer.
DS4Windows will also prompt you to install the necessary drivers for the PS4 controller to work properly on your PC. Follow the instructions provided to install the drivers.
Another popular software option is InputMapper. Similar to DS4Windows, InputMapper allows you to connect your PS4 controller to your PC and customize your controller settings. You can download InputMapper from their official website.
After downloading InputMapper, run the installation file and follow the on-screen instructions to install the software on your PC.
Once the installation is complete, launch InputMapper. If prompted, choose the default settings for your controller. InputMapper will automatically detect your PS4 controller once it is connected to your PC.
Both DS4Windows and InputMapper provide a seamless way to connect your wireless PS4 controller to your PC. Choose the software that suits your preferences and start enjoying your gaming experience on your computer.
Now that you have installed the necessary software, you’re ready to move on to the next step and connect your PS4 controller to your PC via Bluetooth.
Step 3: Connect the PS4 Controller to PC via Bluetooth
Connecting your PS4 controller to your PC via Bluetooth is a straightforward process. Follow these steps to get your wireless controller up and running:
1. Make sure your PC has Bluetooth capabilities. Most modern laptops and desktops come with built-in Bluetooth, but if your PC doesn’t have it, you can use a Bluetooth dongle or adapter to add this functionality.
2. Turn on your PS4 controller by pressing and holding the PlayStation button in the center of the controller until the light bar starts flashing.
3. Open your PC’s Bluetooth settings. You can usually find this in the system tray area of your taskbar, or you can search for “Bluetooth settings” in the Windows search bar.
4. On your PC’s Bluetooth settings, click on the option to “Add a device” or “Pair a new device.” This will initiate the pairing process.
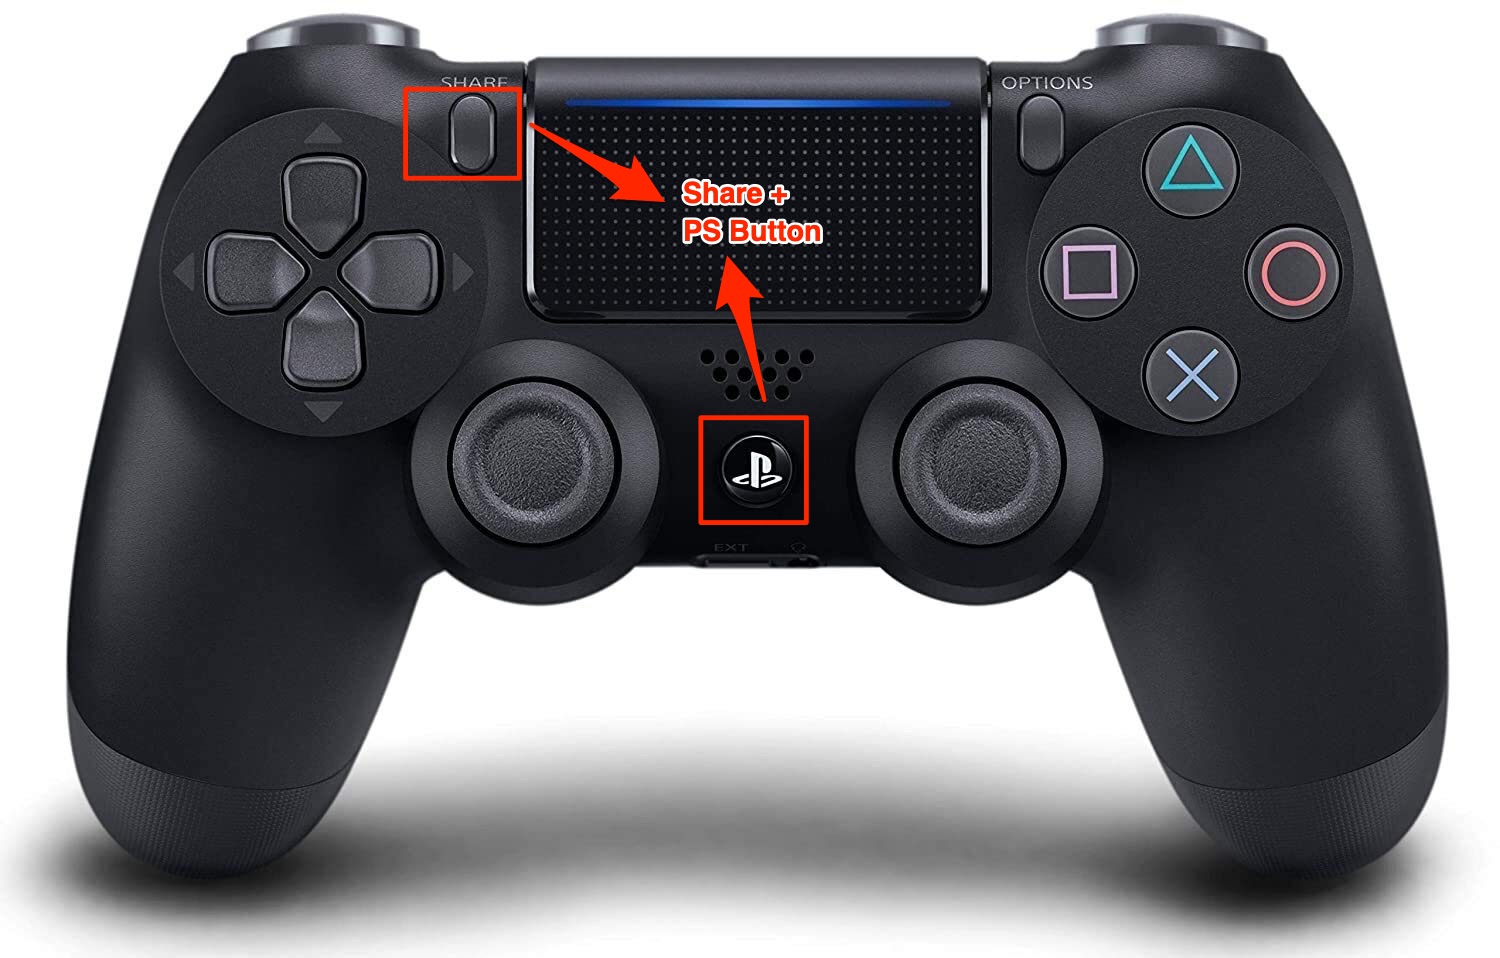
5. On your PS4 controller, press and hold the “Share” button and the “PS” button simultaneously until the light bar starts flashing rapidly.
6. Your PC should now detect the PS4 controller. Look for the “Wireless Controller” or “DUALSHOCK 4” option in the list of available devices and click on it to begin the pairing process.
7. Once the pairing process is complete, your PS4 controller will be connected to your PC via Bluetooth. The light bar on the controller should now be a solid color, indicating a successful connection.
Now that your PS4 controller is connected to your PC via Bluetooth, you can use it to play games and navigate your PC just like you would with a traditional controller.
Step 4: Configure the Controller Settings
Now that you have successfully connected your PS4 controller to your PC via Bluetooth, it’s time to configure the controller settings to ensure optimal gaming experience. Follow these steps to get started:
1. Open the Settings Menu: On your PC, go to the Start menu and click on the Settings icon (the gear-shaped symbol). This will open the Windows Settings menu.
2. Select the Devices Option: In the Windows Settings menu, click on the “Devices” option. This will take you to the Devices settings page.
3. Choose the Bluetooth & Other Devices Tab: In the Devices settings page, select the “Bluetooth & other devices” tab located on the left-hand side.
4. Enable Bluetooth: Make sure that Bluetooth is turned on. If it is already on, you can skip this step. If it is off, simply toggle the Bluetooth switch to the “On” position.
5. Add a Bluetooth Device: Under the “Bluetooth & other devices” tab, click on the “Add Bluetooth or other device” button. This will open the “Add a device” window.
6. Select Wireless Controller: In the “Add a device” window, click on the “Bluetooth” option. This will scan for any available Bluetooth devices nearby.
7. Pair the Controller: Press and hold the PlayStation button and the Share button on your PS4 controller simultaneously for a few seconds. The light bar on the controller will start flashing, indicating that it is in pairing mode.
8. Click on the Controller: In the “Add a device” window, you should see your PS4 controller listed as “Wireless Controller”. Click on it to connect.
9. Confirm the Pairing: Once you click on the controller, Windows will attempt to pair with it. After a few moments, you should see a notification confirming the successful pairing of your PS4 controller.
10. Adjust Controller Settings: To modify the controller settings, go back to the Devices settings page by clicking on the “Devices” option in the Windows Settings menu. Under the “Bluetooth & other devices” tab, you should see your PS4 controller listed. Click on it to access its settings.
From here, you can customize various aspects of your controller, such as button mapping, sensitivity, and vibration settings. Take some time to fine-tune the configuration according to your preferences to enhance your gaming experience.
Now that you have successfully configured your PS4 controller settings on your PC, you are all set to enjoy your favorite games with the comfort and familiarity of your PS4 controller.
Step 5: Test the Controller Connection
Now that you have successfully connected your wireless PS4 controller to your PC, it’s time to test the connection and ensure everything is working properly. Follow these steps to test the controller connection:
1. Launch a game or an application that supports PS4 controllers on your PC. It’s recommended to choose a game that allows you to fully utilize the controller’s features.
2. Once the game or application has started, press the buttons on your PS4 controller to see if they are registering correctly on your PC. Test the directional buttons, analog sticks, triggers, and all the other buttons to ensure they are working as intended. Pay attention to the on-screen prompts or indicators that show the input from your controller.
3. Move the analog sticks in all directions and confirm that the movement is smooth and precise. The response time should be immediate, without any noticeable lag.
4. Try out the vibration feature of the controller by performing actions in the game that trigger vibrations. If the vibration feature is supported by the game and properly configured, you should feel the controller vibrating in response to specific events.
5. Test the wireless range of the controller by moving away from the PC while playing the game. Walk around the room and ensure that the controller remains connected without any interruptions or signal drops. This will help you determine if there are any range limitations or interferences in your setup.
6. If you encounter any issues during the testing process, refer back to the troubleshooting tips provided earlier in this guide. These tips can help you resolve common connectivity problems and ensure a smooth gaming experience.
By following these testing steps, you can ensure that your wireless PS4 controller is properly connected to your PC and functioning correctly. Enjoy the seamless gameplay experience and make the most out of your favorite games!
Troubleshooting Tips
Even though connecting a wireless PS4 controller to a PC is a relatively straightforward process, issues can sometimes arise. If you encounter any difficulties, here are some troubleshooting tips to help you resolve common problems:
1. No Bluetooth Connection: If your computer does not have built-in Bluetooth functionality, you may need to purchase a Bluetooth dongle and connect it to an available USB port. Once the dongle is successfully installed, repeat the steps to connect your PS4 controller.
2. Controller Not Recognized: If your PC is not detecting the controller, try resetting the controller by locating the small hole on the back near the L2 button. Insert a paperclip or similar object into the hole and hold it for a few seconds. Then, try reconnecting the controller.
3. Driver Issues: If your controller is still not working, it may be due to missing or outdated drivers. Visit the official website of your PC’s manufacturer and look for driver updates for the Bluetooth adapter or USB ports. Download and install the latest drivers to ensure compatibility.
4. Incompatible Games: Some PC games may not inherently support the use of a PS4 controller. In such cases, you can try using third-party software like DS4Windows or InputMapper to map the controller inputs to keyboard and mouse commands.
5. Interference with Other Devices: If you experience connectivity issues or input lag, consider moving away from other devices that may be causing interference. WiFi routers, cordless phones, and other Bluetooth devices can sometimes disrupt the signal between the controller and your PC.
6. Battery Life: If your PS4 controller is not holding a charge, ensure that it is connected to your PC or a power source via a USB cable. Additionally, try using a different charging cable or port to eliminate any issues with the power source.
7. Controller Firmware Update: Check if there are any firmware updates available for your PS4 controller. These updates can sometimes improve compatibility and performance. Visit the official PlayStation website or use the PlayStation app to update your controller’s firmware.
Remember, troubleshooting may require some trial and error. If one solution doesn’t work, try the next until you find a resolution. With persistence and patience, you’ll soon be enjoying seamless wireless gameplay with your PS4 controller on your PC.
Conclusion
Connecting a wireless PS4 controller to your PC can greatly enhance your gaming experience. With the help of the right tools and software, you can enjoy the convenience and flexibility of using your controller to play games on your computer.
By following the step-by-step instructions outlined in this article, you can successfully hook up your wireless PS4 controller to your PC. Whether you’re a casual gamer or a dedicated enthusiast, having the ability to use your controller on different platforms opens up a whole new world of gaming possibilities.
Remember to check for any updates or drivers that may be needed to ensure a smooth and seamless connection between your controller and PC. With a little patience and persistence, you’ll be up and running in no time. So why wait? Grab your controller, fire up your PC, and get ready to immerse yourself in an unforgettable gaming experience!
FAQs
1. Can I connect a wireless PS4 controller to my PC?
Yes, you can connect a wireless PS4 controller to your PC. By using either Bluetooth or a USB cable, you can set up the controller to work with your PC and enjoy gaming with the familiar comfort of a PS4 controller.
2. How do I connect a wireless PS4 controller to my PC using Bluetooth?
To connect a wireless PS4 controller to your PC using Bluetooth, make sure your PC has a Bluetooth adapter. Turn on the Bluetooth on your PC and on the PS4 controller by holding the PlayStation logo button and the Share button simultaneously. On your PC, go to the Bluetooth settings, search for devices, and select the PS4 controller. Follow the on-screen instructions to complete the pairing process.
3. Can I connect multiple wireless PS4 controllers to my PC?
Yes, you can connect multiple wireless PS4 controllers to your PC. Once you have successfully connected the first controller, repeat the steps mentioned in the previous question to connect additional controllers. However, keep in mind that the number of controllers your PC can support may vary depending on your PC’s hardware and the games you are playing.
4. What if my PC doesn’t have built-in Bluetooth?
If your PC does not have built-in Bluetooth, don’t worry! You can easily purchase and install a Bluetooth USB adapter. This adapter will allow you to connect your wireless PS4 controller to your PC using Bluetooth.
5. Can I connect a wireless PS4 controller to my PC using a USB cable?
Yes, you can also connect a wireless PS4 controller to your PC using a USB cable. Simply plug one end of the USB cable into the PS4 controller and the other end into a USB port on your PC. Your PC will automatically detect the controller, and you’ll be able to use it for gaming on your PC.