
If you’re a gaming enthusiast looking to enhance your PlayStation 4 (PS4) experience, one accessory you might consider is a wireless headset. A wireless headset offers the convenience of untethered gameplay, allowing you to immerse yourself in the action without worrying about tangling cords. Not only does it provide a clutter-free gaming setup, but it also offers high-quality audio and a comfortable fit for extended gaming sessions. In this article, we’ll guide you through the process of hooking up a PS4 wireless headset, whether you’re a seasoned gamer or a novice exploring the world of console gaming. So grab your controller and let’s dive into the steps to connect your wireless headset to the PS4!
Inside This Article
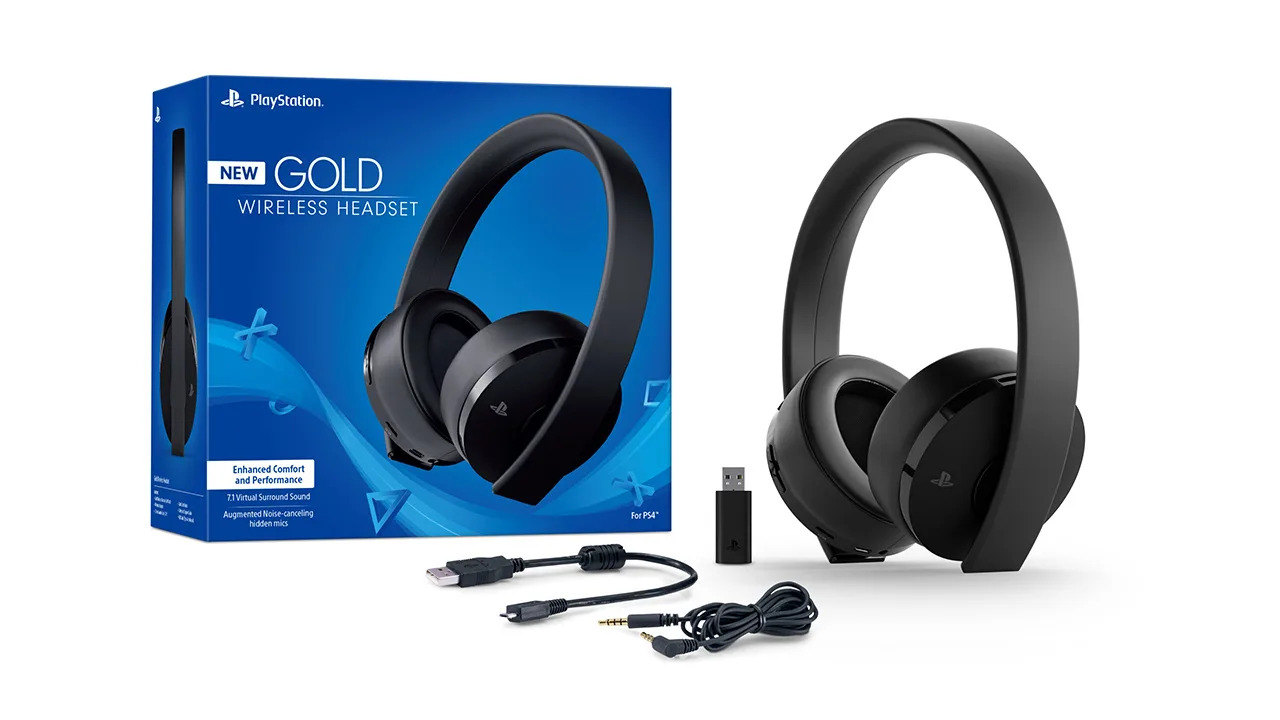
- Unboxing the PS4 Wireless Headset
- Connecting the PS4 Wireless Headset to the Console
- Pairing the PS4 Wireless Headset with the Controller
- Adjusting Audio Settings on the PS4 for the Wireless Headset
- Conclusion
- FAQs
Unboxing the PS4 Wireless Headset
When it comes to gaming, having a good headset can make all the difference in your gaming experience. The PS4 Wireless Headset is a top-of-the-line accessory that provides immersive audio and crystal-clear communication. In this section, we will walk you through the process of unboxing your new PS4 Wireless Headset.
1. First, carefully remove the packaging of the PS4 Wireless Headset. Be sure to handle the headset with care to avoid any damage.
2. Inside the package, you will find the PS4 Wireless Headset, a wireless adapter, a USB charging cable, and an instruction manual. Take a moment to familiarize yourself with the contents.
3. Connect the USB charging cable to the headset and plug the other end into a power source. Allow the headset to charge fully before using it for the first time. This step ensures optimal battery performance.
4. While the headset is charging, take a moment to read the instruction manual. It will provide you with important information about how to use and maintain your new PS4 Wireless Headset.
5. Once the headset is fully charged, you can detach the USB charging cable. The headset is now ready to be connected to your PS4 console.
6. Take the wireless adapter and insert it into one of the available USB ports on your PS4 console. This adapter allows the wireless communication between the headset and the console.
7. Turn on your PS4 console and navigate to the settings menu. From there, select the “Devices” option and then choose “Audio Devices”.
8. In the Audio Devices menu, select “Output Device” and choose the PS4 Wireless Headset from the list of available options. This setting ensures that the audio output is directed to your headset.
9. Next, select “Input Device” and choose the PS4 Wireless Headset as your microphone input. This setting allows you to communicate with other players during multiplayer sessions.
10. Finally, adjust the volume settings to your preference. You can easily control the volume using the buttons located on the headset itself.
That’s it! You have successfully unboxed your PS4 Wireless Headset and connected it to your PS4 console. Now, you can enjoy immersive gaming audio and seamless communication with your friends and teammates.
Connecting the PS4 Wireless Headset to the Console
So, you’ve got your shiny new PS4 wireless headset and you’re excited to experience immersive gaming audio. But how do you connect it to your console? Don’t worry, we’ve got you covered. Follow these simple steps to get your PS4 wireless headset up and running in no time:
1. Start by unboxing your PS4 wireless headset. Inside the box, you’ll find the headset itself, a wireless USB dongle, and a USB charging cable. Make sure all the components are present and in good condition.
2. Locate the USB port on your PS4 console. It’s usually located on the front or back of the console. Plug in the wireless USB dongle into the USB port. This dongle acts as a receiver and allows your console to communicate with the wireless headset.
3. Next, turn on your PS4 console. Once the console is powered up, navigate to the “Settings” menu using your controller. From there, select “Devices” and then “Audio Devices.”
4. In the “Audio Devices” menu, you will see an option for “Output to Headphones.” Select this option and choose “All Audio.” This setting ensures that all audio from your console will be directed to your wireless headset.
5. Now it’s time to pair your PS4 wireless headset with the console. On your headset, locate the power button. Press and hold the power button until the indicator light starts flashing. This indicates that your headset is in pairing mode.
6. On your PS4 console, go back to the “Audio Devices” menu. From there, select “Output to Headphones” again, but this time choose “Chat Audio.” This setting will allow you to use the headset’s microphone for in-game chat.
7. To complete the pairing process, press the “Connect” button on the wireless USB dongle. This will initiate the connection between the headset and the console. Once the connection is established, the indicator light on your headset will become solid.
And there you have it! Your PS4 wireless headset is now connected to your console. You can start enjoying high-quality audio and seamless in-game communication. Remember to adjust the volume and audio settings according to your preferences to enhance your gaming experience.
It’s worth noting that some wireless headsets may have additional steps or specific instructions provided by the manufacturer. Always refer to the user manual or online guides for your specific headset model for any additional setup requirements.
Now, get ready to immerse yourself in the world of gaming with your newly connected PS4 wireless headset!
Pairing the PS4 Wireless Headset with the Controller
Pairing your PS4 wireless headset with the controller is a simple process that allows you to enjoy immersive gaming experiences without the hassle of tangled wires. Here’s a step-by-step guide on how to do it:
1. Make sure your PS4 console is turned on and the controller is fully charged. The headset should also be charged or connected to a power source.
2. Press and hold the power button on the headset until it enters pairing mode. This is usually indicated by a flashing light or some other visual cue.
3. On your PS4 controller, press and hold the PS button to bring up the quick menu. Select “Settings” and navigate to “Devices” and then “Bluetooth Devices.”
4. In the Bluetooth Devices menu, select “Add New Device” and wait for the PS4 to search for available devices.
5. Once the PS4 detects your wireless headset, it will appear in the list of available devices. Select it and the pairing process will begin.
6. Follow any on-screen prompts to complete the pairing process. This may include entering a passkey or confirming the connection on both the controller and the headset.
7. Once the pairing is successful, the wireless headset will be connected to the controller, and you can start enjoying the game audio wirelessly.
It’s important to note that different wireless headsets may have slightly different pairing procedures, so it’s always a good idea to consult the manufacturer’s instructions specific to your model.
In addition, some wireless headsets may also require additional software updates or configuration settings on your PS4. Be sure to check for any firmware updates for your headset and follow any additional instructions provided by the manufacturer to ensure optimal performance.
By following these steps, you can easily pair your PS4 wireless headset with the controller and immerse yourself in the world of gaming without the limitations of wires.
Adjusting Audio Settings on the PS4 for the Wireless Headset
Once you’ve successfully connected your PS4 wireless headset to the console and paired it with the controller, it’s time to fine-tune the audio settings to ensure you have the best gaming experience. Adjusting the audio settings allows you to customize the sound output according to your preferences and optimize the performance of your wireless headset.
To access the audio settings on your PS4, follow these steps:
- 1. Power on your PS4 console and go to the main menu.
- 2. Navigate to the “Settings” option and select it.
- 3. In the Settings menu, select “Devices”.
- 4. From the Devices menu, choose “Audio Devices”.
- 5. You will see an option for “Output to Headphones”. Select this option.
Once you’ve selected “Output to Headphones”, you will be presented with several audio output options. Here’s what each option means:
- – “Chat Audio”: This option prioritizes chat audio over game audio. If you prefer clear communication during multiplayer gaming, select this option.
- – “All Audio”: This option allows you to hear both chat audio and game audio through your wireless headset.
- – “Disabled”: This option turns off audio output to the wireless headset. If you want to use your TV or external speakers for audio output, choose this option.
Choose the option that suits your needs and preferences. If you’re unsure, start with the “All Audio” option, as it provides a balanced mix of chat audio and game audio.
In addition to the “Output to Headphones” option, there are a few other audio settings you can adjust:
- – “Volume Control (Headphones)”: This setting allows you to control the volume level of your wireless headset directly from the PS4. Adjust the slider to increase or decrease the volume.
- – “Sidetone”: Sidetone is a feature that allows you to hear your own voice through the headset. Turning it on can provide a more natural and immersive experience during voice chats.
- – “Microphone Level”: This setting lets you adjust the sensitivity of the microphone on your wireless headset. Increase the level if your voice is too quiet, and decrease it if your voice is too loud or distorted.
Experiment with these settings to find the perfect audio configuration for your PS4 wireless headset. Keep in mind that different games and applications may have their own audio settings, so you may need to make additional adjustments within individual games.
With the audio settings properly adjusted, you’ll be able to immerse yourself in a world of gaming sound effects, crystal-clear communication, and an overall enhanced gaming experience with your PS4 wireless headset.
Conclusion
In conclusion, hooking up a PS4 wireless headset is a simple and convenient way to enhance your gaming experience. With its wireless functionality, you can enjoy a more immersive gameplay without the hassle of tangled wires. By following the step-by-step guide we have provided, you can easily connect your headset to your PS4 and start enjoying high-quality audio and crystal-clear communication with your fellow gamers.
Remember to check the compatibility of your headset with the PS4 and ensure that you have charged it fully before usage. Additionally, keep in mind that different headsets may have specific instructions, so always refer to the manufacturer’s manual for precise guidance.
So, take your gaming to the next level with a wireless headset for your PS4 and enjoy an unmatched audio experience that will truly immerse you in the world of your favorite games.
FAQs
1. Can I connect my wireless headset to a PS4?
Yes, you can connect a wireless headset to a PS4. The PS4 has built-in Bluetooth capability, allowing you to pair a compatible wireless headset to your console wirelessly.
2. How do I pair my wireless headset with a PS4?
To pair your wireless headset with a PS4, follow these steps:
- Make sure your headset is in pairing mode. Consult the headset’s user manual to find out how to enable pairing mode.
- On the PS4 home screen, go to the “Settings” menu.
- Select “Devices” and then “Bluetooth Devices”.
- Choose “Add a new device” and wait for the PS4 to detect your headset.
- Select your headset from the list of available devices.
- Once your headset is successfully paired, you can adjust the audio settings in the “Audio Devices” menu.
3. Will any wireless headset work with a PS4?
No, not all wireless headsets are compatible with the PS4. The headset needs to support Bluetooth or USB audio connectivity to work with the PS4. Make sure to check the compatibility of the headset with the PS4 before purchasing.
4. Can I use my wireless headset for chat and game audio on a PS4?
Yes, most wireless headsets that are compatible with the PS4 allow you to use them for both chat and game audio. However, some headsets may require additional setup or configuration to enable both functionalities. Consult the headset’s user manual or the manufacturer’s website for specific instructions.
5. How can I troubleshoot connection issues with my wireless headset on a PS4?
If you are experiencing connection issues with your wireless headset on a PS4, try the following troubleshooting steps:
- Make sure your headset is fully charged.
- Restart your headset and PS4, then try pairing them again.
- Check if there are any firmware updates available for your headset and install them if necessary.
- Move closer to the PS4 to ensure a strong Bluetooth signal.
- If using a USB wireless headset, try using a different USB port on the PS4.
- If all else fails, consult the headset’s user manual or contact the manufacturer for further assistance.