
Have you ever wondered how to efficiently load large amounts of data into a compressed table in Oracle? If so, you’re in the right place! In this article, we will explore the process of loading data into a compressed table in Oracle, helping you optimize storage and improve performance. Oracle offers various compression options, such as table compression and Advanced Compression, to reduce disk space and boost query response time.
By utilizing compression techniques, you can save storage space while maintaining data integrity. We’ll delve into the different compression methods, including Basic Table Compression and Hybrid Columnar Compression, and explain how to select the right compression option based on your data characteristics and performance requirements.
So, if you’re ready to become a pro at loading data into compressed tables in Oracle, let’s dive in and explore the best practices and tips that will enhance your database performance.
Inside This Article
- Overview
- Step 1: Create a Compressed Table
- Step 2: Prepare the Data File
- Step 3: Enable Direct Path Load
- Step 4: Load Data into the Compressed Table
- Step 5: Verify the Data
- Step 6: Disable Direct Path Load
- Conclusion
- FAQs
Overview
When working with large databases in Oracle, it is important to optimize the storage and performance of your tables. One way to achieve this is by using compression techniques to reduce the storage requirements while maintaining data integrity. In this article, we will explore the process of loading data into a compressed table in Oracle.
Compressing tables in Oracle offers several benefits. It reduces the disk space required to store the data, resulting in cost savings and improved performance. Compressed tables also facilitate faster data retrieval and query execution, benefiting applications with heavy read operations.
Before we delve into the steps of loading data into a compressed table, let’s briefly discuss how compression works in Oracle. Oracle provides two compression methods: basic compression and advanced compression. Basic compression achieves space savings by eliminating redundant data within a data block. On the other hand, advanced compression utilizes more sophisticated algorithms to achieve higher levels of compression.
Now that we have a general understanding of compression in Oracle, let’s explore the steps involved in loading data into a compressed table.
Step 1: Create a Compressed Table
Creating a compressed table in Oracle is a straightforward process that allows for efficient data storage and retrieval. In this step, we will guide you through the process of creating a compressed table for your data.
First, you need to decide which table you want to compress. It’s important to note that not all tables are suitable for compression. Generally, tables that contain large amounts of repetitive data or columns with low cardinality are good candidates for compression.
To create a compressed table, you can use the “CREATE TABLE” statement with the “COMPRESS” attribute. Here’s an example:
sql
CREATE TABLE compressed_table
(
column1 datatype,
column2 datatype,
…
)
COMPRESS;
In the above example, “compressed_table” is the name of the table you want to create. Replace “datatype” with the appropriate data types for your specific columns.
When you include the “COMPRESS” attribute, Oracle will automatically use table compression for the entire table. If you want to compress only specific partitions or subpartitions of the table, you can include the “COMPRESS” attribute at the partition or subpartition level.
It’s important to note that table compression in Oracle is an Enterprise Edition feature. So, make sure your database is running the Enterprise Edition before attempting to create a compressed table.
Once you have created the compressed table, you can proceed to the next step of preparing the data file for loading into the table.
Step 2: Prepare the Data File
Once you have created a compressed table in Oracle, the next step is to prepare the data file that will be loaded into the table. Here are the steps to follow:
- Format the Data: Before loading the data, make sure it is properly formatted. Ensure that the data is compatible with the table structure and data types. This includes checking for any delimiters or separators that need to be used.
- Verify Data Quality: It’s essential to ensure the data’s quality before loading it into the compressed table. Perform necessary data validation and cleansing processes to eliminate any inconsistencies or errors.
- Organize the Data File: Arrange the data in the file according to the table’s column order. Each row of data should align with the respective columns in the table.
- Consider Compression Algorithms: Depending on the compression algorithm used for the table, you may need to compress the data file accordingly. Familiarize yourself with the compression algorithm options available in Oracle and understand which one is being utilized for the table.
- Create Control File or Data Pump: Depending on your preferred method for loading data, you may need to create a control file or data pump. These tools allow you to specify the source file, the target table, mapping rules, and other loading parameters.
- Transfer the Data File: If the data file is located on a different server or machine, make sure it is accessible from the Oracle database server. Transfer the data file to the appropriate location where the database can access it during the load process.
Preparing the data file is a critical step in successfully loading data into a compressed table in Oracle. By following these steps and ensuring the data is correctly formatted and organized, you can simplify the loading process and avoid potential errors or inconsistencies.
Step 3: Enable Direct Path Load
Enabling direct path load in Oracle allows you to efficiently load large amounts of data into a compressed table. By bypassing the buffer cache, direct path load significantly reduces overhead and improves performance during the data loading process.
To enable direct path load, you need to set the appropriate parameter in your Oracle session. Follow the steps below to enable direct path load:
- Connect to your Oracle database using your preferred SQL client.
- Execute the following command to alter your session:
ALTER SESSION ENABLE PARALLEL DML;
This command enables parallel DML (Data Manipulation Language) operations, which is a requirement for direct path load.
Next, execute the following command to enable direct path load:
ALTER SESSION FORCE PARALLEL DML PARALLEL 4;
This command instructs Oracle to use parallel processing with a degree of 4 for the direct path load operation. The degree can be adjusted based on your system resources and the size of the data being loaded.
It’s important to note that enabling parallel DML and setting the degree of parallelism may require appropriate privileges in your Oracle database. Make sure you have the necessary permissions or consult with your database administrator if needed.
Once you have enabled direct path load, you can proceed to the next step of loading data into your compressed table. This optimization technique ensures a faster and more efficient data loading process, particularly for large datasets.
Step 4: Load Data into the Compressed Table
Now that we have created a compressed table and prepared the data file, it’s time to load the data into the table. Loading data into a compressed table follows the same process as loading data into a regular table, with a few additional considerations.
The first step is to prepare the data file for the load. Make sure that the data file is in a format that is compatible with the Oracle database, such as a delimited file (e.g., CSV) or a fixed-width file. Ensure that the file contains the necessary columns and data in the correct format.
Next, open the SQL*Loader utility, which is the tool used to load data into Oracle databases. You can execute SQL*Loader from the command line or through a graphical user interface, such as Oracle SQL Developer.
Specify the necessary parameters for the data load, including the control file, data file, and log file. The control file tells SQL*Loader how to map the columns in the data file to the columns in the table. It also specifies any transformations or validations that need to be applied during the load process.
In the control file, make sure to set the appropriate column attributes for the compressed columns. For example, if you have a column compressed using the “HIGH” compression level, set the attribute “COMPRESS FOR HIGH” for that column in the control file. This ensures that the data is loaded correctly into the compressed column.
Once you have set up the control file, execute the SQL*Loader utility to load the data into the compressed table. SQL*Loader will read the data file, apply any transformations or validations specified in the control file, and insert the data into the compressed table.
During the data load, SQL*Loader will take advantage of the compression algorithm specified for the table. It will compress the data as it is inserted into the table, reducing the storage space required and improving query performance.
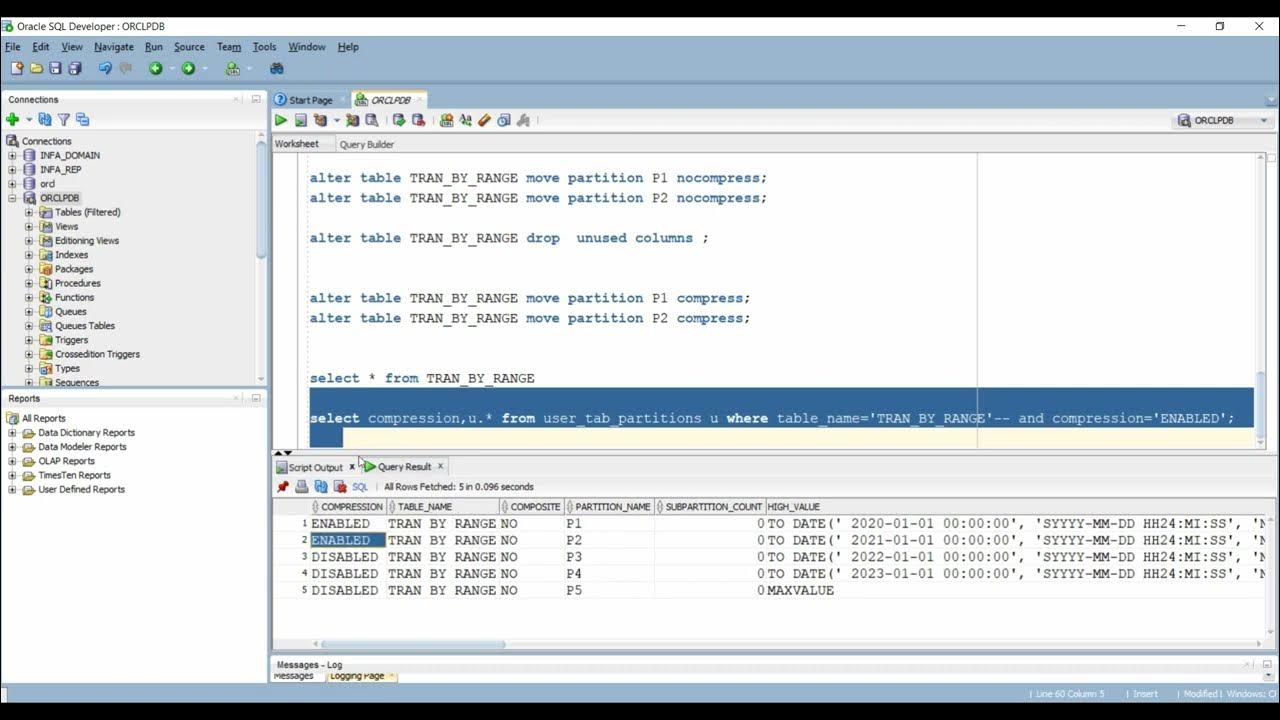
After the data load is complete, you can verify the loaded data by executing queries on the compressed table. You should see that the data has been successfully loaded and that the compression has been applied to the specified columns.
It’s important to note that loading data into a compressed table may take longer than loading data into a regular table. This is because the compression algorithm needs to be applied during the load process. However, the benefits of data compression in terms of storage space savings and query performance improvements outweigh the slight increase in load time.
Once you have successfully loaded the data into the compressed table, you can proceed to the next step of the process, which is to verify the data. This step ensures that the data has been loaded correctly and that the compression has been applied as intended.
Now that we have covered the steps for loading data into a compressed table, let’s move on to Step 5: Verify the Data.
Step 5: Verify the Data
After loading the data into the compressed table, it’s crucial to verify that the data was loaded correctly and accurately. This step ensures the integrity of the data and confirms that the compression process did not introduce any errors.
Here are a few methods you can use to verify the data:
1. Row Count:
Compare the row count of the compressed table with the expected number of rows. You can use the COUNT() function in SQL to get the row count:
sql
SELECT COUNT(*) FROM compressed_table;
2. Sample Data Check:
Randomly select a few rows from the compressed table and compare them with the original data. This method helps ensure that the data was not altered or lost during the compression process. You can use the following query to select a sample of rows:
sql
SELECT * FROM compressed_table SAMPLE (10); — Retrieves a random sample of 10% of the rows
3. Column Checks:
For each column in the compressed table, compare the data values with the original data. Check for any discrepancies or differences. You can use the following query to compare the data in a specific column:
sql
SELECT column_name FROM compressed_table MINUS SELECT column_name FROM original_table;
It’s important to note that the verification process may vary depending on the specific requirements of your data. Adapt these methods to suit your needs and ensure the accuracy of the compressed data.
Remember to document the verification process and results for future reference. This documentation will be useful for auditing purposes and to ensure data reliability.
Once you have successfully verified the data in the compressed table, you can proceed with confidence, knowing that your data is securely stored and compressed.
Step 6: Disable Direct Path Load
Once you have successfully loaded the data into the compressed table using direct path load, you might want to disable this feature to revert back to the normal loading process. Disabling direct path load can be done by following these steps:
1. Connect to your Oracle database using a database administration tool such as SQL*Plus or SQL Developer.
2. Disable the direct path load mode by running the following command:
ALTER SESSION DISABLE PARALLEL DML;
This command will disable the direct path load mode for the current database session.
3. Verify that the direct path load mode has been disabled by checking the value of the parameter:
SHOW PARAMETER parallel_dml_mode;
If the value of the parameter is set to “DISABLED”, then direct path load mode has been successfully disabled.
4. You can now proceed to load data into the compressed table using the normal loading process.
Disabling direct path load can be useful in certain scenarios where you want to perform operations that are not supported in direct path load mode, such as triggers or referential integrity constraints. By disabling direct path load, you can ensure that these operations are correctly executed during the data loading process.
Remember to enable direct path load mode again if you need to load data into the compressed table using direct path load in the future.
Conclusion
In today’s fast-paced world, where data storage and management are becoming increasingly critical, the ability to load data into compressed tables in Oracle is a valuable skill for database administrators and developers. By utilizing compression techniques, such as Advanced Row Compression and Advanced Compression, Oracle allows users to optimize storage and improve query performance.
With the step-by-step guide provided in this article, you can easily learn how to load data into compressed tables in Oracle. Whether you are dealing with large datasets, aiming to reduce storage costs, or simply wanting to enhance query performance, compressed tables offer an efficient and effective solution.
Remember to consider the trade-offs and requirements associated with compression, such as increased CPU overhead and potential limitations on specific data types. It is crucial to analyze your specific use case and workload to determine the most suitable compression method for your Oracle table.
Mastering the art of loading data into compressed tables in Oracle will not only optimize your database performance but also save valuable storage space, ultimately enhancing the overall efficiency and effectiveness of your Oracle database.
FAQs
1. What is a compressed table in Oracle?
A compressed table in Oracle is a table where the data is stored in a compressed format, resulting in reduced storage space requirements and improved query performance. The compression can be achieved through various compression algorithms provided by Oracle, such as basic table compression, advanced row compression, and segment-level compression.
2. Why would I want to load data into a compressed table?
Loading data into a compressed table offers several advantages. Firstly, it helps optimize storage utilization by reducing the space required for data storage. This can be particularly useful when dealing with large volumes of data that can quickly fill up disk space. Additionally, compressed tables can improve query performance as compressed data requires fewer I/O operations, resulting in faster retrieval times.
3. How can I load data into a compressed table in Oracle?
To load data into a compressed table in Oracle, you can use different methods depending on your specific requirements. One option is to use the SQL*Loader utility, which is a powerful tool for loading data from external files into Oracle database tables. Another option is to use the Oracle Data Pump utility, which provides a more flexible and efficient way to import data into compressed tables.
4. Are there any limitations or considerations when loading data into compressed tables?
Yes, there are a few important considerations to keep in mind when loading data into compressed tables. Firstly, ensure that the compression settings of the table are compatible with the loading method you choose. For example, if you are using Oracle Data Pump, make sure to specify the appropriate compression options during the import process. Additionally, be aware that compression may slightly impact the performance of data loading, especially for certain types of data or specific compression algorithms.
5. Can I compress existing data in a non-compressed table?
Yes, it is possible to compress existing data in a non-compressed table. Oracle provides the ALTER TABLE statement with the COMPRESS clause, which allows you to compress the existing data in a table. However, keep in mind that this process may require additional time and system resources, so it is recommended to carefully consider the implications and plan accordingly when compressing existing data.