
Are you ready to take your passion for remote control cars to the next level? If so, it’s time to learn how to make your very own wireless remote control car! Building a wireless remote control car is not only a fun and exciting project, but it also allows you to customize and personalize your car to match your unique style.
Whether you’re a seasoned enthusiast or just starting out, this comprehensive guide will walk you through the process of creating your own wireless remote control car from scratch. From selecting the right components to assembling the car and programming the remote control, you’ll gain all the knowledge and skills needed to embark on this DIY adventure.
So, if you’re ready to experience the thrill of building and driving your very own wireless remote control car, let’s dive in and get started!
Inside This Article
- Materials Needed
- Assembly Process
- Wiring the Remote Control
- Testing and Troubleshooting
- Conclusion
- FAQs
Materials Needed
To make a wireless remote control car, you will need a few essential materials. Here’s a list of what you’ll need:
1. Remote control car kit
The foundation of your wireless remote control car is the car kit itself. This kit usually includes the chassis, motor, wheels, and other necessary components to build the car.
2. Wireless controller
To control your remote control car wirelessly, you’ll need a wireless controller. This device allows you to send signals to the car and dictate its movement. Make sure the controller is compatible with the car kit you’re using.
3. Batteries
Batteries are essential to power both the remote control and the car itself. Check the instructions provided with your car kit and the wireless controller to determine the type and quantity of batteries needed.
4. Screwdriver
A screwdriver is necessary for assembling the car kit. Different sizes of screwdrivers may be required to fit the screws provided in the kit. Make sure you have the correct screwdriver to ease the assembly process.
5. Wire cutters
Wire cutters are essential for making precise cuts and connections when working with the wires in the car kit. This tool allows you to trim excess wire and ensure a neat and secure connection.
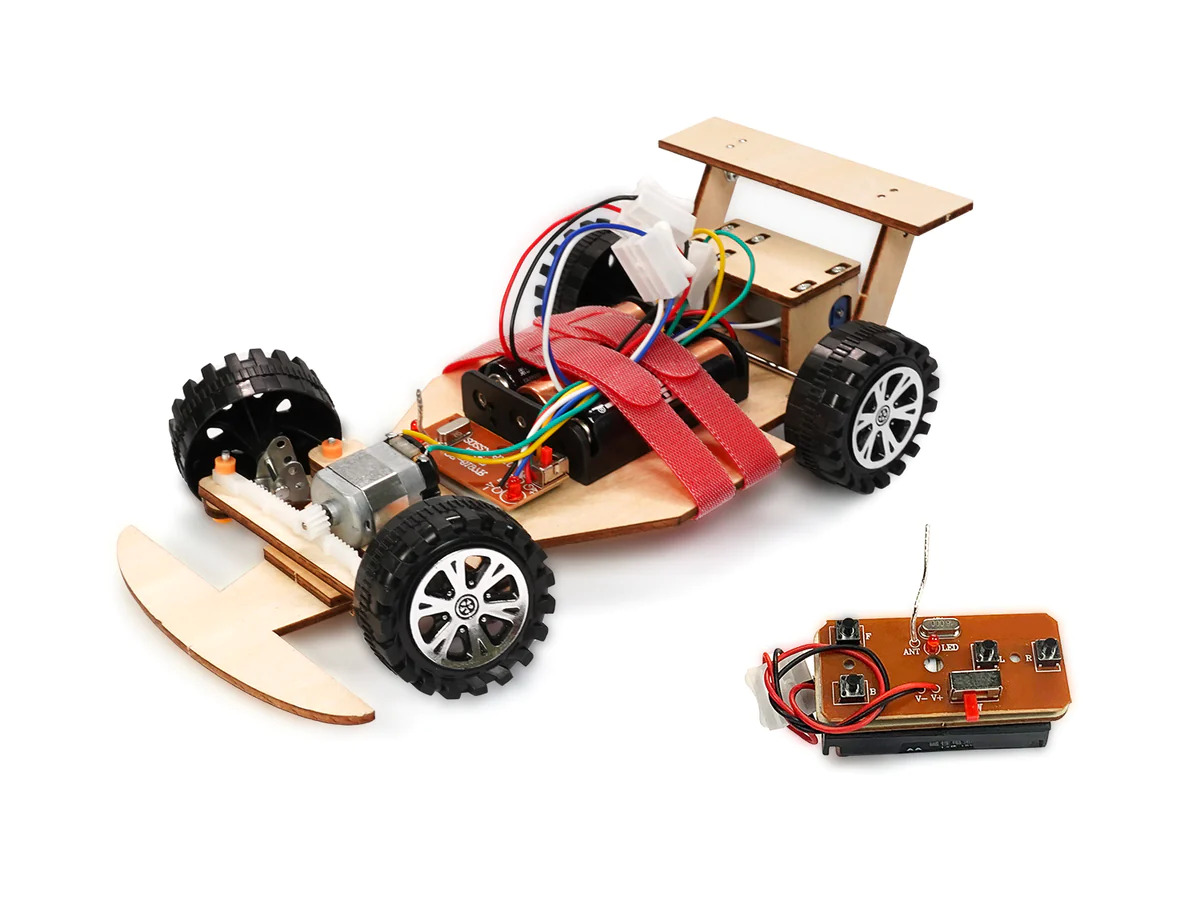
Assembly Process
Step 1: Unpack the remote control car kit
When starting your project of making a wireless remote control car, the first step is to unpack the remote control car kit. Carefully remove all the components from the packaging and familiarize yourself with all the parts included in the kit. This will give you a good understanding of what you will be working with.
Step 2: Install the motor and wheels
The next step is to install the motor and wheels onto the car chassis. Follow the instructions provided in the kit to properly attach the motor to the designated area on the chassis. Make sure the wheels are securely attached to the motor shafts and can rotate smoothly.
Step 3: Connect the wires and solder them
Now it’s time to connect the wires and solder them to ensure a proper electrical connection. Use wire cutters to trim the wires to the required length and strip the ends of the wires. Then, refer to the wiring diagram provided in the kit to connect the wires to their respective terminals on the motor and battery pack. Soldering the connections will provide a strong and durable bond.
Step 4: Attach the body of the car
With the motor, wheels, and wires in place, it’s time to attach the body of the car. Carefully align the body with the chassis and secure it using the screws or clips provided in the kit. Take your time to ensure that the body is securely attached and properly aligned with the wheels for optimal performance.
Step 5: Test the car’s functionality
After completing the assembly process, it’s essential to test the functionality of the remote control car. Insert batteries into the car and the wireless controller, then turn on the power switch. Use the controller to test the car’s movement in all directions – forward, backward, left, and right. Ensure that the car responds to the controller’s commands smoothly and accurately.
With these steps, you have successfully assembled your wireless remote control car. Now, you can enjoy the thrill of driving and controlling your very own creation. Remember to always follow safety precautions and guidelines throughout the assembly process to ensure a safe and enjoyable experience.
Wiring the Remote Control
Step 1: Open the wireless controller
When wiring a remote control for a wireless car, the first step is to open the wireless controller. Carefully remove any screws or clips that hold the controller together, taking note of their location for reassembly later. Once the controller is open, you will have access to its circuit board and components.
Step 2: Identify the different components of the controller’s circuit board
Take a close look at the circuit board in the controller. It may have various components, such as buttons, switches, LEDs, and transistors. Familiarize yourself with the layout and function of these components to ensure you understand how the controller works.
Step 3: Solder wires to the appropriate points on the circuit board
Using a wire cutter and a soldering iron, carefully solder wires to the appropriate points on the circuit board. These points will vary depending on your specific remote control model and the desired connections. Refer to the wiring diagram or instructions provided with the remote control kit for guidance on where to solder the wires.
Step 4: Connect the wires to the car’s receiver
After soldering the wires to the controller’s circuit board, it is time to connect them to the car’s receiver. Locate the receiver on the car’s chassis, usually near the motor. Use a combination of soldering and wire connectors to securely attach the wires from the controller to the receiver. Double-check that each wire is connected to the correct channel on the receiver to ensure proper function.
Testing and Troubleshooting
When you’ve completed the assembly of your wireless remote control car, it’s time to test its functionality and troubleshoot any issues that may arise. Follow these steps to ensure a smooth and enjoyable driving experience:
Step 1: Insert batteries into the remote control and car
The first step in testing your remote control car is to insert batteries into both the remote control and the car itself. Most remote control cars require batteries for both the controller and the car’s receiver. Make sure to follow the instructions provided with your specific kit to determine the correct battery type and quantity.
Step 2: Test the car’s movement
Once the batteries are inserted, turn on the remote control and check if the car is responding properly. Use the control sticks or buttons on the remote to test the car’s movement in all directions – forward, backward, left, and right. Pay close attention to the responsiveness and accuracy of the car’s movements.
Step 3: Adjust any misaligned components or loose connections
If you notice any issues with the car’s movement, such as it not moving in a straight line or turning unevenly, it may indicate a misaligned component or a loose connection. Carefully examine the car and its internal components, such as the motor, wheels, and wires, to ensure they are properly aligned and securely connected. Make any necessary adjustments or tighten any loose connections to improve the car’s performance.
Step 4: Troubleshoot common issues
If you encounter any common issues during the testing process, it’s important to troubleshoot them effectively. Some common problems you may encounter include a car that doesn’t respond to the remote control, a car that only moves in one direction, or a car that moves sporadically. Refer to the troubleshooting section in the instruction manual or search online for common solutions to these issues. It may involve checking the wiring, replacing faulty components, or recalibrating the remote control.
By following these testing and troubleshooting steps, you can ensure that your wireless remote control car is fully functional and ready for hours of exciting driving adventures.
Conclusion
Building a wireless remote control car is not only a fun and exciting project, but it also allows you to explore your creativity and technical skills. By following the steps outlined in this article, you can create a customized car that matches your preferences. Whether you’re a seasoned DIY enthusiast or a beginner, this project is an excellent way to learn about electronics and mechanics.
Remember, do your research, gather all the necessary components, and follow the instructions carefully. Be patient and take your time to ensure each step is done correctly. Before you know it, you’ll have a remote control car that you can enjoy racing and playing with.
So why wait? Start gathering your materials and get ready to embark on an exciting journey of building your very own wireless remote control car!
FAQs
1. Can I build a wireless remote control car from scratch?
Absolutely! Building a wireless remote control car from scratch can be a fun and rewarding project. With the right tools, components, and a little bit of technical know-how, you can create your own custom-designed car that can be controlled remotely. There are many online resources and tutorials available that can guide you through the process step by step.
2. What components do I need to build a wireless remote control car?
To build a wireless remote control car, you will need several key components. These include a motor, wheels, chassis, a microcontroller, motor controller, battery pack, and of course, a wireless transmitter and receiver. Additionally, you may want to include sensors, such as proximity sensors or line-following sensors, for added functionality. It’s important to do some research to ensure you have all the necessary components before starting your project.
3. How does the wireless remote control system work?
The wireless remote control system consists of two main components: the transmitter and the receiver. The transmitter is held by the user and sends signals wirelessly to the receiver, which is connected to the car. These signals are usually in the form of radio waves or infrared signals, depending on the type of wireless communication technology used. The receiver then decodes the signals and sends commands to the microcontroller, which controls the motor and other functionalities of the car.
4. Can I modify an existing remote control car to make it wireless?
Yes, you can modify an existing remote control car to make it wireless. There are conversion kits available that can help you convert a wired remote control car into a wireless one. These kits typically include a wireless transmitter, receiver, and instructions on how to install them. With a little bit of tinkering, you can transform your existing car into a wireless remote-controlled one and enjoy the freedom of wireless control.
5. Are there any safety precautions I should take when building a wireless remote control car?
When building a wireless remote control car, it’s important to prioritize safety. Here are a few precautions to keep in mind:
– Avoid using high-voltage batteries or components that can cause electrical hazards.
– Securely fasten all components to the chassis to prevent them from coming loose during operation.
– Use appropriate safety gear such as goggles and gloves when soldering or working with sharp tools.
– Follow the instructions carefully and double-check all connections before testing the car.
By taking these precautions, you can ensure a safe and enjoyable experience while building and operating your wireless remote control car.