
In today’s fast-paced digital world, staying connected wirelessly has become a necessity. Whether it’s for work, school, or leisure, having the wireless capability on your HP device enables you to access the internet and connect with the world around you effortlessly. However, if you’re new to HP laptops or facing difficulty in finding the wireless capability settings, don’t worry! In this article, we’ll guide you through the process of turning on the wireless capability on your HP device. We’ll provide step-by-step instructions and handy tips to ensure you can easily connect to Wi-Fi networks and enjoy a seamless browsing experience. So, let’s get started and unlock the wireless power of your HP device!
Inside This Article
- Enabling Wireless Capability on HP Devices
- Checking Wireless Capability Status
- Turning on Wireless Capability on a Windows device
- Turning on Wireless Capability on a macOS device
- Troubleshooting Wireless Connectivity Issues
- Conclusion
- FAQs
Enabling Wireless Capability on HP Devices
Wireless capability is an essential feature of modern HP devices, allowing users to connect to Wi-Fi networks and enjoy the convenience of wireless internet access. If you’re having trouble with your wireless connection or need to enable wireless capability on your HP device, this article will guide you through the process. Whether you’re using a Windows or macOS device, the steps are straightforward and easy to follow.
To begin, you need to check the current status of the wireless capability on your HP device. This will help determine if it is already enabled or disabled. On most HP devices, you can easily check the wireless capability status by looking for an indicator light, an icon on the keyboard, or by accessing the network settings in the operating system.
If the wireless capability is disabled, you can turn it on using the following steps:
For Windows devices:
- Open the Start menu and click on the “Settings” icon.
- Select “Network & Internet” from the settings menu.
- Click on “Wi-Fi” in the left-hand menu.
- Toggle the switch to turn on Wi-Fi and enable wireless capability.
For macOS devices:
- Click on the Apple menu and select “System Preferences.”
- Choose “Network” from the System Preferences menu.
- Select “Wi-Fi” from the left-hand menu.
- Click on the checkbox next to “Enable Wi-Fi.”
Once you’ve turned on the wireless capability, your HP device should be able to detect and connect to available Wi-Fi networks. If you’re still experiencing issues with wireless connectivity, here are a few troubleshooting steps you can try:
1. Restart your HP device and router/modem.
2. Update your device’s wireless drivers.
3. Disable and re-enable the wireless adapter in the device manager.
4. Reset the network settings on your device.
5. Contact your internet service provider for further assistance.
By following these steps and troubleshooting tips, you should be able to enable wireless capability on your HP device and enjoy seamless wireless internet access. Stay connected and enjoy the freedom that wireless technology brings to your digital life.
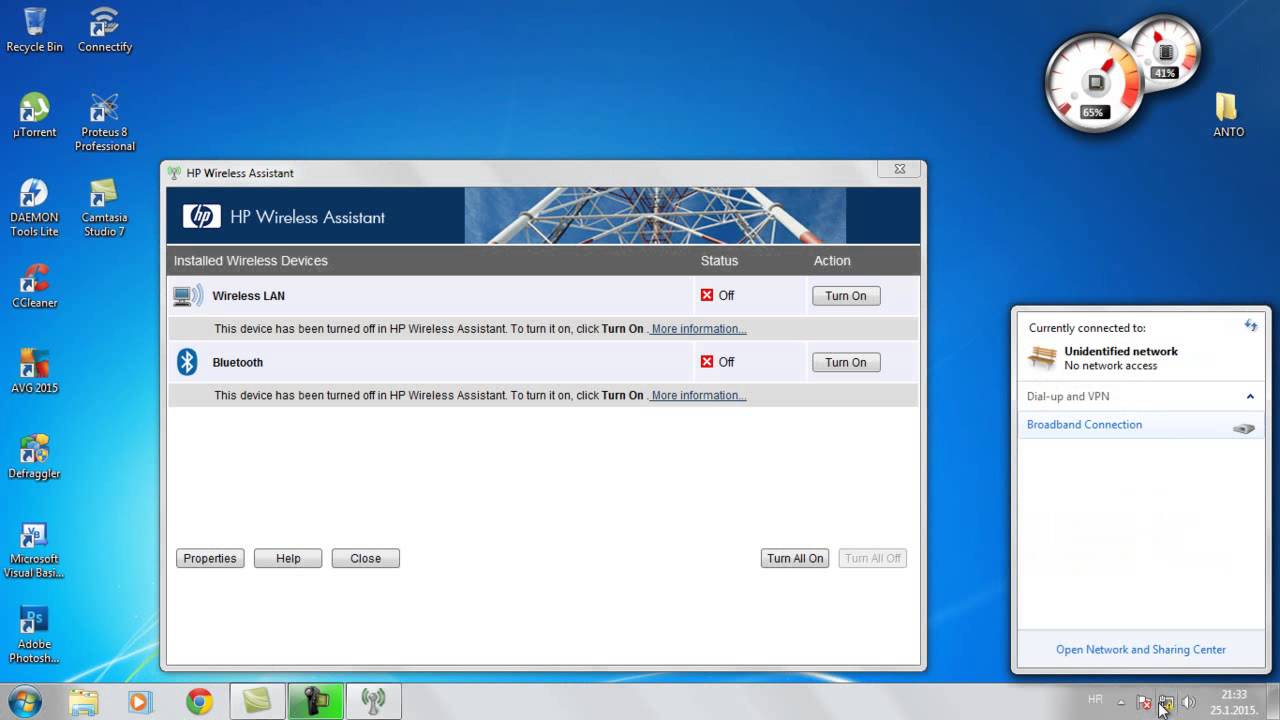
Checking Wireless Capability Status
This section explains how to check the current status of the wireless capability on an HP device to determine if it is already enabled or disabled.
Having wireless capability on your HP device allows you to connect to the internet and other wireless devices without the need for cables or wires. However, sometimes you may encounter issues with your wireless connection or need to verify if the wireless capability is turned on or off. Here’s how you can check the wireless capability status on your HP device:
- Start by locating the wireless icon on your device. On most HP devices, this icon is represented by a small antenna or a Wi-Fi icon, usually located in the system tray on a Windows device or in the menu bar on a macOS device.
- Click or right-click on the wireless icon to open the wireless network menu or the network settings.
- In the wireless network menu or network settings, look for an option that indicates the status of the wireless capability, such as “Wireless On” or “Wi-Fi Enabled.”
- If you see the option stating that the wireless capability is “On” or “Enabled,” it means that your HP device is currently connected to a wireless network or is capable of connecting to one.
- On the other hand, if the option states that the wireless capability is “Off” or “Disabled,” you need to enable it to establish a wireless connection.
Now that you know how to check the wireless capability status on your HP device, you can quickly determine if it is already enabled or disabled. If it is disabled, you can proceed to the next section to learn how to turn it on and regain wireless connectivity.
Turning on Wireless Capability on a Windows device
Enabling wireless capability on an HP device running the Windows operating system is a fairly simple process. Follow these step-by-step instructions to ensure a seamless wireless experience:
- Locate the wireless icon on your taskbar. It typically looks like a series of curved lines or a Wi-Fi symbol.
- Right-click on the wireless icon to access the context menu.
- In the context menu, select “Open Network and Internet settings.”
- This will open the Network & Internet settings window.
- Click on the “Airplane mode” tab, located on the left-hand side.
- Make sure the “Airplane mode” toggle is set to “Off.” This will disable the airplane mode and allow your device’s wireless capability to function.
- Next, navigate to the “Wi-Fi” tab, located below the “Airplane mode” tab.
- Ensure that the “Wi-Fi” toggle is set to “On.” This will enable your device to connect to available wireless networks.
- If you want your device to automatically connect to preferred networks, click on “Manage known networks.”
- A list of previously connected networks will appear. Select the network you want to connect to automatically.
- Click on “Connect.”
- Enter the network password if prompted.
- Once connected, your device should display a connected status, and you will be able to access the internet wirelessly.
Following these steps should successfully enable wireless capability on your HP device running Windows, allowing you to connect to Wi-Fi networks and enjoy wireless connectivity.
Turning on Wireless Capability on a macOS device
If you are using an HP device running the macOS operating system and need to enable the wireless capability, follow these simple instructions.
1. Start by clicking on the Apple menu in the top-left corner of your screen. A drop-down menu will appear.
2. From the drop-down menu, click on “System Preferences.” This will open the System Preferences window.
3. In the System Preferences window, locate and click on the “Network” icon. This will open the Network settings.
4. In the Network settings, you will see a list of available networks on the left-hand side. From the list, select the network you wish to connect to.
5. Once you have selected the network, click on the “Turn Wi-Fi On” button. This will enable the wireless capability on your HP device.
6. If prompted, enter the password for the selected network and click on “Join.” Your HP device will now connect to the network and you will have successfully turned on the wireless capability.
7. To verify that the wireless capability is indeed enabled, look for the Wi-Fi icon in the top-right corner of the screen. It should now be visible, indicating that the wireless capability is active.
That’s it! You have successfully turned on the wireless capability on your HP device running macOS. You can now enjoy the convenience of wireless connectivity and access the internet, email, and other online services without the need for wired connections.
If you encounter any issues during this process, refer to the troubleshooting section of this article for potential solutions to common wireless connectivity problems.
Troubleshooting Wireless Connectivity Issues
In this section, users will find troubleshooting tips and solutions to common wireless connectivity issues that may arise on HP devices.
1. Check the Wi-Fi Network: The first step in troubleshooting wireless connectivity issues is to ensure that the Wi-Fi network you are trying to connect to is working properly. Check if other devices can connect to the network without any problems. If not, there may be an issue with the network itself, such as a router problem or an outage. Contact your internet service provider for further assistance.
2. Restart the Device: Sometimes, a simple restart can fix wireless connectivity issues. Turn off your HP device and wait for a few seconds before turning it back on. This can reset the network settings and resolve any temporary glitches that may be causing the problem.
3. Update Drivers: Outdated or incompatible network drivers can lead to wireless connectivity issues. To update the drivers, go to the official HP support website and download the latest drivers for your specific device model. Install them and then restart your device to apply the changes.
4. Check Airplane Mode: Ensure that Airplane Mode is turned off on your HP device. When Airplane Mode is enabled, it disables all wireless connectivity, including Wi-Fi. You can check the Airplane Mode settings in the system tray or the settings menu of your device.
5. Reset Network Settings: Resetting the network settings can help resolve more complex wireless connectivity issues. On a Windows device, you can do this by going to Settings > Network & Internet > Network Reset. On a macOS device, go to System Preferences > Network > Advanced > Reset. Keep in mind that resetting network settings will remove saved Wi-Fi networks and VPN configurations, so you will need to reconnect to them afterwards.
6. Disable Firewall or Antivirus: In some cases, the firewall or antivirus software on your HP device may be blocking the Wi-Fi connection. Temporarily disable the firewall or antivirus software and check if the wireless connectivity issue persists. If the problem is resolved, add an exception to the software settings to allow the Wi-Fi connection.
7. Contact HP Support: If none of the above solutions work, it is recommended to contact HP support for further assistance. They can provide specific troubleshooting steps based on your device model and help you resolve any underlying hardware or software issues.
By following these troubleshooting tips, you can overcome common wireless connectivity issues on your HP device and enjoy uninterrupted internet access.
Conclusion
In conclusion, turning on the wireless capability on an HP device is a simple and straightforward process. By following the steps outlined in this article, you can ensure that your HP device is ready to connect to wireless networks and enjoy the benefits of wireless connectivity.
Having a functioning wireless connection is essential, especially in today’s connected world. Whether it be for browsing the internet, streaming media, or staying connected with friends and family, having wireless capability on your HP device ensures a seamless and convenient experience. By leveraging the wireless functionality of your HP device, you can stay productive and connected wherever you go.
Now that you know how to turn on the wireless capability on your HP device, you can go ahead and start enjoying the freedom and convenience of wireless connectivity.
FAQs
Q: How do I turn on the wireless capability on my HP device?
A: Turning on the wireless capability on an HP device is a simple process. You can usually do this by pressing a dedicated wireless button on your keyboard or using a key combination. Alternatively, you can also enable the wireless capability from the network settings in the control panel or system tray of your HP device.
Q: I can’t find the wireless button on my HP laptop. What should I do?
A: If you’re unable to locate the wireless button on your HP laptop, don’t worry. Some models have a physical switch or button on the side or front edge of the device, while others may have the button integrated into the function keys. Check your laptop’s user manual or the HP support website for specific instructions on how to enable wireless functionality without a dedicated button.
Q: How do I enable wireless capability on an HP printer?
A: To enable wireless capability on an HP printer, start by navigating to the printer’s control panel and selecting the “Wireless” or “Network” settings. From there, choose the option to connect to a wireless network and follow the on-screen prompts to select your network and enter the wireless password, if necessary. Once connected, the wireless capability on your HP printer should be enabled and ready to use.
Q: Can I enable wireless capability on my HP device without an internet connection?
A: Yes, you can enable wireless capability on your HP device without an internet connection. The wireless functionality itself is independent of internet access. However, to connect to a specific Wi-Fi network and access the internet, you will need an active internet connection provided by your ISP or a wireless router with an internet connection.
Q: How do I troubleshoot if the wireless capability is not working on my HP device?
A: If the wireless capability is not working on your HP device, there are a few troubleshooting steps you can try. First, make sure that the wireless adapter is enabled in the device settings. You can also try restarting your device and resetting the wireless router. Additionally, checking for driver updates or reinstalling the wireless adapter drivers may resolve any software-related issues. If the problem persists, it is recommended to contact HP customer support for further assistance.