
If you’re a digital artist or someone who loves to explore their creativity on the go, chances are you’re familiar with Procreate. It’s one of the most popular digital art apps available, offering a wide range of tools and features that provide endless possibilities. One of the essential aspects of creating stunning artwork is selecting the right colors, and Procreate offers a seamless process for changing colors within your artwork.
In this comprehensive guide, we will walk you through the step-by-step process of changing colors on Procreate, from selecting a new color to applying it to your artwork. Whether you’re a beginner or an experienced Procreate user looking to refine your color-changing techniques, this article has got you covered. So get ready to dive into the world of vibrant colors and unlock a whole new level of creative possibilities on Procreate!
Inside This Article
- Changing Colors in Procreate
- Basic Color Selection
- Adjusting Hue, Saturation, and Brightness
- Using Color Palettes
- Creating Custom Colors
- Conclusion
- FAQs
Changing Colors in Procreate
Procreate is a powerful digital art tool that allows you to create stunning artwork on your iPad. One of the key elements of any artwork is color. With Procreate, you have a wide range of options for changing colors, whether you want to select a basic color, adjust the hue, saturation, and brightness, use color palettes, or even create custom colors. In this article, we will explore these different methods to help you master the art of changing colors in Procreate.
1. Basic Color Selection
The first and easiest way to change colors in Procreate is through the basic color selection tool. In the color panel, you’ll find a vast array of colors to choose from. Simply tap on a color to select it as your foreground color. You can swipe left or right to explore different shades and tones. If you have a specific color in mind, you can also enter the RGB or HSB values to get the exact color you want.
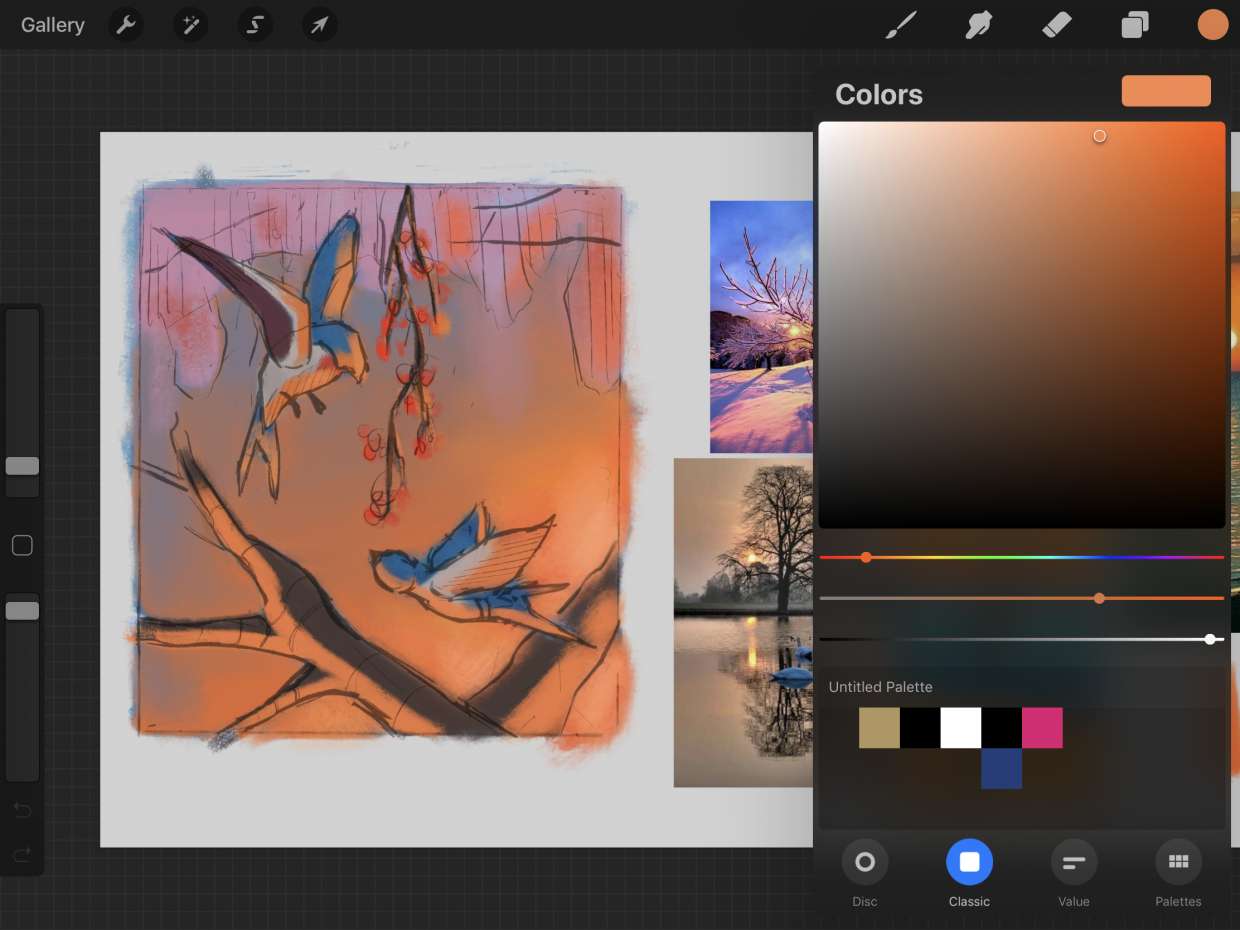
2. Adjusting Hue, Saturation, and Brightness
If you want to fine-tune the color of your artwork, Procreate provides options to adjust the hue, saturation, and brightness (HSB) of your selected color. Tap on the color panel, and you’ll see sliders for these three attributes. Moving the hue slider will change the color itself, while adjusting the saturation will make it more vibrant or muted. The brightness slider controls the overall lightness or darkness of the color.
3. Using Color Palettes
Procreate offers a fantastic feature called color palettes, which allows you to save and organize your favorite colors for easy access. You can create your own palettes or import existing ones to use in your artwork. To access the color palette, simply tap on the circle icon at the top of the color panel. From there, you can select any color from your saved palettes and instantly apply it to your artwork.
4. Creating Custom Colors
If you can’t find the exact color you’re looking for, Procreate lets you create custom colors. Tap on the color panel and select the color you want as your base color. Then, tap on the color disc icon at the bottom right corner. This will open up a color wheel where you can freely adjust the hue, saturation, and brightness to create your desired color. You can also use the slider at the bottom to fine-tune the color even further.
Changing colors in Procreate not only gives you more creative control over your artwork but also allows you to experiment and find the perfect color combinations. Whether you’re a beginner or an experienced artist, mastering the art of color manipulation will elevate your digital art to new heights. So go ahead, explore these color-changing methods in Procreate, and create vibrant and captivating artwork like never before!
Basic Color Selection
When it comes to changing colors in Procreate, the first step is mastering the basic color selection process. Procreate offers a variety of tools and features to help you find the perfect hue for your artwork.
To start, open up the color picker by tapping on the color circle located at the top of the screen. This will bring up a color wheel with a range of colors to choose from. You can slide your finger around the wheel to select a specific shade, or use the outer ring to adjust the saturation.
Once you have selected a base color, you can fine-tune it further by adjusting the brightness using the inner circle of the color picker. Drag the dot towards the center to darken the color or towards the outer edge to lighten it.
Procreate also offers a convenient color history panel, allowing you to easily access previously used colors. Simply tap on the color history icon and choose the desired color from the list. This is especially helpful if you want to maintain consistency in your artwork.
Remember, the key to effective color selection is experimentation. Don’t be afraid to try different combinations and variations to achieve the desired effect. Procreate provides a vast array of colors to choose from, so take advantage of the options available to you!
Adjusting Hue, Saturation, and Brightness
One of the key features that sets Procreate apart from other digital art applications is its extensive color editing capabilities. With Procreate, you can easily adjust the hue, saturation, and brightness of your chosen colors to create the perfect palette for your artwork.
To begin adjusting the hue, saturation, and brightness in Procreate, follow these simple steps:
- Select the layer or object that you want to modify the colors for.
- Tap on the “Color” button located at the top of the screen to access the color editing options.
- Within the color editing panel, you will find three sliders labeled “Hue,” “Saturation,” and “Brightness.”
- To adjust the hue, simply slide the “Hue” slider left or right. Moving the slider to the left will shift the colors towards the cooler end of the spectrum, while moving it to the right will shift the colors towards the warmer end.
- To change the saturation of the colors, slide the “Saturation” slider left or right. Decreasing the saturation will result in more muted and desaturated colors, while increasing it will make the colors more vibrant and saturated.
- The “Brightness” slider allows you to adjust the overall brightness or darkness of the colors. Slide it to the left to darken the colors and to the right to brighten them.
- In addition to the sliders, Procreate also offers a color wheel that you can use to select any color you desire. Simply tap and drag within the wheel to pick a color, and then adjust the sliders to fine-tune the hue, saturation, and brightness.
- Once you are satisfied with the adjustments, tap “Done” to apply the changes to your artwork.
By mastering the art of adjusting hue, saturation, and brightness in Procreate, you can bring your artwork to life with vibrant and captivating colors. Experiment with different combinations and create stunning visuals that truly reflect your artistic vision.
Using Color Palettes
One of the easiest ways to change colors in Procreate is by utilizing color palettes. Color palettes are pre-selected groups of colors that you can quickly access and apply to your artwork. Procreate provides a variety of built-in color palettes to choose from, and you can also create your own custom palettes.
To access the color palettes in Procreate, you can tap on the “Color” button located in the top toolbar. This will bring up the color panel, where you can see the available palettes. You can swipe left or right to browse through the different palettes, or you can tap on the “Palettes” tab at the top to view all the palettes at once.
Once you have selected a color palette, you can simply tap on a color swatch to apply it to your artwork. Procreate also provides options to adjust the opacity of the color and to lock the transparency, allowing you to easily blend and layer colors for your desired effect.
If you want to create your own custom color palette, you can tap on the “+” button at the top right of the Palettes tab. This will open the Color Picker, where you can select the desired color using the color wheel or by entering the specific color values. Once you have chosen a color, you can tap on the “+” button again to add it to your custom palette.
Furthermore, Procreate allows you to import color palettes from external sources. You can download color palettes from websites or other artists and import them into Procreate. To do this, you can tap on the “+” button in the Palettes tab and choose the “Import” option. This will prompt you to select the file containing the color palette, and once imported, the new palette will be available for your use.
Using color palettes in Procreate not only simplifies the process of changing colors but also helps you maintain consistency in your artwork. By using pre-selected or custom palettes, you can establish a cohesive color scheme throughout your project and save time in the color selection process.
Creating Custom Colors
While Procreate offers a wide range of pre-selected colors and the ability to adjust hue, saturation, and brightness, you might want to create your own custom colors to bring your artwork to life. Here’s how you can do it:
1. Start by selecting the brush tool in Procreate. This will allow you to access the color picker.
2. In the color picker, you’ll find a color wheel that you can use to select a base color. Simply drag your finger or stylus around the wheel to choose a hue.
3. Once you’ve selected a hue, you can adjust the saturation and brightness by sliding your finger or stylus vertically along the right side of the color picker. Moving upwards will increase the saturation, while moving downwards will decrease it. Similarly, moving to the right will increase the brightness, and moving to the left will decrease it.
4. To fine-tune your custom color, you can also manually enter specific values for hue, saturation, and brightness using the numeric input fields in the color picker.
5. Another way to create custom colors in Procreate is by utilizing the color palettes feature. You can save your custom color as a swatch in a palette for easy access later on.
6. To create a new palette or add the color to an existing one, tap on the three dots at the top right corner of the color picker and select “Save Current Color”. You can then name the color and choose the palette you want to save it to.
7. Once you have created a custom color and saved it as a swatch, it will be readily available for you to use in your artwork by simply selecting it from the color picker.
Customizing colors in Procreate allows you to bring your artistic vision to life with precision and creativity. By creating your own custom colors, you can achieve the exact look and feel you desire for your artwork.
Changing the color on Procreate is a simple and effective way to enhance your digital artwork. Whether you’re looking to experiment with different color palettes, make adjustments to existing colors, or create stunning visual effects, Procreate offers a wide range of tools and features that allow you to unleash your creativity.
By following the step-by-step instructions in this guide, you can easily change colors in Procreate and take your digital art to the next level. Remember to explore the various color options and experiment with different techniques to find what works best for you. With a little practice and creativity, you’ll be able to create captivating and eye-catching artworks that truly stand out.
So don’t be afraid to play around with the colors in Procreate and let your imagination soar. Whether you’re a professional artist or just starting your digital art journey, changing colors in Procreate is a skill worth mastering. So go ahead, dive in, and let your creativity shine!
FAQs
Q: Can I change the color of an image on Procreate?
A: Yes, Procreate provides various tools and features that allow you to change the color of an image. You can use the selection tool to isolate specific areas and then adjust their color using the color adjustment options.
Q: How do I change the background color on Procreate?
A: To change the background color on Procreate, you can navigate to the “Layers” panel and tap on the background layer. From there, you can use the color picker tool to select a new color or use the brush tool to paint a new background color.
Q: Can I change the color of a specific layer in Procreate?
A: Yes, you can change the color of a specific layer in Procreate by selecting the layer you want to change and then using the color adjustment options. You can adjust the hue, saturation, brightness, and other properties to achieve the desired color.
Q: Is there a way to quickly swap colors on Procreate?
A: Yes, Procreate provides a useful feature called the “ColorDrop” tool that allows you to quickly swap colors. Simply select the ColorDrop tool, choose the color you want to swap, and tap on the area you want to change. Procreate will automatically replace the color with the new one.
Q: Can I create custom color palettes on Procreate?
A: Absolutely! Procreate offers the ability to create custom color palettes. You can either manually select and save colors from the color picker or import custom palettes from other sources. Custom color palettes allow you to easily access and use your preferred colors throughout your artwork.