
Are you looking to add texture to your digital artwork in Procreate? Look no further! Adding texture can bring depth, realism, and character to your illustrations, making them stand out from the crowd. Whether you’re a digital artist or a hobbyist, the ability to add texture to your artwork can take your creations to the next level.
In this article, we will delve into the world of Procreate and explore various techniques and tools you can use to add texture to your artwork. From creating custom brushes to using various layer blending modes, we will cover it all. So, grab your digital stylus and let’s dive into the exciting world of adding texture in Procreate!
Inside This Article
- Understanding Texture in Procreate
- Exploring Procreate’s Brush Library for Texture
- Creating Custom Textures in Procreate
- Applying Textures to Artwork in Procreate
- Conclusion
- FAQs
Understanding Texture in Procreate
When it comes to digital art creation, adding texture can bring your artwork to life. Texture adds depth, visual interest, and a tactile feel to your digital paintings or illustrations. In Procreate, a popular digital art app, understanding texture and how to incorporate it into your artwork can take your creations to the next level.
Texture refers to the surface quality of an object, whether it’s rough, smooth, gritty, or soft. It can be visualized through patterns, bumps, or variations in color and tone. In traditional art, texture is often achieved through different mediums like oil paint, charcoal, or pastels. In Procreate, you have the advantage of being able to create and replicate texture digitally using brushes and custom textures.
Procreate’s Brush Library is a treasure trove of pre-made brushes designed to simulate various textures. From brushes that mimic the roughness of canvas or the grain of paper to brushes that replicate the bristles of a paintbrush, there are endless options to choose from. Experimenting with different brushes and their settings can help you achieve the desired texture for your artwork.
However, if you want more control and uniqueness in your textures, you can also create your own custom textures in Procreate. This allows you to tailor the texture to your specific vision and style. You can create custom brushes using different shapes, patterns, and opacity settings, or even import your own images to use as textures.
Once you have chosen a brush or created a custom texture, applying it to your artwork is simple in Procreate. With each stroke, you can build up layers of texture, adjusting the size, opacity, and blending modes to achieve the desired effect. This freedom gives you the flexibility to experiment and create artwork with a rich, textured look.
Exploring Procreate’s Brush Library for Texture
Procreate is a powerful digital art software that allows artists to create stunning illustrations, paintings, and designs on their iPads. One of the key features that sets Procreate apart is its extensive library of brushes, including a wide range of textures. These brushes are a great way to add depth, dimension, and visual interest to your artwork.
When you open the brush library in Procreate, you’ll find a plethora of options to choose from. From gritty grunge textures to soft watercolor washes, the library has something for every style and project. Each brush is meticulously crafted to mimic the look and feel of various traditional art mediums, making it easy to achieve realistic textures in your digital creations.
Procreate’s brush library is conveniently organized into categories, making it easy to navigate and find the perfect texture for your project. You’ll find categories like ‘Paints’, ‘Pencils’, ‘Inks’, ‘Textures’, and more. Within each category, there are numerous brushes to explore, each with its own unique texture and style.
The ‘Textures’ category in the brush library is a treasure trove of options for adding texture to your artwork. Here, you’ll find brushes that mimic the appearance of various textures, such as canvas, paper, fabric, wood, and more. These brushes allow you to add a tactile feel to your digital artwork, making it visually interesting and engaging.
Once you’ve selected a texture brush from the library, you can customize its settings to achieve the desired effect. Procreate allows you to adjust parameters such as size, opacity, and flow to control the intensity and application of the texture. You can also experiment with blending modes and layering techniques to further enhance the texture in your artwork.
Another exciting feature of Procreate’s brush library is the ability to import and create your own custom brushes. This opens up a world of possibilities for artists who want to add their own unique textures to their artwork. Whether it’s a scanned texture from a physical painting or a digital creation, you can import it into Procreate and turn it into a custom brush.
Overall, exploring Procreate’s brush library for texture is a delightful experience for artists. The extensive variety of brushes, organized categories, and customizable settings allow you to experiment and create artwork that is visually captivating and rich in texture. So, dive into the brush library, unleash your creativity, and add that extra dimension to your digital masterpieces in Procreate.
Creating Custom Textures in Procreate
Procreate is a powerful tool that allows users to create custom textures for their digital artwork. By adding unique textures to your designs, you can add depth, realism, and visual interest to your work. In this section, we will explore how to create custom textures in Procreate, giving you the freedom to truly customize your artwork.
To start creating your own textures in Procreate, you’ll need to open the app and select a new canvas or open an existing one. Once you have your canvas ready, tap on the brush icon to access the Brush Library. This library contains a wide range of brushes, including those specifically designed for creating textures.
Next, you can browse through the brush categories to find the texture brushes. These brushes are designed to mimic different textures, such as wood grain, watercolor strokes, or grainy paper. Choose a brush that aligns with the texture you want to create for your artwork and select it.
Now that you have selected your brush, it’s time to adjust the settings to create your desired texture. Tap on the brush settings icon to access the brush properties. Here, you can modify various parameters such as brush size, opacity, flow, and spacing. Experiment with these settings to achieve the desired texture effect.
Once you have fine-tuned the brush settings, you can start applying the texture to your canvas. Use the Apple Pencil or your finger to make strokes and strokes with different pressure levels to create variations in the texture. You can layer multiple strokes and blend them together to achieve more complex textures.
If you want to create a seamless repeating texture, you can enable the Symmetry feature in Procreate. This allows you to see a mirrored reflection of your strokes in real-time, making it easier to create a uniform and seamless texture pattern.
Additionally, Procreate offers a variety of blending modes that you can apply to your textured layers. These blending modes can change how the texture interacts with the underlying artwork, creating unique effects and enhancing the overall appearance of your piece.
Once you are satisfied with your custom texture, you can save it as a brush for future use. Tap on the brush settings icon again and select “Share” > “Export Brush” to save your texture as a custom brush. This way, you can easily access and use the texture in future artworks.
Creating custom textures in Procreate gives you the freedom to add a personal touch to your digital artwork. Whether you want to create a gritty, realistic texture or a soft, ethereal one, Procreate provides the tools necessary to bring your creative vision to life.
Applying Textures to Artwork in Procreate
Adding textures to your artwork in Procreate can add depth and visual interest, making your digital creations appear more realistic and tactile. Whether you want to simulate the look of traditional materials like paper or canvas, or add unique textures to enhance your designs, Procreate offers a variety of tools and techniques to help you achieve your desired results.
One of the simplest ways to apply textures to your artwork is by using Procreate’s built-in texture brushes. These brushes are designed to mimic the texture of real-world materials, such as chalk, watercolor, or graphite. By selecting a texture brush and adjusting its size and opacity, you can easily add textures to specific areas of your artwork, giving it a more dynamic and organic feel.
If you prefer more control over the textures, you can create your own custom textures in Procreate. Start by importing a texture image or photograph into Procreate, then use the various editing tools to adjust its size, color, and transparency. Once you’re satisfied with the texture, you can save it as a custom brush or a layer, allowing you to apply it to your artwork with precision and flexibility.
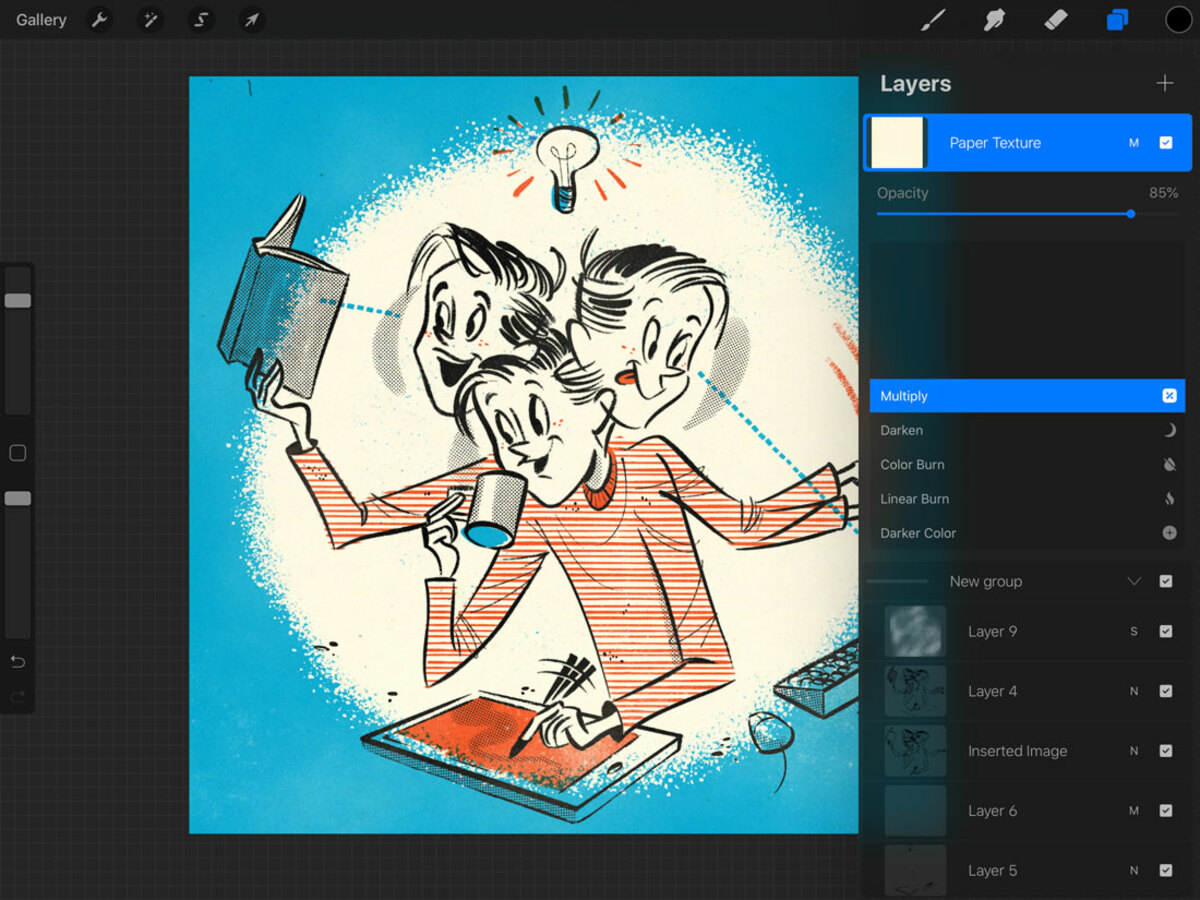
Another technique you can explore is blending modes. Procreate offers a wide range of blending modes that allow you to combine multiple layers and textures in unique ways. For example, you can use the “multiply” blending mode to create subtle texture overlays, or the “overlay” blending mode to add vibrant and dynamic textures to your artwork.
Additionally, Procreate’s layer styles feature provides another avenue for applying textures to your artwork. With layer styles, you can add effects like noise, grain, or pattern overlays to your layers, instantly adding texture and depth to your artwork. Experiment with different layer styles and adjust their settings to achieve the desired level of texture and visual impact.
When applying textures to your artwork in Procreate, it’s important to keep in mind the overall composition and intention of your piece. Use textures strategically to enhance specific elements or areas, rather than overwhelming the entire artwork. Subtlety and balance are key to creating cohesive and visually appealing textures.
Conclusion
Adding texture in Procreate can elevate your digital artwork to a whole new level. By experimenting with different brushes, layer blending modes, and adjustment layers, you can create unique and realistic textures that bring depth and character to your illustrations, paintings, and designs.
Whether you want to give your artwork a traditional feel with paper textures or add a touch of grunge or roughness to your digital creations, Procreate offers a wide range of tools and techniques to achieve the desired result.
Remember to keep practicing and exploring different texture styles and effects to refine your skills and develop your own artistic style. With time and dedication, you will become proficient in adding texture in Procreate, and your artworks will truly stand out.
So, why wait? Start experimenting with texture in Procreate today and unleash your creativity like never before!
FAQs
1. What is Procreate?
Procreate is a powerful digital art and illustration app designed for iPad. It offers a wide range of features and tools that allow artists to create stunning artwork directly on their tablet. Whether you are a beginner or an experienced artist, Procreate offers a user-friendly interface and various customization options to bring your artistic visions to life.
2. How do I add texture in Procreate?
Adding texture to your digital artwork in Procreate is easy and can add depth and realism to your creations. To add texture, you can make use of various brushes available in the app, such as grain brushes, texture brushes, or even create your own custom brushes. Experiment with different brush settings, layering techniques, and blending modes to achieve the desired texture effect.
3. Can I import my own textures into Procreate?
Yes, you can import your own textures into Procreate to use in your artwork. Procreate allows you to import image files, such as JPEG or PNG, and use them as a texture overlay or as a base for your brush. Simply go to the Actions menu, select Add, and choose the image file you want to import. Once imported, you can adjust the opacity, blend mode, and position of the texture to suit your needs.
4. Are there any pre-made texture brushes available in Procreate?
Yes, Procreate provides a wide selection of pre-made texture brushes that you can use in your artwork. These brushes are designed to mimic various textures, such as watercolor, charcoal, canvas, and many more. To access these brushes, tap on the Brush Library icon in the top toolbar, and scroll through the different categories to find the texture brushes that best suit your style.
5. Can I adjust the opacity of the texture in Procreate?
Absolutely! In Procreate, you have full control over the opacity of your textures. You can adjust the opacity of the texture layer itself, or use the blending modes to achieve different effects. Lowering the opacity can create a more subtle texture, while increasing it can make the texture more pronounced. Play around with different opacity settings to find the perfect balance for your artwork.