
Procreate is a powerful digital art and illustration app that has gained immense popularity among artists, designers, and enthusiasts. With its wide array of tools and features, Procreate allows users to unleash their creativity and create stunning artwork right on their digital devices. One of the fundamental skills in Procreate is mastering the art of text. Adding text to your art can bring a whole new dimension to your creations and help convey messages effectively. Whether you want to add a quote, a title, or simply personalize your art, understanding how to do text in Procreate is essential. In this article, we will guide you step by step on how to add, modify, and customize text in Procreate, providing you with the knowledge and skills to take your digital art to the next level.
Inside This Article
- Setting up your canvas
- Choosing the right brush
- Mastering text tools in Procreate
- Adjusting and Formatting Your Text
- Conclusion
- FAQs
Setting up your canvas
Before you start working with text in Procreate, it’s important to set up your canvas properly. The canvas size determines the dimensions of your artwork, and it’s crucial to select the right size to ensure that your text fits perfectly.
To set up your canvas, follow these steps:
- Open Procreate and create a new canvas by tapping the ‘+’ icon.
- Choose the desired dimensions for your canvas. You can select pre-defined sizes or enter custom dimensions.
- Consider the aspect ratio and orientation of your canvas. Landscape orientation works well for wide text layouts, while portrait orientation is better for vertical text placement.
- Once you’ve set up the canvas size and orientation, you can tap on the ‘Create’ button to finalize your canvas.
By setting up your canvas properly, you lay the foundation for creating visually appealing and well-structured text designs in Procreate.
Choosing the right brush
When it comes to creating digital artwork in Procreate, one of the most crucial aspects is choosing the right brush. The brush you use can significantly impact the overall look and feel of your artwork. In this section, we will explore some tips and considerations for selecting the perfect brush in Procreate.
1. Brush Type: Procreate offers a wide selection of brush types, including pencils, inks, watercolors, and more. Consider the style and effect you want to achieve and choose a brush that aligns with your vision.
2. Brush Properties: Within each brush type, there are various properties you can adjust, such as size, opacity, flow, and texture. Experiment with different settings to find the right balance for your artwork.
3. Pressure Sensitivity: If you have a device that supports pressure sensitivity, make sure to take advantage of this feature. It allows you to vary the thickness and opacity of your brush strokes based on the pressure applied, giving a more natural and expressive result.
4. Customization: Procreate allows you to create your own custom brushes or download additional brushes from the Procreate community. Explore different brush sets and experiment with customizations to find brushes that suit your unique style.
5. Favorites: Once you find a brush you love, make sure to add it to your favorites for easy access. This way, you won’t have to search through the entire brush library every time you want to use it.
Remember, choosing the right brush in Procreate is highly subjective and depends on your personal style and preferences. Take the time to explore different brushes and settings, and don’t be afraid to experiment. The more you practice and familiarize yourself with the brushes, the better you will become at creating stunning digital artwork in Procreate.
Mastering text tools in Procreate
Procreate is a powerful digital illustration app that offers a wide range of tools and features to enhance your artwork. One of the key features of Procreate is its text tools, which allow you to add and manipulate text within your designs. Whether you’re creating digital art, illustrations, or even hand-lettering, mastering the text tools in Procreate can significantly enhance your creative process and produce stunning results. In this guide, we’ll explore the various text tools available in Procreate and provide tips on how to use them effectively.
1. Accessing the text tools: To access the text tools in Procreate, start by opening a canvas and selecting the “Text” option from the toolbar. This will open a text layer where you can input your desired text. You can choose from a variety of font styles and sizes, and even import your own custom fonts.
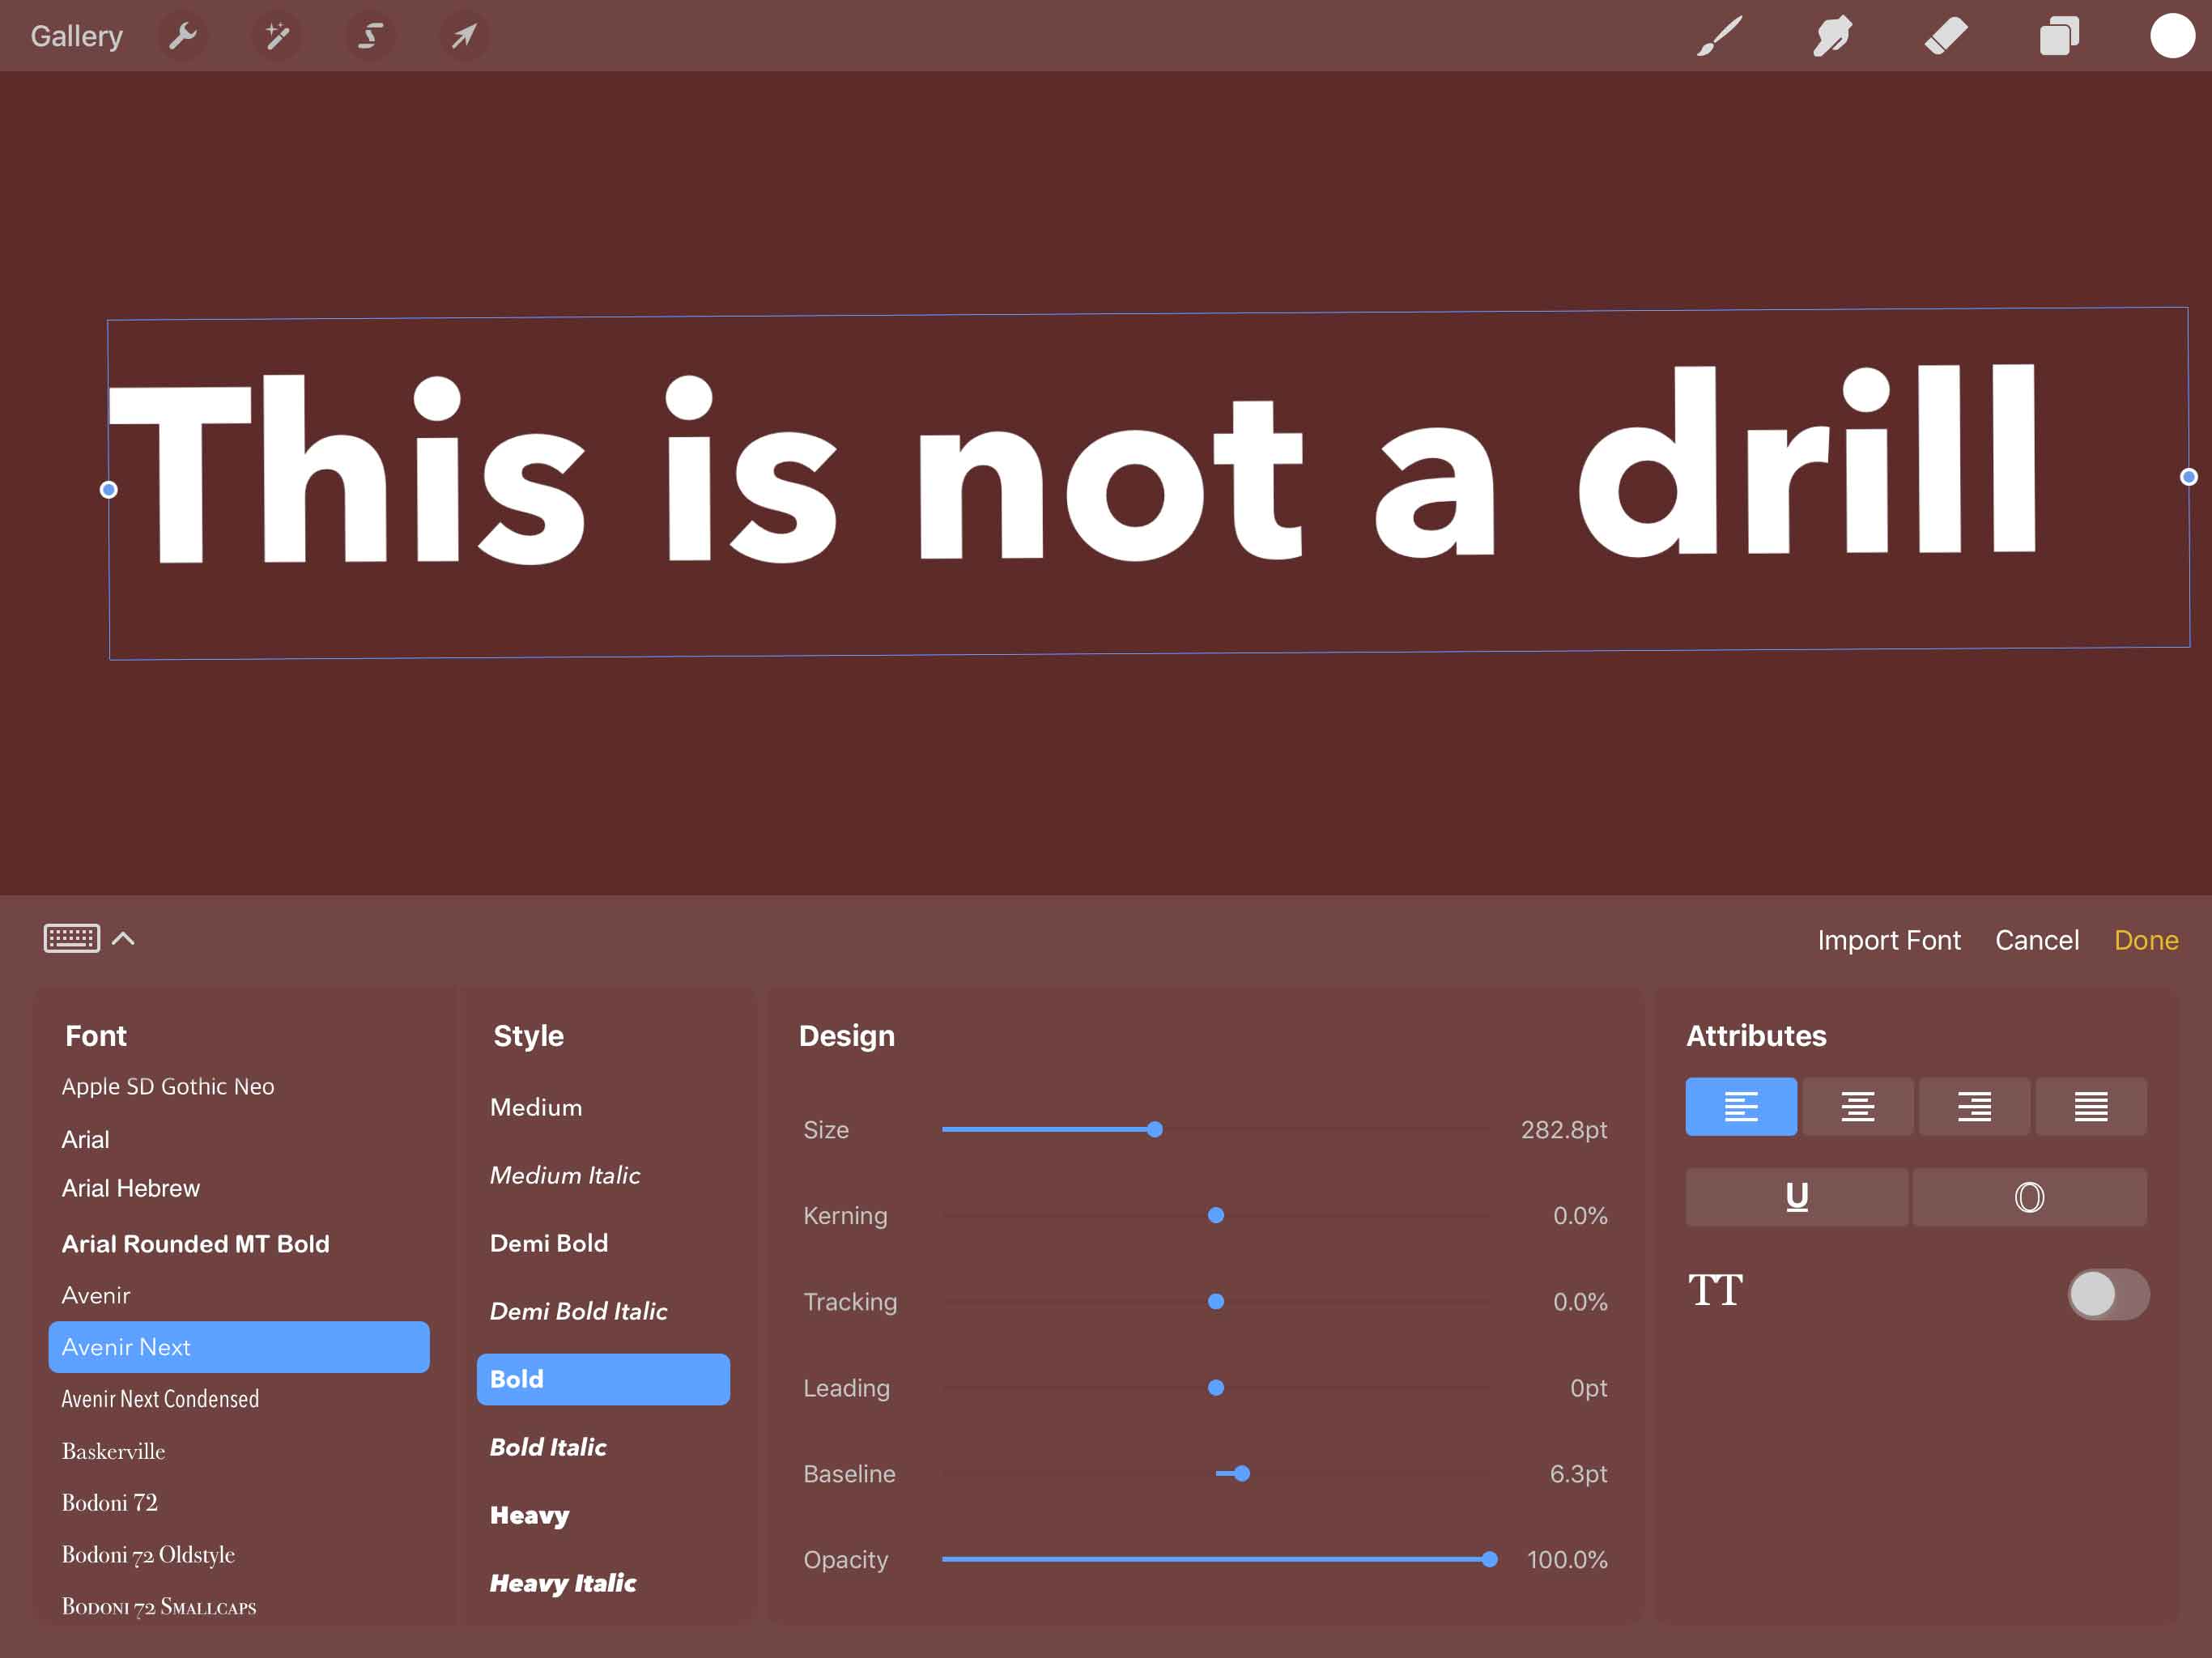
2. Adjusting text attributes: Once you’ve entered your text, Procreate provides several options to adjust the attributes of your text. You can modify the font style, size, alignment, and color to suit the tone and style of your artwork. Procreate also offers advanced features like tracking, leading, and baseline adjustments, allowing you to fine-tune the spacing and positioning of your text.
3. Transforming and arranging text: Procreate enables you to transform and arrange your text in creative ways. You can resize, rotate, and skew the text to fit seamlessly into your design. Additionally, you can easily move and arrange text layers using intuitive gestures, such as dragging and resizing with your fingers.
4. Applying effects and styles: Procreate offers various effects and styles to add depth and visual appeal to your text. You can apply shadows, glows, and strokes to your text, creating a realistic and professional look. Moreover, Procreate provides blending modes, which allow you to blend your text with other elements in your artwork, providing unique and artistic results.
5. Creating custom lettering: If you’re into hand-lettering, Procreate’s text tools provide ample opportunities to create custom lettering styles. You can use the shape and warp tools to distort and manipulate the text, giving it a dynamic and artistic flair. Additionally, Procreate supports pressure sensitivity, enabling you to create varying line thicknesses and letterforms with ease.
6. Working with text layers: Procreate allows you to work with multiple text layers, giving you the flexibility to create complex typography compositions. You can arrange the layers in a stack, adjust their opacity, and apply blending modes to achieve the desired effect. This layer-based workflow empowers you to experiment and iterate freely without affecting other elements in your artwork.
By mastering the text tools in Procreate, you can elevate the quality and creativity of your digital artwork. Whether you’re a professional illustrator or a hobbyist, this feature-rich app provides endless possibilities for adding captivating text elements to your designs. So, get creative, experiment with different styles, and unlock the full potential of Procreate’s text tools to take your artwork to new heights.
Adjusting and Formatting Your Text
Once you have added text to your canvas in Procreate, you have a variety of tools and options to adjust and format it according to your preference. Let’s explore some of the ways you can fine-tune your text in Procreate:
1. Positioning and Resizing: To move your text around the canvas, simply tap and drag it to your desired location. You can also resize your text by selecting it and using the transform handles to make it larger or smaller.
2. Rotation and Skewing: If you want to tilt or angle your text, you can rotate it by selecting it and using the rotation handle. Additionally, you can skew the text by selecting it and using the skew handles to give it a unique perspective.
3. Adjusting Opacity: If you want to make your text more transparent or blend it into the background, you can adjust its opacity. Select your text, go to the Layers panel, and adjust the opacity slider to your desired level.
4. Changing Font Styles: Procreate offers a range of font styles to choose from. To change the font of your text, select it and tap on the Text tab. From there, you can browse through the available fonts and select the one that suits your design best.
5. Modifying Font Properties: In addition to changing the font style, you can adjust other properties such as font size, alignment, and spacing. Select your text, tap on the Text tab, and use the sliders or input fields to modify these properties according to your preferences.
6. Adding Effects: Procreate allows you to add various effects to your text to create visually appealing designs. These effects include drop shadow, outer glow, inner glow, and more. To apply an effect, select your text, go to the Adjustments menu, and choose the effect you want to apply.
7. Layer Styles: Utilizing layer styles can further enhance the appearance of your text. You can add layer styles such as bevels, gradients, and strokes to give your text a more three-dimensional and dynamic look. Access the Layer Styles menu by selecting your text layer and tapping on the Layer Options icon.
8. Blending Modes: Another way to add visual interest to your text is by experimenting with different blending modes. These modes allow you to control how your text interacts with the underlying layers and colors. Select your text layer, tap on the Layer Options icon, and explore the blending modes menu.
By utilizing these adjustment and formatting options, you can truly customize your text and create stunning designs in Procreate. Take some time to experiment and explore the various tools available, and let your creativity flourish.
Text in Procreate can be a powerful tool for artists and designers looking to add a personal touch to their creations. From customizing brush styles to experimenting with different lettering techniques, Procreate offers a wide range of features and options to make your text stand out.
By following the steps outlined in this guide, you can master the art of working with text in Procreate. Whether you’re creating digital illustrations, hand lettering, or designing social media graphics, Procreate’s text capabilities provide endless possibilities for your artistic expression.
Remember to explore and experiment with different fonts, styles, and effects to create unique and captivating text designs. With practice and creativity, you can take your Procreate creations to the next level and captivate your audience with stunning text that truly makes a statement.
FAQs
1. What is Procreate?
Procreate is a powerful digital art app available for iOS devices, such as iPads and iPhones. It allows artists and designers to create stunning artworks, illustrations, and designs using a wide range of digital tools and brushes.
2. Can I use Procreate on Android devices?
No, Procreate is exclusively available for iOS devices and does not have an Android version. However, there are similar apps available for Android users, such as Adobe Photoshop Sketch and Autodesk SketchBook.
3. Is Procreate suitable for beginners?
Yes, Procreate is suitable for artists and designers of all skill levels, including beginners. It offers an intuitive and user-friendly interface, making it easy to learn and navigate. Additionally, Procreate provides a wealth of tutorials and online resources to help beginners get started and improve their skills.
4. What features does Procreate offer?
Procreate offers a wide range of features to enhance your digital art creation experience. Some key features include advanced brushes and brush customization options, layers and blending modes, selection tools, transformation tools, color adjustment options, and the ability to import and export files in various formats.
5. Is Procreate a one-time purchase or a subscription-based app?
Procreate is a one-time purchase app. Once you purchase it from the App Store, you own it and can use it without any subscription fees. This makes it a cost-effective choice for digital artists who want a powerful and feature-rich app without recurring payments.