
Are you the proud owner of the brand new iPhone 13? If so, you’ll want to take all the necessary steps to protect your investment, particularly the stunning display. One of the best ways to safeguard your iPhone 13’s screen from scratches, smudges, and fingerprints is by installing a Zagg screen protector. Zagg is a trusted brand known for its high-quality screen protectors that provide excellent clarity and durability. In this article, we will guide you through the step-by-step process of installing a Zagg screen protector on your iPhone 13. Whether you’re a tech-savvy individual or new to the world of screen protectors, we’ve got you covered with detailed instructions and valuable tips to ensure a seamless installation. So, let’s get started and keep your iPhone 13’s screen looking pristine and flawless.
Inside This Article
- Tools Needed
- Step 1: Clean the iPhone 13
- Step 2: Align the Zagg Screen Protector
- Step 3: Apply the Screen Protector
- Step 4: Remove Air Bubbles
- Conclusion
- FAQs
Tools Needed
Before you begin the installation process, make sure you have the necessary tools at your disposal. Here are the key tools you’ll need to install a Zagg screen protector on your iPhone 13:
- Microfiber Cloth: A microfiber cloth is essential for cleaning the screen of your iPhone 13 before installing the screen protector. It helps remove any dust, fingerprints, or smudges, ensuring a clean surface for installation.
- Dust Removal Sticker: A dust removal sticker is a handy tool to have to eliminate any remaining dust particles after using the microfiber cloth. It’s designed to stick to the screen and lift away dust effectively.
- Hinged Installation Tray: Some Zagg screen protectors come with a hinged installation tray. This tool helps align the screen protector precisely onto the surface of the iPhone 13, making the installation process much easier and more accurate.
- Squeegee Card: A squeegee card helps smooth out any air bubbles or wrinkles that may appear during the installation process. It helps ensure a seamless and bubble-free application of the screen protector.
- Applicator Spray: Depending on the Zagg screen protector model, you might need an applicator spray. This spray is usually used to moisten the adhesive side of the screen protector, allowing for easy repositioning and adjustment during installation.
- Guide Stickers: Some Zagg screen protectors come with guide stickers. These stickers help align the screen protector accurately by providing reference points on the screen. They are especially helpful when you need to reposition the screen protector while applying it.
Having these tools on hand ensures a smooth and successful installation of your Zagg screen protector on the iPhone 13. Now that you have everything you need, let’s move on to the step-by-step guide for installing the screen protector.
Step 1: Clean the iPhone 13
Before installing the Zagg screen protector on your iPhone 13, it’s crucial to ensure that the device is clean and free from any dust or debris. Follow these steps to properly clean your iPhone 13:
1. Start by turning off your iPhone 13 and disconnecting any cables or accessories.
2. Use a microfiber cloth or lens cleaning wipe to gently wipe the screen and the back of your iPhone 13. Make sure to remove any fingerprints, smudges, or dirt. Avoid using any abrasive materials that might scratch the surface.
3. For stubborn or greasy marks, dampen the cloth slightly with distilled water or a 50/50 mixture of water and isopropyl alcohol. Avoid getting any liquid into the device’s ports or openings.
4. Pay close attention to the edges of the screen, as they tend to accumulate dust and debris. Use a soft-bristled brush or a cotton swab to remove any trapped particles.
5. Once you have cleaned the screen and the back of your iPhone 13 thoroughly, give it a few moments to dry completely before proceeding to the next step.
By ensuring that your iPhone 13 is clean and free from any dirt or particles, you create an optimal surface for the Zagg screen protector to adhere to. This step is essential for a smooth installation and to avoid any bubbles or imperfections under the protector.
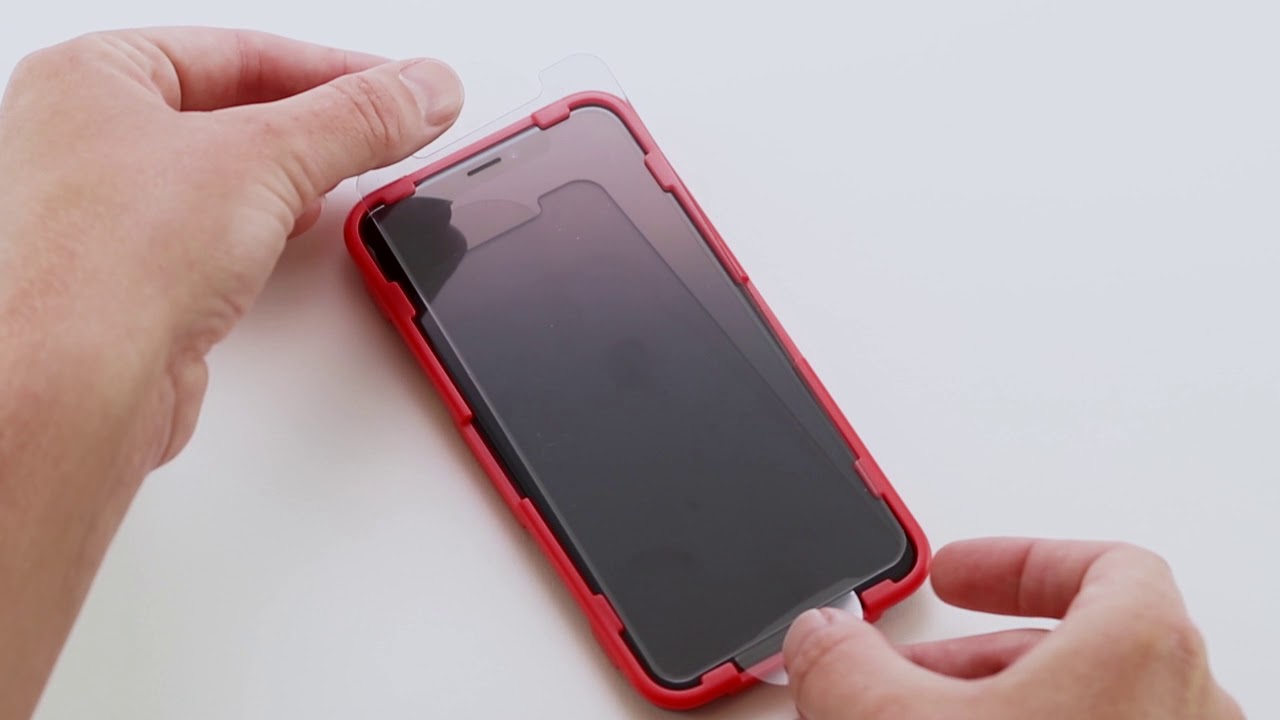
Step 2: Align the Zagg Screen Protector
Once you have prepared the iPhone 13 and cleaned the screen, it’s time to move on to the next step: aligning the Zagg screen protector. This step is crucial to ensure that the protector fits perfectly on your screen, providing optimal protection and clarity.
Here’s a step-by-step guide on how to align the Zagg screen protector with your iPhone 13:
- Start by carefully peeling off the backing of the Zagg screen protector, exposing the adhesive side.
- Hold the screen protector by the edges, making sure not to touch the adhesive surface.
- Align the protector with the top edge of your iPhone 13, matching the speaker and front camera cutouts with the corresponding openings on the screen protector.
- Once the top edge is aligned, gently apply pressure from the top to secure the protector in place.
- Gradually work your way down, pressing the protector against the screen while ensuring that it aligns perfectly with the edges and corners of your iPhone 13.
- If you notice any air bubbles trapped under the screen protector, use the provided smoothing card or your fingertips to push them towards the edges, allowing them to escape.
- Continue pressing and smoothing the protector until it adheres completely to the screen surface, leaving no bubbles or misalignments.
Remember, patience is key during this step. Take your time to align the screen protector accurately, as any misalignment may compromise its effectiveness and visual clarity. It’s better to take a few extra moments to ensure a satisfactory result.
Once the Zagg screen protector is aligned and securely attached to your iPhone 13, you can proceed to the next step, which involves removing any remaining air bubbles and ensuring a flawless installation. Keep reading to learn more!
Step 3: Apply the Screen Protector
Now that you have prepared your iPhone 13 and peeled off the protective layer from the Zagg screen protector, it’s time to apply it to your device. Follow these steps for a seamless installation process:
1. Align the screen protector: Carefully align the screen protector with the edges of your iPhone 13. Ensure that the cutouts for the camera, speaker, and home button (if applicable) are properly lined up.
2. Apply it gradually: Slowly lower the screen protector onto your iPhone’s display, starting from one end. Gradually release it, allowing it to adhere naturally to the screen’s surface. Be cautious and avoid applying excessive pressure during this step.
3. Remove air bubbles: If you notice any air bubbles trapped beneath the screen protector, use a microfiber cloth or the provided squeegee to gently push them towards the edges. Work from the center towards the edges in a smooth, sweeping motion.
4. Smooth out any imperfections: If you encounter any visible imperfections, such as lint or dust particles, gently lift the screen protector and remove them using a clean, lint-free cloth. Continue smoothing out the protector until it lies smoothly and evenly on your iPhone’s screen.
5. Allow it to set: Once the screen protector is properly aligned and free of any imperfections, give it some time to adhere to your iPhone 13’s screen. Avoid touching or using your device for at least 10-15 minutes to allow for a secure bond.
That’s it! You have successfully applied the Zagg screen protector onto your iPhone 13, providing an additional layer of protection for your device’s display.
Step 4: Remove Air Bubbles
After successfully applying the Zagg screen protector to your iPhone 13, you may notice some air bubbles trapped underneath. It is important to remove these bubbles to ensure a smooth and clear display. Here are a few simple steps to help you get rid of those pesky air bubbles:
1. Start by pressing down gently on the center of the screen protector. Use your fingertip or a soft cloth to apply even pressure across the entire surface. This will help to redistribute the adhesive and push out any trapped air.
2. If the air bubbles persist, try using a plastic card or squeegee to smooth them out. Start from the center and move towards the edges, applying gentle pressure as you go. Be careful not to apply too much force, as this could damage the screen protector or your iPhone display.
3. Another useful technique is to lift one corner of the screen protector slightly. As you lift the corner, the adhesive will loosen, allowing the trapped air to escape. Use your finger or the card to push the air bubbles towards the lifted corner, ensuring they are completely removed.
4. If the above methods do not fully eliminate the air bubbles, don’t worry. Sometimes, small bubbles may remain even after multiple attempts. These bubbles are usually not noticeable during regular use and will often disappear over time as the adhesive settles.
5. Remember, it is important to be patient during this process. Rushing or applying excessive force can lead to improper adhesion and potential damage to your screen protector or iPhone display.
With some careful attention to detail and a gentle touch, you can easily remove air bubbles from your Zagg screen protector, leaving behind a flawless and pristine display on your iPhone 13.
After following the step-by-step guide on how to install a Zagg screen protector on your iPhone 13, you can now enjoy a flawless display and enhanced protection for your device. The installation process, although it may seem intimidating at first, is straightforward and can be done by anyone with a little patience and careful attention to detail.
By adding a Zagg screen protector, you are safeguarding your iPhone 13 against scratches, smudges, and fingerprints, ensuring that it remains in pristine condition for longer. The high-quality materials used in Zagg screen protectors provide excellent clarity and sensitivity, allowing you to fully enjoy the stunning display and touch response of your iPhone 13.
Investing in a reliable screen protector like Zagg is a smart choice to prolong the lifespan of your iPhone 13 and maintain its resale value. So, don’t hesitate to protect your device and enjoy a worry-free experience, knowing that your screen is shielded from daily wear and tear.
FAQs
1. Why is it important to install a screen protector on the iPhone 13?
Installing a screen protector on your iPhone 13 is essential for protecting the display from scratches, smudges, and accidental drops. It acts as a barrier between the screen and external elements, ensuring that your device remains in pristine condition.
2. How do I choose the right Zagg screen protector for my iPhone 13?
To choose the right Zagg screen protector for your iPhone 13, consider factors such as the level of protection you desire, the type of material you prefer (tempered glass or film), and any additional features you may want, such as anti-glare or privacy filters. Zagg offers a wide range of options to cater to various preferences and needs.
3. What tools will I need to install a Zagg screen protector on my iPhone 13?
Installing a Zagg screen protector on your iPhone 13 typically requires minimal tools. Most Zagg screen protectors come with a microfiber cloth for cleaning the screen and an application card or squeegee to smooth out any air bubbles during installation. Be sure to follow the instructions provided in the packaging for the best results.
4. Can I reposition a Zagg screen protector if I don’t get it right the first time?
Yes, Zagg screen protectors are designed to allow for repositioning during the installation process. If you don’t get it right on the first try, carefully lift the protector from one corner and adjust its position. Take care to remove any dust particles or fingerprints before reapplying.
5. How do I maintain and clean my Zagg screen protector?
To maintain and clean your Zagg screen protector, use a soft, lint-free cloth or the included microfiber cloth to gently wipe away fingerprints and smudges. Avoid using harsh chemicals or abrasive materials as they can damage the protector. It’s also essential to regularly check for any signs of wear or damage and replace the screen protector if needed.