
If you’re the proud owner of a Moto G smartphone and you’re wondering how to voice record on it, you’ve come to the right place. The Moto G is a highly popular and versatile smartphone, packed with features that make our lives easier and more convenient. One of these features is the ability to voice record, which can be incredibly useful in a variety of situations. Whether you want to capture an important lecture, create a voice memo, or simply record a conversation, the Moto G has you covered. In this article, we will walk you through the steps to voice record on your Moto G, ensuring that you never miss a moment again. Let’s get started!
Inside This Article
- How Do I Voice Record On My Moto G
- Using the Built-in Voice Recorder App
- Using a Third-Party Voice Recording App
- Voice Recording Settings and Options
- Tips for Better Voice Recording on Moto G
- Conclusion
- FAQs
How Do I Voice Record On My Moto G
If you’re wondering how to voice record on your Moto G, you’re in luck! This smartphone comes with a built-in voice recorder app that makes it easy to capture audio. Additionally, you have the option to use third-party voice recording apps to expand your recording capabilities. In this article, we will guide you through the different methods and settings for voice recording on your Moto G, as well as provide some useful tips for better audio quality.
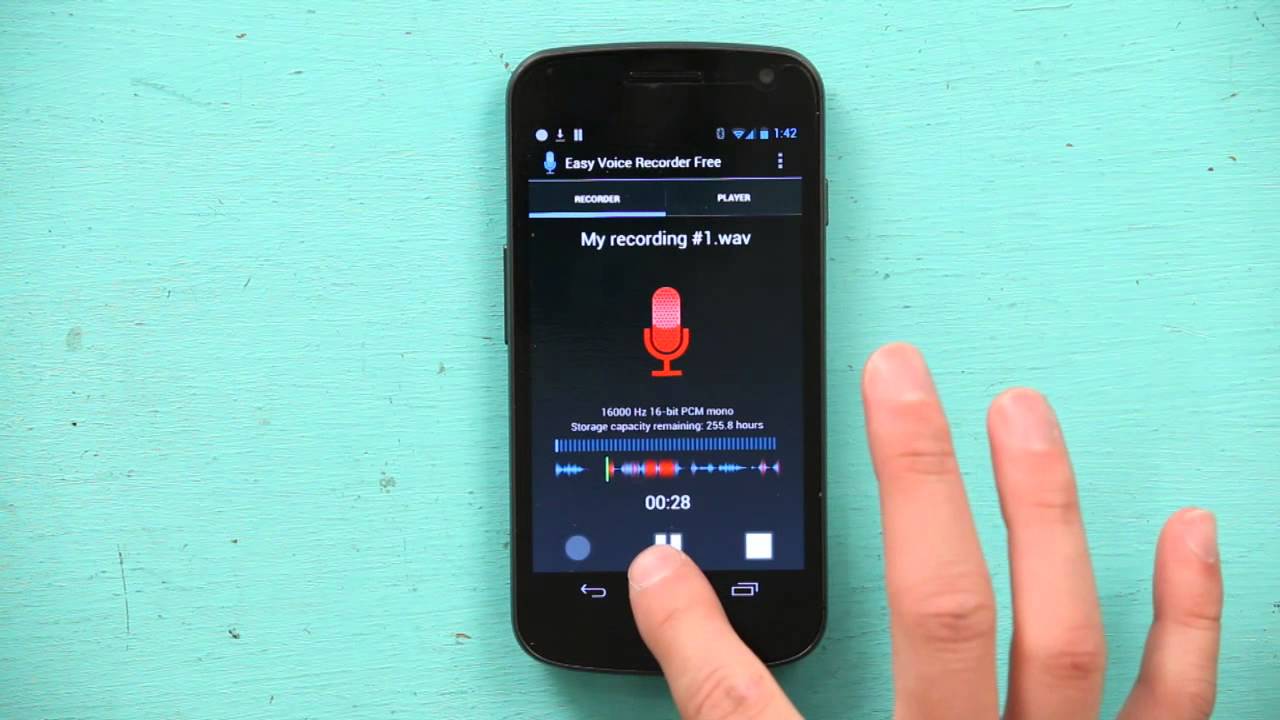
1. Using the Built-in Voice Recorder App
Moto G provides a convenient built-in voice recorder app that allows you to record audio with just a few taps:
- Open the app drawer on your Moto G and locate the Voice Recorder app.
- Tap on the app to open it.
- To start recording, tap the red record button. Speak clearly into the microphone on your device.
- When you’re finished, tap the stop button to end the recording.
- You can access your recorded files by tapping on the list icon, which will display your saved recordings.
- To listen to a recording, select it from the list and tap the play button.
2. Using a Third-Party Voice Recording App
If you prefer more advanced features or additional recording options, you can explore third-party voice recording apps available on the Google Play Store. These apps offer various functionalities like audio editing, transcription, and cloud storage integration. To use a third-party voice recording app:
- Open the Google Play Store on your Moto G.
- Search for voice recording apps using keywords like “voice recorder” or “audio recorder”.
- Select an app of your choice and tap the “Install” button to download and install it.
- Follow the app’s instructions to start recording audio.
3. Voice Recording Settings and Options
There are a few essential settings and options you can explore to optimize your voice recording experience on your Moto G:
- Audio Quality: Check the settings within your voice recording app to adjust the audio quality to your preference. Higher quality settings will result in larger file sizes.
- Storage Location: Some voice recording apps allow you to choose the location where your recordings are saved. You can select the internal storage or an external SD card, depending on your needs and available space.
- File Format: Depending on the app, you may have the option to select the file format of your recordings. Common formats include MP3, WAV, and AAC. Consider the compatibility of the file format with the devices or software you plan to use to play the recordings.
4. Tips for Better Voice Recording on Moto G
To ensure high-quality voice recordings on your Moto G, keep the following tips in mind:
- Minimize Background Noise: Find a quiet environment to record in to reduce background noise interference and enhance the clarity of your recordings.
- Hold the Device Properly: Hold your Moto G steady and avoid covering the microphone with your fingers or hand to capture clear audio.
- Speak Clearly and Loudly: Articulate your words clearly and speak in a loud and consistent voice to ensure optimal recording quality.
- Use Headphones with a Built-in Microphone: If you have headphones with a built-in microphone, you can use them to improve the audio quality of your recordings.
With these methods, settings, and tips, you can now confidently voice record on your Moto G. Whether you’re capturing important memos, interviews, or creative ideas, your smartphone has the tools to help you record and save audio that meets your needs.
Now, go ahead and make the most of your Moto G’s voice recording capabilities!
Using the Built-in Voice Recorder App
The Moto G comes with a built-in voice recorder app, making it easy for you to capture audio recordings on your device. Follow these simple steps to use the built-in voice recorder app:
Step 1: Open the voice recorder app on your Moto G. You can find it in your app drawer or on the home screen, depending on how you have customized your device.
Step 2: Once the app is open, you will see a microphone icon along with a “Record” button. Tap on the “Record” button to start recording.
Step 3: While recording, you can pause or resume the recording by tapping the pause button. This is useful if you want to take a break or want to avoid recording unwanted parts.
Step 4: To stop the recording, tap on the stop button. Your recorded audio file will be saved automatically.
Step 5: The voice recorder app also allows you to playback your recordings. Simply tap on the file you want to listen to, and it will start playing.
Step 6: If you wish to delete any recordings, long-press on the file and select the delete option. This will remove the recording from your device
The built-in voice recorder app on Moto G offers a simple and straightforward way to capture audio recordings. It provides essential features like recording, pausing, stopping, and playback, making it suitable for various purposes such as recording memos, interviews, or even spontaneous ideas that pop into your head.
Using a Third-Party Voice Recording App
If you are looking for more advanced voice recording features or additional customization options, you may consider using a third-party voice recording app on your Moto G. These apps offer a wide range of features that go beyond the basic recording capabilities of the built-in voice recorder app.
One popular and highly-rated third-party app for voice recording is “Voice Recorder & Audio Editor” by Green Apple Studio. This app provides a user-friendly interface and allows you to easily record and save high-quality audio files on your Moto G.
To use a third-party voice recording app, you can follow these steps:
- Open the Google Play Store on your Moto G.
- Search for “Voice Recorder & Audio Editor” or any other voice recording app of your choice.
- Select the desired app from the search results and tap on the “Install” button.
- Once the app is installed, open it and set it as your default voice recording app if prompted.
- Explore the features and options provided by the app, such as the ability to record in different formats, adjust recording quality, and apply filters or effects to your recordings.
- To start recording, tap on the dedicated “Record” button within the app’s interface and begin speaking into the microphone of your Moto G.
- When you’re finished recording, tap on the “Stop” button to end the recording session.
- Save the recorded audio file and choose a location or folder to store it.
By using a third-party voice recording app, you can unlock an array of features and settings that can enhance your voice recording experience on your Moto G. Whether you need to record lectures, interviews, or personal memos, these apps provide the flexibility and customization options to help you capture and manage audio recordings with ease.
Voice Recording Settings and Options
When it comes to voice recording on your Moto G, there are a variety of settings and options that you can explore to enhance your recording experience. Let’s take a closer look at some of the key features you can utilize:
Selecting Audio Quality: Depending on your needs, you can choose the audio quality for your voice recordings. Higher quality options are ideal for professional purposes or when you want to capture intricate details, while lower quality options conserve storage space on your device.
Enabling Noise Cancellation: The Moto G offers noise cancellation functionality to minimize background noise interference and ensure clearer voice recordings. This feature is especially useful when recording in crowded or noisy environments.
Adjusting Mic Sensitivity: In some instances, you may need to adjust the microphone sensitivity to better capture sound. This allows you to optimize the recording levels, depending on the distance and volume of the sound source.
Using External Microphones: If you require even more precise and professional results, you can connect external microphones to your Moto G. This opens up a world of possibilities for recording interviews, podcasts, or other types of high-quality audio.
Managing Recording Formats: The Moto G allows you to choose between different recording formats, such as MP3 or WAV. It’s a good idea to consider the compatibility requirements of the device or software you’ll be using to play or edit your recordings before selecting a format.
Organizing and Naming Recordings: To keep your voice recordings organized, the Moto G gives you the option to create folders and name your recordings. This makes it easier to find and access specific recordings in the future.
By exploring these settings and options, you can customize your voice recording experience on the Moto G and tailor it to your specific needs. Whether you’re recording lectures, interviews, or personal memos, taking advantage of these features will help you achieve high-quality recordings with ease.
Tips for Better Voice Recording on Moto G
Recording high-quality audio on your Moto G can be incredibly useful for a variety of purposes, from capturing important meetings or lectures to creating professional-grade voiceovers. Here are some tips to help you get the best results when recording audio on your Moto G:
1. Find a quiet environment: To ensure clear and crisp recordings, it’s important to choose a quiet location. Avoid noisy areas or places with background distractions that may interfere with the audio quality.
2. Position the phone correctly: The position of your Moto G can greatly impact the audio recording. Hold the phone close to the sound source, such as your mouth for voice recordings, or the speaker for capturing external audio. This helps to minimize background noise and improves the overall quality of the recording.
3. Use earphones with a built-in microphone: If you have a pair of earphones with a built-in microphone, consider using them while recording. They can help eliminate background noise and improve the clarity of your recordings.
4. Adjust the microphone sensitivity: On your Moto G, you may have the option to adjust the microphone sensitivity. Experiment with different levels to find the setting that works best for your recording needs. Lower sensitivity settings can reduce background noise, while higher sensitivity settings can capture distant sounds more effectively.
5. Check the storage availability: Before you start recording, make sure that you have enough storage space available on your Moto G. Large audio files can quickly fill up your device’s memory, so it’s a good practice to regularly transfer or delete recordings to free up space.
6. Avoid covering the microphone: While recording, be mindful of your hand placement. Avoid covering the microphone with your fingers or hand, as this can muffle or distort the audio quality. Keep your hand away from the bottom of the phone where the microphone is located.
7. Test and adjust volume levels: Take some time to test and adjust the volume levels on your Moto G. Too low of a volume can make the recording difficult to hear, while too high of a volume can result in distorted audio. Find a balance that ensures clear and audible recordings.
8. Use a pop filter: If you are recording vocals or speech, consider using a pop filter. This accessory can reduce plosive sounds (such as “p” and “b” sounds) that can cause distortion and impact the quality of the recording.
9. Practice good microphone placement: When recording audio on your Moto G, pay attention to the distance between the microphone and the sound source. Too far away, and the audio may sound distant and faint. Too close, and it may result in distortion or clipping. Experiment with the positioning to find the sweet spot for optimal audio quality.
10. Use a windscreen for outdoor recordings: If you’re recording audio outdoors, consider using a windscreen or a foam cover over the microphone to minimize wind noise. This can help to maintain clarity and enhance the overall quality of your recordings.
By following these tips, you’ll be able to capture high-quality audio recordings on your Moto G. Whether you’re recording important meetings, interviews, or simply indulging in your creative pursuits, these suggestions will help ensure that your voice recordings sound professional and clear.
Overall, the Moto G is a fantastic smartphone that offers a multitude of features and functionalities. Not only does it offer a smooth and seamless user experience, but it also provides a convenient and easy way to voice record on the device. With just a few simple steps, you can capture important conversations, memos, or ideas with clarity and precision.
The Moto G’s built-in voice recording feature ensures that you never miss an important moment or forget a brilliant thought. Whether you’re a student, professional, or just someone who loves to document their life, the Moto G’s voice recording capabilities will undoubtedly come in handy. Plus, with its long battery life and ample storage space, you can record hours of audio without worrying about running out of space.
So, whether you’re attending a lecture, conducting an interview, or simply want to make a voice memo, the Moto G has got you covered. With its user-friendly interface and impressive recording quality, voice recording on the Moto G is a breeze. Get your hands on this incredible smartphone and start capturing your thoughts and memories with ease.
FAQs
1. How do I voice record on my Moto G?
To voice record on your Moto G, follow these steps:
- Open the Voice Recorder app on your Moto G. You can find it in the app drawer or search for it using the search bar.
- Tap on the red record button in the center of the screen to start recording.
- Speak into the microphone clearly and audibly.
- Tap the stop button to end the recording.
- Once you stop the recording, it will be saved automatically. You can find your recordings in the Voice Recorder app or in the “Recordings” folder in your phone’s storage.
2. Can I voice record calls on my Moto G?
Unfortunately, the Moto G does not have a built-in feature to record calls. However, you can use third-party call recording apps from the Google Play Store to record calls on your device. Make sure to check the legal regulations regarding call recording in your region before using such apps.
3. How can I share my voice recordings on my Moto G?
To share your voice recordings on your Moto G, follow these steps:
- Open the Voice Recorder app on your Moto G.
- Locate the recording you want to share.
- Tap and hold on the recording to select it.
- Tap on the share icon, which looks like an arrow pointing upward.
- Choose the app or method you want to use to share the recording, such as email, messaging apps, or cloud storage.
- Follow the prompts to complete the sharing process.
4. How can I change the audio quality of my voice recordings on my Moto G?
To change the audio quality of your voice recordings on your Moto G, follow these steps:
- Open the Voice Recorder app on your Moto G.
- Tap on the three-dot menu icon to access the app’s settings.
- Select “Settings” from the menu.
- Under the “Recording settings” section, you can choose the audio quality you prefer by selecting options like “Standard quality” or “High quality”.
- Once you select your preferred audio quality, it will be applied to all future recordings.
5. Can I transcribe my voice recordings on my Moto G?
The Moto G does not have built-in transcription capabilities in its Voice Recorder app. However, you can use third-party transcription services or apps available in the Google Play Store to transcribe your voice recordings. These apps often use speech recognition technology to convert audio recordings into text. Make sure to choose a reputable transcription app and check user reviews before installing it on your device.