
Are you wondering how to remove the battery from your Google phone? Whether it's for troubleshooting or replacing the battery, knowing the proper steps is crucial. Removing the battery from a Google phone involves a few specific procedures to ensure safety and proper handling. In this article, we'll provide a comprehensive guide on how to remove the battery from your Google phone. You'll learn the necessary steps, precautions, and tips for a smooth battery removal process. Let's dive in and explore the essential details to help you successfully remove the battery from your Google phone. If you're ready to tackle this task, let's get started!
Inside This Article
- Precautions before removing the battery
- Tools required for removing the Google phone battery
- Steps to remove the Google phone battery
- Replacing the Google phone battery
- Conclusion
- FAQs
**
Precautions before removing the battery
**
Before attempting to remove the battery from your Google phone, it’s crucial to take certain precautions to ensure safety and prevent any damage to the device. Here are some essential precautions to keep in mind:
1. Back Up Your Data: Before removing the battery, it’s advisable to back up all your important data, such as contacts, photos, and documents. This ensures that you don’t lose any vital information in case of unexpected issues during the battery removal process.
2. Power Off the Device: Make sure to power off your Google phone before attempting to remove the battery. This simple step can prevent potential electrical hazards and ensure a safe removal process.
3. Use Proper Tools: It’s important to use the appropriate tools for removing the battery. This may include a set of precision screwdrivers or other specialized tools designed for opening the phone casing and accessing the battery compartment.
4. Handle With Care: When handling the battery, exercise caution and handle it with care. Lithium-ion batteries, commonly used in smartphones, can be sensitive to physical damage, so it’s essential to avoid bending, puncturing, or mishandling the battery during the removal process.
5. Avoid Excessive Force: Refrain from applying excessive force when attempting to remove the battery. If the battery seems stuck, carefully assess the situation and avoid using excessive pressure, which could potentially damage the battery or other internal components.
By adhering to these precautions, you can ensure a safe and smooth battery removal process for your Google phone.
Tools required for removing the Google phone battery
Before attempting to remove the battery from your Google phone, it’s essential to have the right tools to ensure a safe and successful process. Here are the tools you’ll need:
1. Screwdriver: Depending on the model of your Google phone, you may require a small screwdriver to access the battery compartment. Ensure that the screwdriver matches the size of the screws to prevent any damage during the removal process.
2. Plastic pry tool or spudger: To safely detach the battery from its housing, a plastic pry tool or spudger is crucial. These non-conductive tools prevent accidental short circuits and minimize the risk of damaging delicate components during the battery removal process.
3. Adhesive strips or adhesive remover: Some Google phone models may have the battery secured with adhesive. In such cases, adhesive strips or adhesive remover can aid in loosening the battery from its adhesive bond without causing damage to the device.
Having these tools at your disposal will not only facilitate the safe removal of the Google phone battery but also minimize the likelihood of accidental damage to the phone’s internal components.
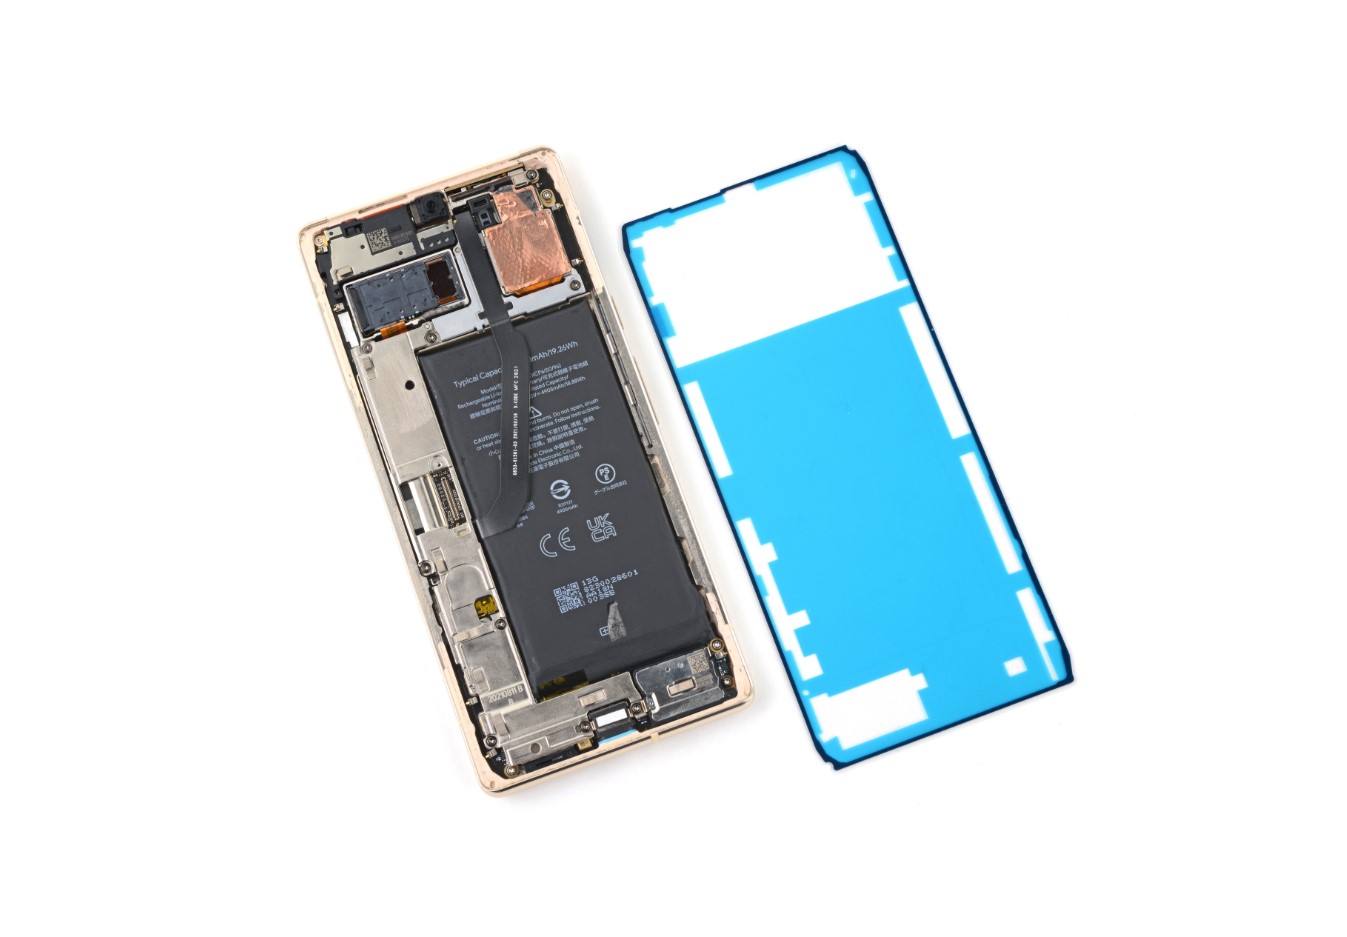
Steps to remove the Google phone battery
Removing the battery from a Google phone can be a delicate process, but with the right tools and careful steps, it can be done effectively. Here’s a guide to help you through the process.
1. Power off the phone: Before attempting to remove the battery, ensure that the phone is powered off. This is a crucial step to prevent any potential electrical hazards during the battery removal process.
2. Gather the necessary tools: To safely remove the battery from your Google phone, you will need a set of precision screwdrivers, plastic pry tools, and a heat gun or hairdryer. These tools will aid in disassembling the phone and accessing the battery.
3. Remove the back cover: Using a plastic pry tool, carefully separate the back cover from the phone. Take your time and work around the edges to avoid damaging the cover or the phone itself.
4. Locate the battery: Once the back cover is removed, locate the battery within the phone. Depending on the model of your Google phone, the battery may be secured with adhesive or screws.
5. Disconnect the battery: If the battery is connected with a cable, gently disconnect it from the phone’s motherboard. Take care to release any latches or connectors holding the cable in place.
6. Remove the battery: After disconnecting the battery, use a plastic pry tool to carefully lift the battery from its housing. Be cautious not to puncture or bend the battery during this process.
7. Handle with care: Once the battery is removed, handle it with care and avoid exposing it to extreme temperatures or physical damage. Properly dispose of the old battery according to local regulations.
By following these steps and exercising patience and precision, you can safely remove the battery from your Google phone without causing any damage to the device or yourself.
Replacing the Google phone battery
When it comes to replacing the battery in your Google phone, it’s essential to ensure that you have the correct replacement battery that is compatible with your specific phone model. Authenticity is key, so always opt for genuine batteries to avoid any potential issues with performance or safety.
Before proceeding with the replacement, make sure to power off your Google phone completely. This simple yet crucial step prevents any potential electrical mishaps during the battery replacement process. It’s a small action that can make a significant difference in ensuring a smooth and safe battery replacement.
Once the phone is powered off, you can begin the process of removing the back cover or accessing the battery compartment of your Google phone. This step may vary depending on the model of your phone, so it’s advisable to refer to the manufacturer’s guidelines or seek professional assistance if needed.
After gaining access to the battery, carefully disconnect it from the phone, ensuring that you handle it with care and attention. Some batteries may be secured with adhesive or screws, so be mindful of the specific method used in your phone and proceed accordingly to detach the battery without causing any damage to the phone or the battery itself.
When the old battery is safely removed, it’s time to install the new battery. Gently place the new battery in the designated slot, ensuring that it is correctly aligned and securely positioned. Once the new battery is in place, reattach any connectors or fastenings as per the original configuration.
With the new battery securely installed, it’s time to power on your Google phone and ensure that the replacement has been successful. If everything is in order, you should notice improved battery performance, providing you with extended usage time for your device.
Remember, if you encounter any challenges or uncertainties during the battery replacement process, seeking professional assistance from authorized service centers or technicians can provide you with the expertise and assurance needed to carry out the replacement effectively.
**
Conclusion
**
In conclusion, removing the battery from a Google phone is not a straightforward process, as most Google smartphones come with non-removable batteries. However, for devices with removable batteries, it is essential to follow the manufacturer’s guidelines to avoid damaging the phone or voiding the warranty. Additionally, it’s crucial to consider the potential risks and safety precautions associated with removing the battery from any electronic device. As technology continues to advance, smartphone designs are evolving, and the trend of non-removable batteries is becoming increasingly common. Therefore, it’s essential to adapt to new methods of troubleshooting and maintenance, such as utilizing professional repair services or seeking assistance from authorized technicians for battery-related issues with Google phones.
Sure, here's the FAQ section for "How To Remove Google Phone Battery" article:
html
FAQs
Q: Can I remove the battery from all Google phones?
A: No, not all Google phones have removable batteries. Some of the newer models come with non-removable batteries.
Q: Is it safe to remove the battery from my Google phone?
A: If your Google phone has a removable battery, it is generally safe to remove it following the manufacturer’s instructions. However, if you are unsure, it’s best to consult the user manual or seek assistance from a professional.
Q: Will removing the battery erase all data on my Google phone?
A: No, removing the battery from your Google phone should not erase any data. However, it’s always a good practice to back up important data regularly.
Q: How often should I remove the battery from my Google phone?
A: There’s usually no need to regularly remove the battery from your Google phone unless you encounter specific issues that require battery removal as a troubleshooting step. It’s best to follow the manufacturer’s recommendations for battery maintenance.
Q: Can removing the battery fix common Google phone issues?
A: In some cases, removing the battery from your Google phone can help resolve certain issues, such as unresponsive screens or system freezes. However, it’s important to assess the specific problem and consider other troubleshooting steps before resorting to battery removal.