
Setting an SD card as the default storage on a Galaxy A tablet can significantly expand the device's storage capacity and enhance its performance. By designating the SD card as the primary storage location, you can free up space on the tablet's internal memory and ensure that new apps, media, and files are automatically saved to the external card. This process is particularly useful for users who frequently download large files or install numerous apps. In this article, we'll explore the step-by-step guide to setting an SD card as the default storage on a Galaxy A tablet, empowering you to optimize your device's storage capabilities. Let's delve into the details of this essential customization.
Inside This Article
- Checking Compatibility
- Inserting the SD Card
- Formatting the SD Card
- Setting the Default Storage
- Conclusion
- FAQs
Checking Compatibility
Before setting an SD card as the default storage on your Galaxy A tablet, it’s crucial to ensure that the device supports this functionality. Not all Android devices allow for the use of an SD card as internal storage, so it’s essential to verify the compatibility of your tablet with this feature.
To check if your Galaxy A tablet supports using an SD card as internal storage, navigate to the official Samsung website or refer to the user manual that came with your device. These resources should provide detailed information about the supported storage options and the process for configuring an SD card as the default storage on your tablet.
It’s also advisable to visit online forums or communities dedicated to Galaxy A tablet users. Engaging with fellow users can provide valuable insights and firsthand experiences regarding the compatibility of SD card usage as internal storage on the Galaxy A tablet. By gathering information from various sources, you can make an informed decision about proceeding with the configuration process.
Inserting the SD Card
Inserting an SD card into your Galaxy A tablet is a simple process that can greatly expand your device’s storage capacity. To get started, locate the SIM card tray on the side of your tablet. This tray will have a small pinhole next to it, which is used to eject the tray.
Once you’ve found the tray, use the SIM ejector tool that came with your tablet or a small paperclip to gently press into the pinhole. This will release the tray, allowing you to pull it out and access the slot for the SD card. Carefully place the SD card into the slot, ensuring that it is oriented correctly to avoid any potential damage to the card or the tablet.
After inserting the SD card, gently push the tray back into the tablet until it clicks into place. It’s important to handle the SD card and tray with care to prevent any bending or damage. With the SD card securely inserted, your tablet is now ready to be configured to utilize the additional storage space for your apps, photos, videos, and other files.
Formatting the SD Card
Before you can use your SD card as the default storage on your Galaxy A tablet, you need to ensure that it is formatted correctly. Formatting the SD card prepares it for use with your device, ensuring compatibility and optimal performance. Here’s how you can format the SD card for your Galaxy A tablet:
1. Insert the SD card into the designated slot on your tablet. Once inserted, navigate to the “Settings” menu on your device.
2. In the “Settings” menu, locate and tap on the “Device Care” option. This will allow you to manage the storage and performance of your tablet.
3. Within the “Device Care” menu, select “Storage” to access the storage settings for your tablet. Here, you will be able to view the available storage options and manage your SD card.
4. Locate the option to format the SD card. This may be listed as “Format SD Card” or a similar variation within the storage settings. Tap on this option to initiate the formatting process.
5. Before proceeding with the formatting, ensure that you have backed up any important data stored on the SD card. Formatting will erase all existing data on the card, so it’s crucial to safeguard any valuable information.
6. Once you have confirmed that the data is backed up, proceed with the formatting process. Your tablet will begin formatting the SD card, preparing it for use as the default storage.
7. After the formatting is complete, your SD card will be ready to be set as the default storage for your Galaxy A tablet. You can now proceed with configuring the default storage settings to optimize the usage of your SD card.
**
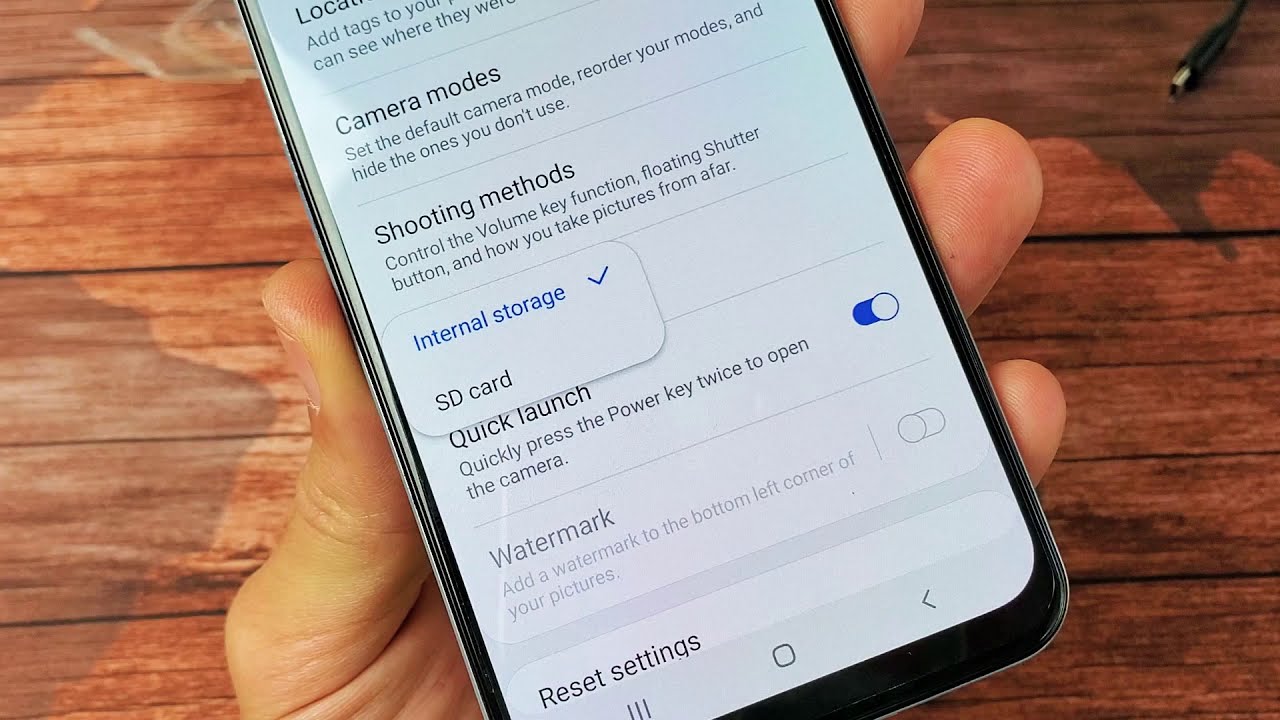
Setting the Default Storage
**
Once you have inserted and formatted the SD card, it’s time to set it as the default storage on your Galaxy A tablet. This ensures that all your photos, videos, and other files are automatically saved to the SD card, freeing up space on the device’s internal storage.
To set the default storage, navigate to Settings on your Galaxy A tablet. Scroll down and select Device Care or Device Maintenance, depending on your device’s version. Then, tap on Storage to access storage settings.
Next, tap on Advanced or Storage Settings to view more options. Here, you should see an option to set the default storage location. Tap on this option to select the SD card as the default storage for photos, videos, and other files.
Once you’ve selected the SD card as the default storage, your Galaxy A tablet will automatically save new photos, videos, and other downloads to the SD card. This helps you manage your device’s internal storage more effectively and prevents it from getting cluttered with media files.
In conclusion, setting an SD card as the default storage on a Galaxy A tablet can significantly expand the device's storage capacity and enhance its functionality. By following the steps outlined in this guide, users can seamlessly manage their storage and optimize their tablet's performance. With the ability to store a plethora of media, apps, and files on the SD card, users can enjoy a more seamless and efficient experience on their Galaxy A tablet. This simple yet impactful customization empowers users to make the most of their device and adapt it to their specific needs. With a larger storage capacity at their disposal, users can explore and utilize the full potential of their Galaxy A tablet without constraints. Ultimately, setting an SD card as the default storage on a Galaxy A tablet offers a practical solution to the common challenge of limited device storage.
Certainly! Here are the FAQs for "How To Set An SD Card As The Default Storage On A Galaxy A Tablet":
**FAQs**
1.
**Can I set an SD card as the default storage on my Galaxy A tablet?**
2.
**What are the benefits of setting an SD card as the default storage on a Galaxy A tablet?**
3.
**Will setting an SD card as the default storage affect the performance of my Galaxy A tablet?**
4.
**Can I use any SD card with my Galaxy A tablet as the default storage?**
5.
**What steps do I need to follow to set an SD card as the default storage on my Galaxy A tablet?**