
Are you looking to customize your AirPod settings to enhance your listening experience? Look no further, as we have got you covered! AirPods are not only popular for their seamless connectivity and superior sound quality, but they also come with a range of customizable settings that allow you to personalize your listening experience. Whether you want to change the double-tap function, adjust the equalizer, or enable automatic ear detection, knowing how to navigate through the settings is essential to make the most out of your AirPods. In this article, we will guide you step by step on how to change AirPod settings and optimize your listening experience. So grab your AirPods and let’s dive in!
Inside This Article
- Overview of AirPod Settings
- Accessing AirPod Settings
- Changing Sound Settings
- Overview of AirPod Settings
- Accessing AirPod Settings
- Changing Sound Settings
- Adjusting Microphone Settings
- Conclusion
- FAQs
Overview of AirPod Settings
AirPods are more than just wireless headphones – they come with a range of settings that can be customized to enhance your listening and calling experience. Whether you want to change the sound settings or adjust the microphone sensitivity, AirPods offer a variety of options to cater to your preferences.
With AirPods, you can access settings directly from your iPhone or iPad. These settings are stored and synced across all your devices, ensuring a seamless experience no matter which device you’re using. Let’s dive into the different categories of AirPod settings and how you can make the most of them.
Sound Settings:
One of the key aspects of AirPods is the sound quality they deliver. With AirPod settings, you have the ability to fine-tune the sound to match your personal taste. Open your device settings and navigate to the Bluetooth menu. Tap on your AirPods and you’ll find a range of sound options. The EQ settings allow you to choose from different presets, such as bass boost or vocal emphasis, to enhance the audio output according to your preferences.
Microphone Settings:
If you use your AirPods for making calls or recording audio, it’s essential to have control over the microphone settings. With AirPods, you can adjust microphone sensitivity, ensuring crystal-clear voice quality. Head to your device settings, select the Bluetooth menu, and tap on your AirPods. You’ll find the microphone options, where you can choose the level of sensitivity – low, medium, or high. This way, you can customize your AirPods for the best possible microphone experience, whether you’re in a noisy environment or a quiet room.
Automatic Ear Detection:
AirPods come with built-in sensors that can detect when they’re in your ears. This feature is not only convenient but also helps conserve battery life. In the AirPod settings, you can turn on or off automatic ear detection. When enabled, your AirPods will automatically pause audio playback when you remove them from your ears and resume it when you put them back in. This hands-free experience ensures seamless transitions between using your AirPods and interacting with your surroundings.
Double-Tap Action:
Another useful setting is the double-tap action, which allows you to customize what happens when you double-tap the AirPods. By default, this feature activates Siri, but you can change it to play/pause, skip to the next track, go back to the previous track, or disable it altogether. This customization provides quick and convenient control over your audio playback without having to reach for your device.
These are just a few examples of the settings available for your AirPods. Explore the settings menu to discover additional features, such as volume control, which allows you to control the volume level directly from your AirPods, and find my AirPods, which helps you locate your misplaced AirPods using the Find My app.
With AirPod settings, you have the power to personalize your listening and communication experience. Take advantage of the options available to tailor your AirPods to your unique preferences and enjoy seamless audio and call quality.
Accessing AirPod Settings
Changing the settings of your AirPods can be done through your iPhone, iPad, or Mac. Here’s how you can access the AirPod settings on different devices:
On iPhone or iPad:
- Make sure your AirPods are connected to your iPhone or iPad.
- Open the Settings app on your device.
- Scroll down and tap on “Bluetooth.”
- Under the “My Devices” section, you should see your AirPods listed. Tap on the (i) icon next to your AirPods.
- Here, you will find various options to customize your AirPod settings such as double-tap functionality, microphone settings, and more.
On Mac:
- Ensure your AirPods are connected to your Mac.
- Click on the Apple menu in the top-left corner of your screen and select “System Preferences.”
- Click on “Bluetooth.”
- In the list of devices, locate your AirPods and click on the (i) icon next to them.
- Similar to the iPhone and iPad, you will find various settings to tweak according to your preference.
Accessing the AirPod settings allows you to personalize your audio experience and modify settings to enhance your overall usage. Experiment with the options available to find what works best for you.
Changing Sound Settings
When it comes to AirPods, adjusting the sound settings can make a significant difference in your listening experience. Whether you prefer a deep bass or crisp highs, the AirPods offer a range of customizable sound settings to suit your personal preferences.
To change the sound settings of your AirPods, follow these steps:
- Ensure that your AirPods are connected to your device.
- Open the settings on your device and navigate to the Bluetooth menu.
- Find and select your AirPods from the list of available devices.
- Once you have selected your AirPods, you will see an option to customize the sound settings.
- Tap on the sound settings option to access the available options.
- Depending on your device, you may have different sound settings to choose from. This can include options like bass boost, treble enhancement, and even equalizer settings.
- Experiment with different sound settings to find the one that best suits your preferences.
- Once you have made your desired changes, simply exit the settings menu, and your new sound settings will be applied to your AirPods.
Keep in mind that the changes you make to the sound settings will only apply to the specific device you are using. If you connect your AirPods to a different device, you may need to adjust the sound settings again accordingly.
By customizing the sound settings of your AirPods, you can enhance your listening experience and enjoy your favorite music, podcasts, and audio content in a way that suits your personal taste.
Overview of AirPod Settings
AirPods have become one of the most popular wireless earphones on the market, thanks to their seamless connectivity and impressive sound quality. However, to fully customize your AirPod experience, it is essential to understand and make use of the various settings available. In this article, we will provide an overview of the different AirPod settings, how to access them, and tips on changing and adjusting them to suit your preferences.
Accessing AirPod Settings
To access the AirPod settings, you can follow these steps:
- Ensure that your AirPods are connected to your iPhone or iPad.
- Go to the Settings app on your device.
- Scroll down and tap on the “Bluetooth” option.
- Find your AirPods in the list of connected devices and tap on the “i” icon next to them.
- Now you will see the details and settings specific to your AirPods.
By accessing these settings, you will have the ability to customize your AirPods to suit your individual preferences.
Changing Sound Settings
One of the key features of AirPods is their impressive sound quality. You can further enhance your listening experience by adjusting the sound settings.
Within the AirPod settings, you can customize the following sound settings:
- Volume Limit: You can set a maximum volume limit to protect your hearing.
- EQ Settings: Choose from a range of equalizer presets such as Bass Boost, Flat, and more, to tailor the sound to your liking.
- Sound Balance: Adjust the left/right audio balance to compensate for any hearing imbalances.
Exploring and experimenting with these sound settings can greatly enhance your listening experience, ensuring that you enjoy your favorite music, podcasts, and movies to the fullest.
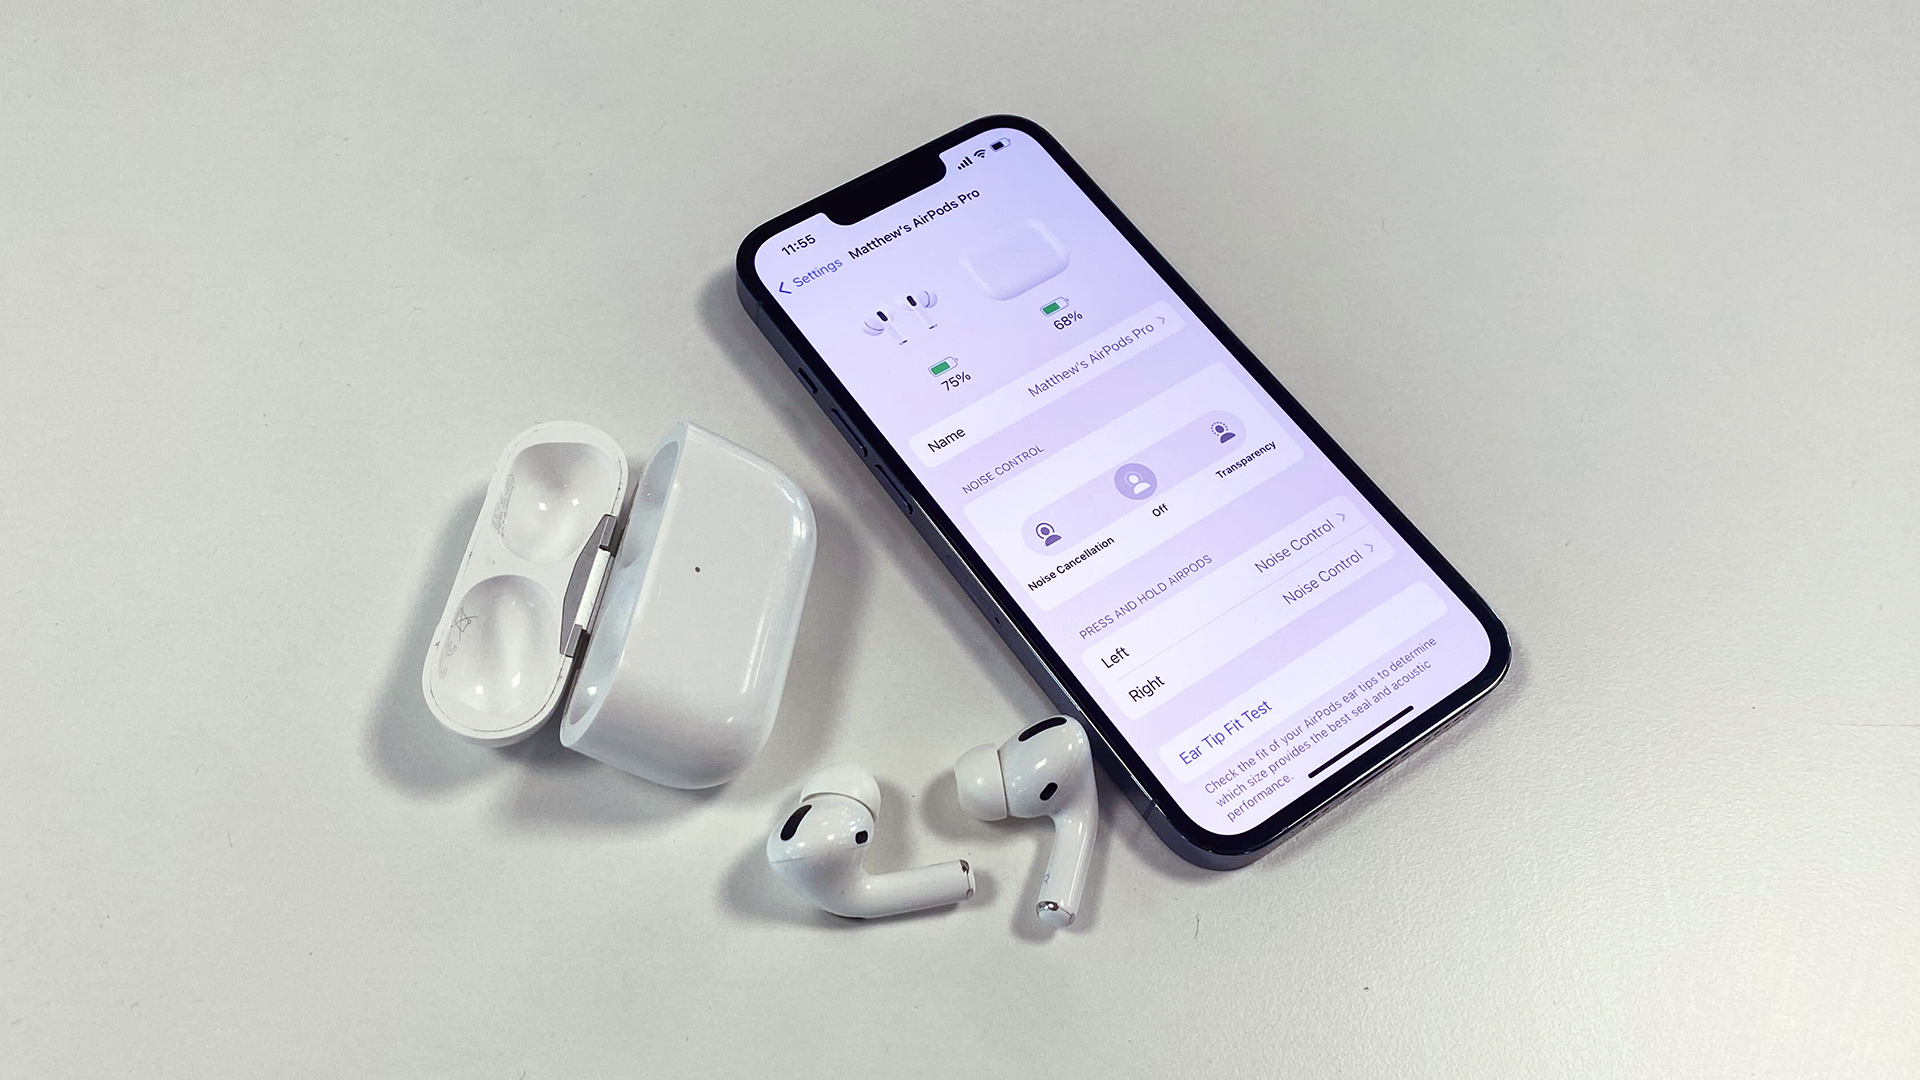
Adjusting Microphone Settings
Aside from sound settings, you can also adjust the microphone settings for your AirPods. This is particularly useful when making phone calls, recording voice notes, or using voice commands.
Within the AirPod settings, you can:
- Change Microphone Ear: Select whether you want the microphone to focus on your left or right AirPod.
- Enable Noise Cancellation: Toggle this setting on to reduce background noise during phone calls.
- Enable Transparency Mode: When enabled, Transparency Mode allows you to hear and interact with your surroundings more clearly while wearing your AirPods.
These microphone settings allow you to have better control over your voice quality and the level of ambient sound you wish to be aware of while using your AirPods.
By familiarizing yourself with the AirPod settings and customizing them to your preferences, you can truly optimize your AirPod experience. Whether it’s fine-tuning the sound or adjusting the microphone settings, these features ensure that your AirPods are tailored to your specific needs and preferences.
Conclusion
In conclusion, being able to change AirPod settings gives you the power to personalize your listening experience and make the most out of your AirPods. With these settings, you can customize functions such as playback controls, Siri activation, and automatic ear detection. Whether you want to adjust the volume, skip songs, or seamlessly switch between devices, the AirPod settings allow for a seamless and customizable user experience.
Additionally, by exploring the various options in the AirPod settings, you can enhance the security of your AirPods by enabling features like Find My AirPods and automatic ear detection. These settings not only provide convenience but also contribute to the overall safety and longevity of your AirPods.
Remember, to change AirPod settings, simply follow the step-by-step instructions outlined in this article. By taking the time to explore and customize the settings, you can optimize your AirPods to suit your individual preferences and needs.
So go ahead, dive into the settings, and unlock the full potential of your AirPods for an immersive and personalized audio experience.
FAQs
1. How do I change the settings on my AirPods?
Changing the settings on your AirPods is simple. Start by opening the Settings app on your iPhone or iPad. Scroll down and tap on “Bluetooth.” Look for your AirPods in the list of available devices and tap the “i” icon next to them. From here, you can customize various settings, such as renaming your AirPods, adjusting the double-tap function, and enabling or disabling automatic ear detection.
2. Can I use my AirPods with an Android device?
Yes, absolutely! AirPods can be used with Android devices as well. While you may not have access to all of the advanced features that are available when using them with an Apple device, you can still pair your AirPods with your Android phone or tablet via Bluetooth. Simply open the Bluetooth settings on your Android device, put your AirPods in pairing mode, and select them from the list of available devices.
3. How can I check the battery life of my AirPods?
Checking the battery life of your AirPods is easy. With your AirPods connected to your iPhone, open the lid of the charging case and bring it near your device. A pop-up will appear on your iPhone screen displaying the battery levels of both your AirPods and the charging case. You can also see the battery percentage by checking the Today View on your iPhone or by asking Siri, “What’s the battery percentage of my AirPods?
4. Can I use only one AirPod at a time?
Yes, you can use only one AirPod at a time. The AirPods are designed to automatically switch to mono audio when you use only one earbud. This means that you can listen to your favorite music, podcasts, or make calls with just one AirPod while keeping the other one in the charging case. The audio will automatically balance between the left and right channels, ensuring a seamless listening experience.
5. How do I update the firmware on my AirPods?
To update the firmware on your AirPods, make sure they are connected to your iPhone and placed inside the charging case. Connect the charging case to a power source and ensure that your iPhone is connected to Wi-Fi. The firmware updates for the AirPods are installed automatically when Apple releases them. You don’t need to manually update the firmware as it gets applied to your AirPods when they are connected to your iPhone and charging.