
The Accessibility menu on your AirPods is a powerful tool that allows you to customize your listening experience to suit your unique needs. Whether you have hearing impairments, want to adjust the audio balance, or simply enhance the sound quality, the Accessibility menu has got you covered.
In this article, we will guide you through the process of using the Accessibility menu to make personalized adjustments to your AirPods settings. From adjusting the volume levels in each ear to enabling live listening, we will explore the various features available in the Accessibility menu and how to optimize them for an enhanced audio experience.
Whether you’re a seasoned AirPods user looking for advanced customization options or new to the world of wireless earbuds and want to make the most out of your device, read on to discover how the Accessibility menu can transform your AirPods into a personalized listening companion.
Inside This Article
- Enable the Accessibility Menu
- Access the Accessibility Menu on your iPhone or iPad
- Customize AirPods settings using the Accessibility Menu
- Adjust sound balance and choose audio settings
- Conclusion
- FAQs
Enable the Accessibility Menu
If you want to customize your AirPods settings to enhance your listening experience, the Accessibility Menu is a valuable tool. Enabling this menu allows you to personalize various features and make the necessary adjustments based on your unique needs. With the Accessibility Menu, you can modify settings such as sound balance, audio settings, and more.
To enable the Accessibility Menu on your iPhone or iPad, follow these simple steps:
- Go to the “Settings” app on your device.
- Scroll down and tap on “Accessibility.”
- Next, select the “Accessibility Shortcut” option, usually located towards the bottom of the page.
- In the following menu, you will find different options. Look for “Accessibility Menu” and toggle the switch to enable it.
- Once enabled, you will now have quick access to the Accessibility Menu by triple-pressing the side or home button, depending on your device model.
By enabling the Accessibility Menu, you can easily make adjustments to your AirPods settings without having to navigate through multiple menus. This accessibility feature provides a convenient and efficient way to personalize your listening experience based on your needs and preferences.
Access the Accessibility Menu on your iPhone or iPad
Apple devices, such as iPhones and iPads, come with a built-in Accessibility Menu that allows users to customize various settings to meet their specific needs. This feature is especially useful for individuals with disabilities or those who require additional assistance.
To access the Accessibility Menu on your iPhone or iPad, simply follow these steps:
- Start by unlocking your device and navigating to the home screen.
- Next, open the “Settings” app. You can usually find this app icon on your home screen.
- Scroll down and tap on “Accessibility.” This option is usually listed towards the top of the settings menu.
- Once you’re in the Accessibility settings, you will find the “Accessibility Menu” option. Tap on it to proceed.
- Toggle the switch to enable the Accessibility Menu. You will notice a green indicator once it is turned on.
Once you have successfully enabled the Accessibility Menu, you can easily customize a variety of settings to enhance your device’s usability. It serves as a convenient shortcut to access features like AssistiveTouch, Voice Control, Magnifier, and more.
It’s worth noting that the exact location of the Accessibility settings may vary slightly depending on the iOS version you are running. However, the general steps provided above should give you a good starting point to find and access the Accessibility Menu on your iPhone or iPad.
By utilizing the Accessibility Menu, Apple ensures that its devices are inclusive and accessible to a wide range of users. So whether you have specific accessibility needs or simply want to enhance your device’s functionality, take advantage of this feature and make your iPhone or iPad truly your own.
Customize AirPods settings using the Accessibility Menu
If you’re an AirPods user, you know that these wireless earbuds offer a seamless and convenient listening experience. But did you know that you can further enhance your AirPods experience by customizing the settings using the Accessibility Menu? This powerful feature allows you to personalize your AirPods’ functionality to suit your specific needs and preferences.
Whether you want to adjust the sound balance, enable audio sharing, or change the double-tap actions, the Accessibility Menu offers a range of options to tailor your AirPods settings. Let’s dive into the steps to customize your AirPods using this menu:
Step 1: Enable the Accessibility Menu
The first step is to make sure you have the Accessibility Menu enabled on your iPhone or iPad. To do this, go to the Settings app on your device and tap on “Accessibility”. Then, navigate to “Accessibility Shortcut” and make sure the “Accessibility Menu” is selected. This will allow you to easily access the Accessibility Menu whenever you need to customize your AirPods settings.
Step 2: Access the Accessibility Menu on your iPhone or iPad
Once you’ve enabled the Accessibility Menu, accessing it is simple. Triple-click the side button (on devices with Face ID) or the home button (on devices with Touch ID). This will bring up the Accessibility Menu on your screen.
Step 3: Customize AirPods settings
Now that you have the Accessibility Menu open, it’s time to customize your AirPods settings. You’ll see a range of options available to you, including:
- Sound Balance: Adjust the sound balance between the left and right AirPods to ensure an optimal listening experience.
- Audio Routing: Choose where the audio output should go when using your AirPods, whether it’s to your AirPods only or to multiple devices simultaneously.
- Double-Tap Actions: Change the actions performed when you double-tap on the AirPods, such as playing/pausing audio, skipping to the next track, or activating Siri.
- Audio Sharing: Easily share audio with a friend by bringing their AirPods or compatible Beats headphones close to your device and tapping “Share Audio”.
Take some time to explore these options and adjust them according to your preferences. You can always go back to the Accessibility Menu to make any changes or revert them to the default settings.
By customizing your AirPods settings using the Accessibility Menu, you can truly personalize your listening experience and make the most out of your AirPods. So go ahead and give it a try, and enjoy a customized and immersive audio experience with your AirPods!
Adjust sound balance and choose audio settings
When it comes to enjoying your music or podcasts, having the ability to adjust the sound balance and audio settings can make a world of difference. Fortunately, with the Accessibility Menu on your AirPods, it’s easy to fine-tune your listening experience to suit your preferences. Here’s how you can do it:
1. Open the Accessibility Menu on your iPhone or iPad by going to the Settings app and selecting “Accessibility”.
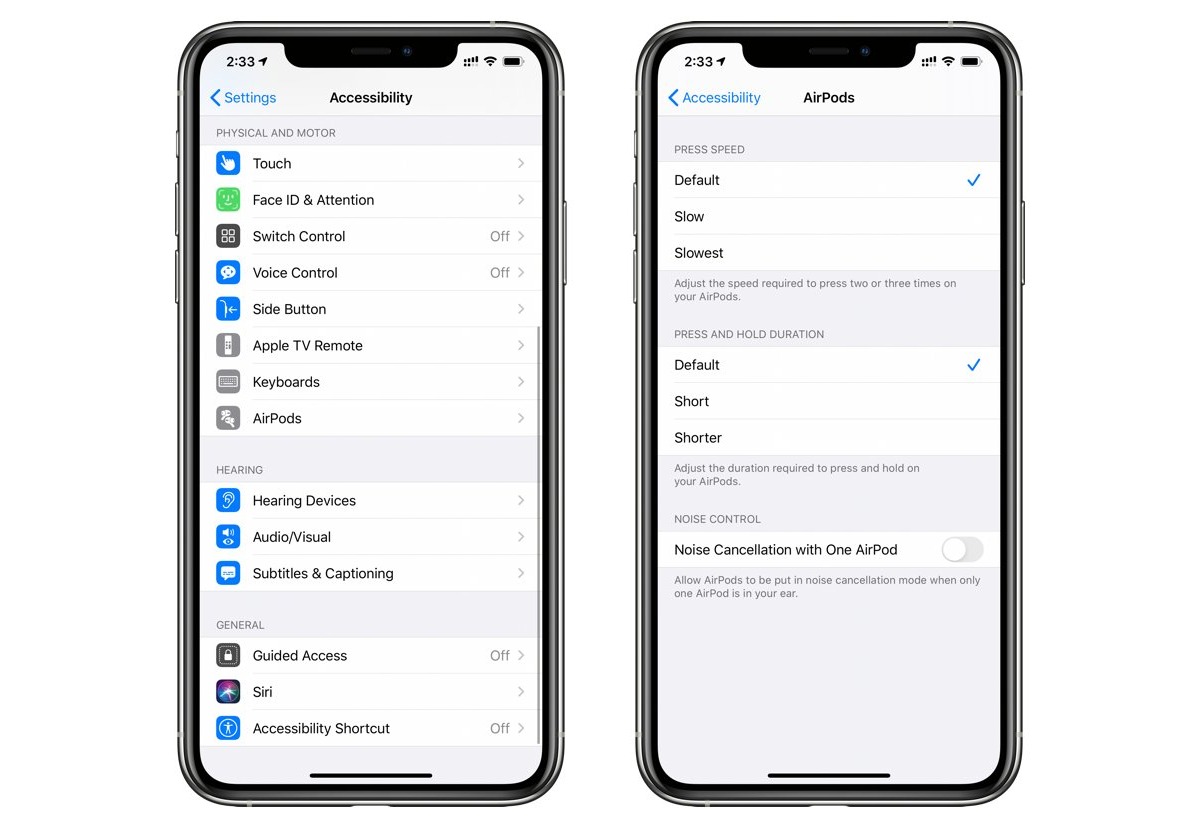
2. Scroll down and tap on “AirPods” under the Hearing section.
3. Next, choose “Audio Accessibility Settings” to access the various audio options available.
4. To adjust the sound balance between the left and right AirPod, swipe the slider left or right to increase or decrease the balance accordingly. This feature can be particularly useful if you have hearing loss in one ear and want to compensate for it.
5. If you want to customize the audio settings for your AirPods, tap on “Custom Audio Settings”. This allows you to adjust the sound equalization, which can enhance the bass response or make the sound clearer and more defined.
6. Within the Custom Audio Settings, you can set the audio levels for “Bass Boost”, “Mid-Tones”, and “Treble”. Experiment with different levels and find the right balance that suits your auditory preferences.
7. Additionally, you can choose between different audio presets like “Vocal Range”, “Bass Reducer”, “Headphone Accommodations”, and more. These presets are designed to optimize the audio quality based on the type of content you’re listening to or your specific hearing needs.
8. Once you’ve made the desired adjustments, exit the Accessibility Menu, and your AirPods will now have the customized sound balance and audio settings you’ve set.
Adjusting the sound balance and choosing the right audio settings can greatly enhance your listening experience, allowing you to enjoy your favorite songs, movies, and podcasts with greater clarity and comfort. Take advantage of the Accessibility Menu on your AirPods to personalize your audio preferences and make the most out of your wireless earbuds.
Conclusion
Customizing your AirPods settings using the Accessibility Menu is a simple and effective way to enhance your listening experience. With the ability to adjust the sound, enable noise cancellation, and customize the touch controls, you can truly make your AirPods your own.
No matter what your preferences or needs may be, the Accessibility Menu provides a variety of options to cater to individual needs. Whether you want to amplify quiet sounds, reduce background noise, or customize your touch controls, the Accessibility Menu has got you covered.
So why settle for default settings when you can tailor your AirPods to suit your preferences? Explore the Accessibility Menu and take advantage of these features to elevate your audio experience to new heights.
With the power to customize your AirPods at your fingertips, there’s no limit to the ways you can personalize your listening experience. So go ahead, dive into the Accessibility Menu, and make your AirPods truly yours.
FAQs
1. Can I customize the settings of my AirPods using the Accessibility Menu?
Yes, the Accessibility Menu on your device allows you to personalize the settings of your AirPods. You can adjust various options such as playback controls, noise cancellation, transparency mode, and more to enhance your audio experience.
2. How do I access the Accessibility Menu on my device?
To access the Accessibility Menu, navigate to the settings of your device. On iOS, go to “Settings” > “Accessibility” > “Accessibility Menu” and toggle it on. On Android, go to “Settings” > “Accessibility” > “Accessibility Menu” and enable it. Once activated, you can easily customize your AirPods settings from the Menu.
3. Can I control the noise cancellation level of my AirPods through the Accessibility Menu?
Yes, with the Accessibility Menu, you can adjust the noise cancellation level of your AirPods. This feature allows you to block out external sounds or let in ambient noise based on your preference. You can toggle between different modes or fine-tune the level to suit your environment.
4. Is it possible to change the track or adjust the volume of my AirPods with the Accessibility Menu?
Absolutely! The Accessibility Menu enables you to control the playback of your AirPods effortlessly. You can skip to the next track, go back to the previous track, play/pause, and adjust the volume—all with just a few taps on your device.
5. Can I use the Accessibility Menu to check the battery level of my AirPods?
Certainly! The Accessibility Menu provides you with an easy way to check the battery level of your AirPods. You can quickly view the battery life of your AirPods, as well as the charging case, without needing to open the case or rely on the battery widget on your device.