
As cell phones have become an integral part of our daily lives, protecting their screens has become of utmost importance. Screen protectors play a crucial role in safeguarding the delicate displays of our mobile devices from scratches, smudges, and even shattering. However, there may come a time when you need to remove a screen protector, either due to wear and tear or because you want to upgrade to a new one.
In this article, we will delve into the various methods and techniques to safely remove a screen protector from your cell phone. Whether you have a tempered glass protector or a film protector, we will guide you step by step, ensuring that you avoid any unwanted damage to your device. So, if you’re ready to learn the ins and outs of removing a screen protector, let’s dive in!
Inside This Article
- Introduction
- Preparing to Remove a Screen Protector
- Method 1: Peeling Off the Screen Protector
- Method 2: Using Heat to Remove the Screen Protector
- Method 3: Applying a Cleaning Solution to Remove the Screen Protector
- Method 4: Using Adhesive Tape to Remove the Screen Protector
- Introduction
- Preparing to Remove a Screen Protector
- Method 1: Peeling Off the Screen Protector
- Method 2: Using Heat to Remove the Screen Protector
- Method 3: Applying a Cleaning Solution to Remove the Screen Protector
- Method 4: Using Adhesive Tape to Remove the Screen Protector
- Conclusion
- Conclusion
- FAQs
Introduction
Screen protectors are a crucial accessory for mobile devices, providing an extra layer of protection against scratches, cracks, and other types of damage. However, there may come a time when you need to remove the screen protector, whether it’s because you want to replace it with a new one or you simply prefer the look and feel of your device without it. In this article, we will explore different methods to safely and effectively remove a screen protector from your mobile device. Whether you are dealing with a glass or plastic screen protector, these methods will help you remove it without causing any damage to your device.
Before we dive into the methods, it’s important to note that the process of removing a screen protector may vary depending on the type of protector and the adhesive used. It’s always a good idea to refer to the manufacturer’s instructions or guidelines specific to your screen protector.
Now, let’s get started and learn how to remove a screen protector from your mobile device.
Preparing to Remove a Screen Protector
Before diving into the process of removing a screen protector, it’s important to properly prepare yourself and your device. Taking a few extra steps will ensure a smoother and more successful removal process. Here are some key tips to follow:
- Gather the necessary tools: To remove a screen protector, you’ll need a few basic tools such as a microfiber cloth, a plastic card or credit card, adhesive tape, and a cleaning solution (if necessary). Having these items at hand will make the process much easier.
- Choose the right time and place: Find a well-lit area with a clean and flat surface to work on. Make sure you have enough time and patience to carry out the removal process without rushing.
- Power off your device: Before attempting to remove the screen protector, it’s important to power off your device. This will prevent any accidental touchscreen actions that could interfere with the removal process.
- Clean the device: Use a microfiber cloth to wipe the screen and remove any dust, fingerprints, or debris. This will ensure a clean surface for the removal process.
- Read the instructions: If your screen protector came with specific instructions for removal, carefully read and follow them. Different screen protectors may have slightly different removal methods, so it’s important to be aware of any specific guidelines.
By preparing yourself and your device properly, you’ll be ready to tackle the screen protector removal process with confidence and efficiency.
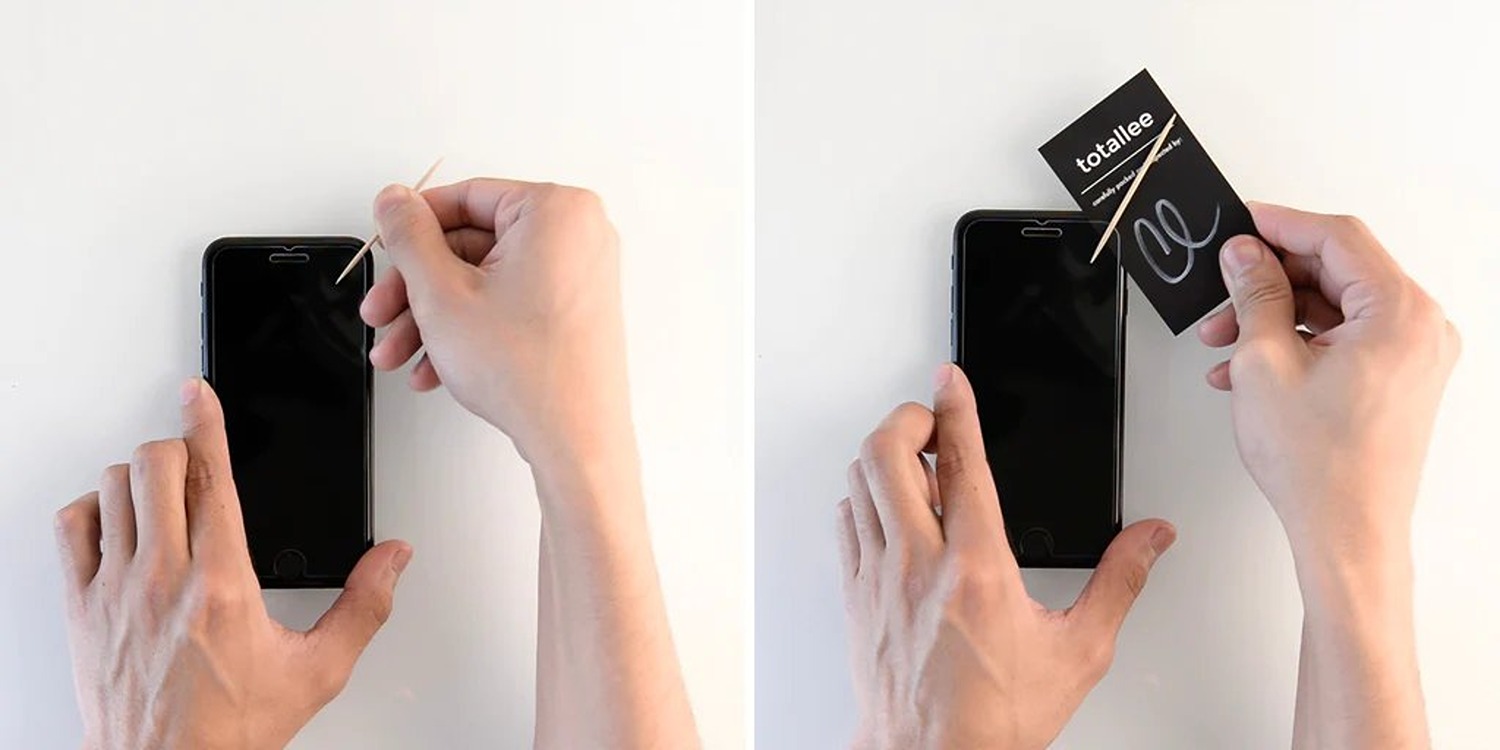
Method 1: Peeling Off the Screen Protector
When it comes to removing a screen protector, the most straightforward method is simply peeling it off. Here’s a step-by-step guide to help you through the process:
- Start by locating a corner of the screen protector. Gently lift it up using your fingernail or a thin, plastic tool like a credit card. Be careful not to scratch the screen.
- Once you have a corner lifted, slowly peel back the screen protector, taking care to maintain a consistent, gentle pulling motion. If you encounter any resistance, stop and reposition your approach.
- Continue peeling the screen protector until it is completely removed from the surface of your device. Again, take your time and be patient to avoid any damage to the screen underneath.
- If you notice any sticky residue left behind on the screen, use a microfiber cloth lightly dampened with water or a mild screen cleaner to gently wipe it away. Avoid using harsh chemicals or abrasive materials that could scratch the screen.
Peeling off a screen protector is a fairly simple process, but it’s important to exercise caution to prevent any accidental damage. Always remember to go slow, use a gentle touch, and be mindful of the screen’s sensitivity.
Method 2: Using Heat to Remove the Screen Protector
If the screen protector is proving to be stubborn and difficult to remove through peeling alone, you can try using heat to loosen its adhesive grip. Here’s how:
- Start by turning off your device and ensuring that it has completely cooled down.
- Take a hairdryer and set it to the lowest heat setting. Hold it a few inches away from the screen protector and begin gently heating the edges.
- Continue heating the edges of the screen protector, moving in a circular motion. Be careful not to concentrate the heat in one area for too long, as this could damage your phone.
- As the adhesive softens, you can use your fingernail, a credit card, or a thin plastic tool to lift the edge of the screen protector.
- Once you have successfully lifted the edge, slowly and carefully peel off the screen protector, applying heat as needed to facilitate the process.
Important tips to keep in mind:
- Avoid using excessive heat, as it can damage your phone’s screen. Always use the lowest heat setting on your hairdryer.
- Be patient and take your time during the process. Rushing can result in accidental damage to your phone.
- If you encounter any resistance while peeling off the screen protector, apply more heat to soften the adhesive further.
- Once the screen protector is removed, use a microfiber cloth to gently clean the screen and remove any remaining adhesive residue.
By using heat, you can effectively loosen the adhesive bond and safely remove the screen protector from your cell phone.
Method 3: Applying a Cleaning Solution to Remove the Screen Protector
If the screen protector on your device is stubbornly clinging on, you may need to try using a cleaning solution to help facilitate its removal. Follow these steps to effectively remove the screen protector using this method:
- Prepare the cleaning solution: Start by mixing a small amount of dish soap or a mild cleaning solution with warm water in a bowl. Make sure to use a cleaning solution that is safe for electronics and will not cause any damage to your device.
- Dampen a microfiber cloth: Dip a microfiber cloth or a cotton ball into the cleaning solution, ensuring that it is thoroughly dampened but not dripping wet.
- Apply the cleaning solution: Gently apply the damp cloth to the surface of the screen protector, allowing the cleaning solution to soak into the adhesive. Be careful not to get any excess liquid into the device’s ports or openings.
- Wait for a few minutes: After applying the cleaning solution, wait for a few minutes to allow it to penetrate the adhesive and loosen the screen protector from the device’s screen.
- Peel off the screen protector: Once the adhesive has had a chance to loosen, use your fingernail or a plastic card to carefully lift and peel off the screen protector. If it doesn’t come off easily, repeat the process of applying the cleaning solution and waiting for a few more minutes before attempting to remove it again.
- Clean any residue: After successfully removing the screen protector, use the damp cloth to clean any remaining adhesive residue on the device’s screen. Gently wipe away the residue until the screen is clean and free from any sticky residue.
- Dry the screen: Finally, use a clean, dry microfiber cloth to thoroughly dry the device’s screen. Make sure there is no moisture left on the screen before applying a new screen protector or using the device.
Using a cleaning solution can be an effective method for removing a screen protector, especially if it has been in place for a long time or is firmly stuck. However, exercise caution during the process to avoid causing any damage to your device. If you are unsure about using a cleaning solution, it is best to consult a professional or refer to the manufacturer’s guidelines for your specific device.
Method 4: Using Adhesive Tape to Remove the Screen Protector
If the previous methods of peeling off or using heat didn’t work, you can try using adhesive tape to remove the screen protector. This method can be effective if the screen protector is not strongly bonded to the screen. Here’s a step-by-step guide on how to use adhesive tape to remove a screen protector:
- Start by cutting a small piece of transparent adhesive tape, enough to cover the width of the screen protector.
- Place the tape on one edge of the screen protector. Make sure to apply it gently to avoid damaging the screen.
- Gently lift the tape, using it as leverage to peel off the screen protector. Slowly and carefully pull the tape towards the opposite side of the screen, keeping it parallel to the surface.
- If the screen protector starts to lift off, continue pulling the tape until the entire protector is removed. Be cautious and take your time to prevent any accidental damage to the screen.
- Inspect the screen for any residue left behind by the screen protector. If there are any sticky remnants, you can clean them off using a microfiber cloth dampened with isopropyl alcohol or a screen cleaning solution. Wipe gently in circular motions to remove the residue.
- Once the screen is clean and free of any adhesive residue, you can apply a new screen protector if desired.
Using adhesive tape can be an effective and gentle method for removing a screen protector, especially if other methods have not been successful. However, it is essential to be cautious and gentle during the process to avoid damaging the screen.
Introduction
Screen protectors are an essential accessory for mobile devices, providing an extra layer of protection against scratches, smudges, and cracks. However, there may come a time when you need to remove a screen protector, whether it’s because you want to replace it or you’re experiencing difficulties with touch sensitivity or visibility. In this article, we will explore various methods you can use to remove a screen protector safely and effectively.
Preparing to Remove a Screen Protector
Before you begin the process of removing a screen protector, it’s important to gather a few supplies and create a clean and controlled environment. Here’s what you’ll need:
- Microfiber cloth
- Isopropyl alcohol or screen cleaning solution
- Adhesive tape (optional)
- Heat source such as a hairdryer (if using the heat method)
It’s also recommended to power off your device to avoid any accidental taps or swipes during the removal process.
Method 1: Peeling Off the Screen Protector
The first method involves gently peeling off the screen protector from the device. Start by identifying a corner or edge of the protector that is slightly lifted. Use your fingernail or a plastic pry tool to grip the edge and slowly peel it back. Take care not to apply excessive force that could cause damage to the screen or leave residue on the device. If you encounter any resistance, stop and try another method to remove the protector.
Method 2: Using Heat to Remove the Screen Protector
If the screen protector is firmly adhered to the screen, using heat can help loosen the adhesive. Use a hairdryer on a low or medium heat setting and hold it a few inches away from the screen protector. Move the hairdryer in a back-and-forth motion to evenly warm the protector. After a few minutes, the adhesive should start to soften, making it easier to peel off the protector gently using your fingernail or a plastic pry tool.
Method 3: Applying a Cleaning Solution to Remove the Screen Protector
If the screen protector is not coming off easily, you can try using a cleaning solution to dissolve the adhesive. Dampen a microfiber cloth with isopropyl alcohol or a screen cleaning solution and gently rub it over the edges of the screen protector. Let the solution sit for a few minutes to allow it to penetrate the adhesive. Then, use your fingernail or a plastic pry tool to lift the edge of the protector and continue peeling it off slowly.
Method 4: Using Adhesive Tape to Remove the Screen Protector
If the above methods are not working, you can try using adhesive tape to remove the screen protector. Cut a small piece of adhesive tape and apply it to one corner or edge of the protector. Press down firmly and then lift the tape, taking the edge of the protector with it. Peel the protector slowly, using the tape to lift and separate it from the screen. Repeat this process on all edges until the protector is completely removed.
Conclusion
Removing a screen protector from your mobile device can be a delicate task, but with the right methods and tools, it can be done effectively. Whether you choose to peel off the protector, use heat, apply a cleaning solution, or utilize adhesive tape, the key is to proceed with caution and avoid applying excessive force. Take your time, be patient, and if necessary, seek professional assistance to ensure the safety of your device. Remember to clean the screen thoroughly after removing the protector and consider applying a new one to keep your mobile device well-protected!
Conclusion
In conclusion, removing a screen protector can be a tricky task, but with the right techniques and tools, it can be done effortlessly. Whether you have a tempered glass screen protector or a plastic film one, the key is to take your time and be gentle to avoid damaging your device’s screen.
Remember to clean and prepare the surface before removing the screen protector. Use a hairdryer or apply heat with a warm cloth to soften the adhesive and make it easier to peel off. Alternatively, use the tape method to slowly lift the edges and peel the protector away.
If you’re struggling, don’t force it. Seek assistance from a professional or contact the manufacturer for guidance. They might have specific instructions for removing their screen protectors.
By following these steps and being patient, you can effectively remove a screen protector without leaving any residue or causing any harm to your smartphone or tablet’s screen. Take care of your devices, and they will continue to serve you well for years to come.
FAQs
1. How do you remove a screen protector without damaging the phone?
To remove a screen protector without damaging your phone, follow these steps:
– Start by heating the screen protector with a hairdryer on a low setting. This will soften the adhesive.
– Use a thin plastic card, such as a credit card or ID card, to gently lift the edge of the screen protector.
– Slowly peel off the screen protector while applying gentle pressure. If the adhesive is stubborn, continue heating it and try again.
– Once the screen protector is removed, clean any residual adhesive using a microfiber cloth and screen cleaning solution.
2. Can I reuse a screen protector after removing it?
In most cases, screen protectors are not designed for reuse. The adhesive tends to lose its stickiness once the protector is removed. It is recommended to use a fresh screen protector for optimal protection.
3. What should I do if there are bubbles or dust trapped under the screen protector?
If you notice bubbles or dust trapped under the screen protector, try the following:
– Lift the corner of the screen protector carefully using a plastic card and then gently smooth out the bubbles or remove the dust using an adhesive tape.
– If the bubbles or dust persist, you may need to remove the screen protector and apply a new one, ensuring the surface is clean and free of debris.
4. How long does a screen protector typically last?
The lifespan of a screen protector can vary depending on the quality and usage. On average, a good-quality screen protector can last anywhere from 6 months to a year. However, factors such as accidental drops, heavy usage, and exposure to extreme temperatures can shorten its lifespan.
5. Can I apply a new screen protector over an existing one?
While it is technically possible to apply a new screen protector over an existing one, it is not recommended. Multiple layers of screen protectors can cause issues with touch sensitivity, screen clarity, and overall performance. It is best to remove the existing screen protector before applying a new one.