
Are you tired of using a phone protector on your mobile phone and want to remove it? Well, you’ve come to the right place! Removing a phone protector can be a bit tricky if you’re not sure how to do it properly. But fear not, this comprehensive guide will walk you through the process step by step. Whether you’re looking to replace your existing phone protector or just want to enjoy the sleek look and feel of your phone without it, we’ve got you covered. From choosing the right tools to safely removing the protector without causing any damage to your device, we’ll provide you with all the information you need. So, let’s get started and learn how to remove a phone protector like a pro!
Inside This Article
- Why Remove Phone Protector?
- Methods to Remove Phone Protector
- Method 1: Heat Gun or Hair Dryer
- Method 2: Rubbing Alcohol
- Method 3: Adhesive Remover
- Method 4: Dental Floss or Credit Card
- Conclusion
- FAQs
Why Remove Phone Protector?
Phone protectors are great for keeping your expensive mobile device safe from scratches, cracks, and other damage. They come in various forms, including screen protectors, cases, and skins. While these protectors offer invaluable protection, there may come a time when you need to remove them. Here are a few reasons why:
- Upgrade or replacement: When you decide to upgrade your phone or get a replacement device, you may want to remove the protector from your old phone. This allows you to keep the protector intact and transfer it to your new device, saving you money and ensuring you continue to enjoy the same level of protection.
- Change in style: Over time, you may want to change the look of your phone. Removing the protector gives you the freedom to explore new cases, skins, or just enjoy the natural beauty of your device without any additional layers.
- Maintenance or repair: There may be instances where you need to perform maintenance or repair on your phone. Removing the protector gives you unrestricted access to the device, whether it’s cleaning the screen, replacing a battery, or fixing a hardware issue.
- Incompatibility: In some cases, the phone protector may not be compatible with certain accessories or features of your phone. Removing it allows you to use accessories or features without any hindrance.
- Peeling or damage: Phone protectors can start to peel off or get damaged over time. This can affect the functionality and aesthetics of your device. Removing the protector allows you to replace it with a new one, ensuring your phone remains protected.
Now that you understand the reasons, it’s important to know the proper methods for removing a phone protector without causing any damage. Let’s explore some effective techniques in the following sections.
Methods to Remove Phone Protector
Removing a phone protector can be a daunting task, but with the right methods, it can be a breeze. Whether you’re looking to replace your old protector or just want to go without one, here are a few effective ways to remove it without damaging your phone.
Method 1: Heat Gun or Hair Dryer
If your phone protector is attached with a strong adhesive, using heat can help soften it and make it easier to remove. Use a heat gun or a hair dryer on a low heat setting, and carefully apply the heat to the edges of the protector. Once the adhesive is heated, gently lift the protector using a plastic card or your fingernail.
Method 2: Rubbing Alcohol
If your phone protector is not too firmly attached, rubbing alcohol can be a useful solution. Apply a small amount of rubbing alcohol to a microfiber cloth and gently rub it on the edges of the protector. The alcohol will help dissolve the adhesive, allowing you to peel off the protector without leaving any residue behind.
Method 3: Adhesive Remover
If the adhesive on your phone protector is particularly stubborn, you can try using a specialized adhesive remover. Apply the remover to a cotton swab or microfiber cloth and carefully rub it on the edges of the protector. Allow the remover to penetrate the adhesive for a few minutes, and then gently peel off the protector.
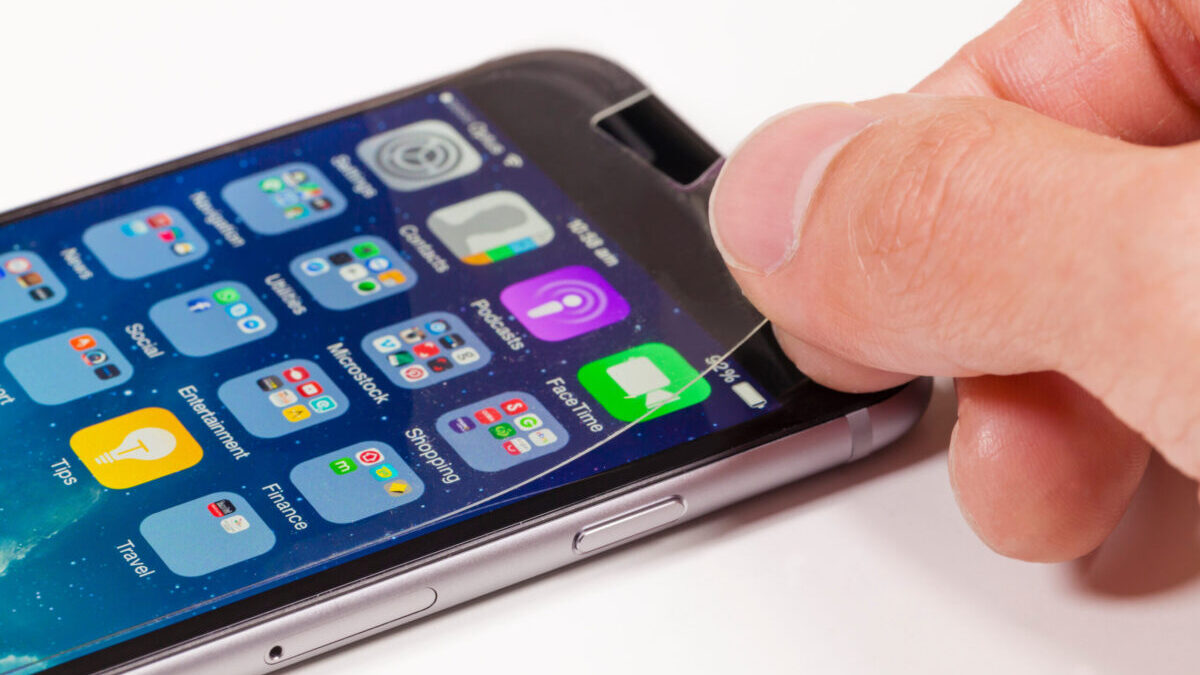
Method 4: Dental Floss or Credit Card
For protectors that are securely attached, using dental floss or a credit card can help pry them off. Start by inserting a piece of dental floss between the protector and the phone, and slowly slide it along the edges to loosen the adhesive. Alternatively, you can use a credit card to gently lift the edges of the protector until it comes off.
Remember, regardless of the method you choose, it’s important to be patient and gentle when removing your phone protector. Avoid using sharp objects that can scratch or damage your phone, and if in doubt, seek professional help to ensure a safe and successful removal.
Method 1: Heat Gun or Hair Dryer
One effective method to remove a phone protector is by using a heat gun or hair dryer. This method works especially well for protectors that are held in place with adhesive.
Start by turning on the heat gun or hair dryer to a low or medium heat setting. Hold the device a few inches away from the edges of the phone protector. Gently move the heat source back and forth, heating the protector evenly.
The heat will soften the adhesive, making it easier to peel off the protector. Use your fingers or a plastic tool to gently lift the edges of the protector. As you continue heating, the adhesive will loosen, allowing you to remove the protector without leaving any residue behind.
Be cautious not to heat the protector for too long, as excessive heat can damage the screen or the phone itself. It’s important to maintain a safe distance and not overheat the device.
Once the protector is removed, use a microfiber cloth to clean the screen and remove any remaining adhesive residue. Gently wipe the screen in a circular motion to ensure a thorough clean.
Method 2: Rubbing Alcohol
If you’re looking to remove a phone protector using a simple and readily available solution, look no further than rubbing alcohol. This method is effective at dissolving adhesive residue and loosening the grip of the protector on your phone’s surface.
Here’s how you can use rubbing alcohol to remove your phone protector:
- Start by powering off your phone and unplugging any cables.
- Prepare a clean microfiber cloth and dampen it with rubbing alcohol. Ensure that the cloth is not dripping wet.
- Gently rub the cloth over the phone protector, focusing on the edges and corners.
- Apply slight pressure while moving the cloth in circular motions. This will help the rubbing alcohol penetrate the adhesive and loosen its grip.
- Continue rubbing until you start to see the adhesive residue lifting off.
- Once you’ve covered the entire surface, use a clean, dry microfiber cloth to wipe away any remaining residue and alcohol.
- Inspect the phone to ensure that all adhesive residue has been removed. If necessary, repeat the process.
- Once you’re satisfied with the results, power on your phone and admire its clean screen.
Important Note: While rubbing alcohol is generally safe to use on phone screens and protectors, it’s always a good idea to test it on a small, inconspicuous area first to ensure it doesn’t cause any damage or discoloration.
Rubbing alcohol is an affordable and accessible solution for removing phone protectors. Its dissolving properties make it an effective option for getting rid of adhesive residue without excessive scrubbing or scraping. Remember to handle your phone with care throughout the process to avoid accidental damage.
Method 3: Adhesive Remover
If you’re struggling to remove the stubborn residue left behind by a phone protector, don’t worry! There’s a solution – adhesive remover. This method is highly effective in dissolving the adhesive and making it easier to remove the protector. It works well on various types of protectors, including plastic and tempered glass.
To get started, you’ll need a few supplies. Firstly, make sure you have an adhesive remover that is safe for use on electronic devices. Some popular options include Goo Gone, Isopropyl Alcohol, or even nail polish remover (acetone-free). Additionally, you’ll need a microfiber cloth or cotton swabs to apply the adhesive remover and clean the surface.
Here’s the step-by-step process to remove the phone protector using an adhesive remover:
- Start by applying a small amount of the adhesive remover onto a microfiber cloth or a cotton swab. Be sure not to oversaturate the cloth or swab, as you don’t want excess liquid getting into the phone.
- Gently rub the adhesive remover onto the residue left behind by the phone protector. Make sure to cover the entire area where the protector was applied.
- Allow the adhesive remover to sit on the residue for a few minutes. This will give it time to dissolve the adhesive and make it easier to remove.
- Using the microfiber cloth or a clean cotton swab, start rubbing the residue in a circular motion. Apply slight pressure to remove the dissolved adhesive from the surface.
- Continue this process until all the residue is completely removed. You may need to repeat the steps a few times if the adhesive is particularly stubborn.
- Once the residue is removed, use a clean microfiber cloth to wipe down the surface and ensure it’s free from any remaining adhesive remover.
It’s important to note that while adhesive removers are generally safe to use on most phone surfaces, it’s always a good idea to test it on a small inconspicuous area first before applying it to the entire surface. This will help ensure that there are no adverse effects or damage to your phone.
Using adhesive remover is an effective way to remove the residue left behind by a phone protector. It saves time and effort compared to other methods and leaves your phone looking clean and free from any sticky residue. So why struggle with a stubborn protector residue when adhesive remover can make the process much easier?
Method 4: Dental Floss or Credit Card
When it comes to removing a stubborn phone protector, one effective method involves using dental floss or a credit card. This technique works well if the protector is made of a flexible material like plastic or rubber. Here’s how to use dental floss or a credit card to remove your phone protector:
- Start by loosening one corner of the phone protector. You can do this by gently lifting the edge with your fingernail or a thin object like a toothpick.
- Once you’ve loosened the corner, take a piece of dental floss and slide it under the protector, positioning it between the protector and the surface of your phone. Make sure to hold onto the ends of the dental floss so that you have control over the process.
- Gently saw back and forth with the dental floss, working your way along the edge of the protector. The dental floss will help separate the adhesive from the phone, gradually lifting the protector off the surface.
- If you don’t have dental floss available, you can also use a credit card. Insert one corner of the credit card under the protector and carefully slide it along the edge, applying steady pressure to lift the protector off the phone.
- Continue working your way around the phone, using the dental floss or credit card to separate the protector from the surface. Be patient and take your time to ensure that you don’t damage the phone or leave any adhesive residue.
- Once you’ve completely removed the protector, use a microfiber cloth to wipe away any leftover adhesive or debris on your phone’s surface. This will help restore the original appearance of your device.
Using dental floss or a credit card is a simple and efficient method for removing a phone protector. It allows you to safely peel off the protector without risking any damage to your phone. Remember to exercise caution and be patient during the process to ensure the best results.
Conclusion
In today’s digital age, the need to protect our phones has become more important than ever. A phone protector serves as the first line of defense, shielding our devices from scratches, drops, and other accidents. Whether it’s a screen protector, a phone case, or a combination of both, these protective accessories play a crucial role in extending the lifespan of our phones and maintaining their aesthetics.
By following the steps outlined in this article, you now have the knowledge and tools to remove a phone protector safely and effectively. Remember to be patient and gentle throughout the process to avoid any damage to your device. If you are unsure or uncomfortable removing the protector yourself, consider seeking assistance from a professional or contact the manufacturer for guidance.
Having a clear and pristine phone display not only enhances the visual experience but also allows you to fully enjoy the features and functionalities of your device. So, go ahead and confidently remove that phone protector, uncovering the beauty of your mobile device.
FAQs
Q: How do I remove a phone protector?
A: Removing a phone protector is a fairly simple process. Start by turning off your phone and removing it from any charging cables or cases. Next, locate the edge of the phone protector and gently peel it back from one corner. Take your time and ensure that you do not apply too much force, as it may cause damage to your screen. Continue peeling back the protector until it is completely removed. If there are any adhesive residues left behind, you can use a mild adhesive remover and a soft cloth to clean it off.
Q: Can I reuse a phone protector after removing it?
A: In most cases, phone protectors are not designed to be reusable once they have been removed. The adhesive used on the protectors tends to lose its stickiness after it has been peeled off. It is recommended to replace the old protector with a new one to ensure proper protection for your phone’s screen.
Q: Are there any special tools required to remove a phone protector?
A: No, you do not need any special tools to remove a phone protector. Your fingers should suffice in peeling back the protector. However, if you encounter any stubborn adhesive residues, you can use a mild adhesive remover and a soft cloth to help remove them.
Q: Will removing a phone protector damage my phone?
A: When removing a phone protector, it should not cause any damage to your phone if done correctly. However, it is important to exercise caution and avoid using excessive force when peeling back the protector. Applying too much pressure or using sharp objects may result in scratches or other damages to the screen.
Q: Can I remove a phone protector from any type of phone?
A: Yes, phone protectors can be removed from any type of phone, including iPhones, Android devices, and other popular smartphone brands. The process of removing the protector is generally the same regardless of the phone model. Just make sure to follow the proper steps and take your time to avoid any mishaps.