
Screen protectors are an essential accessory for your cell phone, providing a layer of protection against scratches, fingerprints, and even shattering. However, there may come a time when you need to remove the screen protector, whether it’s because you want to replace it with a new one or simply switch to using your phone without one.
In this article, we will guide you through the process of removing a screen protector from your cell phone. We will provide you with step-by-step instructions and helpful tips to ensure a smooth and successful removal without causing any damage to your device’s screen. So, if you’re ready to bid farewell to your old screen protector and give your phone a fresh start, let’s dive in and learn how to remove a screen protector.
Inside This Article
- Understanding Screen Protectors
- Step-by-Step Guide on Removing a Screen Protector
- Gather the necessary tools
- Prepare the screen protector for removal
- Lift one corner of the screen protector
- Slowly peel off the screen protector
- Clean the Screen
- Conclusion
- FAQs
Understanding Screen Protectors
Screen protectors play an essential role in keeping our smartphones safe from scratches, dust, and accidental drops. They are thin, transparent sheets that are applied to the surface of a phone’s screen to provide an extra layer of protection.
There are different types of screen protectors available in the market, each with its own unique features and benefits. Let’s take a closer look at some of the most common types:
- Tempered Glass: Tempered glass screen protectors are made from a strong, durable material that can withstand high impact and protect the screen from cracking or shattering. They offer excellent clarity and touchscreen responsiveness, making them a popular choice for many smartphone users.
- PET Film: PET film screen protectors are made from a thin, flexible plastic material. They are easy to install and provide basic protection against scratches and smudges. While they may not offer the same level of durability as tempered glass, they are more affordable and suitable for everyday use.
- Privacy Filters: Privacy filters are unique screen protectors that not only protect your screen but also ensure privacy by limiting the viewing angle. When applied, these filters make it difficult for others to see your screen from the sides, keeping your sensitive information secure.
- Anti-Glare Protectors: If you often find yourself struggling with screen glare, an anti-glare screen protector can be a great solution. These protectors minimize reflections and reduce glare, improving visibility even in bright sunlight or under harsh indoor lighting conditions.
When choosing a screen protector, it is important to consider factors such as durability, clarity, ease of installation, and compatibility with touchscreen devices. Additionally, thickness, oleophobic coating, and impact absorption capabilities are also worth considering.
Step-by-Step Guide on Removing a Screen Protector
Screen protectors are a popular accessory for mobile devices, providing an extra layer of protection against scratches and smudges. However, there may come a time when you need to remove the screen protector, whether it’s to replace it with a new one or simply to clean the screen. If you’re unsure how to remove a screen protector without damaging your device, don’t worry – we’ve got you covered! Follow these step-by-step instructions to safely and effectively remove a screen protector.
1. Prepare for Removal: Start by finding a clean and well-lit area to work in. Make sure you have a microfiber cloth, a credit card or ID card, and a hairdryer (if necessary) at hand. Power off your device and place it on a flat and stable surface.
2. Check the Edges: Gently inspect the edges of the screen protector to determine the type of adhesive used. Most screen protectors have either a full adhesive or a partial adhesive. Full adhesive screen protectors adhere to the entire surface, while partial adhesive ones only stick around the edges.
3. Removing the Screen Protector Using the Card Method: If you have a full adhesive screen protector, start by using a credit card or ID card to lift one corner of the protector. Be careful not to scratch the screen or apply too much force. Once you have lifted the corner, slowly and gently peel off the screen protector, applying even pressure and using the card to help lift it off if necessary.
4. Removing the Screen Protector Using the Hairdryer Method: For screen protectors with strong adhesive, you may need to use heat to loosen the bond. Set your hairdryer to a low or medium setting and hold it about 6 inches away from the screen protector. Use the warm airflow to heat the edges of the protector for about 20-30 seconds. Once the adhesive is softened, use the card method described above to remove the screen protector.
5. Removing the Screen Protector Using the Sticky Tape Method: This method is best suited for partial adhesive screen protectors. Cut a piece of sticky tape or packing tape to approximately the length of your screen. Carefully place one end of the tape on the corner of the screen protector and press down firmly. Slowly lift the tape, ensuring that the screen protector comes off with it. Continue this process until the entire protector is removed.
6. Clean the Screen: Once you have successfully removed the screen protector, use a microfiber cloth to gently wipe away any residue or fingerprints on the screen. If necessary, dampen the cloth slightly with water or a screen cleaning solution, but be sure to avoid getting moisture into any openings or ports.
7. Apply a New Screen Protector (Optional): If you plan to replace the screen protector, now is the time to do so. Follow the manufacturer’s instructions for proper installation, ensuring that you align it correctly and smooth out any air bubbles.
Now that you know how to remove a screen protector, you can do so confidently and without the fear of damaging your device. Remember to take your time, be gentle, and follow the steps carefully. With the right approach, you’ll have a clean and pristine screen in no time!
Gather the necessary tools
Before you begin the process of removing a screen protector from your mobile device, it’s important to gather the necessary tools. Having the right tools on hand will make the removal process much easier and minimize the risk of damaging your device. Here are a few essential tools you’ll need:
- Microfiber cloth: This will help to clean the screen and remove any dust or debris before removing the screen protector.
- Plastic card or scraper: You’ll need a thin, flexible plastic card or scraper to lift the edges of the screen protector.
- Hairdryer or heat gun (optional): If the screen protector is particularly stubborn, you may need to apply heat to help loosen the adhesive.
- Sticky tape (optional): Sticky tape can be used to remove any leftover adhesive residue once the screen protector is removed.
Once you have gathered all of these tools, you will be ready to proceed with the removal process. Make sure to read the instructions carefully and take your time to avoid any accidental damage to your device.
Prepare the screen protector for removal
Before you jump into removing the screen protector, it’s important to prepare it properly. Here are a few steps to follow:
1. Find a clean, well-lit area: Look for a place with good lighting so that you can clearly see the screen protector. Make sure the area is clean to prevent any dust or debris from getting on your device.
2. Power off your device: It’s always a good idea to turn off your device before removing the screen protector. This will prevent any accidental taps or swipes that may occur during the process.
3. Gather the necessary tools: Depending on the method you choose to remove the screen protector, you may need a few tools. For example, if you plan to use the card method, you’ll need a microfiber cloth and a thin, plastic card.
4. Clean the screen protector: Use a microfiber cloth to wipe the surface of the screen protector. This will help remove any smudges or fingerprints that may have accumulated over time.
5. Check for any signs of damage: Before removing the screen protector, take a close look at its condition. If you notice any cracks or chips, be extra careful during the removal process to avoid any further damage to the device’s screen.
6. Remove the case (if applicable): If you have a protective case on your device, it’s best to remove it before attempting to remove the screen protector. This will give you better access and control during the process.
By taking these steps to prepare the screen protector, you’ll ensure a smoother and more successful removal process. Now that you’re ready, let’s move on to the various methods you can use to remove the screen protector.
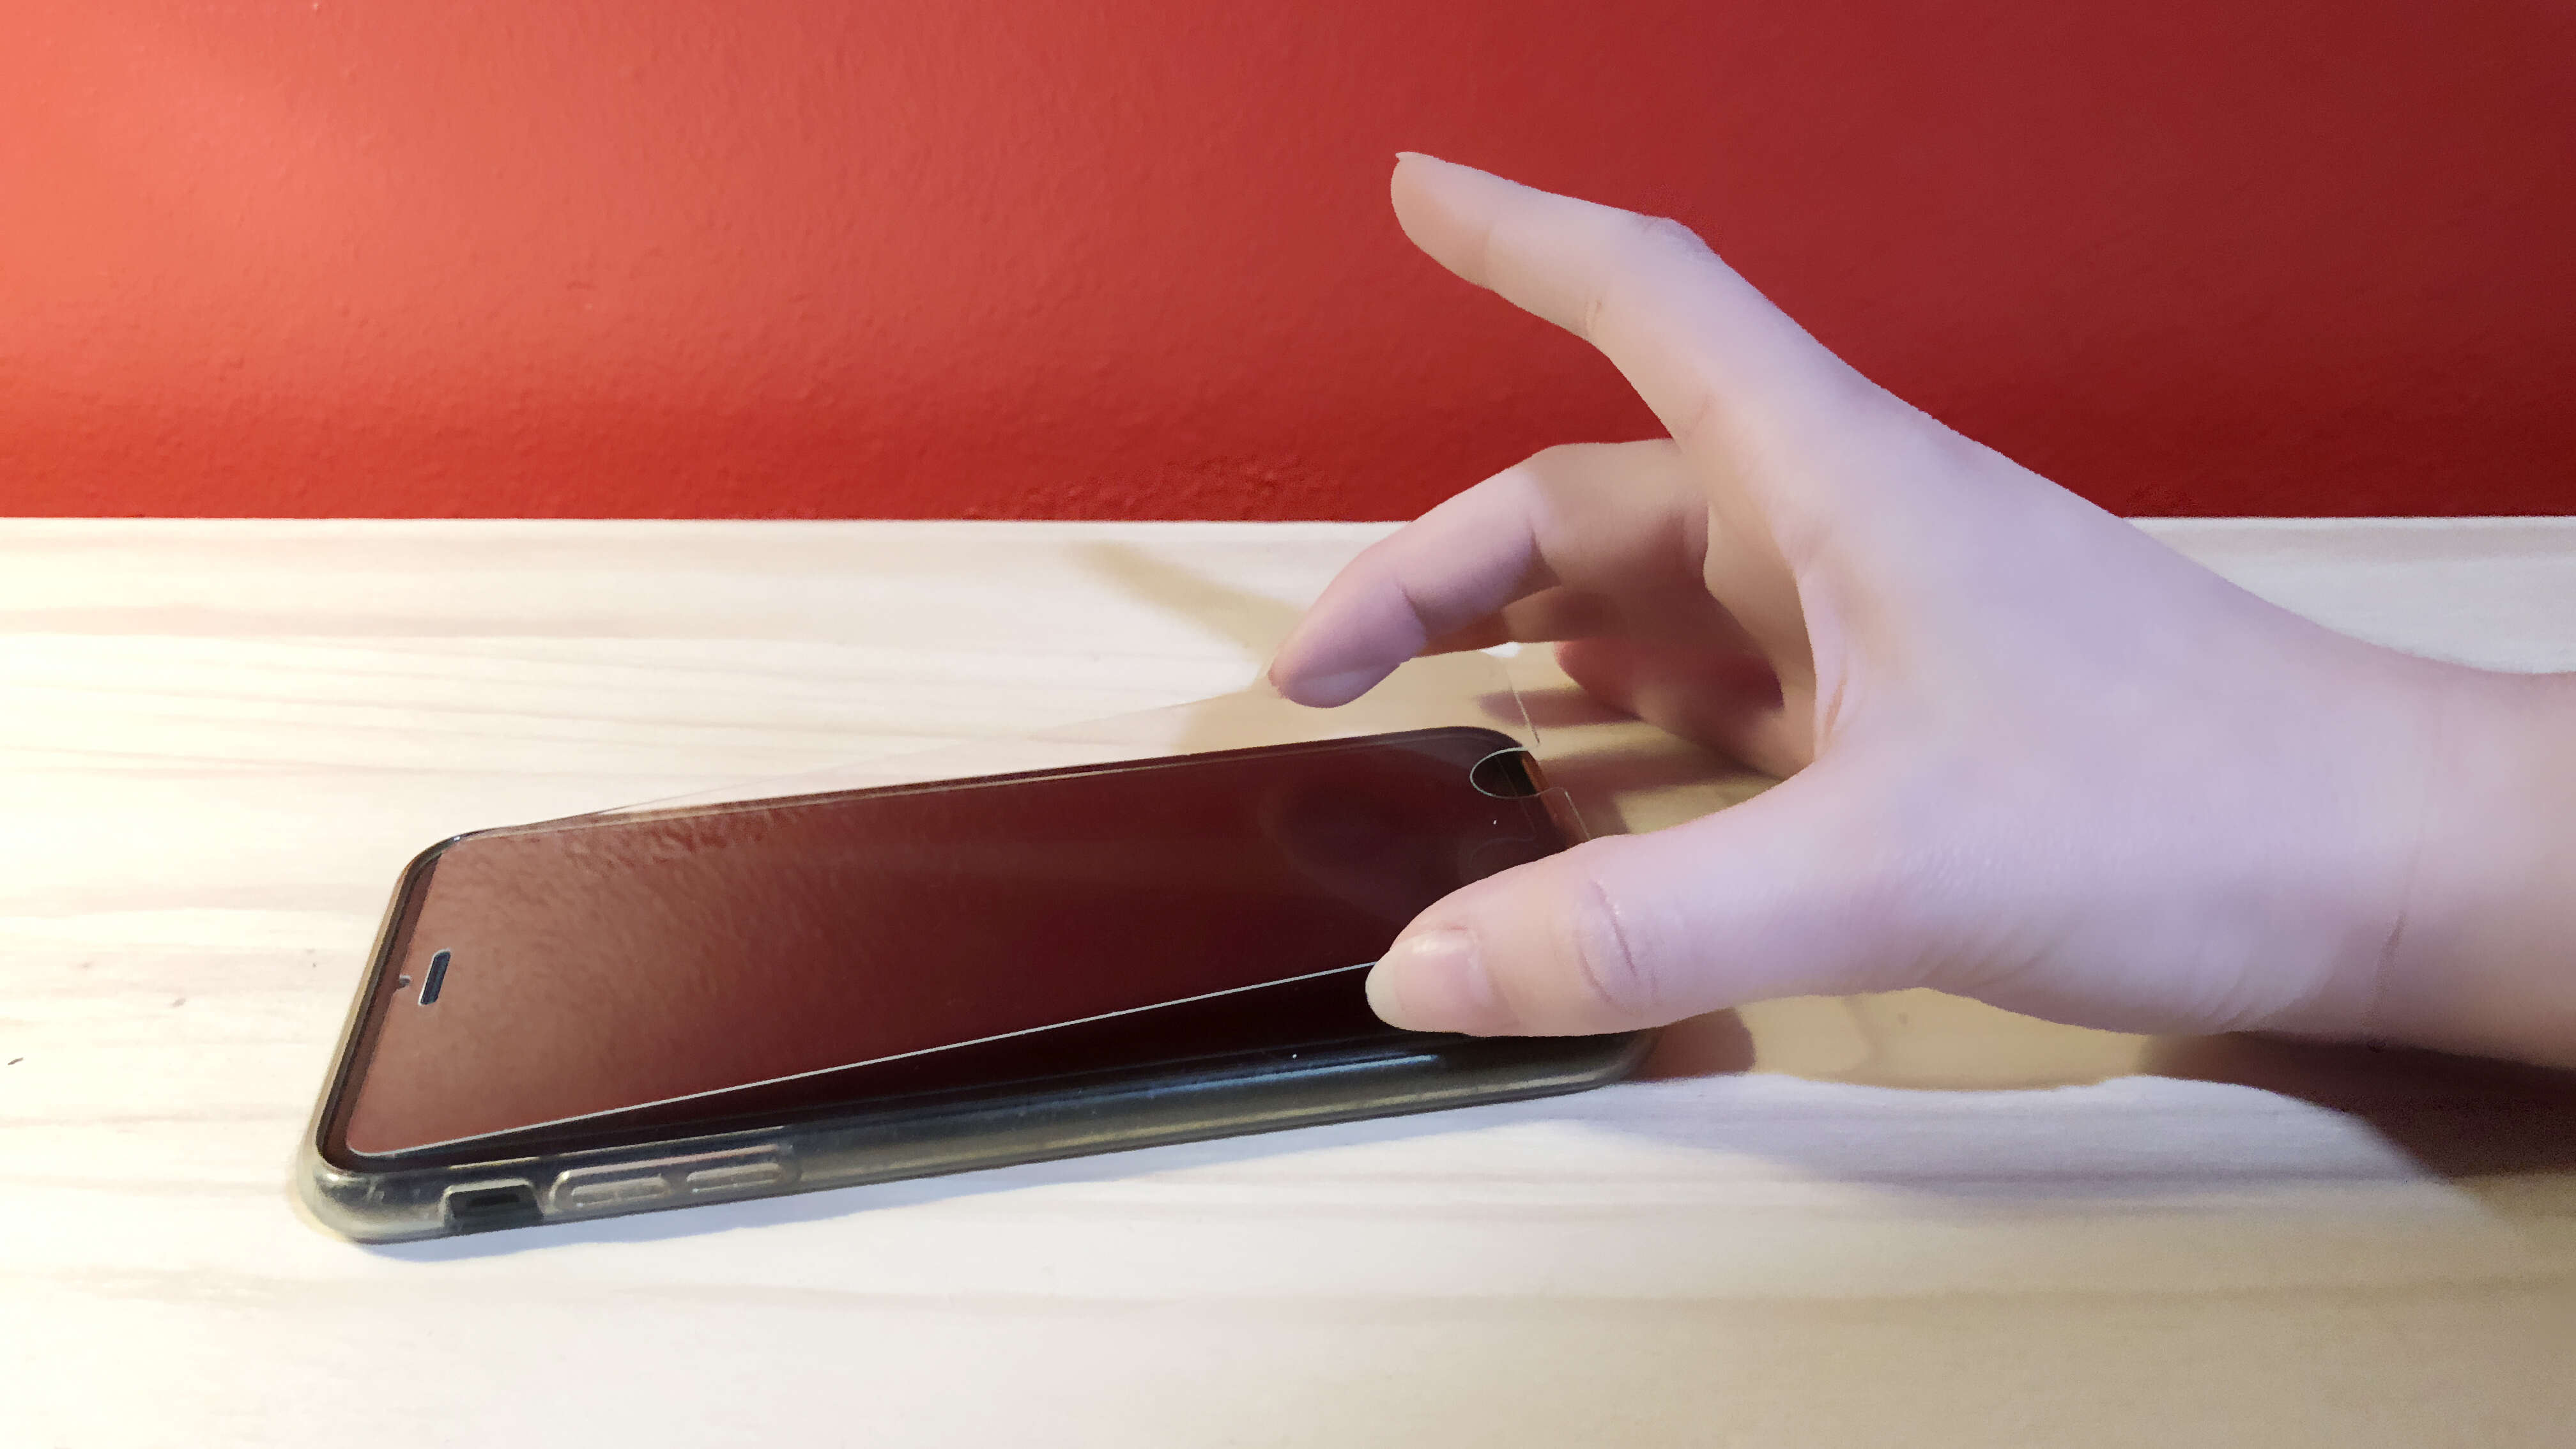
Lift one corner of the screen protector
Once you have gathered the necessary materials and prepared the surface of your device, it is time to begin removing the screen protector. The first step is to lift one corner of the protector using your fingernail or a thin, flat object like a credit card or a plastic scraper. The purpose of lifting one corner is to create a starting point for the removal process.
Gently insert your fingernail or the edge of the card or scraper under one of the corners of the screen protector. Be careful not to apply too much force to avoid damaging the device’s screen. Slowly and carefully lift the corner upward, creating a gap between the protector and the screen. Take your time and be patient, as rushing this step could lead to accidental scratches or cracks.
As you lift the corner, you may notice that the screen protector starts to peel away from the screen. However, it is essential to proceed with caution to prevent any adhesive residue from sticking to the device’s display. If you encounter resistance or the protector does not easily peel away, do not force it. Instead, consider trying an alternative removal method or seek assistance from a professional.
Once you have successfully lifted one corner of the screen protector, hold it firmly with one hand, ensuring it stays lifted. This will allow you to work on removing the remaining sections of the protector while keeping the corner elevated. By keeping the corner lifted, you minimize the risk of the protector resealing itself to the screen, making the removal process more manageable.
With the corner held securely, proceed to the next step of the removal process, such as using a card, a hairdryer, or sticky tape, depending on the method you have chosen. Follow the specific instructions for your selected method to safely and effectively remove the screen protector from your device. Remember to exercise caution and take your time throughout the process to avoid any accidental damage to your device or its screen.
Slowly peel off the screen protector
Now that you have loosened the edges of the screen protector, it’s time to carefully peel it off. Remember to work slowly and be gentle to avoid any damage to your screen.
Start by using your fingernail or a thin, flat object like a credit card to lift the edge of the screen protector. Once you have a good grip on the edge, steadily peel it back, ensuring that it detaches smoothly without any resistance.
As you peel off the screen protector, try to maintain a consistent angle to minimize the chances of it tearing or leaving behind any adhesive residue. If you encounter any stubborn spots, gently apply more heat using the hairdryer or repeat the card method to loosen them further.
Continue to peel off the screen protector until it is completely removed from your device. Take your time and pay attention to any areas that require extra care, such as camera lenses or sensors, to avoid causing any unintentional damage.
Once the screen protector is removed, carefully inspect your device’s screen for any remaining adhesive or residue. If you notice any, you can use a clean microfiber cloth lightly dampened with alcohol or adhesive remover to gently clean it off.
Remember to exercise caution and patience during this process to ensure that you don’t accidentally scratch or damage your screen. If you are unsure or uncomfortable removing the screen protector yourself, it’s always a good idea to seek professional assistance.
Clean the Screen
After successfully removing the screen protector, it’s essential to take a moment to clean your device’s screen thoroughly. This step ensures that you have a clean surface ready for a new screen protector or to use your phone without one.
Here are some steps to follow when cleaning your screen:
- Start by turning off your device to prevent any accidental touches or smudges.
- Use a microfiber cloth to gently wipe away any dust, fingerprints, or smudges on the screen. Microfiber cloths are soft and won’t scratch the surface of your screen.
- If there are stubborn smudges or stains, lightly dampen a corner of the microfiber cloth with distilled water. Avoid using harsh cleaning solutions or chemicals, as they can damage the screen.
- Gently wipe the screen in a circular motion, focusing on the areas with smudges or stains. Be careful not to apply too much pressure, as it can damage the screen.
- Ensure that the screen is completely dry before turning on your device or applying a new screen protector. Moisture can interfere with the touch sensitivity or adhere to the new screen protector, causing bubbles or imperfections.
By following these steps, you can have a clean and clear screen ready for whatever comes next—whether it’s using your phone without a screen protector or applying a new one.
Conclusion
In conclusion, removing a screen protector from your mobile device may seem like a daunting task, but with the right tools and technique, it can be a straightforward process. Whether you are replacing an old screen protector or need to remove it for any other reason, following the steps outlined in this guide will help you accomplish the task successfully.
Remember to be patient and gentle to avoid damaging your screen or leaving any residue behind. Additionally, having proper cleaning supplies on hand can help maintain the integrity of your device’s screen after the removal process.
By following these steps, you can ensure a smooth experience when removing a screen protector. Enjoy clear and crisp visuals on your device once it’s free from any old or damaged protectors, and protect your investment with a new one, if necessary!
FAQs
FAQ 1: Can I reuse a screen protector after removing it?
Answer: Screen protectors are designed for one-time use as they can easily lose their adhesive properties when removed. It is recommended to replace the screen protector with a new one once it has been removed.
FAQ 2: How do I remove a screen protector without damaging my screen?
Answer: To remove a screen protector without damaging your screen, start by using a thin, rigid object like a credit card or a plastic pry tool. Carefully insert it between the screen protector and the screen and gently lift an edge. Slowly and steadily peel off the screen protector, making sure to apply minimal pressure and keep it parallel to the screen surface.
FAQ 3: What should I do if the screen protector leaves residue on my screen?
Answer: If the screen protector leaves residue on your screen, you can try cleaning it with a microfiber cloth and a small amount of water or screen cleaning solution. Gently wipe the residue off the screen in a circular motion. If the residue persists, you can use a mild adhesive remover or rubbing alcohol on a cotton swab to clean the affected area. Remember to be gentle and avoid getting any liquid inside the device.
FAQ 4: Can I remove a tempered glass screen protector by heating it?
Answer: It is not recommended to remove a tempered glass screen protector by heating it. Heating a tempered glass screen protector can cause it to crack or shatter, making the removal process more difficult and potentially damaging your device’s screen. Stick to the manual removal method using a credit card or a plastic pry tool to avoid any mishaps.
FAQ 5: What should I do if my screen protector starts to peel off on its own?
Answer: If your screen protector starts to peel off on its own, it is a sign that the adhesive is weakening. In such cases, it is best to remove the screen protector entirely and replace it with a new one. Continuing to use a screen protector that is peeling off can leave your device’s screen unprotected and increase the risk of scratches and damage.