
Are you struggling to remove a glass screen protector from your cell phone? Don’t worry, you’re not alone. Many people find themselves in a pickle when it comes to trying to take off these pesky protectors without damaging their devices. Whether it’s due to an outdated protector, a cracked screen, or simply wanting to replace it with a new one, knowing the right technique is essential.
In this article, we’ll delve into the step-by-step process of removing a glass screen protector without causing any harm to your smartphone. We’ll explore various methods and tricks to make this task a breeze, ensuring that you can conveniently replace your protector whenever you need to. So, let’s dive in, discover the secrets of getting rid of that stubborn glass protector, and unveil a pristine screen that’s ready for a fresh start!
Inside This Article
- Gathering the Appropriate Tools
- Evaluating the Condition of the Protector
- Peeling off the Glass Screen Protector
- Removing Residual Adhesive
- Gathering the Appropriate Tools
- Evaluating the Condition of the Protector
- Peeling off the Glass Screen Protector
- Removing a Glass Screen Protector: Step-by-Step Guide
- Gathering the Appropriate Tools
- Evaluating the Condition of the Protector
- Peeling off the Glass Screen Protector
- Removing Residual Adhesive
- Conclusion
- FAQs
When it comes to removing a glass screen protector from your mobile device, it’s important to proceed with caution to avoid causing any damage. Luckily, with the right tools and a systematic approach, you can easily take off a glass screen protector without any hassle. In this step-by-step guide, we will walk you through the process, ensuring a smooth removal. Let’s get started!
Gathering the Appropriate Tools
The first step is to gather the necessary tools to ensure a safe and efficient removal. Here’s what you’ll need:
- Microfiber cloth: This will help you clean the screen and remove any dust or smudges.
- Credit card or plastic scraper: These tools will assist in lifting the screen protector off the device.
- Isopropyl alcohol (70% concentration or higher): This can be used to clean the screen and remove any adhesive residue.
- Adhesive remover (optional): If there is stubborn adhesive residue, an adhesive remover can be used to make the process easier.
- Dust sticker or tape: This will help remove any remaining dust particles from the screen.
Evaluating the Condition of the Protector
Before removing the screen protector, take a moment to evaluate its condition. Check for any cracks, chips, or damage that could affect the removal process. Additionally, assess the adhesive strength and residue level. If the adhesive is very strong or there is a significant amount of residue, you may need to adjust your approach.
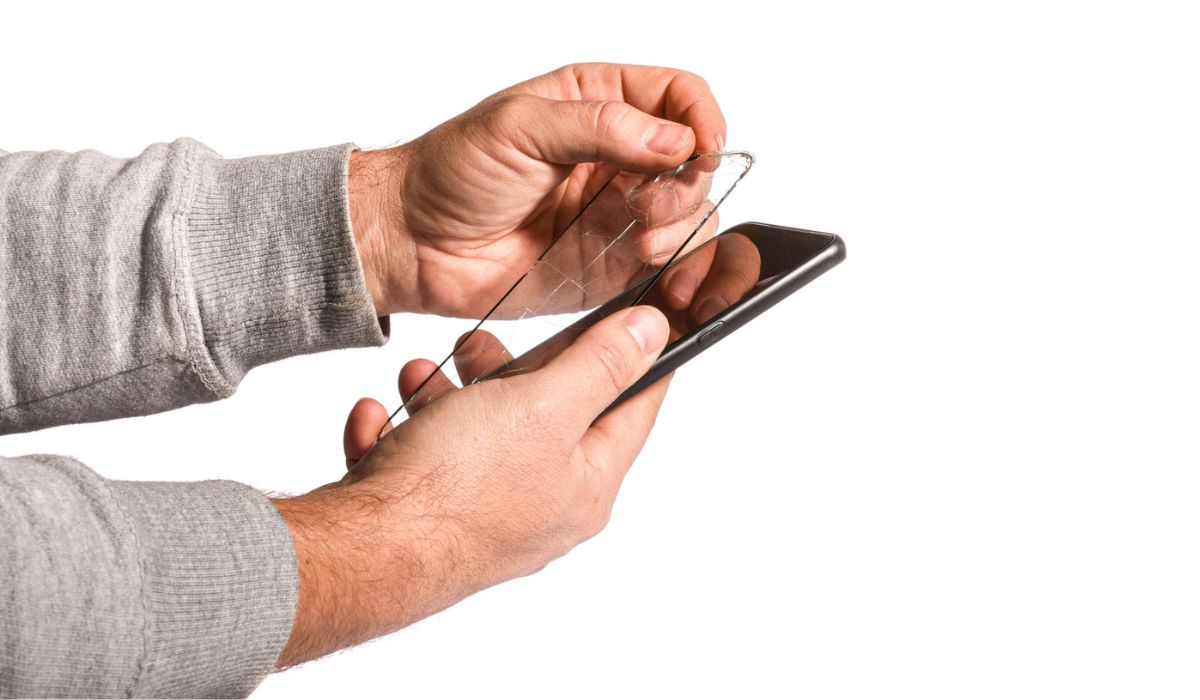
Peeling off the Glass Screen Protector
Once you have gathered your tools and assessed the condition of the protector, you can proceed with the removal process. Follow these steps:
- Start from one corner or edge of the screen protector.
- Using a credit card or plastic scraper, gently lift the edge of the protector.
- Slowly peel off the screen protector, applying gentle pressure as you go.
- Continue peeling until you have removed the entire protector from the device.
- Be cautious while peeling to avoid applying excessive force or causing any damage to the screen.
Removing Residual Adhesive
After removing the glass screen protector, you may notice some adhesive residue left on the screen. Follow these steps to remove it:
- Clean the screen using a microfiber cloth to remove any dust or debris.
- Dampen the cloth with isopropyl alcohol, ensuring it is at least 70% concentration.
- Gently rub the adhesive residue in circular motions with the dampened cloth.
- If necessary, you can use an adhesive remover for stubborn residue. Follow the manufacturer’s instructions.
- Ensure the screen is clean and free of any adhesive residue before reapplying a new screen protector.
By following this step-by-step guide, you can safely and effectively remove a glass screen protector from your mobile device. Remember to proceed with caution and take your time to prevent any damage to the screen. Happy removing!
Gathering the Appropriate Tools
When it comes to removing a glass screen protector, having the right tools on hand is essential. Here are the tools you will need:
- Microfiber cloth: This soft cloth is perfect for cleaning the screen and removing smudges or dust particles.
- Credit card or plastic scraper: You’ll need a flat, non-metallic tool to help lift and peel off the screen protector.
- Isopropyl alcohol: Use isopropyl alcohol with a concentration of 70% or higher to clean the screen and remove any residue left behind by the protector.
- Adhesive remover (optional): If the screen protector is particularly stubborn to remove or leaves behind adhesive residue, an adhesive remover can be useful.
- Dust sticker or tape: To ensure a clean surface before reapplying a new screen protector, have a dust sticker or tape handy to remove any dust or lint.
Having these tools ready will make the removal process much easier and smoother.
Evaluating the Condition of the Protector
Before removing a glass screen protector, it’s important to evaluate its condition. This will help you determine the best approach for removal and ensure the safety of your device.
The following steps will guide you in evaluating the condition of the protector:
Checking for cracks or damage: Carefully inspect the surface of the glass screen protector for any visible cracks, chips, or scratches. If you notice significant damage, it’s recommended to replace the protector entirely to maintain the integrity of your screen.
Assessing adhesive strength and residue level: Examine how well the protector is adhering to the screen. If it starts to lift or peel off on its own, it may be time to remove it. Additionally, check for any adhesive residue left behind from previous applications. This residue can affect the performance of a new protector, so it’s important to remove it before applying a new one.
Identifying alignment issues or air bubbles: Take a close look at the protector to ensure it is properly aligned with the screen. If you notice misalignment or significant air bubbles, it may be worth considering removing and reapplying the protector for better visibility and touch sensitivity.
By thoroughly evaluating the condition of your glass screen protector, you can make an informed decision on whether to remove it and proceed to the next steps.
Peeling off the Glass Screen Protector
When it comes time to remove a glass screen protector from your phone, it’s essential to proceed with care and precision. Follow these steps to ensure a smooth removal process:
- Starting from one corner or edge: Locate a corner or edge of the screen protector that you can easily access. It’s essential to start from this point to maintain control and avoid causing any damage.
- Using a credit card or plastic scraper: Once you’ve identified the starting point, use a credit card or a plastic scraper specifically designed for phone screens. Slide it underneath the edge of the protector, gently lifting it away from the screen. Be cautious not to use any sharp or metal objects that could scratch the phone.
- Slowly peeling it off while applying gentle pressure: With the credit card or plastic scraper in place, gradually peel back the screen protector. Apply gentle pressure as you go, ensuring that the adhesive separates from the screen smoothly. Take your time and continue peeling until the entire protector is removed.
- Being cautious to avoid damaging the screen: Throughout the removal process, it’s crucial to be extremely careful to avoid any screen damage. Pay close attention to the pressure you apply, ensuring it is gentle enough not to crack or scratch the screen. If you encounter any resistance or difficulty, stop and reevaluate your approach to minimize the risk of damage.
Removing a glass screen protector requires patience and attention to detail. By following these steps, you can successfully remove the protector without causing any harm to your phone’s screen.
Removing a Glass Screen Protector: Step-by-Step Guide
When it comes time to remove a glass screen protector from your device, it’s important to proceed with caution to avoid any damage to the screen. Follow this step-by-step guide to safely remove a glass screen protector:
Gathering the Appropriate Tools
Before you begin, gather the necessary tools to make the removal process easier:
- Microfiber cloth: Use a soft, lint-free cloth to clean the screen and remove any debris.
- Credit card or plastic scraper: These tools can be useful for lifting the screen protector off the device.
- Isopropyl alcohol (70% concentration or higher): Use alcohol to clean the screen and remove any adhesive residue.
- Adhesive remover (optional): If the adhesive is particularly stubborn, an adhesive remover can be used to help dissolve it.
- Dust sticker or tape: Use a dust sticker or tape to remove any dust particles from the screen before reapplying a new protector.
Evaluating the Condition of the Protector
Before removing the screen protector, take a moment to evaluate its condition:
- Check for cracks or damage: If the screen protector is cracked or damaged, it may be more difficult to remove in one piece.
- Assess adhesive strength and residue level: Take note of how well the adhesive is still holding the protector to the screen and if there is any residue buildup.
- Identify alignment issues or air bubbles: Look for any misalignment or air bubbles that may have occurred during the initial installation.
Peeling off the Glass Screen Protector
Start the removal process by following these steps:
- Start from one corner or edge: Begin by lifting the corner or edge of the screen protector.
- Use a credit card or plastic scraper: Insert the card or scraper beneath the protector and slowly lift it away from the screen.
- Slowly peel it off while applying gentle pressure: Continue to peel off the screen protector, applying gentle pressure to prevent any damage to the screen.
- Be cautious to avoid damaging the screen: Take your time and be careful not to scratch or crack the screen during the removal process.
Removing Residual Adhesive
After removing the screen protector, there may be some residual adhesive left on the screen. Here’s how to remove it:
- Clean the screen with a microfiber cloth: Wipe the screen with a clean, dry microfiber cloth to remove any dust or debris.
- Dampen the cloth with isopropyl alcohol: Moisten the cloth with isopropyl alcohol, ensuring it is at least 70% concentration or higher.
- Gently rub the adhesive residue in circular motions: Using the damp cloth, gently rub the adhesive residue in circular motions to loosen it.
- Optionally use an adhesive remover for stubborn residue: If the adhesive residue is stubborn, you can apply a small amount of adhesive remover to further dissolve it.
- Ensure the screen is clean and residue-free before reapplication: Once the adhesive residue is removed, use a clean, dry microfiber cloth to ensure the screen is clean and free of any residue before reapplying a new screen protector.
By following these steps, you can safely and effectively remove a glass screen protector from your device and prepare it for the application of a new protector.
Conclusion
In conclusion, knowing how to properly remove a glass screen protector is crucial to prevent any damage to your device. By following the steps mentioned in the article, you can safely and successfully remove the glass screen protector without leaving any residue or scratches on your phone.
Remember to clean the screen thoroughly before applying a new screen protector to ensure a smooth and bubble-free installation. Additionally, be gentle and patient while removing the protector to avoid any mishaps.
Taking off a glass screen protector may seem daunting at first, but with the right technique and a bit of practice, it can be a simple and hassle-free process. Always refer to the manufacturer’s instructions for your specific screen protector, as different models may have slightly different removal methods.
By properly removing and replacing your screen protector, you can continue to enjoy a clear and protected screen on your smartphone or tablet. Stay informed, take your time, and ensure the longevity of your device by taking proper care of its accessories.
FAQs
Q: How do I take off a glass screen protector?
A: To remove a glass screen protector, start by using a credit card or your fingernail to gently lift one corner of the protector. Once you have lifted the corner, carefully peel it off, making sure to apply even pressure to prevent any cracks or damage to the screen. If the protector is being stubborn, you can use a hairdryer on low heat to warm up the adhesive, which will make it easier to remove.
Q: Can I reuse a glass screen protector?
A: It is not recommended to reuse a glass screen protector once it has been taken off. The adhesive on the protector tends to lose its effectiveness after removal, making it less likely to stick properly if reused. Additionally, there may be dust or particles trapped between the protector and the screen, which can affect its performance if reused.
Q: How do I clean a glass screen protector?
A: To clean a glass screen protector, use a microfiber cloth or a lens cleaning wipe specifically designed for electronic devices. Avoid using harsh chemicals or abrasive materials, as they can scratch or damage the protector. Gently wipe the surface of the protector in a circular motion until it is clean and free from smudges or fingerprints.
Q: Can I remove a glass screen protector without any tools?
A: Yes, you can remove a glass screen protector without any tools. If there are no tools available, you can try using a piece of scotch tape to lift the corner of the protector. Simply stick the tape to the corner, press down firmly, and then peel it off gently. Once the corner is lifted, you can proceed to remove the protector using your fingers.
Q: Will removing a glass screen protector leave residue on my phone screen?
A: In most cases, removing a glass screen protector should not leave any residue on your phone screen. However, if there is any adhesive residue left behind, you can use a mild cleaning solution such as isopropyl alcohol or a screen cleaning spray to remove it. Apply a small amount to a microfiber cloth and gently wipe the affected area until the residue is gone.