
Are you tired of straining your eyes while watching videos or movies on your small phone screen? If so, then creating a projector for your phone might be the solution you’ve been looking for. With a DIY projector, you can enjoy your favorite media on a larger screen without breaking the bank. In this article, we will guide you through the process of creating your own projector using simple materials that you may already have at home. Whether you want to host a movie night with friends or take your phone entertainment to the next level, our step-by-step instructions will help you bring your big screen dreams to life. So, get ready to embark on a fun and creative project that will transform your phone into a mini home theater.
Inside This Article
- Materials Needed
- Step 1: Gathering the Materials
- Step 2: Building the Box
- Step 3: Creating the Lens Holder
- Step 4: Inserting the Lens
- Step 5: Mounting the Phone
- Step 6: Adjusting the Focus
- Step 7: Testing the Projector
- Conclusion
- FAQs
Materials Needed
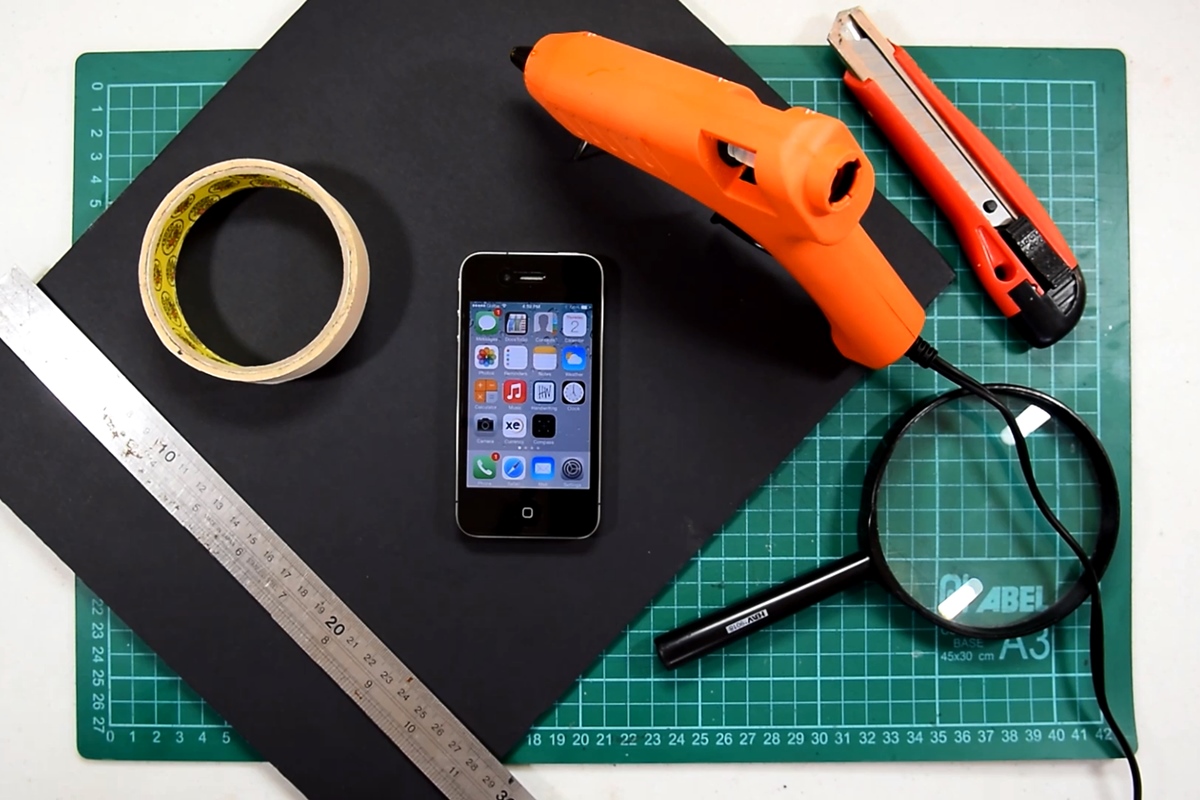
Creating a projector for your phone is a fun and creative DIY project that can bring your entertainment experiences to a whole new level. To get started, you will need a few materials:
– A shoebox or any sturdy cardboard box that is large enough to hold your phone and act as the projection box.
– A magnifying lens or a fresnel lens, which will serve as the main component for magnifying and focusing the phone’s screen.
– A hobby knife or scissors to cut out holes and shapes in the box.
– Duct tape or any strong adhesive to secure the components together.
– A ruler and a pencil to measure and mark the dimensions and positions of the holes.
– A foam board or cardboard that can be used to create the base and support for the phone and lens.
– Optional materials include colored paper or fabric to decorate the box and make it visually appealing.
These materials are readily available at hardware stores, craft stores, or even your own home. So gather them up and let’s start building your very own projector for your phone!
Step 1: Gathering the Materials
Before you can start creating your own projector for your phone, you’ll need to gather a few materials. Here’s a list of what you’ll need:
- A shoebox or any similar sturdy box that is large enough to accommodate your phone.
- A magnifying lens with a focal length of around 200-300mm. You can find these lenses at hobby stores or online retailers.
- A sharp knife or scissors to cut holes in the box.
- Black construction paper or cardboard to line the inside of the box and prevent light leakage.
- A ruler or measuring tape to ensure accurate measurements.
- Double-sided tape or glue to secure the materials in place.
- A marker or pen to mark the cutting lines on the box.
- Your smartphone or any device you plan to use for projection.
Gathering these materials will ensure that you have everything you need to build your projector successfully. Having them all in one place will make the process much more convenient and efficient.
Step 2: Building the Box
Once you have created the base for your projector, it’s time to build the box that will house the magnifying lens and your phone. This box will act as the projector chamber, ensuring that the projected image is clear and focused.
Here’s how you can build the box:
- Gather the materials: You will need a sturdy cardboard box, a ruler, a pencil, a utility knife, adhesive tape, and a piece of white paper or foam board.
- Measure and mark: Using the ruler and pencil, measure and mark the dimensions of your phone on the top of the box. Ensure that the marked area is slightly larger than your phone so that it fits comfortably inside.
- Make the cutout: Carefully cut out the marked area using the utility knife. Take your time to ensure a clean and precise cut.
- Create the projection surface: On the opposite side of the box, attach the white paper or foam board using adhesive tape. This will serve as the projection surface where the image from your phone will be displayed.
- Secure the lens holder: Cut a small hole in the middle of the projection surface and insert the magnifying lens holder from Step 1. Make sure it fits snugly and is securely attached.
- Adjust the angle: Depending on the type of magnifying lens and the size of your phone, you may need to adjust the angle of the lens holder to achieve the best focus. Experiment with different positions until you find the optimal setting.
- Seal the box: Use adhesive tape to seal any gaps or openings in the box, ensuring that no light leaks out. This will help to maintain the projection quality.
Once you have completed these steps, you will have successfully built the box for your phone projector. The next step is to assemble all the components and start enjoying the big-screen experience with your favorite movies, videos, and presentations.
Step 3: Creating the Lens Holder
Now that you have the base and the magnifying lens, it’s time to create the lens holder for your phone projector. The lens holder will ensure that the lens stays securely in place and is aligned correctly for optimal projection.
To create the lens holder, you’ll need the following materials:
- A small piece of sturdy cardboard
- A craft knife
- A ruler
- Glue or tape
Here’s how you can create the lens holder:
- Measure the dimensions of your magnifying lens, and mark these measurements on the cardboard.
- Using a craft knife, carefully cut out the marked dimensions on the cardboard. Take your time to ensure clean and precise cuts.
- Next, create flaps on the edges of the cardboard cutout. These flaps will help secure the lens in place.
- Apply glue or tape to the flaps, and fold them over the lens. Press firmly to ensure a strong hold.
Once you’ve created the lens holder, place the magnifying lens in the holder and ensure that it fits snugly. The lens holder will serve as a protective barrier for the lens and keep it in position during projection.
Remember to test the lens holder with your phone projector setup to ensure that it provides a clear and focused image. Adjust the positioning of the lens holder if necessary to achieve the desired results.
Creating a lens holder may require some trial and error, so don’t be discouraged if it takes a few attempts to get it right. With patience and practice, you’ll be able to create a sturdy and reliable lens holder for your phone projector.
Step 4: Inserting the Lens
Once you have completed the construction of the projection box, it’s time to move on to the next crucial step – inserting the lens. The lens is the component that will magnify the image and project it onto a surface, creating the projector effect for your phone.
The first thing you need to do is ensure that the lens is clean and free from any dust or smudges. Use a soft microfiber cloth to gently wipe away any dirt, fingerprints, or debris from the lens surface. This will ensure optimal clarity and image quality.
Next, locate the lens holder that you created in Step 2. This is where the lens will be securely placed to stay in position during operation. Carefully place the lens into the holder, making sure it fits snugly without any wobbling or misalignment.
If needed, you can use a small amount of adhesive or tape to keep the lens in place within the holder. Be cautious not to apply too much adhesive, as it could affect the image quality or make it difficult to adjust the focus later on.
Once the lens is securely in place, you can align it with the opening in the projection box. Gently insert the lens holder into the designated slot, ensuring that it is centered and aligned properly. Take your time to find the correct position for optimal image projection.
It may be necessary to adjust the focus of the lens to achieve a clear and sharp image. Most lenses have a focus adjustment ring that can be rotated to sharpen or blur the image. Experiment with different settings until you achieve the desired focus and clarity.
After inserting the lens and adjusting the focus, you are one step closer to completing your homemade phone projector. Now, move on to the final step – connecting your phone to the projector and enjoying your favorite videos, movies, or presentations on a larger screen!
Step 5: Mounting the Phone
Mounting your phone securely onto the projector is a crucial step to ensure a stable and clear projection. Follow these simple steps to mount your phone onto the DIY projector.
1. Choose a position: Decide where on the projector you want to place your phone. It’s best to position it in the center, aligned with the lens, for optimal projection quality.
2. Attach adhesive strips: Use small adhesive strips or double-sided tape to attach your phone securely to the projector. Apply the adhesive to the back of your phone or to a phone case if you have one, making sure it is centered and aligned with the lens.
3. Adjust the angle: Find the right angle for your phone by tilting it slightly forward or backward. This will depend on the projector design and the position of the lens. Experiment with different angles to ensure the projected image is clear and in focus.
4. Check for stability: Once your phone is mounted, give it a gentle shake to ensure it stays in place. If it feels loose or unstable, reinforce the adhesive or consider using additional support, such as a small piece of foam or a rubber band, to keep it securely in position.
5. Testing the projection: Turn on your phone’s display and check if the image is projected correctly onto the screen or wall. Adjust the focus and position of your phone as needed to achieve the desired clarity and size of the projected image.
6. Cable management: Depending on the projector design, you may need to consider how to manage the cables. Ensure that any charging or data cables connected to your phone do not interfere with the projection or obstruct the lens.
7. Explore mounting options: If you want a more versatile mounting solution, you can consider using a phone mount or an adjustable phone holder that can be attached to the projector. This allows for easier adjustment of the phone’s position and angle.
Remember to exercise caution when mounting your phone onto the DIY projector to avoid any damage. Take your time to ensure a secure and stable attachment, and you’ll be ready to enjoy your homemade projector in no time.
Step 6: Adjusting the Focus
Once you have assembled your projector, the final step is to adjust the focus for a clear and crisp image. Follow these steps to ensure optimal focus:
-
Position your phone in the projection box so that the image is projected onto the screen or wall.
-
Stand at a distance from the screen or wall where you plan to watch the projected image.
-
Use the adjustable focus knob or slider on your projector to adjust the focus. Rotate or slide it until the projected image appears sharp and in focus.
-
Check the corners and edges of the image to make sure they are not blurry or distorted. If necessary, make further adjustments to improve the overall focus.
-
Remember to take into account the ambient lighting conditions in the room. If the room is too bright, it may affect the clarity of the projected image. Consider dimming the lights or closing the curtains for better visibility.
By carefully adjusting the focus, you can ensure that your projected image is sharp and easy to view. Take your time to find the right focus for a satisfying viewing experience.
Step 7: Testing the Projector
After completing the assembly of your DIY projector, it’s time to put it to the test! Here are a few steps to follow when testing your newly created device.
1. Find a dark room: For optimal projection, choose a room with minimal ambient light. This will enhance the image quality and ensure a clearer projection.
2. Connect your phone: Connect your phone to the projector using the appropriate cable or wireless connection. Make sure the phone is positioned correctly in the projector’s dock or holder.
3. Adjust the focus: Use the focus knob or slider on your projector to adjust the image sharpness. Start with the knob at the center position and then turn it slowly in both directions until you achieve the desired focus. Be patient and take your time for accurate results.
4. Align the projection: Position your projector and adjust the angle until the projection aligns perfectly with the projection surface. This may require some trial and error, so experiment with different positions and angles until you find the best setup.
5. Start the projection: Open the desired content on your phone, such as a movie, presentation, or slideshow. Play it and observe the projected image. Ensure that the image is clear, bright, and properly aligned with no distortion or blurriness. Make any necessary adjustments to the projector or the positioning of your phone.
6. Test different environments: Experiment with different environments and lighting conditions to see how your projector performs. Try using it during daytime with curtains closed, or in different rooms with varying levels of light. This will help you understand the projector’s limitations and adjust accordingly.
7. Evaluate the sound quality: While testing the projector, pay attention to the sound quality. Most DIY projectors do not come with built-in speakers, so you may need to connect external speakers for better audio. Ensure that the audio syncs properly with the video and that the sound is clear and audible.
8. Make adjustments if needed: If you notice any issues during the testing process, troubleshoot and make the necessary adjustments. This may involve repositioning the projector, fine-tuning the focus, or addressing any connectivity issues with your phone.
Remember, the performance of a DIY phone projector may not match that of a professional-grade device. However, by following these steps and making appropriate adjustments, you can enhance the image quality and enjoy your homemade projector to the fullest.
Conclusion
In conclusion, creating a projector for your phone can be a fun and rewarding DIY project. By following the steps outlined in this article, you can transform your phone into a portable cinema experience. Whether you want to watch movies, share presentations, or enjoy a slideshow of your favorite photos, having a projector for your phone opens up a whole new world of possibilities.
Remember to choose high-quality materials, use proper tools, and follow safety precautions to ensure the best results. Experiment with different projection distances, angles, and settings to find the optimal viewing experience.
So go ahead, unleash your creativity, and turn your phone into a powerful projector that will entertain and impress your friends and family. Happy projecting!
FAQs
1. Can I use any phone as a projector?
While most smartphones have the capability to project images and videos, not all phones have built-in projectors. In order to use your phone as a projector, you will need to make use of external accessories or applications specifically designed for projection purposes.
2. What accessories do I need to create a projector for my phone?
To create a projector for your phone, you will need a few key accessories. These include a magnifying lens, a box or a makeshift enclosure, and a reflective surface such as a white wall or a projector screen. You may also need a small tripod or stand to hold your phone in place.
3. Are there any apps available for turning my phone into a projector?
Yes, there are several apps available on both Android and iOS platforms that can turn your phone into a projector. These apps utilize the phone’s screen mirroring or casting capabilities to project content onto a larger surface. Some popular projector apps include Screen Mirroring and AllCast.
4. How do I create a makeshift enclosure for my phone projector?
Creating a makeshift enclosure for your phone projector is relatively simple. You can use a cardboard box and cut out a hole in one side to fit the magnifying lens. Make sure the lens is securely attached and positioned correctly to focus the projected image. You can also customize the box by painting it or adding decorations.
5. What are the limitations of using a phone as a projector?
While using your phone as a projector can be a convenient option, it does have some limitations. The brightness and image quality may not match that of dedicated projectors. Additionally, the size of the projection may be limited to the size of your phone’s screen. It is also important to note that extended use of your phone as a projector may drain the battery faster than normal usage.