
In today’s digitally-driven world, we rely heavily on our smartphones for various tasks. From communication to entertainment, our mobile devices have become an essential part of our daily lives. One of the most popular features of modern smartphones is their ability to project videos and images onto larger screens. However, what if you don’t have access to a traditional projector or want to turn your phone into a projector without using a magnifying glass?
In this article, we will explore a creative and innovative technique that allows you to transform your smartphone into a projector without the need for any additional equipment. Whether you want to enjoy a movie night with friends or share a presentation at work, this simple DIY solution will enable you to project content from your phone onto a wall or any other suitable surface.
Inside This Article
- Materials Needed
- Method 1: Using a Shoebox
- Method 2: Using a Cardboard and a Lens
- Method 3: Using a DIY Smartphone Projector Kit
- Method 4: Using a Simple Lens Setup
- Conclusion
- FAQs
Materials Needed
To turn your phone into a projector without a magnifying glass, you will need a few key materials. Here is a list of what you will need:
- A shoebox or a cardboard box
- A smartphone with a bright screen
- A sharp utility knife
- A ruler or measuring tape
- A pencil or pen
- A piece of matte white paper or a thin white poster board
- A pair of scissors
- A small lens or magnifying glass
- Strong adhesive or glue
These materials can easily be found at home or purchased inexpensively at a local craft store. Once you have gathered these materials, you are ready to begin the process of turning your phone into a projector without a magnifying glass.
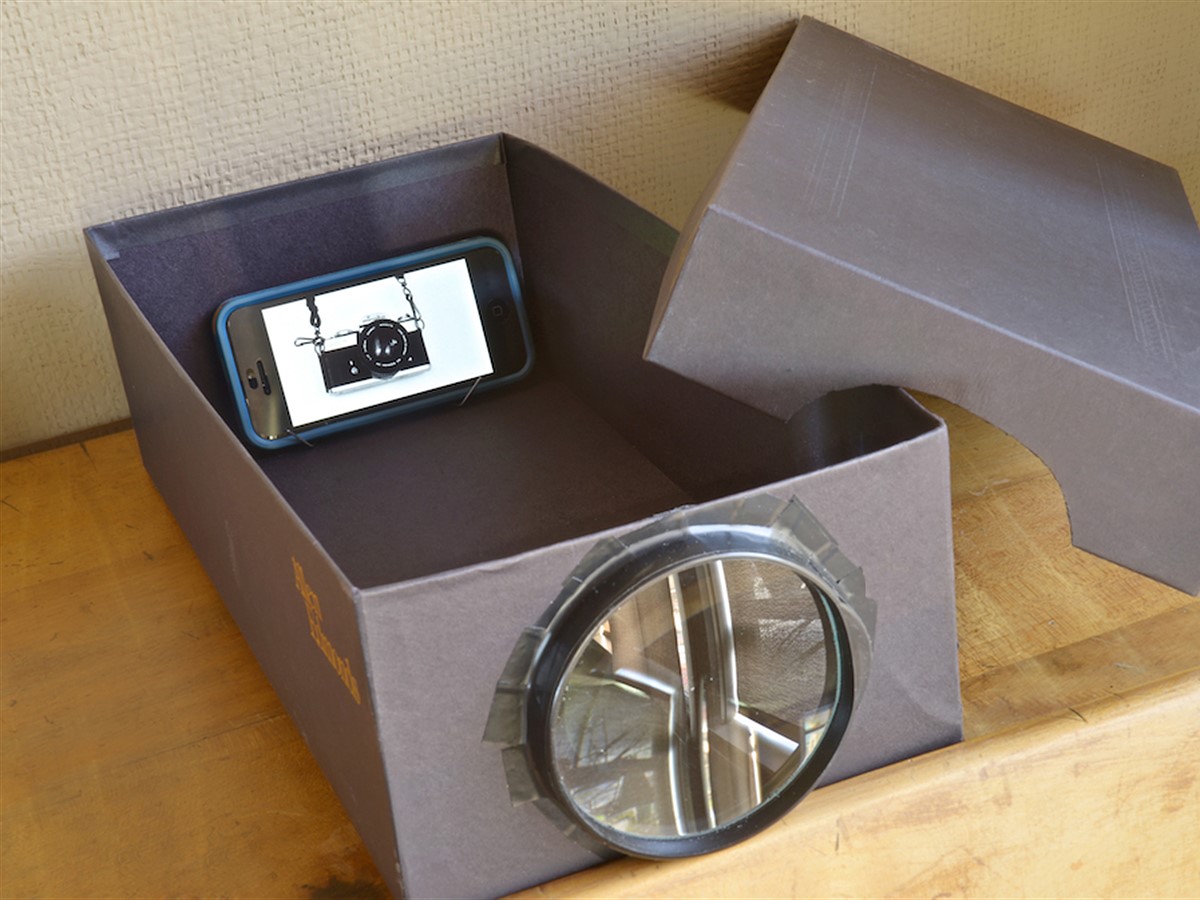
Method 1: Using a Shoebox
One of the simplest and most cost-effective ways to turn your phone into a projector is by using a shoebox. This method involves creating a makeshift projector using materials that are easily available at home. Here’s how you can do it:
1. Gather the materials: For this method, you will need a shoebox, a magnifying glass, a ruler, a pencil, a cutter, and adhesive tape.
2. Prepare the shoebox: Start by removing the lid and one side of the shoebox. This will serve as the base for your projector.
3. Measure and mark: Take the magnifying glass and place it at one end of the shoebox. Use the ruler and pencil to mark the position of the magnifying glass on the shoebox.
4. Create a hole: Use the cutter to carefully cut out a hole along the marked line. Make sure the hole is just big enough to fit the magnifying glass snugly.
5. Secure the magnifying glass: Place the magnifying glass in the hole, ensuring that it is positioned correctly to focus the projected image on the opposite wall.
6. Set up your phone: Turn on your phone and find a video or image that you want to project. Place your phone inside the shoebox, resting it on the opposite end of the magnifying glass.
7. Align and project: Close the shoebox with the phone inside, leaving a small gap for the light to pass through. Align the phone’s screen with the magnifying glass and adjust the focus until the projected image appears sharp on the wall or screen in front of you.
8. Enjoy your makeshift projector: Sit back and enjoy watching your favorite videos or movies projected on the wall, courtesy of your DIY shoebox projector.
Keep in mind that the quality of the projection may not be as high as that of a professional projector, but this method provides a fun and affordable way to enjoy a larger screen experience from your phone.
Method 2: Using a Cardboard and a Lens
If you don’t have a magnifying glass handy, don’t worry! You can still turn your phone into a projector using a simple combination of cardboard and a lens.
To start, gather the materials you’ll need:
- A shoebox or any other sturdy piece of cardboard
- A small lens or magnifying glass
- A pen or pencil
- A ruler
- A cutter or scissors
- Tape or glue
Once you have your materials ready, follow these steps:
1. Take the shoebox or cardboard and measure the size of your phone by placing it on top and marking the dimensions with a pen or pencil.
2. Use the ruler to draw a rectangle on one side of the cardboard, using the measurements you just marked. This will serve as the opening for your phone.
3. Carefully cut out the rectangle using a cutter or scissors. Make sure the opening is slightly smaller than the size of your phone to ensure a snug fit.
4. Locate the center of the opposite side of the cardboard and mark it with a dot. This is where the lens will be placed.
5. Take your lens or magnifying glass and position it over the marked dot. Trace the outline of the lens onto the cardboard.
6. Cut out the traced circle on the cardboard, ensuring that the hole is slightly smaller than the diameter of the lens. This will allow the lens to fit securely.
7. Insert the lens into the hole, making sure it is in the correct orientation to project the image from your phone onto a flat surface.
8. Secure the lens in place using tape or glue, ensuring that it is tightly fixed and doesn’t move during use.
9. Once everything is set up, open a video or picture on your phone that you want to project. Place your phone into the opening you created, making sure the screen is facing towards the lens.
10. Find a dark room or darken the space you’re in to enhance the visibility of the projected image. Adjust the distance between the cardboard and the projection surface to focus the image and achieve the desired size.
With this method, you can turn your phone into a projector without the need for a magnifying glass. It’s a simple and cost-effective solution that allows you to enjoy content on a larger screen anywhere, anytime!
Method 3: Using a DIY Smartphone Projector Kit
If you want to take your smartphone projector experience to the next level, using a DIY smartphone projector kit is a great option. These kits provide all the necessary materials and instructions to create a more professional and durable projector setup.
The DIY smartphone projector kits usually include a specially designed projector box or enclosure, a lens, and other necessary components. The box is designed to hold your smartphone securely in place while the lens helps to magnify and project the image onto a larger surface.
Here’s how you can use a DIY smartphone projector kit:
- Start by assembling the projector box according to the instructions provided. Usually, it involves folding the cardboard or plastic pieces and securing them with adhesive or clips.
- Once the box is assembled, locate the slot or opening where you will place your smartphone. The kit should have a designated spot to fit your phone securely.
- Insert your smartphone into the slot or opening, making sure it aligns with the lens inside the box. The lens will help magnify the image for projection.
- Adjust the focus of the lens by moving it closer or farther away from the smartphone. This will ensure a clear and sharp projection.
- Position the projector box on a flat surface and adjust the angle of the lens if needed. You can prop up the box using books or other objects to achieve the desired height.
- Turn on a video or image slideshow on your smartphone and position it in front of the lens. The image or video will be projected onto a nearby wall or screen.
- Adjust the brightness and volume settings on your smartphone for optimal viewing experience.
A DIY smartphone projector kit offers a more stable and reliable setup compared to other homemade projector methods. It provides a convenient and portable solution for turning your smartphone into a projector.
It’s important to note that the quality of the projection will depend on various factors such as the brightness of the room, the resolution of the smartphone screen, and the distance between the projector and the projection surface. Experimenting with different settings and environments can help you achieve the best results.
So, if you’re looking to create a more professional and polished smartphone projector, consider using a DIY smartphone projector kit. It’s a great way to enhance your movie nights and presentations without the need for a bulky magnifying glass.
Method 4: Using a Simple Lens Setup
If you’re searching for a straightforward and effective way to turn your phone into a projector without a magnifying glass, a simple lens setup might be the perfect solution for you. This method utilizes a few basic materials to create a device that can magnify and project your phone’s screen onto a bigger surface. It’s easy to set up and can provide an enjoyable viewing experience.
To create a simple lens setup, you’ll need a few items that are readily available. These include a large convex lens, a small piece of cardboard or a black card, tape, and your smartphone. The lens is the most crucial component, and it can typically be found at an electronics store or online. Make sure to choose a lens with a focal length of approximately two to three inches for the best results.
Once you have all the materials ready, follow these steps:
- Start by cutting a small hole in the center of the cardboard or black card that is slightly larger than the size of your phone’s screen. This will be the viewing window through which the image will be projected.
- Position your phone upside down on the cardboard, aligning the screen with the hole that you just created.
- Using tape, secure the phone in place, ensuring it is positioned precisely and centered with the hole.
- Take the large convex lens and hold it a few inches away from the viewing window. Adjust the distance between the lens and the cardboard until the projected image appears focused and clear.
- Once you’ve achieved the desired focus, use additional tape to secure the lens in place, ensuring it maintains its position.
Now, your simple lens setup is ready to use! Simply turn on your phone and start playing a video or displaying an image. The image will get magnified and projected onto a larger surface, allowing you to enjoy a more immersive viewing experience.
One advantage of this method is its portability. You can easily dismantle the setup and take it with you wherever you go. Whether you’re at a friend’s house, camping, or on a vacation, you can transform any room into a mini home theater by setting up your phone projector in a matter of minutes.
While this method provides a quick and accessible way to turn your phone into a projector, keep in mind that the image quality may not be as high as that of commercial projectors. The resolution and brightness will depend on your smartphone’s capabilities. Nevertheless, it can still enhance your viewing experience and make your smartphone screen feel much larger.
So, if you’re looking for an easy and affordable way to turn your phone into a projector without a magnifying glass, give the simple lens setup a try. Gather the materials, follow the steps, and enjoy your favorite movies, videos, and photos on a bigger screen.
Technology is constantly evolving, and finding creative ways to enhance our phone usage is always exciting. Turning a phone into a projector without a magnifying glass offers a unique and convenient way to enjoy movies, videos, and presentations on a larger screen.
By utilizing simple household items and a few innovative techniques, it is possible to transform your everyday smartphone into a mini projector. Whether you’re looking to entertain friends at a gathering, make a presentation in a creative way, or simply want to have a movie night under the stars, this DIY projector hack is sure to impress.
While professional projectors may come with higher image quality and additional features, having the ability to create a makeshift projector using just your phone adds a fun and resourceful dimension to your tech repertoire.
So, gather your materials, follow the instructions, and start enjoying your mobile phone as a projector without the need for a magnifying glass. Get ready to bring your entertainment and presentations to the big screen!
FAQs
1. Can I turn my phone into a projector without a magnifying glass?
Absolutely! While using a magnifying glass is one way to turn your phone into a projector, there are alternative methods that don’t require one. Keep reading to learn more about these creative solutions.
2. What are the different ways to turn my phone into a projector?
There are a few ways you can achieve this. One method is by using a DIY smartphone projector box made out of cardboard or a shoebox. Another option is to connect your phone to a portable projector. Additionally, you can use a projector attachment lens specifically designed for smartphones.
3. How does a DIY smartphone projector box work?
In a DIY smartphone projector box, your phone acts as the projector’s light source. By placing your phone in a specific position within the box and projecting the image onto a smooth surface, such as a white wall or screen, the image magnifies and becomes visible. It’s a low-cost and creative way to enjoy a larger screen experience.
4. What are the benefits of turning my phone into a projector?
Turning your phone into a projector offers several advantages. Firstly, it allows you to enjoy a larger screen size without investing in an expensive TV or monitor. It can also enhance your viewing experience for movies, videos, and even presentations. Moreover, it’s a fun and interactive way to entertain friends, family, or even yourself.
5. Can I project content from any app or platform?
Yes, you can project content from any app or platform that is accessible through your phone. Whether you want to watch videos on YouTube, stream movies on Netflix, or showcase a PowerPoint presentation, your phone’s projection capabilities allow you to view content from various sources. Just ensure that your phone is connected to the projector or positioned correctly within the DIY projector box.