
In today’s digital age, mobile phones have become an essential part of our daily lives. From communication to entertainment, we rely on these devices for various tasks. But what truly enhances the functionality and convenience of our mobile phones are the accessories that accompany them. One such accessory that can greatly enhance the user experience is a custom connector. Whether it’s for charging, data transfer, or audio connectivity, having a custom connector that perfectly suits your needs can make a world of difference. In this article, we will guide you through the process of creating a custom connector in PowerApps. So, if you’re ready to unlock the full potential of your mobile phone, let’s get started!
Inside This Article
- Overview
- Prerequisites
- Step 1: Create a new custom connector
- Step 2: Configure the connector endpoints
- Step 3: Define actions and triggers
- Step 4: Test and debug the custom connector
- Conclusion
- FAQs
Overview
In PowerApps, custom connectors are a powerful tool that allows you to integrate external services and APIs into your app. With custom connectors, you can extend the capabilities of your PowerApps app by connecting to a wide range of data sources and services. This article will guide you through the process of creating a custom connector in PowerApps, enabling you to leverage the full potential of this feature.
Creating a custom connector involves several steps, including defining the endpoints, configuring actions and triggers, and testing and debugging. By following these steps, you’ll be able to build a custom connector that seamlessly integrates with your app and provides the functionality you need.
Before diving into the details, it’s important to note that creating a custom connector requires some prerequisite knowledge. You should have a basic understanding of REST APIs, endpoints, and authentication methods. Additionally, you need to ensure that you have the necessary permissions and access to the service or API you intend to connect to.
By the end of this article, you’ll have a clear understanding of how to create a custom connector in PowerApps and be well-equipped to incorporate external services and APIs into your app. So, let’s get started!
Prerequisites
Before you can start creating a custom connector in PowerApps, there are a few prerequisites that you need to have in place. These prerequisites will ensure a smooth and successful custom connector creation process. Here are the key prerequisites:
- PowerApps account: To create a custom connector in PowerApps, you need to have an active PowerApps account. If you don’t have one, you can sign up for an account on the PowerApps website.
- Access to PowerApps Studio: You will need access to PowerApps Studio, the visual development environment for creating and managing your custom apps. PowerApps Studio is available as a web app and can be accessed using a supported web browser.
- Understanding of APIs: It’s important to have a basic understanding of APIs (Application Programming Interfaces) and how they function. Custom connectors in PowerApps are essentially wrappers around APIs, so having a good grasp of API concepts will be beneficial.
- API documentation: You should have access to the documentation of the API you want to connect to using the custom connector. The API documentation will provide details about the endpoints, parameters, and authentication requirements.
- API key or credentials: Depending on the API you want to connect to, you may need to obtain an API key or any other required credentials. These credentials will be used to authenticate and authorize your custom connector to access the API services.
By ensuring that you have the above prerequisites in place, you will be better equipped to create a custom connector in PowerApps. These prerequisites will help you understand the process and requirements involved, ensuring a successful custom connector creation experience.
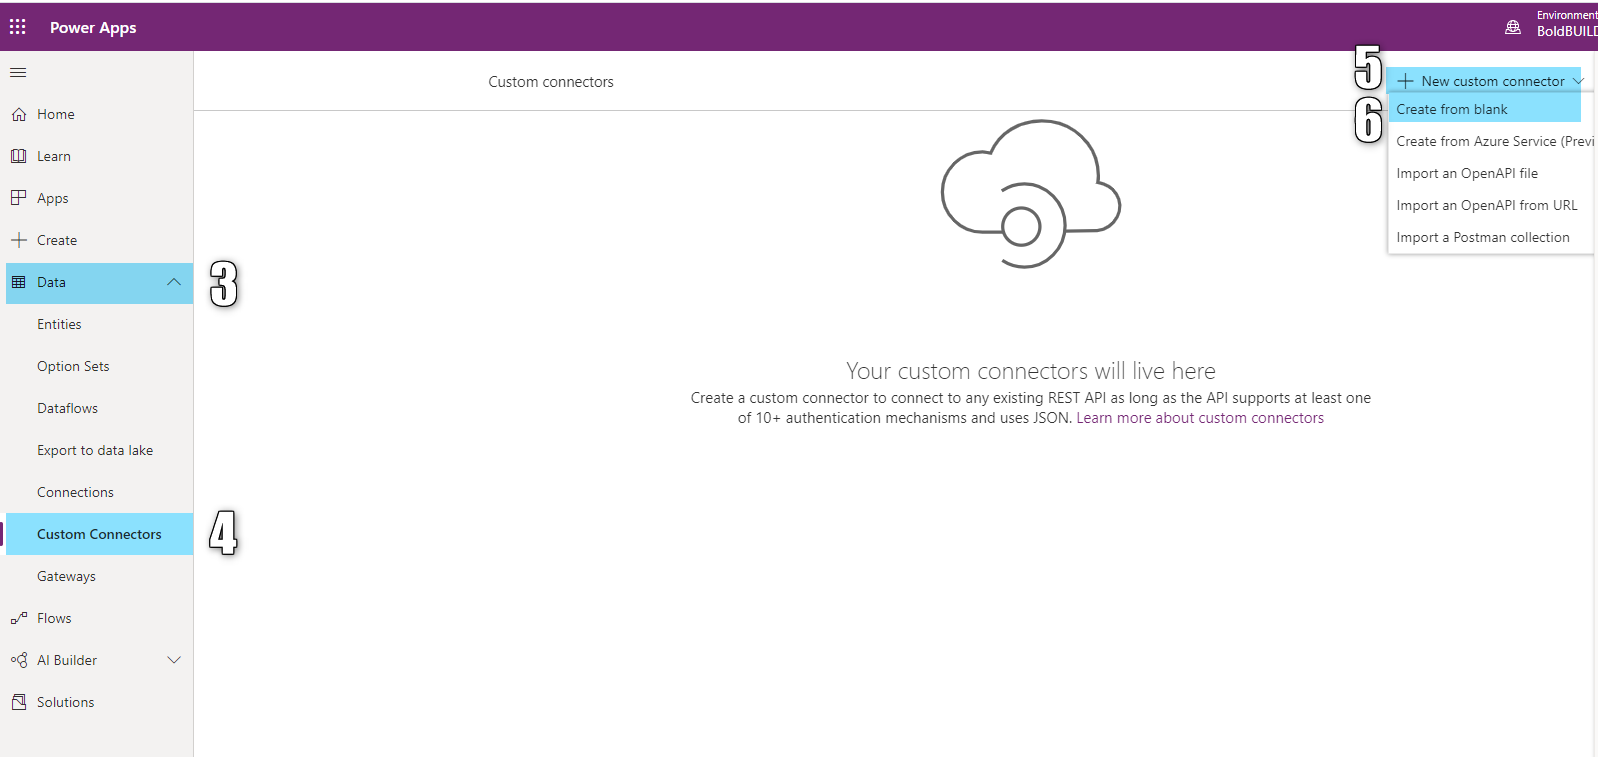
Step 1: Create a new custom connector
Creating a new custom connector in PowerApps allows you to integrate external systems, APIs, and services into your PowerApps applications. This enables you to extend the functionality of your apps by accessing data and performing actions that are not natively supported by PowerApps connectors.
To create a new custom connector, follow these steps:
- Open the PowerApps portal and navigate to the Connections tab.
- Click on the “New custom connector” button to start the creation process.
- Provide a meaningful name for your custom connector, along with a description that describes its purpose.
- Choose the appropriate security type for your connector. PowerApps supports both OAuth 2.0 and API key authentication methods.
- Next, you need to define the base URL for your custom connector. This is the endpoint that PowerApps will use to communicate with the external system.
- Specify the actions and triggers that your custom connector will support. Actions represent the operations that can be performed on the connected system, while triggers enable the connector to respond to specific events.
- Configure the authentication settings for your custom connector. This includes providing any required credentials, tokens, or API keys.
- Once you have configured all the necessary settings, click on the “Create connector” button to finish the creation process.
After creating the custom connector, you can start using it in your PowerApps applications by adding it to the available connectors. This will allow you to access the actions and triggers defined in the connector and leverage the functionality provided by the external system.
Creating a custom connector in PowerApps provides a powerful way to integrate external systems and services into your applications. It gives you the flexibility to extend the capabilities of PowerApps and create more robust and versatile apps.
Step 2: Configure the connector endpoints
Once you have created a new custom connector in PowerApps, the next step is to configure the connector endpoints. The endpoints define the URLs where your custom connector will send requests and receive responses from external systems or services.
To configure the endpoints, follow these steps:
- Click on the Definition tab in the custom connector editor.
- Scroll down to the Endpoints section and click on the + Add endpoint button.
- In the URL field, enter the URL of the endpoint you want to configure. This can be the base URL of the external system or service you are integrating with.
- Choose the OAuth 2.0 authentication type if required, and specify the relevant details such as the authorization URL and token URL.
- If your endpoint requires additional headers or parameters, click on the + Add parameter button and enter the details.
- Save the endpoint configuration by clicking on the Update connector button.
By configuring the connector endpoints, you are essentially defining the communication channels between PowerApps and the external systems or services you want to connect with. This allows you to send requests and retrieve data seamlessly within your custom connector.
It is important to ensure that you have the necessary permissions and credentials to access the external systems or services through the configured endpoints. This may involve obtaining API keys, tokens, or other authentication credentials.
Additionally, make sure to test the connectivity of your custom connector by performing some sample requests. This will help you verify that the endpoints are functioning correctly and that you can successfully retrieve data from the external systems or services.
Configuring the connector endpoints is a crucial step in creating a custom connector in PowerApps. It allows you to establish a bi-directional connection between PowerApps and external systems or services, enabling you to leverage their functionality and data within your PowerApps applications.
Step 3: Define actions and triggers
Now that you’ve created a custom connector in PowerApps, it’s time to define the actions and triggers that will be available to users. Actions are the specific operations that can be performed using the custom connector, while triggers are events that can initiate the actions. Let’s dive into the process of defining actions and triggers.
1. Start by navigating to the custom connector you created in the previous step. Click on the “Definition” tab to access the connector’s definition.
2. Under the “Actions” section, select “New Action” to define a new action. You’ll be prompted to provide a name and a summary for the action. It’s important to choose a descriptive name that accurately represents the functionality of the action.
3. Once you’ve entered the name and summary, you can define the inputs and outputs for the action. Inputs are the parameters or data that the action requires to execute, while outputs are the results or data that the action returns.
4. Next, you can specify the authentication requirements for the action. Depending on the nature of your custom connector, you may need to configure OAuth, API key, or other authentication methods to ensure secure access to the action.
5. After defining the inputs, outputs, and authentication requirements, you can proceed to define the action’s implementation. This involves writing the necessary code or configuring the underlying service to perform the desired functionality.
6. Similarly, you can define triggers by selecting “New Trigger” under the “Triggers” section. Triggers allow the custom connector to respond to specific events and automatically initiate actions. Just like with actions, you’ll need to provide a name and a summary for the trigger.
7. Once you’ve defined the triggers, you can configure the trigger conditions. These conditions determine when the trigger should be activated and the associated actions should be executed. This could be based on specific data changes, timer intervals, or other trigger events.
8. Finally, save your work and test the actions and triggers. You can do this by navigating to the “Test” tab in the custom connector’s definition and executing the actions or simulating the trigger events.
By defining actions and triggers in your custom connector, you empower users to perform specific operations and automate tasks within PowerApps. This level of customization and integration enhances the overall functionality and efficiency of your PowerApps solution.
Step 4: Test and debug the custom connector
After creating and configuring your custom connector in PowerApps, the next crucial step is testing and debugging. This step is essential to ensure that your custom connector is functioning properly and delivering the expected results. Here are some key considerations when it comes to testing and debugging your custom connector.
1. Test individual actions and triggers: Begin by testing each individual action and trigger within your custom connector. This will allow you to verify that each component is working correctly and producing the desired outcomes. Run tests for both input and output parameters to confirm that the data is being processed accurately.
2. Use sample data: To carry out effective testing, it is highly recommended to use sample data. By providing sample input data, you can simulate different scenarios and ensure that your custom connector can handle various types of inputs. This will help you identify any potential issues or discrepancies in how your connector handles different data sets.
3. Monitor error messages: As you perform testing, pay close attention to any error messages that may appear. If there are any errors or failures while running an action or trigger, the error message will provide valuable clues about the issue at hand. Analyze the error message and take necessary steps to rectify the problem.
4. Debug with logging: PowerApps provides built-in logging capabilities that can be instrumental when diagnosing issues with your custom connector. By enabling logging, you will be able to capture detailed information about the execution flow, input/output data, and any errors encountered. Analyzing these logs can help you identify the root cause of any problems and debug your custom connector effectively.
5. Monitor performance: When testing your custom connector, it’s important to evaluate its performance. Ensure that the response times are acceptable and that the connector can handle a reasonable volume of requests without any degradation in performance. If you notice any performance issues, investigate the cause and optimize your connector accordingly.
6. Iterate and refine: Testing and debugging your custom connector is an iterative process. As you identify and resolve issues, it’s important to continuously refine and improve your connector. Don’t hesitate to make adjustments, updates, or modifications based on the insights gained during testing.
7. Seek feedback: Don’t be afraid to seek feedback from users or colleagues who have experience with custom connectors. Their input can provide valuable insights and help you uncover any blind spots or areas for improvement. Consider conducting user testing to gather feedback and identify any usability or functionality issues that may have been overlooked.
By following these testing and debugging best practices, you can ensure that your custom connector is robust, reliable, and capable of delivering the intended functionality. Testing and debugging are crucial steps in the development process, allowing you to identify and resolve any issues before deploying your custom connector to production.
The ability to create custom connectors in PowerApps opens up a world of possibilities for users to extend the functionality and integration of their apps. With custom connectors, users can seamlessly connect to external systems and services, leveraging their APIs to exchange data and perform actions within their PowerApps.
Creating custom connectors may seem daunting at first, but with the right knowledge and resources, it becomes a valuable skill that allows users to build robust and tailored PowerApps solutions. By following the steps outlined in this guide and leveraging PowerApps’ visual interface and code editor, users can confidently create custom connectors tailored to their specific requirements.
Remember to carefully plan your connector design, thoroughly test the connection and functionality, and keep an eye out for any updates or changes to the APIs you are working with. With practice and experience, you will become proficient in creating custom connectors and unlocking the full potential of PowerApps.
FAQs
1. What is a custom connector in PowerApps?
A custom connector in PowerApps is a way to extend the functionality of your app by connecting it to an external system or service. It allows you to interact with APIs and use the data and capabilities of other services within your PowerApps. By creating a custom connector, you can simplify the integration process and leverage the power of external systems in your app.
2. How do I create a custom connector in PowerApps?
To create a custom connector in PowerApps, you need to define the API endpoints, authentication requirements, and actions that your connector will support. You can do this by using the Custom Connector wizard in PowerApps, which provides a step-by-step process to define the connector’s properties and actions. Once the connector is created, you can use it in your app to interact with the external system.
3. What are the benefits of using custom connectors in PowerApps?
Using custom connectors in PowerApps offers several benefits. Firstly, it allows you to leverage the data and capabilities of external systems, expanding the functionality of your app. Secondly, it simplifies the integration process by providing a standardized way to connect to various systems and services. Additionally, custom connectors enable you to reuse connections across multiple apps, saving time and effort in development. Lastly, custom connectors provide a secure and reliable way to interact with external systems, ensuring data privacy and compliance.
4. Can I share my custom connectors with others?
Yes, you can share your custom connectors with others in your organization or even with external users. PowerApps provides a sharing mechanism that allows you to control access to your custom connectors. You can choose to share the connector with individuals or groups, and specify the level of access they have, such as read-only or read-write. This allows your colleagues or partners to use the custom connector in their own apps, promoting collaboration and efficiency.
5. Can I use custom connectors in PowerApps on mobile devices?
Yes, custom connectors can be used in PowerApps on mobile devices. PowerApps provides a responsive design, allowing you to create apps that are optimized for different screen sizes, including mobile devices. When using a custom connector in a mobile app, you can take advantage of the same functionality and data integration as in the web version of the app. This enables you to build powerful, cross-platform applications that can be used on the go.