
Welcome to our comprehensive guide on how to use the Elbow Connector in PowerPoint. If you’re looking to add a touch of creativity and flexibility to your presentation slides, the Elbow Connector is a fantastic tool to have in your arsenal. This handy feature allows you to draw curved lines that connect different objects in your slides, providing a visually appealing way to guide your audience’s attention and emphasize key points.
In this article, we will walk you through the step-by-step process of using the Elbow Connector in PowerPoint. Whether you’re a beginner who’s just getting started with PowerPoint or a seasoned presenter looking to level up your slide design, we’ve got you covered. So, let’s dive in and explore the exciting possibilities that the Elbow Connector has to offer!
Inside This Article
- Benefits of using Elbow Connectors in PowerPoint
- Adding an Elbow Connector to your PowerPoint slide
- Adjusting the appearance of an Elbow Connector
- Tips and Best Practices for Using Elbow Connectors in PowerPoint
- Conclusion
- FAQs
Benefits of using Elbow Connectors in PowerPoint
Elbow connectors are a powerful tool that can greatly enhance your PowerPoint presentations. These unique connectors offer a range of benefits that can help you create visually appealing and professional-looking slides. In this section, we will explore some of the key benefits of using elbow connectors in PowerPoint.
1. Flexibility: One of the main advantages of elbow connectors is their flexibility. These connectors allow you to create curved and angled lines, making it easy to connect different elements and create visually interesting diagrams and flowcharts. Whether you need to highlight a process, showcase relationships between elements, or guide the audience’s attention, elbow connectors offer the versatility to fit your specific design needs.
2. Visual Appeal: Elbow connectors can add a touch of sophistication to your presentations. The unique shape and design of these connectors make your slides look more polished and professional. By using elbow connectors, you can create smooth curves and angles that break away from the traditional straight lines, resulting in a more visually engaging and captivating presentation.
3. Ease of Use: Elbow connectors are incredibly easy to use, even for users with limited design skills. With just a few clicks, you can insert an elbow connector into your slide and adjust its position and angle. This simplicity allows you to focus on the content of your presentation without worrying about complex design techniques.
4. Clear Communication: Elbow connectors can be highly effective in conveying your message clearly to the audience. By connecting elements with elbow connectors, you can visualize the flow of information, demonstrate cause and effect relationships, and guide the eye of the viewer. This helps to enhance comprehension and ensure that your audience understands the key points of your presentation.
5. Customization Options: Elbow connectors offer a range of customization options to suit your presentation style. You can change the color, thickness, and style of the connector to match the overall theme of your slides. This allows you to create a cohesive and visually appealing presentation that aligns with your branding or personal preferences.
Overall, utilizing elbow connectors in PowerPoint can elevate the quality and impact of your presentations. From enhancing visual appeal to facilitating clear communication, these connectors provide a range of benefits that can make your slides more engaging and effective. So, take advantage of the flexibility and ease of use of elbow connectors to create visually stunning and compelling PowerPoint presentations.
Adding an Elbow Connector to your PowerPoint slide
Adding an Elbow Connector to your PowerPoint slide can be a great way to enhance the visual appeal and convey a message effectively. Follow the step-by-step guide below to easily add an Elbow Connector to your PowerPoint presentation:
1. Open your PowerPoint presentation and navigate to the slide where you want to add the Elbow Connector.
2. Click on the “Insert” tab in the top menu and select “Shapes” from the toolbar. A drop-down menu will appear with various shape options.
3. Scroll down and select the “Elbow Connector” shape. It usually looks like a diagonal line with two endpoints.
4. Click and drag on your slide to draw the Elbow Connector. You can resize and reposition it according to your preference by clicking and dragging the edges or endpoints of the shape.
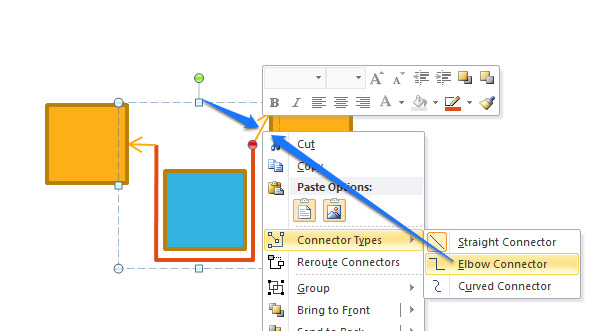
5. To connect the Elbow Connector to other objects, such as text boxes or images, simply click on one endpoint of the shape and drag it to the desired object. The Elbow Connector will automatically adjust its angle to connect the objects smoothly.
6. Customize the appearance of the Elbow Connector by right-clicking on it and selecting “Format Shape” from the drop-down menu. Here, you can change the line color, thickness, and style to match your presentation’s design.
7. You can also add arrowheads to the endpoints of the Elbow Connector by clicking on “Line Options” in the Format Shape pane. Choose the desired arrow style and adjust its size and position as needed.
8. Once you are satisfied with the placement and appearance of the Elbow Connector, you can add any additional text or formatting to complete your slide.
That’s it! You have successfully added an Elbow Connector to your PowerPoint slide. Repeat these steps for any other slides where you want to include Elbow Connectors in your presentation.
Remember, Elbow Connectors can be an effective way to visually connect information on your slides, guide the viewer’s eye, or illustrate a concept. Use them strategically to enhance the overall visual impact and clarity of your PowerPoint presentation.
Adjusting the appearance of an Elbow Connector
Once you have added an elbow connector to your PowerPoint slide, you may want to customize its appearance to make it more visually appealing and suitable for your presentation. Here are a few tips on how to adjust the appearance of an elbow connector:
- Formatting the line: You can change the color, thickness, and style of the elbow connector line to match your presentation’s design. To do this, select the connector and navigate to the “Format” tab in the PowerPoint ribbon. From there, you can modify the line color, weight, and dash style.
- Adjusting the endpoints: By default, the elbow connector will have arrowhead endpoints. If you want to change the endpoints or remove them altogether, select the connector, right-click, and choose “Edit Points” from the context menu. This allows you to manipulate the connector’s shape and endpoints to suit your needs.
- Resizing and repositioning: To resize an elbow connector, click on it and drag the resize handles until you achieve the desired length. You can also reposition the connector by clicking and dragging it to a different location on the slide. This flexibility allows you to create dynamic and visually engaging diagrams and flowcharts.
- Changing the elbow style: PowerPoint offers different elbow styles for connectors, including sharp, rounded, and curved elbows. To change the elbow style, select the connector, navigate to the “Format” tab, and click on the “Edit Shape” dropdown. From there, you can select the desired elbow style that best suits your slide’s aesthetics.
- Applying formatting effects: If you want to add a little flair to your elbow connector, you can apply various formatting effects such as shadow, reflection, or glow. These effects can be found in the “Format” tab under the “Shape Styles” or “Shape Effects” sections.
By adjusting the appearance of an elbow connector in PowerPoint, you can elevate the overall visual impact of your presentation and effectively communicate your ideas and concepts to your audience. Remember to experiment with different styles and options to find the best fit for your specific slide design and content.
Tips and Best Practices for Using Elbow Connectors in PowerPoint
Elbow connectors in PowerPoint are a powerful tool that can help you create visually appealing and professional-looking presentations. Whether you’re illustrating a process flow, connecting different elements on a slide, or adding arrows for directional emphasis, elbow connectors can be a valuable asset. To ensure you make the most of this feature, here are some tips and best practices to keep in mind:
1. Use elbow connectors sparingly: While elbow connectors can be a great addition to your PowerPoint slides, it’s important not to overuse them. Too many connectors can make your slide look cluttered and confusing. Use them strategically to guide the viewer’s eye and highlight key points.
2. Align and position connectors precisely: To maintain a clean and professional appearance, make sure to align and position your elbow connectors accurately. You can use the alignment guides in PowerPoint to ensure your connectors line up perfectly with the desired elements. This will give your presentation a polished and well-organized look.
3. Customize the appearance: PowerPoint allows you to customize the appearance of your elbow connectors to match your overall presentation theme. Experiment with different line styles, colors, and arrowheads to find the combination that best suits your slide design. Consistency in visual elements is key to creating a cohesive and professional-looking presentation.
4. Keep connectors visible: To ensure your elbow connectors are easily visible to your audience, consider using thicker line weights or contrasting colors. This will make them stand out against the background and other elements on the slide. Remember, the purpose of the connector is to draw attention and provide clarity, so make sure it’s clearly visible.
5. Use connectors to create visual hierarchy: Elbow connectors can be used effectively to create a visual hierarchy on your slide. Using different connector lengths or curves can emphasize the relationship between elements and guide the viewer’s gaze. Experiment with different layouts to achieve the desired visual impact.
6. Group connectors with related objects: If you’re using multiple connectors to illustrate a process or relationship, consider grouping them with the associated objects. This will make it easier for your audience to understand the connections and flow of information on the slide. Grouping also helps maintain the integrity of your design if you need to move or resize elements.
7. Test your presentation on different devices: Before finalizing your PowerPoint presentation, make sure to test it on different devices and screen sizes. This will help you ensure that your connectors and other visual elements are displayed correctly and are easily viewable by your audience. This step is crucial to prevent any formatting or alignment issues during your actual presentation.
8. Practice restraint: Lastly, exercise restraint when using elbow connectors. Remember that they are just a tool to enhance your presentation, not the main attraction. Use them thoughtfully and selectively to support the content and message of your slides. The goal is to create a visually pleasing and impactful presentation, and elbow connectors should be used in a way that complements and reinforces your overall storytelling.
By following these tips and best practices, you can effectively leverage elbow connectors in PowerPoint to enhance the visual appeal and clarity of your presentations. Use them intelligently, and your audience will be engaged and impressed by your professional-looking slides.
Conclusion
Using an elbow connector in PowerPoint can greatly enhance your presentation capabilities. This versatile tool helps you to create professional and visually appealing slides by allowing you to easily connect shapes, lines, and other elements in unique and creative ways. Whether you need to create flowcharts, diagrams, or simply want to add a touch of visual interest to your slides, the elbow connector is a powerful tool at your disposal.
By following the steps outlined in this article, you can confidently incorporate elbow connectors into your PowerPoint presentations. Remember to experiment with different layouts and designs to find what works best for your specific content. With practice, you’ll be able to create stunning visual representations that will captivate your audience and deliver your message effectively. So, go ahead and unleash your creativity with the elbow connector in PowerPoint!
FAQs
Q: What is an elbow connector in PowerPoint?
An elbow connector in PowerPoint is a type of connector that allows you to draw lines or arrows between objects or shapes at specific angles. It is commonly used to create flowcharts, diagrams, or to highlight relationships between elements in a presentation.
Q: How can I insert an elbow connector in PowerPoint?
To insert an elbow connector in PowerPoint, follow these steps:
1. Open your PowerPoint presentation and navigate to the slide where you want to add the elbow connector.
2. Click on the “Insert” tab in the PowerPoint menu bar.
3. Click on the “Shapes” dropdown button in the “Illustrations” group.
4. Select the “Lines” category, and then choose the “Elbow Connector” option.
5. Click and drag on the slide to create the starting point of the elbow connector, and then release the mouse button.
6. Click and drag again to create the second point of the elbow connector, and release the mouse button. The elbow connector will be automatically adjusted to connect the two points at a right angle.
Q: Can I customize the appearance of an elbow connector in PowerPoint?
Yes, you can easily customize the appearance of an elbow connector in PowerPoint. After inserting the connector, you can:
– Change the line color, thickness, or style by selecting the connector and using the formatting options in the “Shape Format” tab.
– Modify the arrowhead style or add arrowheads to the connector by selecting the connector, clicking on the “Format” tab, and using the “Shape Styles” or “Shape Outline” options.
– Adjust the position and angle of the elbow connector by clicking and dragging the yellow handle points on the connector.
Q: How do I reconnect an elbow connector to a different shape or object?
If you want to connect an elbow connector to a different shape or object, follow these steps:
1. Select the elbow connector by clicking on it.
2. Hover your mouse over one of the endpoints of the connector until the cursor changes to a small square.
3. Click and drag the endpoint to the desired shape or object. The connector will automatically snap and adjust to the new position.
Q: Can I add text to an elbow connector in PowerPoint?
Currently, PowerPoint does not have a built-in feature to directly add text to an elbow connector. However, you can use a workaround by adding a text box adjacent to the connector and positioning it to appear as if it’s connected. Simply create a text box, type in your desired text, and align it next to the elbow connector.