
In today’s digital age, staying connected to the internet is essential for both personal and professional needs. While most of us rely on Wi-Fi networks to access the internet, there are times when we find ourselves in a location devoid of any available networks. This is where creating a Wi-Fi hotspot on your Windows 8 device can come to the rescue.
By turning your Windows 8 device into a Wi-Fi hotspot, you can share your internet connection with other devices such as smartphones, tablets, or laptops. This is incredibly useful when you’re on the go, traveling, or simply in an area with weak or no internet connectivity. In this article, we will guide you through the steps to create a Wi-Fi hotspot on your Windows 8 device, so you can stay connected wherever you are.
Inside This Article
- Requirements for Creating a Wi-Fi Hotspot on Windows 8
- Step-by-Step Guide to Creating a Wi-Fi Hotspot on Windows 8
- Troubleshooting Common Issues while Creating a Wi-Fi Hotspot on Windows 8
- Tips for Optimizing the Performance of Your Wi-Fi Hotspot on Windows 8
- Conclusion
- FAQs
Requirements for Creating a Wi-Fi Hotspot on Windows 8
If you’re using a Windows 8 computer and want to create a Wi-Fi hotspot, there are a few requirements you need to meet. These requirements include:
- Windows 8 OS: To create a Wi-Fi hotspot on your device, you must have the Windows 8 operating system installed. This feature is not available on earlier versions of Windows.
- Wireless Network Adapter: Your computer must have a wireless network adapter that supports the hotspot functionality. Most modern laptops and desktops come with built-in wireless adapters, but if your device doesn’t have one, you may need to purchase an external adapter.
- Active Internet Connection: In order to share your internet connection with other devices, your computer must be connected to the internet itself. The Wi-Fi hotspot will essentially share the internet connection from your computer with other devices that connect to it.
- Administrative Privileges: Creating a Wi-Fi hotspot requires administrative privileges on your Windows 8 computer. Make sure you are logged in with an account that has administrative rights.
- Compatible Device: The device you want to connect to the Wi-Fi hotspot must support Wi-Fi connectivity. This includes smartphones, tablets, laptops, and other devices that can connect to a Wi-Fi network.
By ensuring that your Windows 8 computer meets these requirements, you can proceed with setting up a Wi-Fi hotspot and sharing your internet connection with other devices.
Step-by-Step Guide to Creating a Wi-Fi Hotspot on Windows 8
Are you tired of being restricted by the limited Wi-Fi range on your Windows 8 device? Creating a Wi-Fi hotspot on Windows 8 can be the perfect solution. With this feature, you can transform your computer into a wireless access point, allowing other devices to connect and enjoy internet access.
Follow these simple steps to create a Wi-Fi hotspot on your Windows 8 device:
- First, ensure that your Windows 8 device is connected to the internet. A stable internet connection is necessary for creating a hotspot.
- Next, open the Control Panel on your Windows 8 device. You can do this by searching for “Control Panel” in the Start menu.
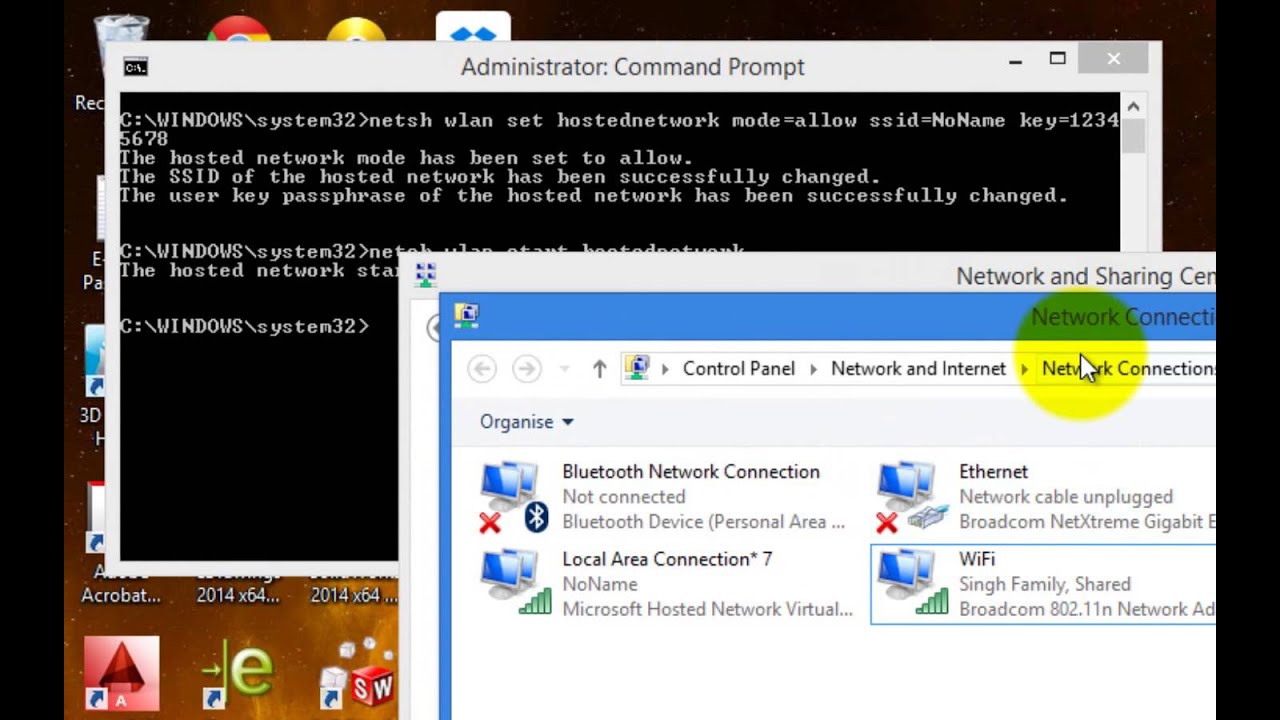
- In the Control Panel, find and click on the “Network and Sharing Center” option. This will open a new window with various networking options.
- In the “Network and Sharing Center” window, click on the “Change adapter settings” link located on the left-hand side.
- You will now see a list of available network connections. Right-click on the network connection that is currently providing internet access to your Windows 8 device, such as your Ethernet or Wi-Fi connection.
- From the context menu, select “Properties.” This will open a new window with the properties of the selected network connection.
- In the network connection properties window, navigate to the “Sharing” tab. Here, you will find an option labeled “Allow other network users to connect through this computer’s internet connection.” Tick the checkbox next to this option.
- Below the checkbox, you will see a dropdown menu labeled “Home networking connection.” Click on the dropdown menu and select the network connection that you want to share as a Wi-Fi hotspot. For example, if you want to share your Ethernet connection, select it from the list.
- Click on the “OK” button to save the changes and close the properties window.
- Now, go back to the “Network and Sharing Center” window. You should see a new network connection labeled as “Microsoft Virtual Wi-Fi Miniport Adapter” or similar.
- Right-click on the newly created virtual Wi-Fi adapter and select “Properties” from the context menu.
- In the properties window of the virtual Wi-Fi adapter, go to the “Sharing” tab once again.
- Tick the checkbox next to the option “Allow other network users to connect through this computer’s internet connection.”
- Click on the “OK” button to save the changes.
- Congratulations! You have successfully created a Wi-Fi hotspot on your Windows 8 device. Other devices can now connect to this hotspot and access the internet.
Remember to keep your Windows 8 device connected to the internet at all times to maintain the functionality of the Wi-Fi hotspot. Additionally, make sure to secure your hotspot with a strong password to prevent unauthorized access.
Now that you know how to create a Wi-Fi hotspot on Windows 8, you can enjoy the convenience of wireless internet access on all of your devices, regardless of their proximity to a traditional router. Stay connected wherever you go!
Troubleshooting Common Issues while Creating a Wi-Fi Hotspot on Windows 8
Creating a Wi-Fi hotspot on Windows 8 can be a convenient way to share your internet connection with other devices. However, like any technology, it’s not always without its challenges. If you’re facing issues while trying to set up a Wi-Fi hotspot on Windows 8, we’ve got you covered with some troubleshooting tips.
1. Check for hardware and software compatibility:
Before diving into the troubleshooting process, ensure that your computer meets the necessary hardware requirements for creating a Wi-Fi hotspot. Additionally, make sure that your Windows 8 operating system is up to date, as outdated software can sometimes cause connectivity issues.
2. Verify your network adapter settings:
Access the Network and Sharing Center in the Control Panel and navigate to the “Change adapter settings” option. Ensure that your wireless network adapter is enabled and configured correctly. Sometimes, simply disabling and re-enabling the adapter can resolve connectivity problems.
3. Restart your computer and network devices:
Restarting your computer and the modem or router you’re using can help refresh the network settings and resolve any temporary issues. It’s a simple yet effective troubleshooting step that can often fix connectivity problems.
4. Check for conflicting software:
Some software programs, particularly those related to virtualization or VPNs, can interfere with the Wi-Fi hotspot functionality. Check for any conflicting software and temporarily disable or uninstall them to see if it resolves the issue.
5. Update your network adapter drivers:
Outdated or incompatible network adapter drivers can cause connectivity problems. Visit the manufacturer’s website and download the latest drivers for your network adapter. Install and restart your computer to ensure the new drivers take effect.
6. Reset network settings:
If all else fails, you can try resetting your network settings to their default configurations. Open the Command Prompt as an administrator and enter the following commands: “netsh int ip reset” and “netsh winsock reset.” Restart your computer afterward to apply the changes.
7. Seek professional help:
If you’ve exhausted all troubleshooting steps and are still unable to create a Wi-Fi hotspot on Windows 8, it might be time to seek professional assistance. Contact your computer manufacturer’s support or a certified technician who can diagnose and help resolve the issue.
Remember, troubleshooting Wi-Fi hotspot issues on Windows 8 can be a trial-and-error process. Be patient, and try these steps one at a time to pinpoint and resolve the specific problem you’re facing.
Tips for Optimizing the Performance of Your Wi-Fi Hotspot on Windows 8
Creating a Wi-Fi hotspot on Windows 8 can be a convenient way to share your internet connection with other devices. However, to ensure a smooth and efficient experience, it’s important to optimize the performance of your Wi-Fi hotspot. Here are some valuable tips to help you get the most out of your Windows 8 hotspot:
1. Choose the Right Wi-Fi Channel: In a crowded Wi-Fi environment, interference from other networks can cause signal degradation. To overcome this, select the least congested channel for your hotspot. You can use free tools like Wi-Fi Analyzer to determine the least used channel in your area.
2. Position Your Router Strategically: The physical placement of your router can significantly impact the signal strength and coverage of your Wi-Fi hotspot. Keep it in a central location away from obstructions like walls, furniture, or metal objects, to ensure the maximum transmission range.
3. Update Your Router Firmware: Regular updates to your router’s firmware can improve its functionality and performance. Check the manufacturer’s website for any firmware updates available for your router and install them to benefit from the latest features and bug fixes.
4. Use a Strong Wi-Fi Password: To protect your hotspot from unauthorized access, always use a strong and unique password. A weak password can compromise the security of your network and lead to a slower performance due to unauthorized users connecting to your hotspot.
5. Limit the Number of Connected Devices: The more devices connected to your Wi-Fi hotspot, the more bandwidth is shared among them. Consider limiting the number of connected devices to ensure each device receives an adequate amount of bandwidth, leading to better performance.
6. Update the Wireless Adapter Drivers: Outdated or incompatible wireless adapter drivers can cause connectivity issues and impact the performance of your Wi-Fi hotspot. Visit the device manufacturer’s website and download the latest drivers for your wireless adapter to ensure optimal performance.
7. Use Quality Accessories: The performance of your Wi-Fi hotspot can also be influenced by the quality of the accessories you use, such as antennas or range extenders. Investing in high-quality accessories can enhance signal strength, coverage, and overall performance.
8. Enable QoS (Quality of Service) Settings: Quality of Service settings prioritize specific applications, devices, or types of traffic on your network. By enabling QoS, you can allocate more bandwidth to essential tasks or devices, ensuring a smoother and faster performance for those activities.
9. Keep Your Wi-Fi Hotspot Secure: Regularly update your Windows 8 operating system and install security patches to minimize the risk of vulnerabilities. Additionally, use a reliable antivirus software and enable a firewall to protect against malware and unauthorized access, ensuring a secure and optimized Wi-Fi hotspot.
By following these tips, you can optimize the performance of your Wi-Fi hotspot on Windows 8, providing a reliable and fast internet connection for all your connected devices.
Creating a Wi-Fi hotspot on Windows 8 is a simple and convenient way to share your internet connection with other devices. Whether you’re using it at home, in a café, or at a conference, the ability to create a hotspot provides flexibility and connectivity on the go.
By following the step-by-step guide mentioned above, you can easily turn your Windows 8 device into a Wi-Fi hotspot in just a few clicks. This feature not only enables you to connect multiple devices simultaneously but also allows you to control the network and customize the settings according to your preferences.
Having a Wi-Fi hotspot on your Windows 8 device opens up a world of possibilities. You can stay connected, share files, stream videos, and browse the internet with ease. So, go ahead and give it a try. Create your Wi-Fi hotspot and enjoy seamless connectivity wherever you go.
FAQs
**Q: Is it possible to create a Wi-Fi hotspot on Windows 8?**
Absolutely! Windows 8 allows you to easily turn your computer into a Wi-Fi hotspot, enabling you to share your internet connection with other devices.
**Q: Do I need any additional software to create a Wi-Fi hotspot on Windows 8?**
Thankfully, no extra software is required. Windows 8 has a built-in feature that allows you to turn your computer into a hotspot without the need for any third-party applications.
**Q: Can I connect multiple devices to the Wi-Fi hotspot created on Windows 8?**
Yes, you can. Once you’ve set up the Wi-Fi hotspot on your Windows 8 computer, you can connect multiple devices such as smartphones, tablets, or laptops, as long as they are within range of your computer’s Wi-Fi signal.
**Q: Can I secure the Wi-Fi hotspot created on Windows 8 with a password?**
Absolutely! In fact, it is highly recommended to secure your Wi-Fi hotspot with a password to prevent unauthorized access. Windows 8 allows you to set up a password for your hotspot during the setup process.
**Q: What are the steps to create a Wi-Fi hotspot on Windows 8?**
To create a Wi-Fi hotspot on Windows 8, follow these simple steps:
1. Open the Control Panel.
2. Click on “Network and Internet.”
3. Select “Network and Sharing Center.”
4. Click on “Change adapter settings” on the left sidebar.
5. Right-click on the network connection that has internet access (e.g., Ethernet or Wi-Fi).
6. Select “Properties” from the context menu.
7. Switch to the “Sharing” tab.
8. Check the box that says “Allow other network users to connect through this computer’s Internet connection.”
9. From the dropdown menu, select the hotspot network connection you want to use (e.g., “Wi-Fi”).
10. Click on “Settings” to set up a password and customize the hotspot settings.
11. Once you’re done, click on “OK” to save the changes.
And that’s it! Your Windows 8 computer is now a Wi-Fi hotspot that other devices can connect to.