
Are you looking to learn how to de-pin a connector? If you’re a mobile accessories enthusiast or someone who loves tinkering with technology, understanding how to de-pin a connector can come in handy. Whether you want to modify your existing accessories or create custom cables, de-pinning a connector allows you to remove individual pins without damaging the connector itself. In this article, we will guide you through the step-by-step process of de-pinning a connector, highlighting the tools and techniques you need to do it safely and efficiently. So, if you’re ready to unleash your inner DIY spirit and gain a deeper understanding of mobile accessories, let’s dive into the world of de-pinning connectors!
Inside This Article
- Tools Required
- Step 1: Identifying the Connector Pins
- Step 2: Preparing the Connector
- Step 3: Removing the Pins
- Step 4: Reinstalling the Pins
- Step 5: Testing the Connection
- Conclusion
- FAQs
Tools Required
When it comes to de-pinning a connector, having the right tools can make the process much easier and efficient. Here are the essential tools you’ll need:
- Pinning Tool: This specialized tool is designed specifically for removing pins from connectors. It typically has a fine tip that can be inserted into the connector to release the pin.
- Needle Nose Pliers: These pliers come in handy when you need to grip and pull on the pins. They have a long, narrow jaw that allows for precise handling of the small components.
- Tweezers: Tweezers can be helpful in manipulating the pins, especially when working with delicate connectors or tight spaces. They allow for more control and precision in handling the pins.
- Small Screwdriver: A small screwdriver, such as a flathead or Phillips-head, may be required to loosen any screws or fasteners securing the connector in place. It can also be useful in prying open the connector housing.
- Wire Cutters/Strippers: Depending on the type of connector you’re working with, you may need wire cutters or strippers to trim or strip the wires connected to the pins. These tools ensure clean cuts and proper preparation of the wires.
- Electrical Tape: While not a strictly necessary tool, electrical tape can come in handy for insulating and protecting the exposed wires after de-pinning the connector. It helps prevent short circuits and ensures the integrity of the electrical connection.
Having these tools readily available will ensure that you’re well-equipped to tackle the de-pinning process with confidence and precision. Remember to exercise caution and follow proper safety measures when handling small electrical components.
Step 1: Identifying the Connector Pins
Before you begin the process of de-pinning connector, it’s important to first identify the pins you need to remove. Connectors can vary in size and shape, so it’s crucial to have a clear understanding of the specific pins you want to work with.
Start by examining the connector closely. Look for any markings or labels that indicate the purpose of each pin. Some connectors might have numbers or letters next to the pins to signify their function.
If markings are absent, don’t worry. You can still identify the pins by their position and physical appearance. Take note of the pin configuration, such as the number of pins in a row or the pattern they form.
Another helpful identifying factor is the color of the pins. In some cases, connectors may have pins of different colors to differentiate between power, ground, and data pins. This color-coding can assist you in determining which pins you need to de-pin.
Additionally, consult any documentation or specifications available for the connector. These resources can provide valuable information about the pinout and pin assignments, making it easier to identify the specific pins you wish to remove.
Remember, accurate identification of the connector pins is essential to ensure you de-pin the correct ones and avoid any damage to the connector or the device it is connected to.
Step 2: Preparing the Connector
Once you have identified the connector pins in your mobile device, the next step is to prepare the connector for pin removal. Preparing the connector properly will ensure a smooth and successful process.
The first thing you should do is make sure you have the necessary tools on hand. These typically include a small flathead screwdriver, a pair of needle-nose pliers, and a pair of wire cutters. These tools will help you in removing and reinstalling the pins without damaging them or the connector.
Before you begin, it is crucial to power off your mobile device. This will prevent any accidental shorts or damage to the connectors. It’s always better to be safe than sorry!
Next, carefully inspect the connector for any visible damage or debris. Use a magnifying glass if necessary to get a closer look. Look out for bent or misaligned pins, as these may need to be straightened or realigned before further steps can be taken.
If you notice any debris or dirt in the connector, you can gently remove it using a can of compressed air or a soft brush. Be cautious not to use excessive force, as this can cause damage to the delicate pins. If the debris is stubborn and cannot be easily removed, it is best to consult with a professional technician.
Now that you have ensured the connector is clean and damage-free, it’s time to check the condition of the pins. Look for any signs of corrosion or discoloration. If you find any, you can use a small amount of isopropyl alcohol and a cotton swab to clean them. Gently rub the pins to remove any oxidation or dirt, then let them dry completely before moving on to the next step.
Lastly, inspect the connector’s housing for any cracks or loose parts. If any components appear to be damaged, it’s essential to replace them before proceeding. Contact your device manufacturer or a professional technician for assistance in obtaining the necessary replacement parts.
Once you have completed these steps, you are ready to move on to the next phase of the pin removal process. Properly preparing the connector ensures a strong foundation for successful pin removal and reinstallation, ultimately leading to a well-restored mobile device.
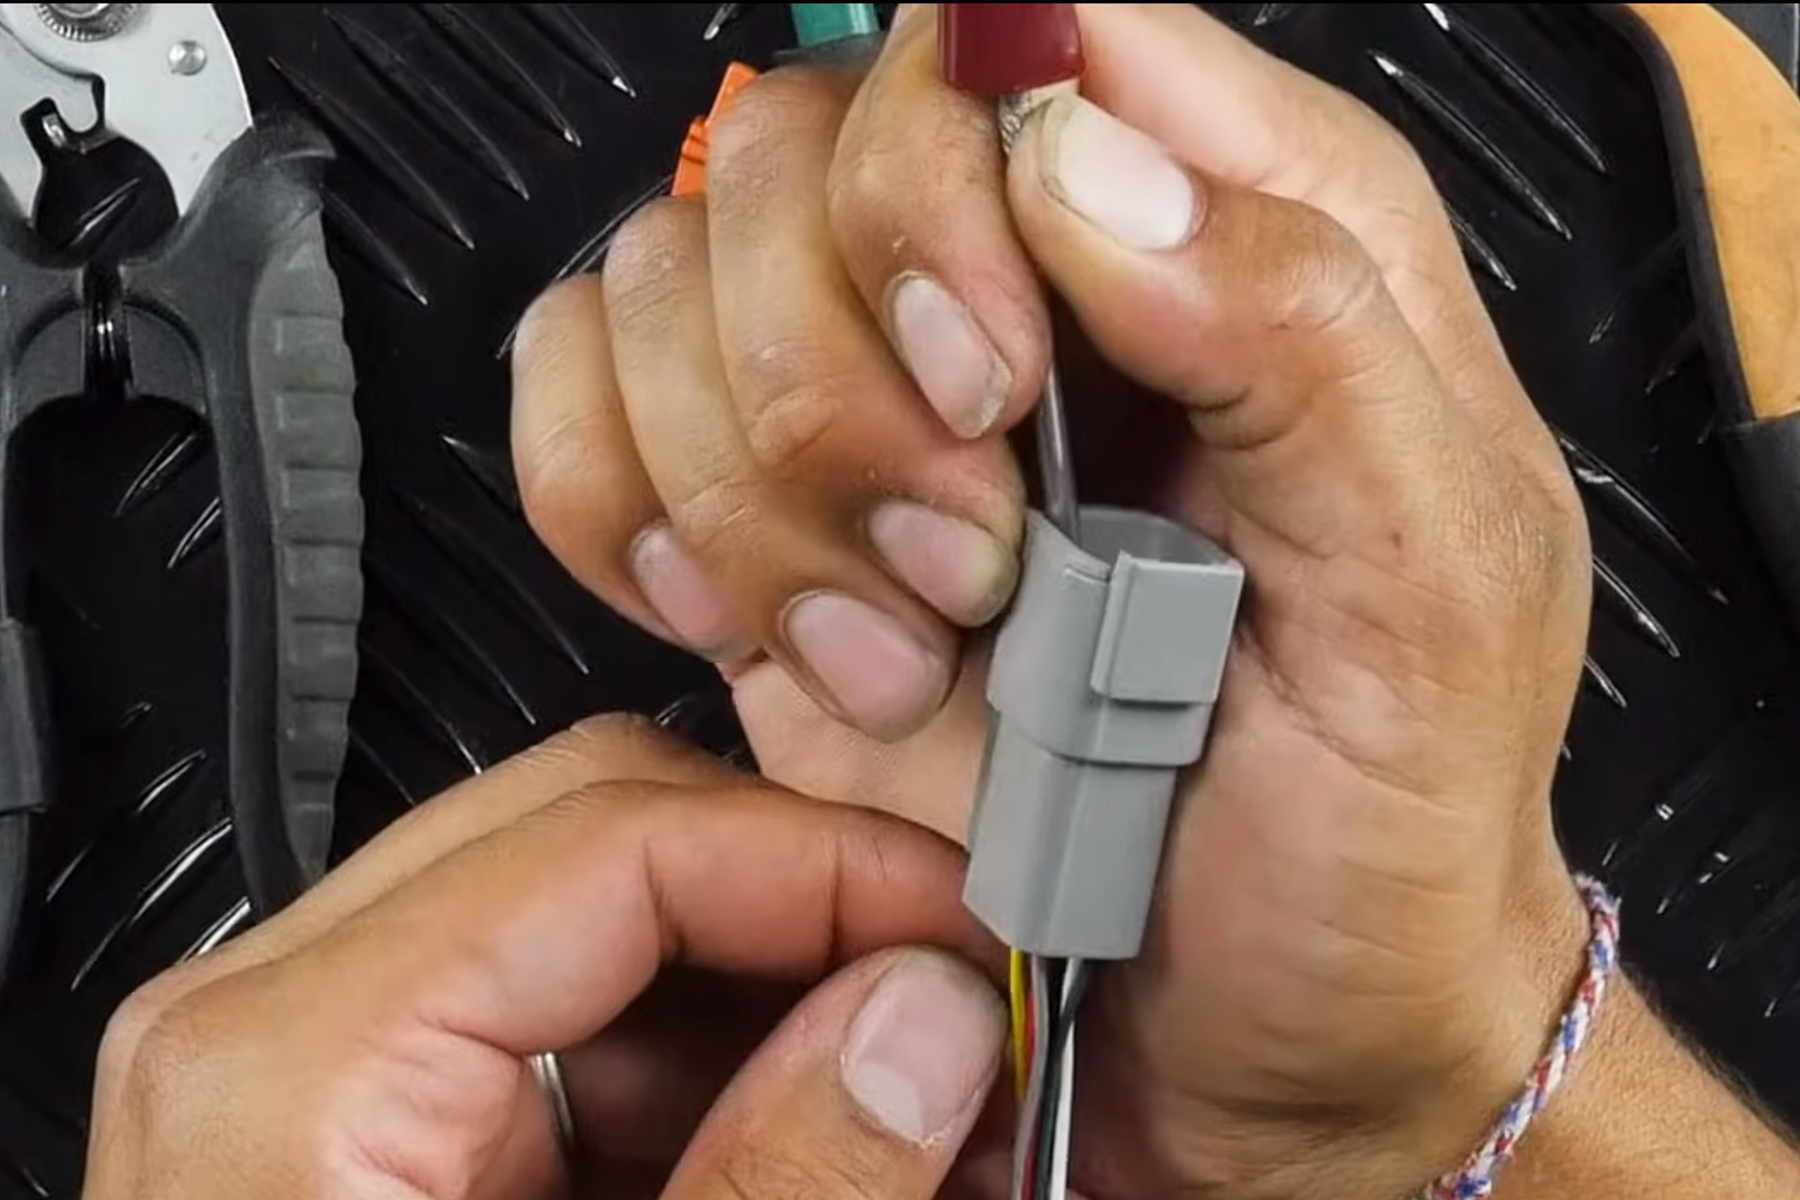
Step 3: Removing the Pins
Removing the pins from a connector can be a delicate process, but with the right tools and techniques, you can do it effectively. Here are the steps to follow:
1. Identify the pins: Before you start removing the pins, it’s important to identify which ones need to be taken out. Refer to the pinout diagram or documentation of the connector to understand the pin configuration.
2. Gather the necessary tools: To successfully remove the pins, you’ll need a few tools, including a pin removal tool, needle-nose pliers, and a magnifying glass (optional but helpful for precision work).
3. Insert the pin removal tool: Take the pin removal tool and insert it into the connector alongside the pin you want to remove. The tool should have a small hook or barb that will allow you to catch and pull out the pin.
4. Apply gentle pressure: Once the pin removal tool is inserted, apply gentle pressure to engage the hook or barb with the pin. Be careful not to use excessive force, as this can damage the connector or the pin itself.
5. Pull out the pin: With the gentle pressure applied, carefully pull the pin out of the connector. Use the needle-nose pliers if necessary to get a better grip on the pin and ensure a smooth extraction.
6. Repeat for each pin: Repeat the process for each pin that needs to be removed, taking care to ensure that you don’t mix up the pins or damage any surrounding components.
7. Inspect the pins and connector: Once all the pins have been removed, take a moment to inspect them for any signs of damage or wear. Also, check the connector itself to ensure that no stray bits of the pin are still stuck inside.
8. Clean and reassemble: If required, clean the pins and connector using an appropriate solution or by gently wiping them with a clean cloth. Once cleaned, reassemble the connector by inserting the remaining pins or replacing the removed ones if necessary.
By following these steps carefully, you can successfully remove the pins from a connector without causing any damage. However, it’s always a good idea to refer to the documentation or seek professional help if you’re unsure or uncomfortable performing the task yourself.
Step 4: Reinstalling the Pins
Once you have successfully removed the pins from the connector, it’s time to reinstall them. This step is crucial to ensure that the connector functions properly and maintains a secure connection. Follow the steps below to reinstall the pins with ease:
- Prepare the Pins: Before reinstalling the pins, make sure they are clean and free from any debris or damage. Inspect the pins carefully to ensure they are straight and undamaged. If any pins are bent or damaged, replace them with new ones.
- Align the Pins: Take the connector and carefully align the pins with their respective slots or holes. Make sure the pins are aligned correctly to avoid any connectivity issues. Double-check the alignment before moving to the next step.
- Insert the Pins: Gently insert each pin into its designated slot or hole in the connector. Be careful not to apply too much force as it may damage the pins or the connector itself. Slowly and steadily push each pin until it is fully inserted.
- Ensure Proper Seating: Once the pins are inserted, ensure that they are properly seated into the connector. Check for any wobbling or loose pins. If you notice any loose pins, remove and reinstall them, making sure they are securely seated.
- Test the Connection: After reinstalling all the pins, it’s important to test the connection to ensure it is working correctly. Connect the appropriate devices or cables to the connector and check for a stable and secure connection. If there are any issues, reexamine the pins and their alignment.
That’s it! By following these steps, you can easily reinstall the pins in the connector and restore its functionality. Remember to handle the pins and connector with care to avoid any damage. With the pins securely installed, you can now enjoy a reliable and uninterrupted connection for your mobile accessories.
Step 5: Testing the Connection
Once you have successfully completed the process of removing and reinstalling the pins in the connector, it is important to test the connection to ensure everything is functioning properly. Testing the connection will help you determine if the pins have been properly reinstalled and if any issues need to be addressed.
Here are a few steps you can follow to test the connection:
- Power on the Device: Start by turning on the device or equipment that you have connected using the renovated connector.
- Check for Power Indicators: Look for any power indicators on the device and ensure that they are functioning. This will help you determine if the power is reaching the device through the connector.
- Verify Data Transmission: If the connection involves data transmission, such as in the case of a mobile accessory, perform a test to ensure that data is being transmitted successfully. This can be done by transferring files or performing any relevant tasks that involve data transfer.
- Test Audio/Visual Output: If the connection is related to audio or visual output, such as connecting a headphone or a display device, check if the audio is clear and the video is displaying correctly.
- Inspect for Loose Connections: While testing the connection, keep an eye out for any loose connections or intermittent issues. Wiggle the connector gently to see if it causes a disruption in the connection. If you notice any problems, double-check the pins and ensure they are securely seated in the connector.
By following these steps, you can verify if the connection is functioning properly and if the pins have been successfully reinstalled. If you encounter any issues during testing, you may need to revisit the previous steps to make sure everything is in order.
It is important to test the connection before fully relying on it, especially if it involves critical functions or sensitive data. Taking the time to perform a thorough test can help you avoid potential problems down the line and ensure a reliable and secure connection.
Conclusion
In conclusion, learning how to de-pin a connector is a useful skill for anyone who works with mobile accessories or electronics. It allows you to customize and repair your devices, saving you time and money. By following the step-by-step guide we provided, you can safely remove pins from connectors without damaging the wires or causing any harm. Remember to exercise caution and patience during the process and always refer to the specific pinout diagrams for the connectors you are working with.
De-pinning a connector opens up a world of possibilities, from creating custom cable setups to troubleshooting and repairing faulty connections. With practice, you will become comfortable with this process and gain confidence in your ability to work with connectors. So go ahead and give it a try, and you’ll be amazed at how much you can accomplish.
FAQs
1. What is a connector de-pinning?
Connector de-pinning is the process of removing individual pins or wires from a connector without damaging or breaking them. This is usually done to modify or repair electronic devices, such as cell phones, by replacing a faulty wire or connector.
2. Why would I need to de-pin a connector?
There are several reasons why you might need to de-pin a connector. It could be to replace a damaged wire, modify the wiring configuration, or install aftermarket accessories. De-pinning also allows for easier troubleshooting and testing of circuits within the connector.
3. What tools are required to de-pin a connector?
To de-pin a connector, you’ll need a set of precision de-pinning tools specifically designed for the connector type you are working with. These tools typically include a combination of de-pinning tools, such as probes, hooks, or extraction tools, depending on the connector design.
4. How do I de-pin a connector?
The process of de-pinning a connector may vary depending on the connector type, but generally, it involves gently releasing the locking mechanism or retaining clip on the connector, using the appropriate de-pinning tool to push or lift the pin, and then carefully pulling the pin out of the connector housing.
5. Are there any precautions I should take when de-pinning a connector?
Yes, there are a few precautions to keep in mind when de-pinning a connector. First, make sure to follow proper safety guidelines, such as wearing safety goggles and working in a well-ventilated area. Additionally, take care not to damage the connector or surrounding components, and ensure that you have a clear understanding of the wiring and connector layout before de-pinning.