
Are you having trouble enabling the touchscreen feature on your Windows 10 device? Well, you’re not alone. Many users find themselves struggling to figure out how to activate this functionality. A touchscreen can greatly enhance your user experience, allowing you to effortlessly navigate through apps, websites, and documents with a simple tap or swipe of your finger. In this article, we will provide you with step-by-step instructions on how to enable the touchscreen feature on Windows 10. Whether you have a laptop, tablet, or hybrid device, we’ve got you covered. So, let’s dive in and make your Windows 10 device fully touch-enabled!
Inside This Article
- Method 1: Using Device Manager
- Method 2: Updating Touchscreen Drivers
- Method 3: Enabling Touchscreen via Settings
- Method 4: Resetting Touchscreen Calibration
- Conclusion
- FAQs
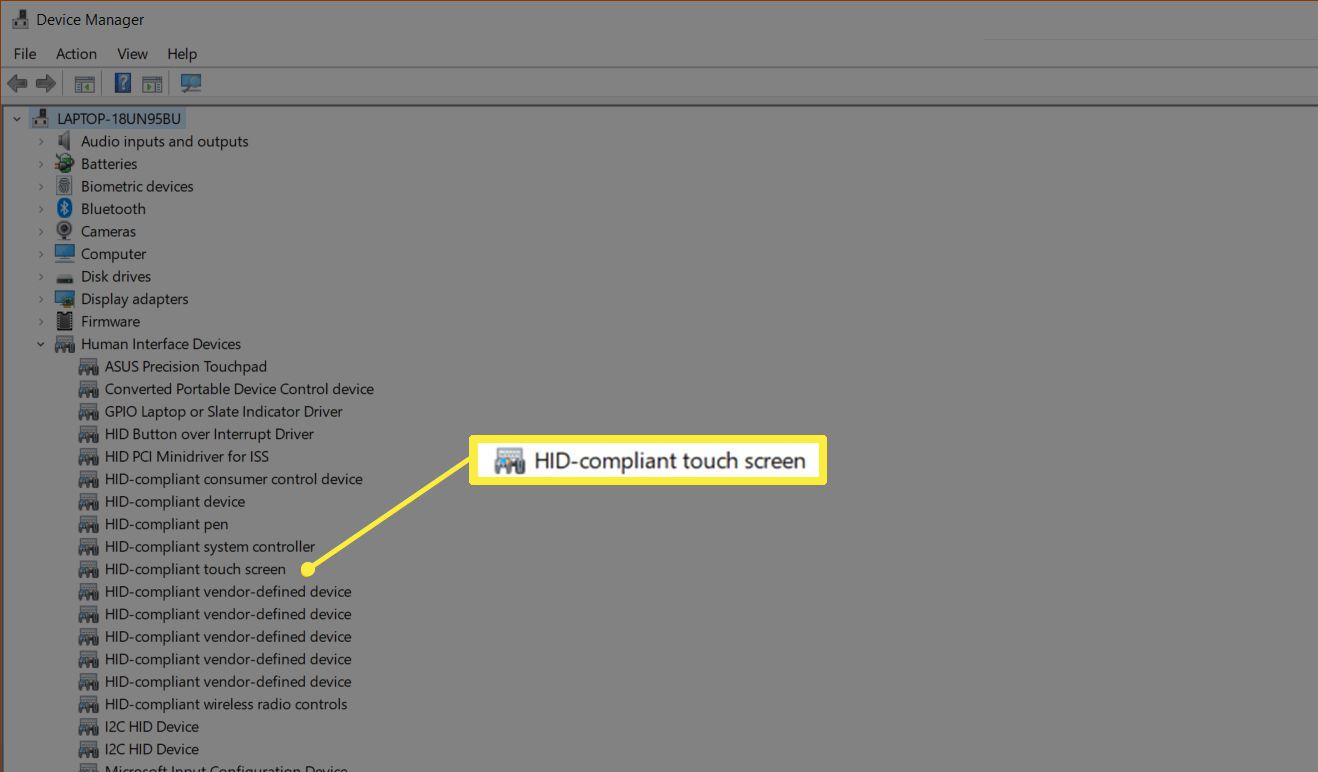
Method 1: Using Device Manager
Device Manager is a powerful tool in Windows 10 that allows you to manage and control various hardware components of your computer. In order to enable the touchscreen functionality on your Windows 10 device, you can use Device Manager to ensure that the appropriate driver is installed and functioning correctly.
Here is a step-by-step guide on how to enable touchscreen using Device Manager:
- Press the Windows key + X on your keyboard to open the Power User menu and select Device Manager from the list.
- In the Device Manager window, expand the “Human Interface Devices” category by clicking on the arrow next to it.
- Locate the entry for your touchscreen device. It is usually labeled with a name that includes “Touchscreen” or “HID-compliant touch screen”.
- Right-click on the touchscreen device and select “Enable” from the context menu. If the device is already enabled, you will see the option to disable it instead.
- Once the device is enabled, close the Device Manager window and restart your computer.
Upon restarting, your touchscreen should now be enabled and ready to use. You can test its functionality by tapping on the screen or using gestures to navigate through Windows 10. If the touchscreen is still not working, you may need to update the drivers or try other methods.
Remember, Device Manager is a crucial tool for managing hardware components on your computer, and enabling the touchscreen is just one of the many things you can do with it. So, don’t hesitate to explore its features and make the most out of your Windows 10 device.
Method 2: Updating Touchscreen Drivers
Updating the touchscreen drivers on your Windows 10 device can help resolve any issues or glitches related to the touchscreen functionality. Here’s how you can do it:
- Open Device Manager: Right-click on the Start button and select Device Manager from the context menu.
- Expand the Human Interface Devices section: In the Device Manager window, find and expand the section labeled “Human Interface Devices.”
- Locate the touchscreen driver: Look for a driver with “Touchscreen” or “HID-compliant touch screen” in its name. Right-click on it and select Update driver from the drop-down menu.
- Select the automatic update option: In the Update Drivers window, choose the option that says “Search automatically for updated driver software”. Windows will then search the internet and install the latest driver for your touchscreen device.
- Restart your computer: Once the driver update is complete, it is recommended to restart your computer to ensure the changes take effect.
Updating the touchscreen drivers keeps your device up-to-date with the latest enhancements and bug fixes. It can also help resolve incompatibility issues that may arise due to outdated drivers.
If updating the touchscreen drivers does not solve the problem, you can try other methods mentioned in this article to enable touchscreen functionality on your Windows 10 device.
Method 3: Enabling Touchscreen via Settings
If your touchscreen is not enabled on Windows 10, you can try enabling it via the settings. Here’s how:
1. Go to the Start menu and click on “Settings” (the gear icon).
2. In the Settings window, click on “Devices.”
3. In the Devices menu, click on “Touchpad & touchscreen” on the left-hand side.
4. On the right-hand side, under the “Touchscreen” section, toggle the switch to turn on the touchscreen functionality.
5. Close the Settings window and test your touchscreen to see if it is now enabled.
Enabling the touchscreen via the settings is a straightforward method that allows you to quickly activate the touchscreen functionality on your Windows 10 device. By following these steps, you can ensure that your touchscreen is ready for use.
Method 4: Resetting Touchscreen Calibration
If you are experiencing issues with the touchscreen on your Windows 10 device, such as inaccurate touch responses or unresponsive areas, resetting the touchscreen calibration may help resolve the problem. This method involves recalibrating the touchscreen to ensure accurate and precise touch input.
Before proceeding with the touchscreen calibration reset, it is recommended to clean the screen surface to remove any dirt, fingerprints, or smudges. This will help ensure accurate calibration results.
Follow these steps to reset the touchscreen calibration on your Windows 10 device:
1. Open the “Settings” app by clicking on the Start menu and selecting the gear icon.
2. Once the Settings window is open, click on the “Devices” option.
3. In the left sidebar, click on “Touchpad” or “Pen & Touch” (depending on your device).
4. Scroll down and click on the “Calibrate” button located under the “Reset” section.
5. Follow the on-screen instructions to complete the calibration process. This usually involves touching specific targets on the screen in a designated pattern.
6. Once the calibration is complete, click on the “Apply” or “Save” button to save the changes.
7. Restart your device for the new calibration settings to take effect.
By resetting the touchscreen calibration, you are ensuring that your device accurately detects and responds to touch inputs. This can help eliminate any inaccuracies or unresponsiveness you may have been experiencing with the touchscreen.
If the calibration reset did not resolve the touchscreen issue, you may need to consider other troubleshooting methods such as updating drivers or contacting the manufacturer for further assistance.
Note: The steps provided may vary slightly depending on your specific Windows 10 version and device model. It is important to follow the instructions provided by the operating system and consult your device’s user manual if needed.
Conclusion
Enabling the touchscreen on Windows 10 can greatly enhance your interaction and productivity. Whether you have a touchscreen-enabled laptop or a desktop with a separate touchscreen monitor, following the simple steps outlined in this article will allow you to take full advantage of the touchscreen functionality.
With a few clicks, you can enable the touchscreen feature, customize its settings, and enjoy the convenience of navigating through your device with just a swipe or a tap. From zooming in on images to scrolling through webpages, the touchscreen capability offers a more intuitive and seamless user experience.
So, don’t hesitate to enable the touchscreen on Windows 10 and unlock a new level of interactivity. Embrace the future of computing and harness the power of touch in your everyday tasks.
FAQs
Q: Can I enable touchscreen on Windows 10?
A: Yes, Windows 10 supports touchscreen functionality on compatible devices. However, not all devices come with a built-in touchscreen. If your device has a touchscreen, it should already be enabled by default. If not, you can manually enable it through the device settings.
Q: How do I check if my Windows 10 device has a touchscreen?
A: To check if your Windows 10 device has a touchscreen, go to the “Device Manager” by pressing the Windows key + X and selecting “Device Manager” from the list. In the device manager, expand the “Human Interface Devices” category. If you see a “HID-compliant touch screen” or similar entry, it means your device has a touchscreen.
Q: How do I enable touchscreen on Windows 10?
A: If your device has a touchscreen but it is not enabled, follow these steps to enable it:
1. Press the Windows key + I to open the Settings app.
2. Click on “Devices” and then select “Pen & Windows Ink” from the left sidebar.
3. In the “Pen & Windows Ink” settings, toggle the “Ignore touch input when I’m using my pen” option to Off.
4. Close the Settings app and your touchscreen should be enabled.
Q: Can I enable touchscreen on a desktop PC running Windows 10?
A: Yes, you can enable touchscreen functionality on a desktop PC running Windows 10 if you have a compatible touchscreen monitor. The process for enabling the touchscreen is the same as described earlier. However, keep in mind that not all desktop monitors come with touch support, so make sure to check the specifications of your monitor before attempting to enable touchscreen functionality.
Q: What should I do if my touchscreen is not working on Windows 10?
A: If your touchscreen is not working on Windows 10, there are a few troubleshooting steps you can try:
1. Restart your computer and see if the touchscreen starts working.
2. Make sure the device drivers for the touchscreen are up to date. You can do this by going to the “Device Manager,” expanding the “Human Interface Devices” category, right-clicking on the touchscreen entry, and selecting “Update driver.”
3. If updating the drivers doesn’t solve the issue, try disabling and re-enabling the touchscreen in the device settings.
4. If none of these steps work, it’s possible that there might be a hardware issue with the touchscreen. In such cases, it’s best to contact the manufacturer or seek professional assistance.