
Are you tired of accidental taps and swipes on your Windows 10 touchscreen? You’re not alone! Many Windows 10 users find themselves frustrated by the constant interference of their touchscreen. Whether you’re trying to write an important document, play a game, or simply navigate through your desktop, unintentional touches can disrupt your flow and cause unwanted actions.
In this article, we will provide you with a comprehensive guide on how to turn off the touchscreen on your Windows 10 device. By following these steps, you will regain full control of your computer and eliminate the frustrations caused by accidental touches. So, let’s dive in and discover how you can temporarily or permanently disable the touchscreen functionality on your Windows 10 device. Whether you’re using a laptop, desktop, or tablet, we’ve got you covered!
Inside This Article
- How to Turn Off Touchscreen on Windows 10
- Method 1: Using Device Manager
- Method 2: Disabling the Touchscreen Driver
- Method 3: Using the Device Properties Settings
- Method 4: Using Registry Editor
- Conclusion
- FAQs
How to Turn Off Touchscreen on Windows 10
Windows 10 is a versatile operating system that caters to a wide range of devices, including those with touchscreens. While touchscreens can be convenient for certain tasks, such as navigating through menus or drawing, there may be times when you want to disable the touchscreen functionality. Whether you need to prevent accidental touches or simply prefer to use a keyboard and mouse, turning off the touchscreen on Windows 10 is a straightforward process. In this article, we will explore several methods to help you disable the touchscreen on your Windows 10 device.
Method 1: Using Device Manager
One way to disable the touchscreen on Windows 10 is by using the Device Manager. Here’s how:
- Press the Windows key + X on your keyboard to open the Power User menu.
- Select “Device Manager” from the list.
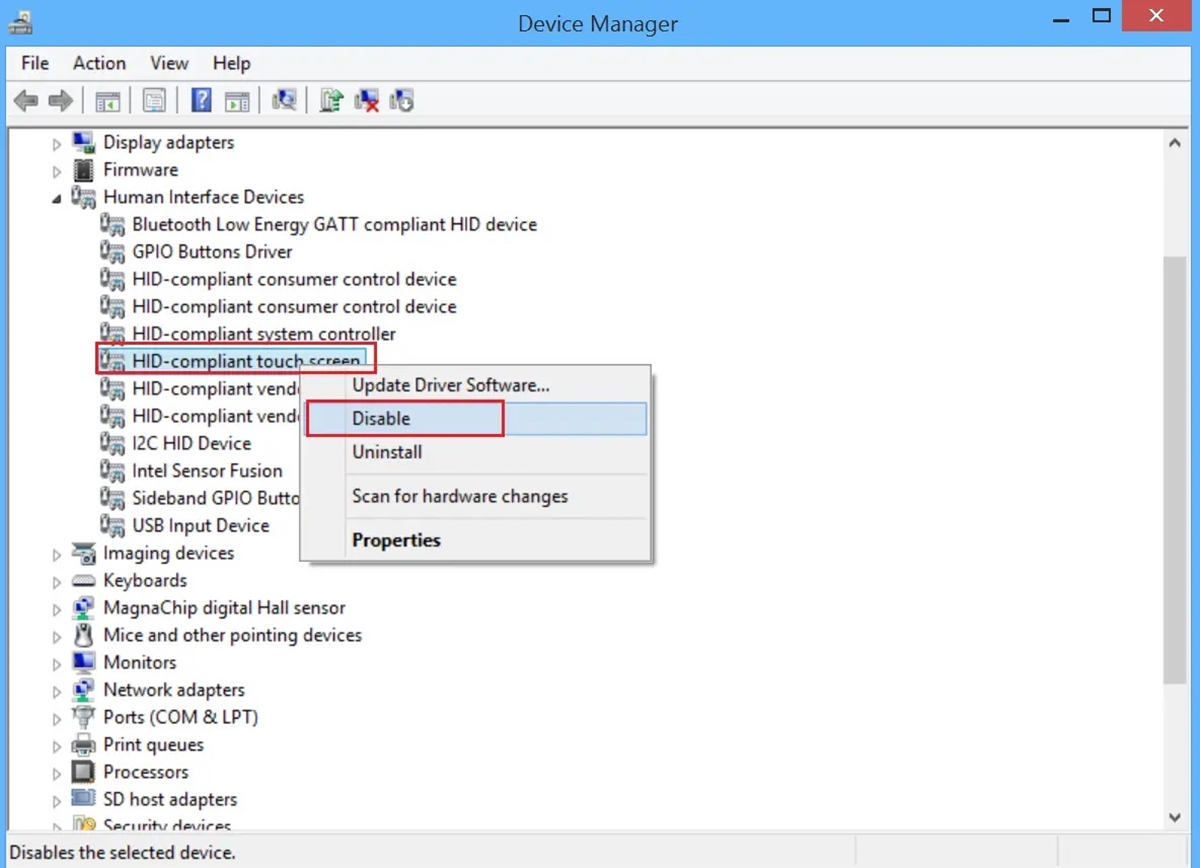
- In the Device Manager window, expand the “Human Interface Devices” category.
- Right-click on the “HID-compliant touch screen” device and select “Disable device”.
- A warning message may appear. Click “Yes” to confirm the action.
Method 2: Disabling the Touchscreen Driver
If the previous method doesn’t work or you prefer a more direct approach, you can disable the touchscreen driver. Here’s how:
- Press the Windows key + X on your keyboard to open the Power User menu.
- Select “Device Manager” from the list.
- In the Device Manager window, expand the “Human Interface Devices” category.
- Locate the entry for your touchscreen device (it may have a specific name or manufacturer listed).
- Right-click on the touchscreen device and select “Disable”.
- Confirm the action if prompted.
Method 3: Using the Device Properties Settings
Another method to disable the touchscreen on Windows 10 is through the Device Properties settings. Follow these steps:
- Press the Windows key + X on your keyboard to open the Power User menu.
- Select “Device Manager” from the list.
- In the Device Manager window, expand the “Human Interface Devices” category.
- Locate your touchscreen device and right-click on it.
- From the context menu, select “Properties”.
- In the Properties window, navigate to the “Driver” tab and click on the “Disable” button.
- Confirm the action if prompted.
Method 4: Using Registry Editor
For advanced users, the Registry Editor offers another way to disable the touchscreen. Please exercise caution when working with the registry, as making incorrect changes can cause system instability. Here’s how:
- Press the Windows key + R on your keyboard to open the Run dialog box.
- Type “regedit” (without quotes) and press Enter to open the Registry Editor.
- Navigate to the following registry key:
HKEY_LOCAL_MACHINE\SYSTEM\CurrentControlSet\Enum\HID. - Expand the “HID” key and search for the entry related to your touchscreen device.
- Right-click on the touchscreen device entry and select “Permissions”.
- In the Permissions window, click on the “Advanced” button.
- Next, click on the “Disable inheritance” checkbox and choose the option to convert the permissions to explicit.
- After applying the changes, restart your computer for the settings to take effect.
Disabling the touchscreen on Windows 10 can be useful for various reasons. Whether you’re using a laptop, tablet, or other touch-enabled device, these methods provide options to temporarily or permanently turn off the touchscreen functionality. By following the steps outlined above, you can regain control and enhance your computing experience to suit your preference and needs.
Method 1: Using Device Manager
If you’re looking to disable the touchscreen feature on your Windows 10 device, one of the simplest methods is to use the Device Manager. The Device Manager is a built-in Windows utility that allows you to manage and control the hardware devices connected to your computer.
To access the Device Manager, you can follow these steps:
- Press the Windows key + X on your keyboard to open the Power User menu.
- From the menu that appears, select “Device Manager” to launch the utility.
Once you have the Device Manager open, you’ll see a list of all the hardware devices on your computer. Look for the “Human Interface Devices” category and expand it by clicking on the arrow next to it.
Within the “Human Interface Devices” category, you should be able to find a touch screen or HID-compliant touch screen entry. Right-click on it and select “Disable device” from the context menu that appears.
A warning message will pop up, asking you to confirm the action. Click “Yes” to disable the touchscreen. This action will immediately disable the touchscreen and prevent it from responding to any touch input.
If you ever want to re-enable the touchscreen, simply follow the same steps and choose “Enable device” instead of “Disable device.”
Using the Device Manager to disable the touchscreen is a convenient option as it does not require any additional software installation. However, it should be noted that this method will only disable the touchscreen temporarily. If you restart your computer, the touchscreen will be enabled again.
Method 2: Disabling the Touchscreen Driver
Disabling the touchscreen driver is another effective method to turn off the touchscreen on Windows 10. By disabling the driver, you can temporarily or permanently disable the touchscreen functionality.
To disable the touchscreen driver, follow these steps:
- Press the Windows key and type “Device Manager”.
- Click on the Device Manager app from the search results.
- In the Device Manager window, scroll down and locate the “Human Interface Devices” category.
- Expand the category by clicking on the arrow next to it.
- Look for a device with the word “touchscreen” or “touch input” in its name. It may be called something like “HID-compliant touchscreen” or “HID-compliant touch screen controller”.
- Right-click on the touchscreen device and select “Disable device” from the context menu.
- A confirmation dialog box will appear. Click “Yes” to disable the device.
After disabling the touchscreen driver, the touchscreen functionality will be turned off. To re-enable it, simply follow the same steps and click on “Enable device” instead.
Note that disabling the touchscreen driver is a temporary solution, and the device might be re-enabled after a system restart or update. If you want to permanently disable the touchscreen, you can consider using other methods like disabling the touchscreen in the BIOS settings or physically disconnecting the touchscreen hardware.
Method 3: Using the Device Properties Settings
If you’re looking for a simple and convenient way to disable the touchscreen on your Windows 10 device, using the Device Properties settings is a great option. This method allows you to quickly turn off the touchscreen without having to go through complex procedures or install additional software.
Follow these step-by-step instructions to disable the touchscreen using the Device Properties settings:
- Open the Start menu and click on the “Settings” icon.
- In the Settings window, select the “Devices” option.
- Click on the “Pen & Windows Ink” tab on the left side of the window.
- Scroll down and find the “Ignore touch input when I’m using my pen” option.
- Toggle the switch to the “On” position.
- Click on the “Apply” button to save the changes.
By enabling the “Ignore touch input when I’m using my pen” option, you effectively disable the touchscreen functionality while using a pen or stylus. This setting is particularly useful for artists, designers, or individuals who frequently use a digital pen on their Windows 10 device.
It’s important to note that while this method disables touch input when a pen or stylus is detected, it doesn’t entirely turn off the touchscreen. If you want to completely disable the touchscreen functionality, you may need to consider using other methods such as disabling the touchscreen driver or using the Device Manager.
To re-enable the touchscreen, simply follow the same steps and toggle the “Ignore touch input when I’m using my pen” option to the “Off” position.
Using the Device Properties settings provides a hassle-free way to control your touchscreen functionality in Windows 10. Whether you’re looking to temporarily disable touch input or switch between touch and pen/stylus usage, this method gives you the flexibility and convenience to customize your device according to your needs.
Method 4: Using Registry Editor
If you’re comfortable making changes in the Windows Registry, you can also disable the touchscreen using the Registry Editor. Please note that modifying the Registry can be risky, so it’s important to proceed with caution and make backups before making any changes.
Here’s how you can disable the touchscreen using the Registry Editor:
1. Press the Windows key + R to open the Run dialog box.
2. Type “regedit” and press Enter to open the Registry Editor.
3. In the Registry Editor window, navigate to the following path:
HKEY_LOCAL_MACHINE\Software\Policies\Microsoft\Windows
4. Right-click on the “Windows” folder, select New, and then click on Key to create a new key.
5. Name the new key “TabletPC” (without the quotes).
6. Inside the “TabletPC” key, right-click on the right-side pane, select New, and then click on DWORD (32-bit) Value.
7. Name the new DWORD value “DisableTouchSupport”.
8. Double-click on the “DisableTouchSupport” value and set the value data to 1.
9. Click OK to save the changes.
10. Close the Registry Editor and restart your computer to apply the changes.
Once your computer restarts, the touchscreen should be disabled. If you want to enable it again in the future, you can follow the same steps and set the “DisableTouchSupport” value data to 0 or simply delete the “TabletPC” key.
Remember, making changes in the Registry Editor should be done with caution. If you’re unsure or uncomfortable with making these changes, it’s best to seek assistance from a professional or choose one of the other methods mentioned earlier to disable the touchscreen on your Windows 10 device.
Conclusion
In conclusion, knowing how to turn off the touchscreen on Windows 10 can be useful in various situations. Whether you want to prevent accidental touches, save battery life, or simply prefer to use a mouse and keyboard, disabling the touchscreen feature is a straightforward process. By following the methods mentioned in this article, you can easily toggle the touchscreen functionality on and off based on your preferences.
Remember, it’s important to ensure that you are comfortable with temporarily disabling the touchscreen and be aware of the potential limitations it may impose. Always remember to re-enable the touchscreen when necessary, especially if you rely on it for certain tasks or applications.
With the steps provided in this article, managing the touchscreen settings on your Windows 10 device should be a breeze. Take control of your touchscreen experience and tailor it to your needs and preferences.
FAQs
1. How can I turn off the touchscreen on my Windows 10 device?
To turn off the touchscreen on a Windows 10 device, you can follow these steps:
- Open the Device Manager by pressing the Windows key + X and selecting Device Manager from the menu.
- In the Device Manager window, expand the “Human Interface Devices” category.
- Find the touchscreen driver in the list (it is usually named “HID-compliant touch screen” or something similar).
- Right-click on the touchscreen driver and select “Disable device” from the context menu.
- A warning message will appear, asking if you want to disable the device. Click “Yes” to confirm.
- The touchscreen should now be disabled. You can re-enable it at any time by following the same steps and selecting “Enable device” instead of “Disable device.”
2. Can I temporarily disable the touchscreen without going to the Device Manager?
Yes, you can temporarily disable the touchscreen without accessing the Device Manager by using the tablet mode feature in Windows 10. Here’s how:
- Open the Action Center by clicking on the notification icon in the taskbar or by pressing Windows key + A.
- In the Action Center, click on the “Tablet mode” button to enable tablet mode.
- Once tablet mode is enabled, the touchscreen will be disabled. You can use your device with a keyboard and mouse.
- To re-enable the touchscreen, simply click on the “Tablet mode” button in the Action Center again to disable tablet mode.
3. Will disabling the touchscreen affect other input methods on my Windows 10 device?
No, disabling the touchscreen will only turn off the touch functionality. Other input methods such as the keyboard, mouse, and stylus will still work as usual. You can continue to interact with your device using these input methods even with the touchscreen disabled.
4. Can I disable the touchscreen on a laptop but still use it in tablet mode?
Yes, you can disable the touchscreen on a laptop while still utilizing the tablet mode. Follow the steps mentioned in the first FAQ to disable the touchscreen using the Device Manager. Once disabled, you can switch to tablet mode by using the Action Center or by detaching the laptop screen depending on your device. In tablet mode, the touchscreen will be enabled, allowing you to utilize it without interfering with the disabled touchscreen feature.
5. Are there any third-party applications that can help me disable the touchscreen on Windows 10?
Yes, there are several third-party applications available that can help you disable the touchscreen on your Windows 10 device. These applications provide a user-friendly interface and allow you to easily toggle the touchscreen functionality on or off. A quick search in your preferred app store will give you multiple options to choose from. However, always make sure to download applications from trusted sources to ensure your device’s security.