
The Apple Watch is not just a sleek wearable device; it’s also a powerful tool that keeps you connected to what matters most. With its advanced notifications system, you can receive alerts, messages, and updates right on your wrist. However, managing all of these notifications can sometimes become overwhelming. That’s where this article comes in. Here, we will explore how to effectively manage all of your Apple Watch notifications, ensuring that you stay informed without being bombarded with constant interruptions. Whether you want to fine-tune which apps send you notifications, customize the alerts you receive, or simply learn how to prioritize and organize your notifications, we’ve got you covered. So, let’s dive in and discover how to take control of your Apple Watch notifications for a more streamlined and hassle-free experience.
Inside This Article
- Setting up notifications on your Apple Watch
- Managing notification settings on your Apple Watch
- Customizing notification preferences for specific apps
- Using the Apple Watch Do Not Disturb feature
- Disabling notifications temporarily on your Apple Watch
- Managing notifications from your iPhone’s Notification Center
- Prioritizing and Organizing Notifications on your Apple Watch
- Using the Apple Watch notification actions and quick replies
- Troubleshooting common notification issues on your Apple Watch
- Conclusion
- FAQs
Setting up notifications on your Apple Watch
One of the great features of the Apple Watch is the ability to receive notifications right on your wrist. Whether it’s a text message, a call, or an app notification, you can stay connected without constantly checking your iPhone. To get started, follow these simple steps to set up notifications on your Apple Watch.
First, make sure your Apple Watch is connected to your iPhone. Open the Watch app on your iPhone and go to the My Watch tab. From there, scroll down and tap on “Notifications.”
In the Notifications settings, you’ll find a list of all the apps installed on your iPhone. You can choose which apps you want to receive notifications from on your Apple Watch by toggling the switch next to each app.
Now, let’s customize the notification settings for each app. Tap on an app name to access its specific settings. Here, you can enable or disable the “Mirror iPhone alerts” option, which will determine whether the notifications on your Apple Watch mirror the alerts on your iPhone.
Additionally, you can choose how you want to be alerted for each app’s notifications. You can select between options like a sound, a tap on the wrist, or a prominent haptic feedback. Choose the option that suits your preference and tap “Done” to save the changes.
To further personalize your notifications, you have the option to enable or disable the “Notification Privacy” feature. When enabled, this feature requires you to tap on a notification to reveal its content, ensuring your privacy in case someone else glances at your Apple Watch.
It’s important to note that some apps may have their own built-in notification settings. So, if you don’t see the desired customization options in the Apple Watch app, check the settings within the specific app on your iPhone.
Once you have set up and customized your notifications on your Apple Watch, you’re ready to start receiving alerts and staying connected throughout the day. Whether it’s an important email, a social media update, or even fitness reminders, you’ll never miss a beat with your Apple Watch notifications on your wrist.
Managing notification settings on your Apple Watch
Managing notification settings on your Apple Watch allows you to control which apps can send you notifications and how those notifications are displayed. Whether you want to prioritize certain notifications or silence them altogether, the Apple Watch provides a range of options to customize your notification experience.
To access your notification settings, start by opening the “Watch” app on your paired iPhone. From there, navigate to the “Notifications” tab to view and adjust your Apple Watch notification settings.
Once in the notification settings, you’ll see a list of apps installed on your iPhone that support notifications on the Apple Watch. You can toggle the switch next to each app to enable or disable notifications for that particular app. This allows you to fine-tune which apps can send notifications to your wrist.
In addition to enabling or disabling notifications, you can also customize how each app’s notifications appear on your Apple Watch. For example, you can choose to have alerts display as banners, which appear temporarily at the top of the screen, or as alerts, which require you to take action to dismiss them.
Furthermore, you can adjust the notification sound and haptic feedback settings for each app. This means you can choose whether to receive an audible alert, a gentle tap on your wrist, or both. This level of customization ensures that you can be discreetly notified without disturbing those around you.
It’s worth noting that some apps have additional notification settings that can be accessed within the app itself. For instance, messaging apps often allow you to configure whether or not message previews are shown in notifications. This gives you even more control over how notifications are displayed on your Apple Watch.
To make it easier to manage notifications, you can also choose to mirror the notification settings from your iPhone. This means that any changes you make to notification settings on your iPhone will be automatically applied to your Apple Watch. This can be particularly helpful if you want to maintain consistent settings across both devices.
Finally, if you ever need a break from notifications, you can activate the “Do Not Disturb” feature on your Apple Watch. This feature allows you to temporarily silence all notifications until you manually disable it. It’s perfect for times when you need uninterrupted focus or simply want to enjoy a moment of peace without being constantly alerted.
By taking advantage of the notification settings on your Apple Watch, you can tailor your notification experience to suit your preferences. Whether you want to stay on top of important alerts or minimize distractions, managing your Apple Watch’s notification settings puts you in control.
Customizing notification preferences for specific apps
One of the great features of the Apple Watch is its ability to receive notifications from your favorite apps. However, sometimes the constant stream of notifications can be overwhelming. That’s where the customization options come in handy. With your Apple Watch, you have the ability to tailor your notification preferences for specific apps, so you only receive the notifications that matter most to you.
To customize the notification preferences for specific apps on your Apple Watch, follow these simple steps:
- Open the Apple Watch app on your iPhone.
- Scroll down and tap “Notifications”.
- Under the heading “Mirror iPhone alerts from”, you will see a list of apps that are installed on your iPhone.
- Tap on the app for which you want to customize the notification settings.
- On the next screen, you will see various options to customize the app’s notification settings.
The options may vary depending on the app, but some common settings include:
- Show Alerts: This option allows you to choose whether or not to receive alerts from the app on your Apple Watch.
- Sounds: This option allows you to choose whether or not to play sounds for the app’s notifications on your Apple Watch.
- Banners: This option allows you to choose whether or not to show banners for the app’s notifications on your Apple Watch.
- Badge App Icon: This option allows you to choose whether or not to display a badge on the app’s icon on your Apple Watch.
- Show on Lock Screen: This option allows you to choose whether or not to show the app’s notifications on the lock screen of your Apple Watch.
Once you have customized the app’s notification settings, you can exit the Apple Watch app on your iPhone. The changes will automatically sync to your Apple Watch, and you will now only receive notifications from that particular app according to your preferences.
By customizing the notification preferences for specific apps, you can streamline your Apple Watch experience and ensure that you only receive the notifications that are important to you. So go ahead and take control of your notifications!
Using the Apple Watch Do Not Disturb feature
The Apple Watch Do Not Disturb feature provides you with the ability to temporarily disable all incoming notifications on your device. This feature comes in handy when you want to focus on a specific task, have a meeting, or simply want some uninterrupted time.
To enable the Do Not Disturb feature on your Apple Watch, follow these simple steps:
- On your Apple Watch, swipe up from the watch face to open the Control Center.
- Tap on the crescent moon icon, which represents the Do Not Disturb mode.
Once activated, the Do Not Disturb mode will mute all incoming alerts, including calls, messages, and app notifications. However, you will still be able to receive important notifications, such as emergency alerts and alarms.
If you would like to schedule the Do Not Disturb mode to automatically activate and deactivate at specific times, you can configure this in the settings.
To customize the Do Not Disturb settings on your Apple Watch, follow these steps:
- Open the Apple Watch app on your iPhone.
- Navigate to the My Watch tab at the bottom of the screen.
- Scroll down and tap on “Do Not Disturb.”
- Here, you can choose to manually enable or disable Do Not Disturb or set a schedule for it to activate automatically.
By setting a schedule, you can ensure that your Apple Watch automatically enters Do Not Disturb mode during specific time periods, such as at night or during work hours.
Keep in mind that when the Do Not Disturb mode is enabled on your Apple Watch, it will also sync with your iPhone. This means that any changes you make to the Do Not Disturb settings on your iPhone will reflect on your Apple Watch, and vice versa.
The Do Not Disturb mode is a convenient feature that allows you to take control of your notifications and establish boundaries for uninterrupted focus. By utilizing this feature on your Apple Watch, you can ensure that you are not disturbed during important moments or when you simply need some time to yourself.
Disabling notifications temporarily on your Apple Watch
While receiving notifications on your Apple Watch can be convenient, there may be times when you need a break from the constant buzzing and alerting on your wrist. Luckily, Apple has provided a simple way to disable notifications temporarily on your Apple Watch.
To disable notifications temporarily, follow these steps:
- On your Apple Watch, swipe down from the top of the watch face to access the Notification Center.
- Scroll up or down to navigate through your notifications until you find the one you want to disable temporarily.
- Once you’ve found the notification, swipe left on it.
- You will now see two options: “Clear” and “Manage”. Tap on “Manage”.
- In the next screen, you will see options to manage how this specific app’s notifications appear on your Apple Watch.
- To temporarily disable notifications from this app on your watch, toggle off the switch labeled “Mirror iPhone” or “Deliver Quietly”.
- Once you’ve disabled the notifications for that app, you can swipe left again to return to the Notification Center.
By following these simple steps, you can temporarily stop notifications from specific apps from appearing on your Apple Watch. This can be particularly useful during meetings, workouts, or when you simply need some uninterrupted time. However, it’s important to note that disabling notifications temporarily on your Apple Watch does not affect the notifications on your iPhone.
If you want to re-enable notifications for the app you have disabled temporarily, follow the same steps and toggle the switch back on.
It’s worth mentioning that you can also enable the Do Not Disturb mode on your Apple Watch to silence all notifications at once. This is a convenient feature when you want to focus, relax, or sleep without being disturbed by incoming alerts. Simply swipe up on the watch face to access the Control Center, tap on the Do Not Disturb icon, and you’re good to go.
Managing notifications from your iPhone’s Notification Center
The iPhone’s Notification Center is a powerful tool that allows you to manage and customize your notifications across all your devices, including your Apple Watch. By accessing the Notification Center on your iPhone, you can easily take control of your incoming notifications and ensure that you only receive the ones that are most relevant to you.
To access the Notification Center on your iPhone, simply swipe down from the top of the screen. Here, you will find a list of all your recent notifications, including messages, emails, social media notifications, and more. You can quickly scroll through the list to review all the notifications you have received.
If you want to clear all the notifications at once, you can tap on the “Clear” button at the top of the Notification Center. This will remove all the notifications from the list and give you a clean slate.
To manage individual notifications, you can swipe left on any notification to reveal options such as “View”, “Clear”, or “Manage”. Tapping on “Manage” will take you to the settings page for that app’s notifications, where you can customize the alert style, sounds, and other notification preferences.
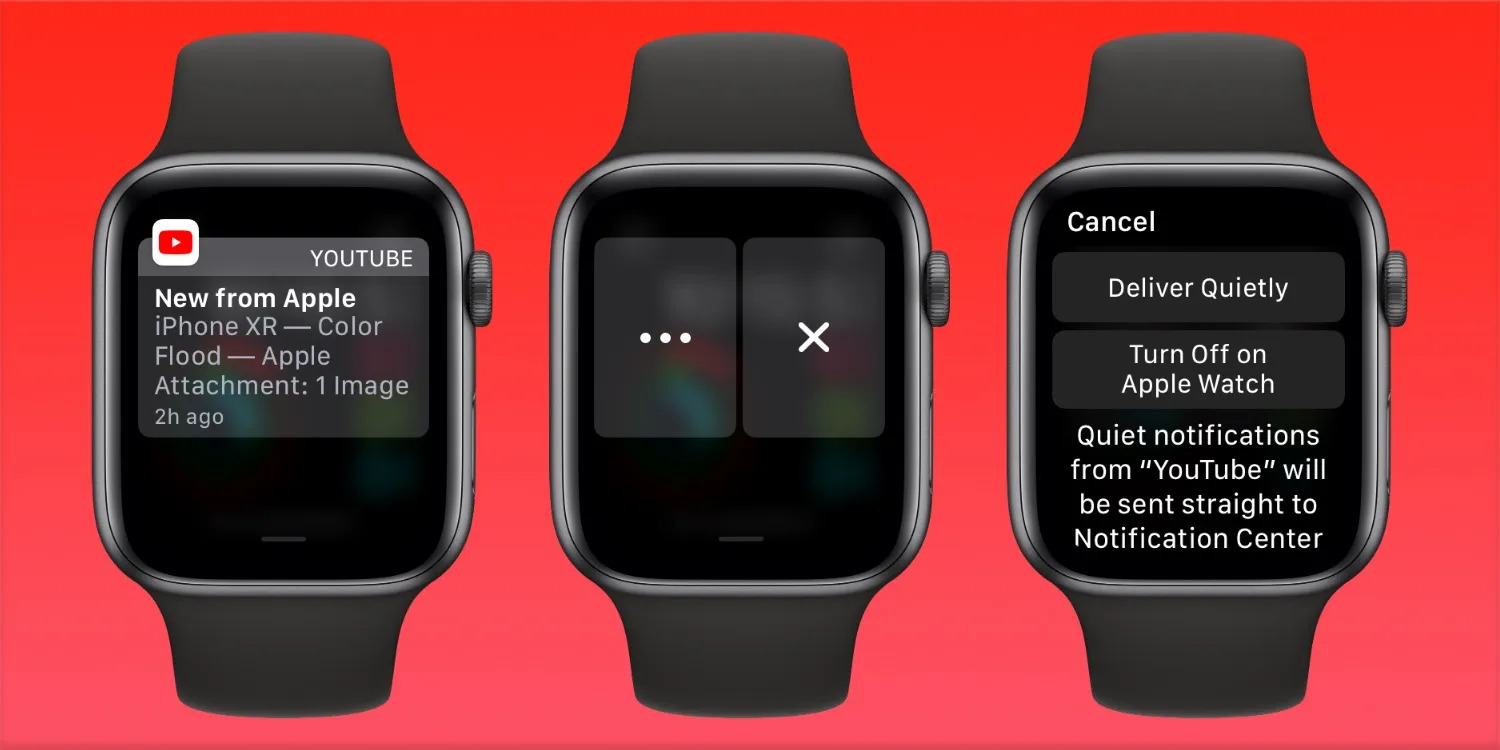
If you want to temporarily disable notifications for a particular app, you can tap on the “X” button on the top right corner of the notification. This will give you the option to either deliver the notifications quietly or turn them off entirely. Choosing the “Deliver Quietly” option will send the notifications to the Notification Center without alerting you, while selecting “Turn Off” will completely disable the notifications for that app.
In addition to managing individual notifications, you can also customize the overall behavior of your iPhone’s Notification Center. To do this, go to the Settings app on your iPhone and navigate to “Notifications”. Here, you will find a list of all the apps installed on your device. You can tap on any app to access its notification settings and modify the alert style, notification grouping, and other preferences.
Furthermore, you can arrange the order of your notifications by going to the “Notification Center” section in the Settings app. Here, you can choose whether the notifications appear in chronological order or if they should be grouped by app. You can also enable or disable the “Show Previews” option, which determines whether the notification content is displayed on the lock screen or only after you authenticate with Face ID or Touch ID.
By managing notifications from your iPhone’s Notification Center, you can easily stay on top of important updates while minimizing distractions. Whether you want to customize the behavior of individual apps or control how notifications are displayed on your lock screen, the Notification Center gives you the flexibility to tailor your iPhone’s alerts to suit your needs.
Prioritizing and Organizing Notifications on your Apple Watch
Getting notifications on your Apple Watch can be incredibly helpful, but it can also become overwhelming if they constantly interrupt your day. Fortunately, Apple provides several options to help you prioritize and organize your notifications, ensuring that you only receive the most important alerts on your wrist.
Here are some effective ways to prioritize and organize your notifications on your Apple Watch:
- Customize your notification settings: Open the Apple Watch app on your iPhone, go to “My Watch,” and navigate to the “Notifications” section. Here, you can choose which apps can send you notifications on your Apple Watch. Disable notifications from apps that you don’t need or want to receive alerts from, and keep them enabled for the ones that are important to you.
- Adjust the notification style: You can further customize how notifications are delivered on your Apple Watch. In the “Notifications” section of the Apple Watch app, tap on an app and select “Custom.” From there, you can choose whether to receive notifications as banners, alerts, or keep them only in Notification Center.
- Use the “VIP” feature: With the “VIP” feature, you can designate specific contacts or email addresses as VIPs, ensuring that their notifications always come through on your Apple Watch. To set up VIPs, open the Mail app on your iPhone, select a contact or email address, and tap on “Add to VIP.” You can also configure VIP settings in the Apple Watch app.
- Create notification groups: If you receive a lot of notifications from a single app, you can create notification groups to keep them organized. Simply open the Apple Watch app, go to “Notifications,” select the app, and choose “Custom.” Toggle on the “Notification Grouping” option, and all notifications from that app will be grouped together on your Apple Watch.
- Enable “Prominent Haptic”: Apple Watch uses haptic feedback to alert you to notifications. By enabling the “Prominent Haptic” setting, your Apple Watch will give you more noticeable haptic feedback for incoming alerts, making it easier to prioritize them without having to look at your wrist.
- Manage notifications from the Notification Center: On your Apple Watch, swipe down from the top of the screen to access the Notification Center. Here, you can view all your recent notifications and take actions such as dismissing or clearing them. You can also manage notifications directly from the Notification Center settings in the Apple Watch app on your iPhone.
- Take advantage of Do Not Disturb: If you need uninterrupted time, enable the Do Not Disturb feature on your Apple Watch. This will silence all incoming notifications and keep your Apple Watch screen from lighting up. To activate Do Not Disturb, swipe up on your watch face to access Control Center and tap on the crescent moon icon.
By using these tips, you can easily prioritize and organize the notifications on your Apple Watch, ensuring that you only receive the most important alerts and minimizing distractions throughout your day.
Using the Apple Watch notification actions and quick replies
Your Apple Watch offers more than just the ability to receive notifications; it also provides convenient ways to take action or respond to them. With the use of notification actions and quick replies, you can efficiently manage your notifications without having to reach for your iPhone. Let’s explore how to use these features on your Apple Watch.
Notification actions are interactive options that appear directly on your Apple Watch when a notification arrives. They allow you to quickly perform specific actions without opening the associated app. For example, if you receive a message, you can reply to it directly from the notification without needing to open the messaging app on your iPhone.
To access the notification actions, simply raise your wrist to activate your Apple Watch display when a notification appears. You will see the notification along with the available actions. Depending on the app and the notification type, the actions may vary. Common notification actions include reply, delete, archive, mark as read, and more. To select an action, tap on the corresponding button on your Apple Watch screen.
In addition to notification actions, Apple Watch also offers quick replies for certain messaging apps. Quick replies are pre-designed response options that you can choose from when replying to a message directly from the notification. These pre-written responses can save you time and effort when sending quick replies to your contacts.
When a message notification arrives, scroll down the notification to view the available quick replies. Tap on the reply that best suits your response, and your Apple Watch will send it instantly. It’s a convenient way to stay connected with your contacts without the need to type out a full response.
To customize your quick replies, you can do so through the Apple Watch app on your iPhone. Open the app and navigate to the Messages section, then tap on “Default Replies.” From here, you can edit, add, or delete quick reply options to tailor them to your preferences and frequently used phrases.
It’s worth noting that not all messaging apps support quick replies on Apple Watch. However, many popular apps like Messages, Mail, and WhatsApp do offer this feature, allowing you to swiftly respond to notifications from these apps.
Using the Apple Watch notification actions and quick replies provides a streamlined way to interact with your notifications and stay connected on the go. Make the most of these features to efficiently manage your messages, emails, and other notifications without having to constantly rely on your iPhone.
Troubleshooting common notification issues on your Apple Watch
While receiving notifications on your Apple Watch can be convenient, there may be times when you encounter some common issues that prevent notifications from showing up or functioning properly. Before you get frustrated, try these troubleshooting steps to resolve the most common notification issues on your Apple Watch.
1. Make sure your Apple Watch and iPhone are connected: The connection between your Apple Watch and iPhone is vital for notifications to work seamlessly. Ensure that both devices are properly paired and that they are in close proximity to maintain a stable Bluetooth connection.
2. Verify notification settings on your iPhone: Sometimes, the issue might not be with your Apple Watch but with the notification settings on your iPhone. Open the Watch app on your iPhone and navigate to the “Notifications” section to review which apps are allowed to send notifications to your Apple Watch. Ensure that the desired apps are enabled for notifications.
3. Check notification settings on your Apple Watch: On your Apple Watch, go to the Settings app and select “Notifications.” Here, make sure that the “Mirror iPhone” option is enabled if you want notifications to sync with your iPhone’s settings. Alternatively, you can customize notification settings individually for each app.
4. Restart your Apple Watch: A simple restart can often resolve minor software glitches. Press and hold the side button until the “Power Off” slider appears, then drag the slider to turn off your Apple Watch. Wait for a few seconds, and then press and hold the side button again until the Apple logo appears to turn your Apple Watch back on.
5. Update your Apple Watch software: Outdated software can lead to compatibility issues and disrupt the functionality of your Apple Watch notifications. Check for available software updates by going to the Settings app on your Apple Watch, selecting “General,” and then choosing “Software Update.”
6. Reset your Apple Watch: If all else fails, you may need to reset your Apple Watch to its factory settings. Keep in mind that this will erase all data and settings on your Apple Watch, so make sure to back up any important information beforehand. To reset your Apple Watch, go to the Settings app, select “General,” then “Reset,” and choose “Erase All Content and Settings.”
7. Contact Apple Support: If none of the troubleshooting steps mentioned above resolve your notification issues, it may be necessary to reach out to Apple Support for further assistance. They can provide personalized guidance and help resolve any underlying issues specific to your Apple Watch.
By following these troubleshooting steps, you should be able to address most common notification issues on your Apple Watch. Enjoy the convenience of staying informed and connected with your favorite apps and services right on your wrist!
Conclusion
Managing your Apple Watch notifications efficiently is crucial for a seamless and hassle-free user experience. By following the tips and tricks outlined in this article, you can take control of your notifications and tailor them to suit your preferences and needs. Whether it’s customizing the settings, using priority mode, or leveraging the power of third-party apps, you now have the tools to optimize your Apple Watch notifications.
Remember, finding the right balance between staying informed and avoiding unnecessary distractions is key. Take the time to explore and experiment with the different notification options available to you, and don’t hesitate to adjust them as your needs change.
With a well-managed notification setup, you’ll be able to make the most of your Apple Watch and stay connected with ease while keeping interruptions to a minimum. So, go ahead, take charge of your Apple Watch notifications, and embrace a more streamlined and personalized wearable experience.
FAQs
Q: How do I manage notifications on my Apple Watch?
Managing notifications on your Apple Watch is simple. You can customize which apps send you notifications and choose how those notifications are delivered. To get started, open the Apple Watch app on your iPhone and navigate to the “My Watch” tab. From there, scroll down and select “Notifications.” Here, you can customize the notification settings for each individual app installed on your iPhone.
Q: Can I choose which notifications I receive on my Apple Watch?
Absolutely! With Apple Watch, you have full control over which notifications you receive. As mentioned earlier, you can customize the notification settings for each app on your iPhone through the Apple Watch app. Simply toggle on or off the notifications for each app, depending on your preferences. This way, you’ll only receive the notifications that are important to you directly on your wrist.
Q: Can I reply to notifications on my Apple Watch?
Yes, you can reply to notifications on your Apple Watch in a variety of ways. With pre-set replies, you can simply tap on an appropriate response to send it instantly. Additionally, you can use the Scribble feature to write out a reply by drawing letters on the screen. If you have Siri enabled, you can also use voice dictation to compose and send replies. Apple Watch offers convenient and efficient ways to respond to notifications, so you never miss a beat.
Q: Are there any accessibility options for managing notifications on Apple Watch?
Apple Watch is designed with accessibility in mind, and there are several options available to make managing notifications easier for everyone. You can enable features like “Prominent Haptic” which provides a more distinct vibration for notifications, or “Speak Notifications” which reads aloud incoming alerts. These settings can be found in the “Accessibility” section of the Apple Watch app on your iPhone.
Q: Can I mute notifications temporarily on my Apple Watch?
If you need some quiet time or want to prevent notifications from disturbing you, you can mute notifications temporarily on your Apple Watch. To do this, simply swipe down from the top of the watch face to access the Notification Center, then tap the “bell” icon. This will enable “Do Not Disturb” mode, silencing all notifications until you choose to disable it. You can also enable “Theater Mode” which not only mutes notifications but also keeps the screen from lighting up when you raise your wrist.