
Welcome to the future of home automation! If you’ve recently invested in HomeKit-enabled devices, congratulations on taking the first step towards a smarter, more convenient home. With HomeKit, Apple’s smart home platform, you can seamlessly control and monitor various aspects of your home using your iPhone, iPad, or even Siri, Apple’s voice assistant. In this comprehensive guide, we’ll walk you through the process of setting up and using your HomeKit devices to unlock the full potential of your smart home. Whether you want to control your lights, thermostat, security cameras, or other accessories, we’ve got you covered. So, let’s dive in and discover how to transform your humble abode into a cutting-edge smart home with HomeKit devices!
Inside This Article
- Getting Started with HomeKit
- What is HomeKit?
- Compatible Devices with HomeKit
- Requirements for Setting Up a Smart Home with HomeKit
- Setting Up Your HomeKit Devices
- Creating a Home in the Home App
- Adding and Configuring HomeKit Devices
- Organizing and Managing HomeKit Accessories in Rooms and Zones
- Using HomeKit for Smart Home Automation
- Creating Scenes and Automations
- Controlling Your Smart Home Devices with Siri
- Accessing and Controlling Your HomeKit Devices Remotely
- Troubleshooting and Tips for HomeKit Users
- Common Issues and How to Resolve Them
- Maximizing Security and Privacy in Your Smart Home
- Exploring Advanced Features and Integrations with HomeKit
- Conclusion
- FAQs
Getting Started with HomeKit
Welcome to the world of HomeKit, Apple’s smart home platform that allows you to control and automate your home accessories with ease. Whether you’re looking to set up a basic smart home or want to dive into advanced automation, HomeKit offers a reliable and secure ecosystem for your connected devices.
1. What is HomeKit?
HomeKit is a framework developed by Apple that enables smart home automation. It provides a unified platform for various home accessories, allowing you to control them individually or group them together in scenes and automations. With HomeKit, you can use Siri or the Apple Home app on your iPhone, iPad, or Mac to control your devices.
2. Compatible Devices with HomeKit
HomeKit works with a wide range of smart home devices, including lights, thermostats, door locks, cameras, and more. When purchasing smart home accessories, look for the HomeKit logo to ensure compatibility. Many popular brands like Philips Hue, August, and ecobee offer HomeKit-enabled devices.
3. Requirements for Setting Up a Smart Home with HomeKit
To get started with HomeKit, you’ll need a few things:
- An iPhone, iPad, or iPod touch running iOS 9 or later, or a Mac running macOS Mojave or later.
- A compatible Wi-Fi network or a HomePod, Apple TV, or iPad set up as a home hub for remote access and automation.
- HomeKit-enabled devices that support the accessories you want to control.
Once you have these requirements in place, you’re ready to set up your HomeKit devices and start enjoying the benefits of a smart home.
What is HomeKit?
HomeKit is a framework developed by Apple that allows you to automate and control various smart home devices through your iPhone, iPad, or Apple Watch. It brings together different smart devices from different manufacturers under a unified platform, providing a seamless and secure experience.
With HomeKit, you can easily set up, manage, and control your smart home accessories using the Home app on your Apple device. From turning on lights to adjusting the thermostat, unlocking doors to playing music, HomeKit allows you to control these actions with just a few taps or voice commands.
One of the key advantages of HomeKit is its emphasis on privacy and security. Apple has implemented strict guidelines for manufacturers to follow in order to ensure that your smart home data remains private and secure. All communication between your Apple devices and HomeKit-enabled accessories is end-to-end encrypted, giving you peace of mind.
Additionally, HomeKit offers seamless integration with Siri, Apple’s voice assistant. This means you can control your smart home devices by simply asking Siri to perform specific actions. Whether you’re at home or away, you can use your voice to turn on the lights, adjust the temperature, or even lock the doors.
HomeKit is compatible with a wide range of smart home devices, including lighting systems, thermostats, door locks, cameras, and even smart plugs. This extensive compatibility allows you to create a truly interconnected and personalized smart home ecosystem.
Whether you are a tech enthusiast or someone who simply wants to make their life more convenient and efficient, HomeKit offers a user-friendly interface and powerful automation capabilities to enhance your smart home experience.
Compatible Devices with HomeKit
HomeKit is designed to work seamlessly with a wide range of smart home devices, allowing you to control and automate your home with ease. When choosing devices that are compatible with HomeKit, you’ll have plenty of options to enhance your smart home experience. Here are some popular categories of devices that work with HomeKit:
- Smart Lights: Replace your traditional light bulbs with HomeKit-compatible smart lights and enjoy the convenience of controlling them with your voice or mobile device. You can adjust brightness, set up schedules, and even change the color of the lights.
- Smart Thermostats: With a HomeKit-compatible thermostat, you can control and monitor the temperature of your home, create customized schedules, and even use location-based automation to ensure your home is always comfortable when you arrive.
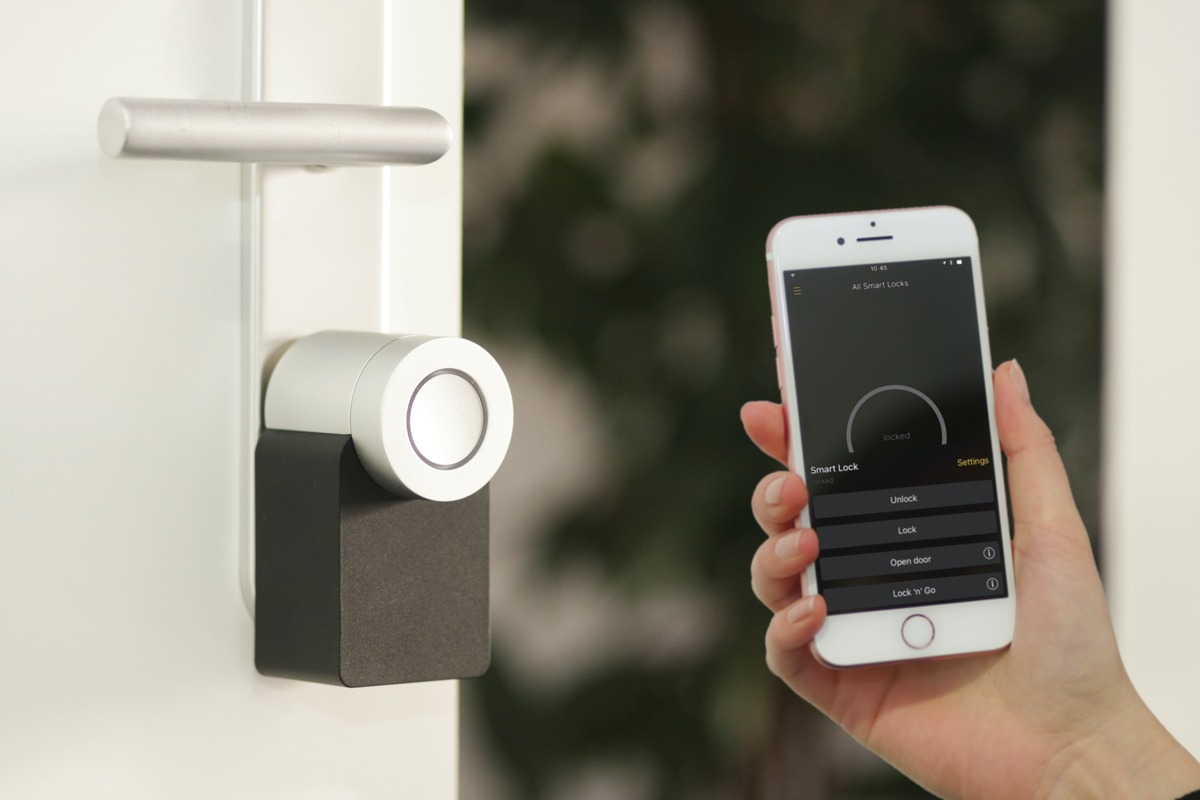
- Smart Locks: Secure your home and grant access to family members or guests with HomeKit-compatible smart locks. You can lock and unlock your doors remotely, receive notifications when someone enters or leaves, and even integrate them with other HomeKit devices for advanced automation.
- Smart Cameras: Keep an eye on your home with HomeKit-compatible smart cameras. These cameras offer features like live streaming, motion detection, and two-way audio, allowing you to monitor your property from anywhere using the Home app or Siri.
- Smart Plugs: Transform ordinary devices into smart devices with HomeKit-compatible smart plugs. Simply plug in your devices, and you’ll be able to control them remotely, set up schedules, and even monitor energy usage.
- Smart Sensors: HomeKit-compatible sensors provide valuable information about your home’s environment. From motion sensors that trigger lights or alarms to door and window sensors that notify you when they are opened or closed, these devices add an extra layer of security and convenience.
These are just a few examples of the compatible devices that can be integrated into your HomeKit setup. Whether you want to automate your lights, secure your home, or create a more energy-efficient environment, there’s a HomeKit-compatible device available for you.
Requirements for Setting Up a Smart Home with HomeKit
Before you can start building your smart home with HomeKit, there are a few essential requirements that you need to consider. By ensuring that you meet these requirements, you’ll be able to seamlessly integrate and control your HomeKit-enabled devices. Here are the three key requirements to get started:
- HomeKit-Compatible Devices: To set up a smart home with HomeKit, you need to ensure that your devices are compatible with the HomeKit platform. Look for the “Works with Apple HomeKit” logo on the packaging or product description to verify compatibility. HomeKit works with a wide range of devices, including smart lights, thermostats, locks, cameras, and more.
- An Apple Device: To control your HomeKit devices, you’ll need an Apple device such as an iPhone, iPad, or iPod touch. These devices act as the central hub for your smart home, allowing you to set up and manage your HomeKit accessories. Make sure your Apple device is running the latest version of iOS or iPadOS.
- A HomeKit-Enabled Hub: While not always required, having a HomeKit-enabled hub provides additional functionality and convenience. The hub acts as a bridge between your HomeKit devices and allows you to control them remotely, set up automations, and access your smart home when you’re away. Apple TV, HomePod, or iPad can serve as a HomeKit hub.
By meeting these requirements, you’ll have everything you need to create a smart home ecosystem with HomeKit. You’ll be able to control your devices using the Home app, Siri voice commands, and even remotely access and manage your home while you’re on the go. Take the time to ensure compatibility and set up your Apple device and HomeKit hub for a seamless smart home experience.
Setting Up Your HomeKit Devices
Setting up your HomeKit devices is an exciting step towards building your smart home ecosystem. With HomeKit, you can control and automate various aspects of your home, including lights, thermostats, door locks, and more, all from your iPhone, iPad, or even the HomePod. Follow these steps to set up your HomeKit devices and get started with a seamlessly integrated smart home experience.
1. Check for Compatibility: Before purchasing any smart devices, it’s crucial to ensure they are compatible with HomeKit. Look for the “Works with Apple HomeKit” label or consult the manufacturer’s specifications to confirm compatibility. This will guarantee that your devices can seamlessly connect to the Home app and be controlled through Siri or automations.
2. Prepare Your Devices: Before starting the setup process, make sure to follow the manufacturer’s instructions for each device. This may include installing batteries, connecting power cables, or configuring device-specific settings. Having your devices ready will ensure a smooth and hassle-free setup experience.
3. Launch the Home App: Open the Home app on your iPhone, iPad, or iPod touch. This pre-installed app serves as the control center for all your HomeKit devices. If it’s your first time using the app, you’ll be guided through a brief introduction to its features and capabilities.
4. Add Your Devices: Tap the “+” symbol in the top-right corner of the Home app to add a new accessory. The app will prompt you to scan the device’s QR code or manually enter the provided setup code. Follow the on-screen instructions to connect each device to your HomeKit network.
5. Configure Device Settings: Once your devices are successfully added, you can customize their names, assign them to specific rooms, and even group them into zones for easier management. The Home app provides intuitive controls to help you organize and categorize your devices effectively.
6. Test Device Functionality: Before moving on to more advanced features, ensure that each device is working correctly. Test the functionality of lights, locks, or any other controllable feature to verify that they respond as expected when commanded through the Home app or Siri.
7. Explore Automation Options: HomeKit allows you to create scenes and automations to simplify your daily routines. For example, you can create a “Good Morning” scene that opens the blinds, adjusts the thermostat, and turns on the coffee maker with a single tap. Dive into the Home app’s automation section to explore the possibilities and set up personalized workflows.
8. Connect with Siri: One of the key advantages of HomeKit is its integration with Siri. You can control your HomeKit devices using voice commands, such as “Hey Siri, turn off the living room lights” or “Hey Siri, lock the front door.” Ensure that Siri is enabled on your device and start controlling your smart home with ease.
9. Access Remotely: With HomeKit, you can securely access and control your smart home devices even when you’re away. Make sure you have a HomePod, Apple TV, or iPad set up as a home hub to enable remote access. Then, use the Home app or Siri to manage your devices from anywhere in the world.
By following these steps, you’ll have your HomeKit devices up and running in no time. Enjoy the convenience, comfort, and enhanced functionality that a smart home brings, all while having complete control at your fingertips.
Creating a Home in the Home App
Creating a home in the Home app is the first step in setting up and managing your smart home with HomeKit devices. The Home app is a centralized platform that allows you to control and automate your compatible smart home devices from one place.
To create a home in the Home app, follow these simple steps:
- Open the Home app on your iPhone or iPad. If you don’t have it installed, you can download it from the App Store.
- Tap on the “+” icon at the top-right corner of the screen.
- Choose “Add Home” from the list of options.
- Enter a name for your home. This could be something like “My Home” or “Family Home.” The name should be descriptive and easy to remember.
- Tap “Done” to create your home.
Once you’ve created your home, you can begin adding and configuring your HomeKit devices to customize your smart home experience.
It’s important to note that you can create multiple homes in the Home app if you have different locations with separate sets of HomeKit devices. For example, you may have a primary home and a vacation home, each with its own collection of smart devices.
Creating a home in the Home app not only gives you a user-friendly interface to control your smart devices but also enables advanced features such as automations and scenes. With a few taps, you can effortlessly transform your home into a smart, connected space that meets your specific needs and preferences.
Adding and Configuring HomeKit Devices
Once you have created a home in the Home app, the next step is to add and configure your HomeKit devices. Here’s how you can do it:
1. Start by identifying the HomeKit-compatible devices you want to add to your smart home. These may include smart lights, thermostats, door locks, cameras, and more. Make sure the devices you choose are labeled as “Works with Apple HomeKit”.
2. Open the Home app on your iPhone or iPad, and tap on the “+” button in the top-right corner of the screen. This will bring up the “Add Accessory” screen.
3. Follow the manufacturer’s instructions for each device to put them in pairing mode. This usually involves pressing a button or scanning a QR code on the device. Once the device is in pairing mode, it will appear on the “Add Accessory” screen in the Home app.
4. Tap on the device that you want to add, and the Home app will guide you through the setup process. This may include connecting the device to your Wi-Fi network and assigning it a name and room location.
5. If prompted, enter any passcodes or security information required by the device. This step is important to ensure that only authorized users can control your HomeKit devices.
6. Once the device is successfully added, you can customize its settings within the Home app. This may include adjusting brightness and color settings for smart lights, setting temperature thresholds for thermostats, or creating motion detection zones for cameras.
7. Repeat this process for each HomeKit device you want to add to your smart home. As you add more devices, you can organize them into rooms and zones within the Home app to make it easier to control and manage them.
8. Remember to test each device to ensure it functions correctly and responds to commands from the Home app or Siri. If you encounter any issues, refer to the troubleshooting section below for assistance.
By adding and configuring your HomeKit devices, you are one step closer to enjoying the convenience and automation of a smart home. Take your time to set up each device properly and explore the various customization options available to personalize your smart home experience.
Organizing and Managing HomeKit Accessories in Rooms and Zones
Once you have set up your HomeKit devices, it’s time to organize and manage them effectively in rooms and zones. This allows you to have better control and quick access to specific accessories based on their location within your home.
Creating rooms in the Home app is the first step in organizing your HomeKit accessories. A room can represent a physical space in your home, such as the living room, bedroom, kitchen, or even external areas like the backyard or garage. To create a room, open the Home app, tap on the “+” symbol, and select “Room”. Give the room a name and assign it to a specific zone, if desired.
After creating rooms, it’s time to assign accessories to each room. To do this, tap on the accessory icon and select “Details”. Under the “Location” section, you will find the option to assign the accessory to a specific room. Select the appropriate room from the list and tap “Done”. Repeat this process for each accessory you want to assign to a room.
Organizing accessories in rooms provides convenience as you can easily control all the devices in a specific room with a single tap. For example, if you have assigned your smart lights, thermostat, and TV to the living room, you can use the Home app to turn them on/off or adjust settings collectively without having to control each device individually.
In addition to organizing accessories in rooms, you can further optimize your smart home by creating zones. A zone is a collection of rooms that share common characteristics or are located in close proximity to each other. For instance, you can create a zone called “Upstairs” and include bedrooms and bathrooms on the second floor of your house.
To create a zone, open the Home app and tap on the “Rooms” tab. Scroll to the bottom and select “Room Settings”. Tap on “Zones” and then “Add Zone”. Give the zone a name and select the rooms that you want to include in the zone. Tap “Done” to save the changes.
Once you have created zones, you can control multiple rooms within a zone simultaneously. For example, if you have created a zone called “Outdoor” and included the backyard and garage, you can control all the accessories in those areas with a single tap. This makes it more convenient to manage your outdoor devices or set up automated actions for a specific zone.
Organizing and managing HomeKit accessories in rooms and zones provides a streamlined approach to controlling your smart home. It not only simplifies the management of devices but also enhances the overall smart home experience by enabling convenient access and control based on the specific location within your home.
Using HomeKit for Smart Home Automation
HomeKit, Apple’s smart home platform, offers users a seamless and convenient way to automate various aspects of their homes. From controlling lights and thermostats to managing door locks and security cameras, HomeKit allows you to create customized scenes and automations to enhance your home’s functionality. In this section, we will explore the key features and benefits of using HomeKit for smart home automation.
1. Creating Scenes and Automations
With HomeKit, you can easily create scenes to control multiple devices with a single command. For example, you can create a “Goodnight” scene that turns off all the lights, locks the doors, and adjusts the thermostat to a comfortable sleeping temperature. Simply use the Home app or Siri to activate the scene, and your home will transform with just a few taps or voice commands.
In addition to scenes, HomeKit allows you to set up automations. Automations are triggered based on certain conditions or events, such as time of day, location, or the status of other devices. For instance, you can set up an automation that turns on the lights when you arrive home, or adjusts the temperature when the outdoor temperature drops below a certain threshold.
2. Controlling Your Smart Home Devices with Siri
One of the most convenient features of HomeKit is its integration with Siri, Apple’s virtual assistant. With Siri, you can control your smart home devices using voice commands. Simply activate Siri on your iPhone, iPad, Apple Watch, or HomePod, and give it a command like “Hey Siri, turn off the living room lights.” Siri will instantly communicate with HomeKit and execute the requested action, saving you time and effort.
Siri can also be used to activate scenes and automations. You can simply say, “Hey Siri, good morning,” and Siri will execute the corresponding scene, adjusting your home to your preferred morning settings. This hands-free control adds an extra layer of convenience and simplicity to your smart home experience.
3. Accessing and Controlling Your HomeKit Devices Remotely
Another great advantage of HomeKit is its remote access functionality. With an Apple TV, HomePod, or iPad set up as a home hub, you can control your HomeKit devices even when you’re away from home. Whether you’re at the office, on vacation, or running errands, you can use the Home app on your iPhone or iPad to check the status of your devices and make adjustments as needed.
Remote access also allows you to take advantage of location-based automations. For example, you can set up an automation that turns on the porch lights when you’re approaching home, ensuring a well-lit entryway. With HomeKit, you have the flexibility to manage your smart home from anywhere, giving you peace of mind and control over your home’s settings.
Using HomeKit for smart home automation opens up a world of possibilities for creating a truly connected and intelligent home. Whether it’s setting up scenes and automations, controlling devices with Siri, or accessing your home remotely, HomeKit empowers you to personalize and enhance your home’s functionality with ease and convenience.
Creating Scenes and Automations
With HomeKit, you have the power to create customized scenes and automations that can make your smart home even smarter. Scenes allow you to control multiple HomeKit devices with just a single command or tap, while automations enable your devices to work together based on certain triggers and conditions.
To create a scene, start by opening the Home app on your iOS device. Tap on the “+” icon to add a new automation, and then select “Create a Scene.” Give your scene a name that reflects its purpose, such as “Movie Night” or “Bedtime.”
Next, choose the devices you want to include in your scene. This can be as simple as turning on the lights and adjusting the thermostat, or more complex with actions like closing the blinds, playing your favorite playlist, and adjusting the mood lighting.
Once you’ve selected the devices, you can customize their settings for the scene. For example, you can choose the brightness level of your lights, the temperature of your thermostat, and the volume of your speakers. These settings will be applied every time you activate the scene.
After customizing the device settings, you can add your scene to the Home app’s main screen for easy access. This allows you to quickly activate the scene with just a tap, without having to navigate through the app.
Automations take the capabilities of scenes to the next level by allowing your smart devices to react automatically to specific triggers or conditions. For example, you can set up an automation to turn on the lights in your living room when you arrive home after sunset or to lock the doors and turn off all devices when you leave the house.
To create an automation, open the Home app and tap on the “+” icon again. From there, choose “Create an Automation.” You can select the desired trigger for your automation, such as time of day, location, or a specific event happening on one of your devices.
Once you’ve chosen your trigger, you can set the conditions for the automation. For instance, you can specify that the automation should only run if you are at home, or if a certain device is in a particular state.
Finally, you need to select the actions that will be performed when the automation is triggered. This could include turning on lights, adjusting the temperature, playing a specific music playlist, or even sending notifications to your iPhone.
With scenes and automations, you can simplify your daily routines and make your smart home work for you. Whether it’s setting the perfect ambiance for a movie night or having your home automatically respond to your arrival, HomeKit gives you the power to create the ultimate personalized smart home experience.
Controlling Your Smart Home Devices with Siri
Siri, Apple’s voice-controlled assistant, allows you to control your smart home devices with just a few simple commands. It’s a convenient and hands-free way to manage your smart home ecosystem, whether you’re at home or away.
Here are some tips on how to control your smart home devices using Siri:
1. Activate Siri
To get started, activate Siri either by saying “Hey Siri” followed by your command or by pressing and holding the side button on your iPhone or iPad. You can also use Siri on your Mac or Apple Watch by clicking the Siri icon or raising your wrist respectively.
2. Control Individual Devices
Once Siri is active, you can control individual smart home devices by specifying their names. For example, you can say “Hey Siri, turn off the living room lights” or “Hey Siri, set the thermostat to 72 degrees.”
3. Set Scenes
Siri allows you to set up scenes that trigger multiple actions at once. For example, you can create a scene named “Goodnight” that turns off all the lights, locks the doors, and adjusts the thermostat to a comfortable sleep setting. Then, simply say “Hey Siri, activate the Goodnight scene” to execute all those actions simultaneously.
4. Create Custom Voice Commands
You can create custom voice commands with Siri to make controlling your smart home even more personalized. For instance, you can set up a command like “Hey Siri, I’m home” to turn on the lights, play your favorite playlist, and adjust the temperature as soon as you walk through the door.
5. Control Groups of Devices
If you have multiple devices in a room or zone, you can control them all at once by assigning them to a group. For example, you can create a group called “Living Room” and say “Hey Siri, turn off the Living Room” instead of specifying each device individually.
6. Use Siri Shortcuts
Siri Shortcuts allow you to create personalized automation workflows that are triggered by a specific phrase or time. This feature takes Siri’s capabilities to the next level, allowing you to execute complex routines with a single command. For example, you can create a shortcut named “Movie Night” that dims the lights, closes the blinds, and starts playing your favorite movie on your TV, all by saying “Hey Siri, Movie Night.”
Controlling your smart home devices with Siri adds convenience, simplicity, and a touch of magic to your daily routines. With just your voice, you can transform your living space into a fully automated and responsive environment.
Accessing and Controlling Your HomeKit Devices Remotely
One of the great benefits of using HomeKit devices is the ability to access and control your smart home remotely. Whether you’re at work, on vacation, or simply away from home, you can still manage your devices using the Home app on your iPhone, iPad, or even your Apple Watch.
To remotely access your HomeKit devices, you need to make sure that you have a reliable internet connection and that your HomeKit hub is set up. The HomeKit hub can be an Apple TV, HomePod, or iPad, and it acts as a bridge between your devices and the cloud. It allows you to communicate with your smart home even when you’re not on the same Wi-Fi network.
Once your HomeKit hub is set up, follow these steps to access and control your devices remotely:
- Ensure that you have the latest version of the Home app installed on your iOS or iPadOS device.
- Open the Home app and ensure that you’re signed in with the same Apple ID used to set up your HomeKit devices.
- If necessary, tap on the “Rooms” tab at the bottom of the screen to view all your devices organized by rooms.
- To control a specific device, simply tap on it. You’ll be able to adjust settings, turn it on or off, or perform any actions associated with that device.
- If you want to control multiple devices or create scenes, tap on the “Automation” tab at the bottom of the screen. Here, you can create customized automations to control your devices based on specific triggers or time settings.
Another convenient way to control your HomeKit devices remotely is through Siri. With Siri integration, you can simply use voice commands to control your smart home. Whether you’re using your iPhone, iPad, Apple Watch, or even a HomePod, just say, “Hey Siri,” followed by your command.
For example, you can say, “Hey Siri, turn off the living room lights,” or “Hey Siri, set the thermostat to 72 degrees.” Siri will understand your command and perform the action accordingly, even when you’re not at home.
It’s important to note that remote access and control of your HomeKit devices rely on a secure connection. Apple implements strong encryption to protect your data and ensures that your devices are securely linked to your Apple ID. This ensures that only authorized users can access and control your smart home.
So, whether you’re coming home late and want to turn on the lights before you arrive or you want to make sure your home is secure while you’re away, using HomeKit to remotely access and control your devices brings convenience and peace of mind.
Troubleshooting and Tips for HomeKit Users
Setting up and using HomeKit devices can be an exciting way to enhance your smart home experience. However, like any technology, there may be occasional hiccups or challenges that arise. In this section, we will explore some common troubleshooting tips and offer helpful advice to ensure a smooth HomeKit experience.
1. Common Issues and How to Resolve Them:
One common issue that HomeKit users may encounter is devices not responding or disconnecting from the network. If you find that a device is unresponsive, try the following steps:
- Check if the device is properly connected to power
- Ensure that the device is within range of your Wi-Fi router
- Restart your device by unplugging it and plugging it back in
- Restart your router
- Reset the device and re-add it to your HomeKit configuration
Another potential issue is incompatible or outdated firmware. It is important to regularly check for firmware updates for your HomeKit devices and ensure that they are up to date. Manufacturers often release firmware updates to address bugs, improve performance, and ensure compatibility with newer versions of the HomeKit protocol.
2. Maximizing Security and Privacy in Your Smart Home:
When it comes to smart home devices, security and privacy are of utmost importance. Here are some tips to maximize security and protect your privacy when using HomeKit:
- Use strong, unique passwords for your HomeKit accessories and your Apple ID
- Enable two-factor authentication for your Apple ID
- Regularly update your Apple devices and HomeKit accessories with the latest security patches
- Consider using a separate network dedicated to your smart home devices for added security
- Be cautious when granting permissions to third-party apps and devices
3. Exploring Advanced Features and Integrations with HomeKit:
While HomeKit offers a seamless way to control your smart home devices, there are also some advanced features and integrations that you can explore:
- Use the Home app to create complex scenes and automations
- Integrate HomeKit with other smart home platforms, such as Amazon Alexa or Google Assistant
- Utilize the Home app on multiple Apple devices for convenient access and control
- Consider adding smart home accessories that support additional functionalities, such as cameras, door locks, or thermostats
By following these troubleshooting tips and implementing the suggested best practices, you can ensure a seamless and secure HomeKit experience. Whether you’re new to HomeKit or a seasoned user, taking the time to troubleshoot and maximize your smart home setup will enhance your overall satisfaction and enjoyment.
Common Issues and How to Resolve Them
Setting up a smart home with HomeKit devices can sometimes come with its fair share of challenges. Here are some common issues that users may encounter and how to resolve them:
1. Connectivity Problems: One of the most common issues is experiencing connectivity problems between your HomeKit devices and your home Wi-Fi network. If you’re having trouble connecting or controlling your devices, try the following steps:
- Check your Wi-Fi signal strength: Make sure your router is properly positioned and not blocked by any obstructions.
- Restart your devices: Power cycle your HomeKit devices and the router to refresh the connections.
- Update firmware: Check if there are any firmware updates available for your devices and install them.
- Reset devices: If all else fails, you can try resetting your devices and adding them back to your HomeKit setup from scratch.
2. Device Unresponsive: Sometimes, you may notice that one or more of your HomeKit devices become unresponsive. Here’s what you can do to fix it:
- Check power and batteries: Ensure that the device is properly powered and the batteries, if applicable, are charged or replaced.
- Reset the device: Follow the manufacturer’s instructions to perform a device reset, which will often restore its functionality.
- Ensure compatible network bands: Some devices may require specific network bands (e.g., 2.4 GHz) for proper functioning. Verify if your Wi-Fi network supports the required band.
3. Siri Commands Not Working: If you’re having trouble controlling your HomeKit devices using Siri, try the following steps:
- Check device compatibility: Ensure that the device you’re trying to control is compatible with Siri and HomeKit.
- Verify Siri settings: Go to your device’s settings and ensure that Siri is enabled for HomeKit control.
- Calibrate voice recognition: Train Siri to recognize your voice properly by following the on-screen instructions.
4. HomeKit Home Missing: Sometimes, you may find that your HomeKit home is missing from the Home app. Here’s what you can do to resolve this:
- Check iCloud account: Ensure that you’re signed in with the correct iCloud account associated with your HomeKit setup.
- Restart devices: Power cycle your devices and the iOS device on which you’re accessing the Home app.
- Reset HomeKit setup: If the issue persists, you can try resetting your HomeKit setup and adding your devices and accessories again.
5. Devices Not Responding to Automations: If your HomeKit devices are not responding to automations, try these troubleshooting steps:
- Check device status: Make sure the devices you’re trying to automate are in the “reachable” state in the Home app.
- Verify automation settings: Double-check your automation settings and make sure they’re correctly configured.
- Restart hub and devices: Restart your HomeKit hub (Apple TV, HomePod, or iPad) and your devices to refresh the connections.
By following these troubleshooting tips, you can overcome common issues and enjoy a smooth and seamless experience with your HomeKit-enabled smart home.
Maximizing Security and Privacy in Your Smart Home
When it comes to setting up a smart home, security and privacy are two crucial aspects that should never be overlooked. By following a few simple steps, you can ensure that your smart home is secure and your personal information remains private. Here are some tips to help you maximize the security and privacy of your smart home:
1. Secure Your Wi-Fi Network:
Start by securing your Wi-Fi network with a strong and unique password. This will prevent unauthorized access to your smart home devices and keep your data safe from potential hackers.
2. Keep Firmware and Software Updated:
Regularly check for firmware and software updates for all your home automation devices. Manufacturers often release these updates to fix security vulnerabilities and improve device performance. Stay on top of updates to keep your smart home secure.
3. Use Two-Factor Authentication:
Enable two-factor authentication whenever possible. This provides an extra layer of security by requiring an additional verification step, such as a unique code sent to your mobile device, in addition to your password.
4. Disable Unnecessary Features:
Review the features of your smart home devices and disable any that you don’t use or need. Unnecessary features can sometimes introduce security risks, so it’s best to disable them to minimize vulnerabilities.
5. Secure Your Voice Assistant:
If you use a voice assistant like Siri or Amazon Alexa to control your smart home devices, make sure to secure it with a strong password. This will prevent unauthorized access to your voice assistant and the connected devices in your home.
6. Set Up Guest Networks:
Consider setting up a separate guest network for visitors to your home. This will prevent them from accessing your main network, keeping your smart home devices and personal information isolated from potential threats.
7. Review Privacy Policies and Data Handling:
Before purchasing any smart home devices, take the time to review the privacy policies and data handling practices of the manufacturer. Ensure that they respect your privacy and have strong security measures in place.
8. Disable Remote Access When Not in Use:
If you don’t regularly need to access your smart home devices remotely, consider disabling remote access. This reduces the chances of unauthorized access to your devices and helps protect your privacy.
9. Regularly Monitor and Update Passwords:
Periodically change the passwords for your smart home devices and associated accounts. Choose strong and unique passwords and avoid reusing passwords across different platforms.
10. Invest in a Secure Network Router:
Consider investing in a secure network router that offers advanced security features, such as built-in firewalls and intrusion detection. A secure router can add an extra layer of protection to your smart home network.
By following these tips, you can maximize the security and privacy of your smart home. Remember to stay vigilant and regularly review and update your security measures to ensure a safe and protected smart home environment.
Exploring Advanced Features and Integrations with HomeKit
Once you’ve set up your smart home with HomeKit devices, you can dive into exploring the advanced features and integrations that HomeKit has to offer. From creating custom automations to integrating with other smart home platforms, HomeKit empowers you to personalize and enhance your smart home experience.
Here are some of the key advanced features and integrations you can explore with HomeKit:
- Create Custom Automation: HomeKit allows you to create custom automations based on specific triggers and conditions. For example, you can set up an automation to turn on the lights and adjust the thermostat when you arrive home. You can also create time-based automations or automate actions based on the status of other devices in your home.
- Integrate with Siri Shortcuts: With Siri Shortcuts, you can create personalized voice commands to control your HomeKit devices. For instance, you can set up a shortcut to dim the lights, lock the doors, and play your favorite music by simply saying a specific phrase to Siri.
- Extend Control with Apple TV or HomePod: If you have an Apple TV or HomePod, you can use them as a hub to remotely control your HomeKit devices when you’re away from home. This allows you to access and manage your smart home even if you’re not on the same Wi-Fi network.
- Integrate with Other Smart Home Platforms: HomeKit offers seamless integration with other smart home platforms like Philips Hue, August, and Ecobee. This allows you to control and manage devices from different brands within the Home app, providing a unified and streamlined smart home experience.
- Explore Advanced Automations with HomeKit-enabled Accessories: Some HomeKit-enabled accessories, such as motion sensors, door/window sensors, and cameras, offer more advanced automation options. You can set up automations to receive notifications when motion is detected, automatically lock the doors when you leave, or even trigger specific actions based on different scenarios in your home.
- Participate in the HomeKit Ecosystem: Apple’s HomeKit ecosystem continues to grow, with an ever-expanding range of compatible devices and accessories. By exploring the ecosystem, you can discover new devices that fit your needs and expand the capabilities of your smart home.
With these advanced features and integrations, HomeKit provides a powerful platform for creating a personalized and seamless smart home experience. Take the time to explore and experiment with the possibilities to truly make your home smarter and more efficient.
Conclusion
Setting up and using your smart home with HomeKit devices has never been easier. With the ability to control your lights, thermostats, door locks, and more right from your phone, you can enjoy the convenience and comfort of a fully connected home.
By following the steps outlined in this guide, you can seamlessly integrate your HomeKit-compatible devices into your smart home ecosystem. From setting up your home hub to adding and controlling devices, you now have the knowledge and tools to transform your living space into a cutting-edge, automated haven.
With HomeKit’s advanced security features, you can also have peace of mind knowing that your home is protected. Whether you’re at work, on vacation, or simply lounging on the couch, you can monitor and control your smart home devices with ease, right from your iPhone or iPad.
So, take the leap into the world of smart home technology and experience the convenience, efficiency, and comfort it brings. Start with a few HomeKit devices, expand your collection gradually, and discover the limitless possibilities of a fully connected home.
FAQs
1. What is HomeKit?
HomeKit is a framework developed by Apple that allows users to control smart home devices using their Apple devices. It provides a unified platform for managing various smart home products, ensuring seamless communication and integration between them.
2. Which devices are compatible with HomeKit?
HomeKit is compatible with a wide range of smart home devices, including thermostats, locks, cameras, lights, sensors, and more. Many popular brands like Philips, August, Schlage, and Honeywell have HomeKit-enabled devices available.
3. How do I set up HomeKit?
To set up HomeKit, you need to ensure you have a compatible iOS device (iPhone, iPad, or iPod touch) running on iOS 10 or later. Then, follow these steps:
– Open the Home app on your device.
– Tap the “+” icon to add a new accessory.
– Follow the on-screen instructions to set up the accessory.
– You may need to enter a unique setup code provided with the device.
– Once the device is added, you can assign it to a room and customize its settings.
4. How do I control HomeKit devices?
Controlling HomeKit devices is easy with the Home app or Siri. With the app, you can create scenes to automate multiple devices, control individual devices, and monitor their status. Siri integration allows you to control your devices with voice commands, providing added convenience.
5. Can I control my HomeKit devices when away from home?
Yes, you can control your HomeKit devices remotely when you are away from home. To enable remote access, make sure you have a HomePod, Apple TV, or iPad serving as a Home Hub. This way, you can securely access and control your devices using your iPhone or iPad remotely through iCloud.