
Welcome to our comprehensive guide on how to set up the J5Create docking station! Whether you’re a tech-savvy individual or just getting started with your first docking station, we’ve got you covered. The J5Create docking station is a versatile accessory that allows you to expand the capabilities of your laptop or desktop computer. With its multiple ports and convenient connectivity options, it’s the perfect solution for streamlining your workflow and maximizing productivity. In this article, we will walk you through the step-by-step process of setting up your J5Create docking station, from unpacking it to connecting all your devices. So, let’s dive in and get started on harnessing the full potential of your J5Create docking station!
Inside This Article
- Overview
- Compatibility of J5Create Docking Station
- Connecting J5Create Docking Station to your computer
- Configuring settings and setup process of J5Create Docking Station.
- Conclusion
- FAQs
Overview
The J5Create Docking Station is a powerful accessory that allows you to expand your laptop’s functionality and productivity. With its wide range of connectivity options, you can easily connect multiple external displays, peripherals, and audio devices to create a versatile workstation setup. Whether you’re working from home, in the office, or on the go, setting up the J5Create Docking Station is a straightforward process that will enhance your overall computing experience.
By following the step-by-step instructions in this guide, you’ll learn how to connect the docking station to your laptop, configure audio settings, and seamlessly connect external displays and peripherals. Whether you’re a tech-savvy professional or a casual user, this guide will help you make the most out of your J5Create Docking Station.
So, let’s dive in and explore how to set up your J5Create Docking Station for an enhanced computing experience.
Compatibility of J5Create Docking Station
The J5Create Docking Station is a versatile accessory that provides seamless connectivity and convenience to users. One of the key considerations before purchasing a docking station is its compatibility with your devices. In this section, we will discuss the compatibility of the J5Create Docking Station and the devices it can be used with.
The J5Create Docking Station is designed to work with a wide range of devices, including laptops, ultrabooks, and tablets. It supports both Windows and Mac operating systems, making it compatible with a majority of computers in the market.
When it comes to laptop compatibility, the J5Create Docking Station is compatible with models from popular brands such as Dell, HP, Lenovo, Acer, and ASUS. Whether you have a Windows-based laptop or a MacBook, the J5Create Docking Station can be easily integrated into your setup.
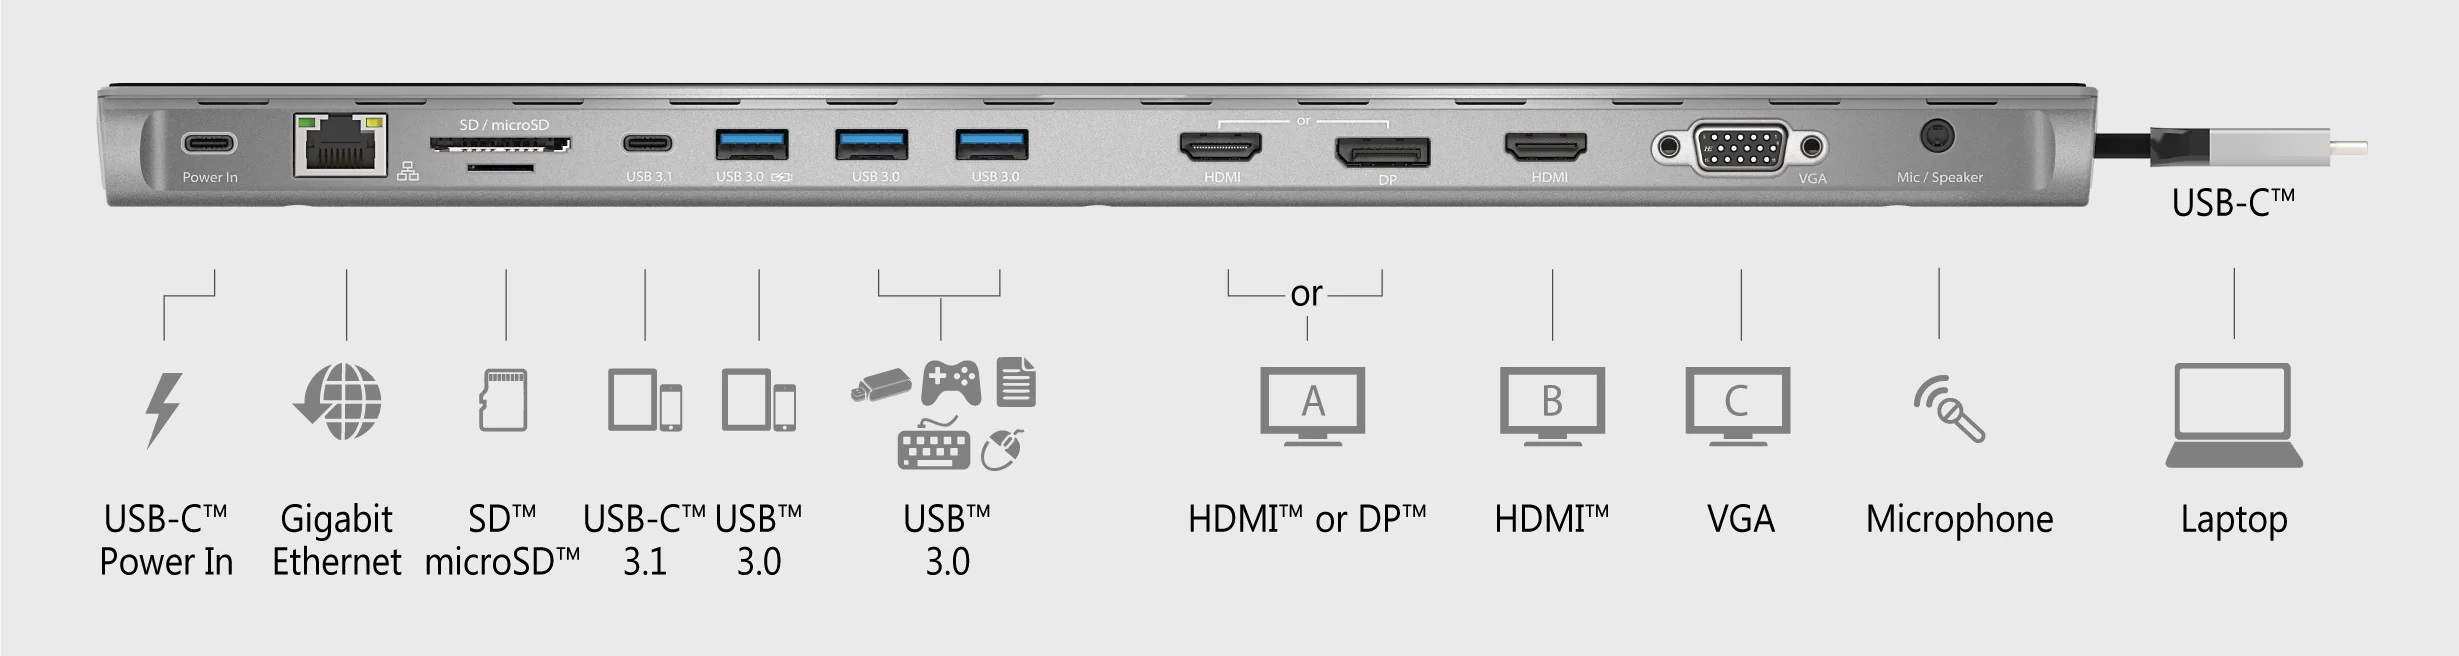
In terms of connectivity options, the J5Create Docking Station offers a variety of ports to connect your devices. It features USB 3.0 ports for fast data transfer, HDMI and DisplayPort outputs for connecting external monitors, an Ethernet port for wired internet connection, and audio jacks for connecting speakers or headphones.
Additionally, the J5Create Docking Station supports dual-monitor setups, allowing you to expand your workspace and increase productivity. You can connect two external displays to the docking station and enjoy a multi-monitor setup without the hassle of connecting and disconnecting cables.
Furthermore, the J5Create Docking Station offers compatibility with USB Type-C devices, ensuring that it can seamlessly integrate with the latest laptops and tablets equipped with this technology.
It is worth noting that while the J5Create Docking Station offers broad compatibility, it is always recommended to check the specific model and specifications of your device to ensure compatibility.
Connecting J5Create Docking Station to your computer
Setting up your J5Create Docking Station is a simple process that will greatly enhance your productivity and convenience. Follow these steps to connect the docking station to your computer:
1. Begin by ensuring that your computer is turned off.
2. Locate the USB-C or Thunderbolt port on your computer. This is typically found on the side or back of your laptop.
3. Take the USB-C cable that came with your J5Create Docking Station and insert one end into the USB-C or Thunderbolt port on your computer.
4. Connect the other end of the USB-C cable to the USB-C port on the J5Create Docking Station.
5. Once the cable is securely connected, turn on your computer.
6. Your computer should automatically recognize the J5Create Docking Station and install any necessary drivers. If prompted, follow the on-screen instructions to complete the installation.
7. Once the J5Create Docking Station is successfully connected to your computer, you can begin enjoying the benefits of enhanced connectivity and expanded functionality.
Note: Some docking stations may require additional power sources, such as an AC adapter. If this is the case for your J5Create Docking Station, be sure to connect and power on the AC adapter before turning on your computer.
Configuring settings and setup process of J5Create Docking Station.
Once you have successfully connected and set up your J5Create Docking Station to your laptop, it’s time to configure the settings to ensure optimal performance. In this section, we will guide you through the process of configuring various settings and making the most out of your docking station.
1. Display Settings:
One of the key features of the J5Create Docking Station is the ability to connect multiple external displays. To configure the display settings, follow these steps:
- Click on the “Start” menu and open the “Settings” app.
- Go to the “System” section and select “Display”.
- Under the “Multiple Displays” section, choose the desired display mode, such as “Extend” to extend your laptop screen or “Duplicate” to mirror the laptop screen.
- Click “Apply” and then “Keep Changes” to save the settings.
2. Audio Settings:
The J5Create Docking Station also supports audio output, allowing you to connect speakers or headphones. To configure the audio settings, follow these steps:
- Right-click on the speaker icon in the taskbar and select “Sounds”.
- Go to the “Playback” tab and choose the “J5Create Docking Station” as the default playback device.
- Click “Apply” and then “OK” to save the settings.
3. Network Settings:
If your J5Create Docking Station has an Ethernet port, you can easily connect to a wired network. To configure the network settings, follow these steps:
- Click on the “Start” menu and open the “Settings” app.
- Go to the “Network & Internet” section and select “Ethernet”.
- Under the “Ethernet” section, click on “Change adapter options”.
- Right-click on the Ethernet connection corresponding to the J5Create Docking Station and select “Properties”.
- In the “Properties” window, select “Internet Protocol Version 4 (TCP/IPv4)” and click on the “Properties” button.
- Choose the “Obtain an IP address automatically” option and click “OK” to save the settings.
4. USB Hub Settings:
The J5Create Docking Station usually comes with multiple USB ports, allowing you to connect peripherals such as a keyboard, mouse, or external hard drive. To configure the USB hub settings, follow these steps:
- Connect the desired peripherals to the USB ports on the docking station.
- Windows will automatically install the necessary drivers for the connected devices.
- You can check the status of connected devices by going to the “Device Manager” and expanding the “Universal Serial Bus controllers” section.
By following these steps, you can easily configure the settings of your J5Create Docking Station and make the most out of its features. Whether it’s adjusting the display settings, configuring audio output, connecting to a wired network, or using the USB hub, the J5Create Docking Station offers convenience and versatility to enhance your productivity.
Conclusion
Setting up a J5Create Docking Station is a straightforward process that offers a range of benefits. It provides a convenient solution for connecting multiple devices to your computer or laptop, creating a more productive and efficient work environment. Whether you need to expand your monitor setup, connect additional peripherals, or charge your devices, the J5Create Docking Station has got you covered.
With its easy-to-use design and compatibility with various devices, this docking station is an excellent addition to any tech setup. By following the step-by-step instructions provided in this article, you can quickly get your J5Create Docking Station up and running, enjoying seamless connectivity and enhanced functionality.
So, why wait? Simplify your work setup and improve your productivity by setting up a J5Create Docking Station today.
FAQs
1. How do I set up the J5Create Docking Station?
Setting up the J5Create Docking Station is a simple process. First, make sure your laptop or computer is powered off. Then, connect the docking station to your laptop or computer using the provided USB-C or USB-A cable. Once connected, power on your laptop or computer and wait for the operating system to recognize the docking station. You may need to install additional drivers or software that are included with the docking station. Follow the on-screen prompts to complete the setup process.
2. What devices are compatible with the J5Create Docking Station?
The J5Create Docking Station is compatible with a wide range of devices. It is designed to work with both Windows and Mac operating systems, making it versatile for use with different laptops and computers. It offers multiple USB-C and USB-A ports, allowing you to connect devices such as external monitors, keyboards, mice, printers, USB drives, and more.
3. Can I connect multiple monitors to the J5Create Docking Station?
Yes, the J5Create Docking Station supports multiple monitors. Depending on the model, it can support up to two or three external monitors simultaneously. Simply connect your monitors to the available video output ports on the docking station, such as HDMI, DisplayPort, or VGA, and configure the display settings on your computer accordingly. With multiple monitors, you can enjoy a more productive and immersive working or gaming experience.
4. Does the J5Create Docking Station provide charging capabilities?
Yes, select models of the J5Create Docking Station offer charging capabilities. These models provide Power Delivery (PD) or USB Power Delivery (USB-PD) support, allowing you to power and charge your laptop or other compatible devices through the docking station. Make sure to check the specifications of the specific docking station model to confirm its charging capabilities.
5. Are there any additional features or benefits of the J5Create Docking Station?
Yes, besides providing seamless connectivity and convenience, the J5Create Docking Station may offer additional features such as Ethernet ports for wired internet connectivity, audio ports for connecting headphones or speakers, and SD card readers for data transfer. These extras make the docking station a versatile accessory that enhances your overall computing experience.