
Are you looking to make accurate measurements using your iPhone? Look no further than the Measure app! This handy tool allows you to easily measure objects and distances using augmented reality. One of the key features of the Measure app is the level. With this feature, you can ensure that surfaces and objects are perfectly level and aligned. Whether you’re hanging a picture frame or installing a shelf, the level in the Measure app can be your go-to companion. In this article, we will guide you through the process of using the level in the Measure app on your iPhone, providing you with step-by-step instructions and helpful tips along the way. So, let’s get started and unleash the full potential of your iPhone’s Measure app!
Inside This Article
- Setting Up the Measure App
- Using the Level Tool
- Calibrating the Level Tool
- Tips and Tricks for Accurate Measurements
- Conclusion
- FAQs
Setting Up the Measure App
The Measure app is a handy tool available on your iPhone that allows you to measure objects and distances using your phone’s camera. To get started with the Measure app, follow these simple steps:
1. Open the Measure app: Locate the Measure app on your iPhone’s home screen and tap on the icon to open it. The app will launch, and you will see a viewfinder on the screen.
2. Grant necessary permissions: When you open the Measure app for the first time, you may be prompted to grant it access to your camera. Tap on “OK” or “Allow” to proceed.
3. Familiarize yourself with the interface: Take a moment to explore the various tools and options available in the Measure app. You will find buttons for switching between different measurement modes, including the ruler, level, and more.
4. Enable the level tool: For the purpose of this article, we will focus on using the level tool in the Measure app. To enable the level tool, tap on the “Level” button at the bottom of the screen.
5. Calibrate the level tool (optional): Before using the level tool, you may want to calibrate it to ensure accurate measurements. Calibration instructions can be found in the next section of this article.
Now that you have set up the Measure app on your iPhone, you are ready to start using the level tool for measuring and leveling objects. Keep reading to learn how to use the level tool effectively.
Using the Level Tool
One of the useful features of the Measure app on your iPhone is the built-in Level tool, which allows you to easily determine if an object or surface is perfectly horizontal or vertical. Whether you’re hanging a picture frame, installing shelves, or setting up furniture, the Level tool can be a handy companion to ensure precise alignment. Here’s how you can use the Level tool on your iPhone:
1. Open the Measure app: Locate and open the Measure app on your iPhone. The app icon resembles a ruler on a white background.
2. Switch to the Level tool: Once you have the Measure app open, swipe left or right on the measurement options at the bottom of the screen until you find the Level tool. Tap on it to select it.
3. Place your iPhone on the object or surface: To use the Level tool, you need to place your iPhone on the object or surface you want to check for levelness. It could be a tabletop, a wall, or any other flat surface. Ensure that your iPhone is in contact with the surface.
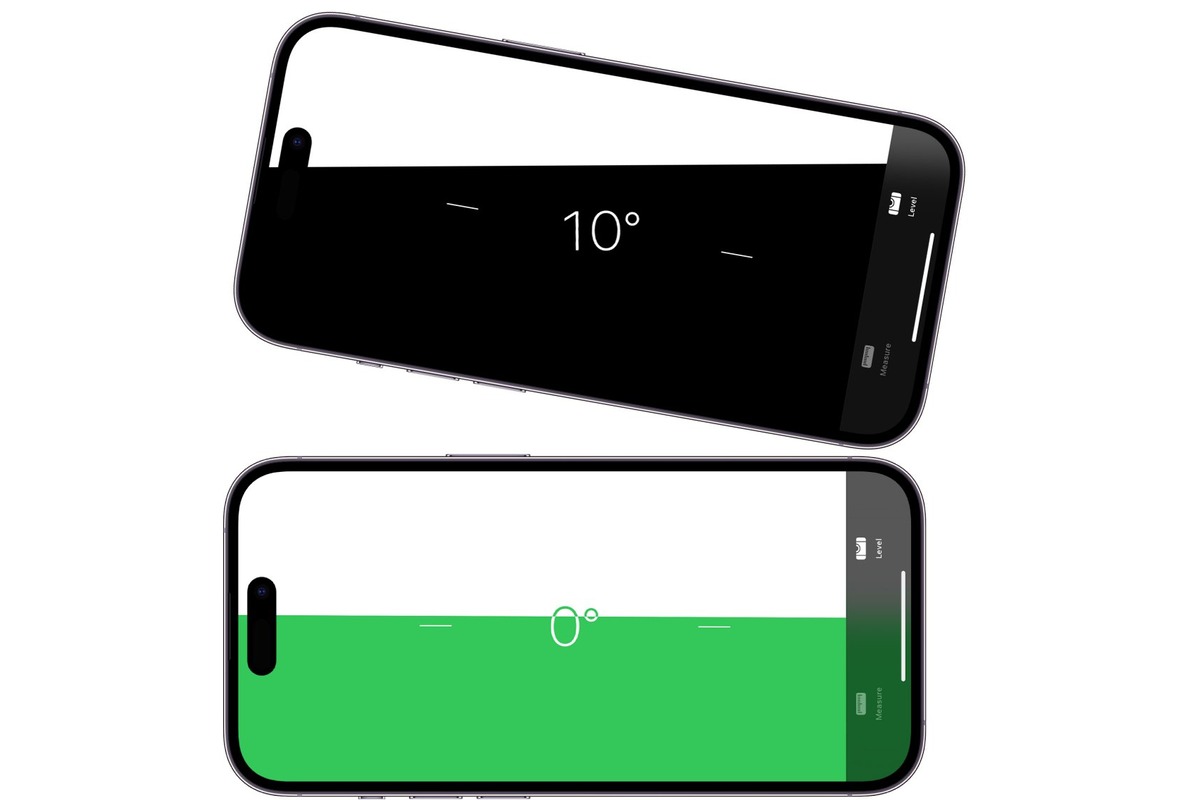
4. Observe the bubble level indicator: Once your iPhone is placed on the surface, look at the bubble level indicator displayed on the screen. You’ll notice a green or yellow liquid-filled bubble surrounded by two curved lines. The goal is to center the bubble between the lines to indicate that the surface is level.
5. Make adjustments if necessary: If the bubble is not centered between the lines, it means the surface is not level. You may need to adjust the object or surface until the bubble is perfectly centered. Use this feedback to make precise adjustments and ensure an even alignment.
6. Take a screenshot or save the measurement: If you want to retain a record of the level measurement, you can take a screenshot by pressing the Sleep/Wake button and the Home button simultaneously. The screenshot will be saved in your Photos app for future reference.
7. Use the Level tool for vertical surfaces: The Measure app’s Level tool can also be used to determine if a surface is perfectly vertical. Simply hold your iPhone against the wall or vertical object, and adjust it until the bubble is centered to ensure a vertical alignment.
By using the Level tool in the Measure app on your iPhone, you can accurately check for levelness and ensure precise alignment for various tasks around your home or workplace.
Calibrating the Level Tool
Calibrating the level tool in the Measure app is essential to ensure accurate measurements. Here’s how you can calibrate the level tool on your iPhone:
1. Open the Measure app and select the “Level” tool from the bottom menu.
2. Place your iPhone on a flat and level surface, such as a table or countertop.
3. Tap the “Calibrate” button at the bottom of the screen. This will activate the calibration process.
4. Follow the on-screen instructions to adjust the level. You will need to tilt your iPhone in different directions to align the bubble with the center marker.
5. Once the bubble is perfectly centered, tap “Done” to complete the calibration process.
6. Your level tool is now calibrated and ready to use for accurate measurements.
Note: It is recommended to calibrate the level tool periodically, especially if you notice any inconsistencies in the readings or if you have dropped your phone.
Tips and Tricks for Accurate Measurements
When it comes to using the Measure app on your iPhone, achieving accurate measurements is crucial. Whether you’re measuring a piece of furniture for a new room layout or determining the dimensions of a space for a renovation project, you want to ensure that your measurements are precise. To help you achieve accurate measurements with the Measure app, here are some tips and tricks to keep in mind:
1. Choose a Stable Surface: To obtain accurate measurements, it’s essential to place your iPhone on a stable surface. Avoid balancing it on uneven or unstable objects, as this may lead to inaccurate readings. Opt for a flat and sturdy surface to ensure reliable results.
2. Hold Your iPhone Steadily: When using the Measure app, it’s important to hold your iPhone as steady as possible. Small movements or vibrations can affect the accuracy of your measurements. Ensure a stable grip and keep your hand steady while taking measurements to achieve precise results.
3. Use Guiding Objects: Another helpful tip is to use guiding objects to improve accuracy. If you’re measuring a long distance, try placing a physical object, such as a straight edge or a piece of masking tape, along the path you intend to measure. This will provide a visual reference and help you maintain a straight line for more precise measurements.
4. Take Multiple Measurements: To increase accuracy, consider taking multiple measurements of the same object or space. Measure from different angles and positions to ensure consistency and double-check your results. Taking multiple measurements can help identify any discrepancies and provide a more accurate overall measurement.
5. Use the Zoom Feature: The Measure app provides a zoom feature that can be beneficial when measuring small objects or distances. By zooming in on the object or area you’re measuring, you can obtain a more detailed view, making it easier to align the virtual measuring lines accurately and improve measurement precision.
6. Check for Calibration: Periodically check the calibration of your iPhone’s sensors to ensure accurate measurements. To do this, go to the Settings app, select “Privacy,” then “Location Services,” and finally “System Services.” From there, you can recalibrate your device by enabling and disabling the Compass calibration option.
7. Ambient Lighting Conditions: Keep in mind that ambient lighting conditions can affect the accuracy of the Measure app. Bright or harsh lighting can cast shadows and distort the measurements. If possible, measure in well-lit environments and avoid areas with extreme lighting conditions for more accurate results.
8. Take Multiple Reference Points: When measuring complex shapes or objects, it can be helpful to take multiple reference points. Instead of relying on a single measurement, use the Measure app to measure from different edges, corners, or angles. This will provide a more comprehensive understanding of the object’s dimensions and increase measurement accuracy.
9. Avoid Using Measure App near Magnetic Objects: Magnetic objects can interfere with the sensors’ accuracy in your iPhone and affect the measurements taken with the Measure app. While using the app, try to avoid being near magnetic objects like speakers, large metallic surfaces, or electronic devices to ensure more precise measurements.
10. Familiarize Yourself with the App: Lastly, take the time to familiarize yourself with the various features and functionalities of the Measure app. Experiment with different measurement tools, such as the level tool, ruler, or person’s height measurement, to gain confidence and improve your measurement accuracy.
By following these tips and tricks, you can maximize the accuracy of your measurements using the Measure app on your iPhone. From stable surfaces to multiple measurement techniques, incorporating these strategies will help you achieve reliable and precise results for all your measurement needs.
In conclusion, the Measure app on your iPhone is a powerful tool that allows you to take measurements quickly and accurately. Whether you need to measure the length of a piece of furniture, the width of a room, or the height of a building, the Measure app has got you covered. By utilizing the app’s level feature, you can also ensure that your measurements are taken with precision.
With its intuitive interface and handy features, the Measure app is a must-have for anyone who needs to make measurements on a regular basis. Whether you’re a DIY enthusiast, a professional contractor, or just someone who wants to make sure that picture frame is perfectly straight, the Measure app is there to assist you.
So go ahead, download the Measure app on your iPhone today and start measuring with ease and accuracy!
FAQs
1. What is the Level feature in the Measure app on an iPhone?
The Level feature in the Measure app on your iPhone is a handy tool that allows you to measure and determine if a surface or object is perfectly horizontal or vertical. It utilizes the built-in accelerometer and gyroscope sensors to provide accurate leveling measurements.
2. How do I access the Level feature in the Measure app?
To access the Level feature on your iPhone, open the Measure app, which is pre-installed on most iPhones. Once you have the app open, swipe left on the different measurement options (Ruler, Level, and Measure) until you reach the Level tool. Tap on the Level option, and you’re ready to use it.
3. Can I calibrate the Level feature in the Measure app?
Yes, you can calibrate the Level feature in the Measure app to ensure accurate readings. To do this, place your iPhone on a flat and level surface and tap the “Calibrate” button at the top right corner of the screen. Follow the on-screen instructions to complete the calibration process.
4. How do I use the Level feature to measure if a surface is horizontal or vertical?
Using the Level feature is simple. Open the Measure app on your iPhone and select the Level option. Align your iPhone with the surface or object you want to measure. The app will display a visual indicator, usually in the form of a bubble, that moves in real-time to indicate whether the surface is level (horizontal) or plumb (vertical).
5. Are there any additional features or settings available in the Level feature?
The Level feature in the Measure app offers a few additional settings and features. For example, you can toggle sound effects on or off, which provide audio cues when your device is level. Additionally, you can change the appearance of the visual indicator by choosing between different styles, such as a traditional bubble or a digital level.