
Are you struggling to figure out which way a SIM card goes in your iPhone? Well, you’re not alone! Inserting a SIM card in an iPhone can be a bit tricky, especially if you’re doing it for the first time. The SIM card is a small, rectangular chip that stores your subscriber information and allows you to make calls, send texts, and access mobile data on your device.
In this article, we will guide you through the process of inserting a SIM card in your iPhone, providing you with step-by-step instructions and tips to ensure a smooth and successful installation. Whether you have an iPhone 12, iPhone SE, or any other model, you’ll be able to confidently insert your SIM card and get your phone up and running in no time.
Inside This Article
- Inserting a SIM Card in an iPhone
- Troubleshooting SIM Card Installation
- Removing a SIM Card from an iPhone
- Conclusion
- FAQs
Inserting a SIM Card in an iPhone
Are you the proud owner of a new iPhone? One of the first things you’ll need to do is insert a SIM card so that you can make calls, send messages, and access mobile data. The process may seem a bit confusing if you’re new to iPhones, but don’t worry, we’ve got you covered.
The specific method for inserting a SIM card in an iPhone may vary slightly based on the model you have. However, the general steps remain the same. Let’s dive in and learn how to do it.
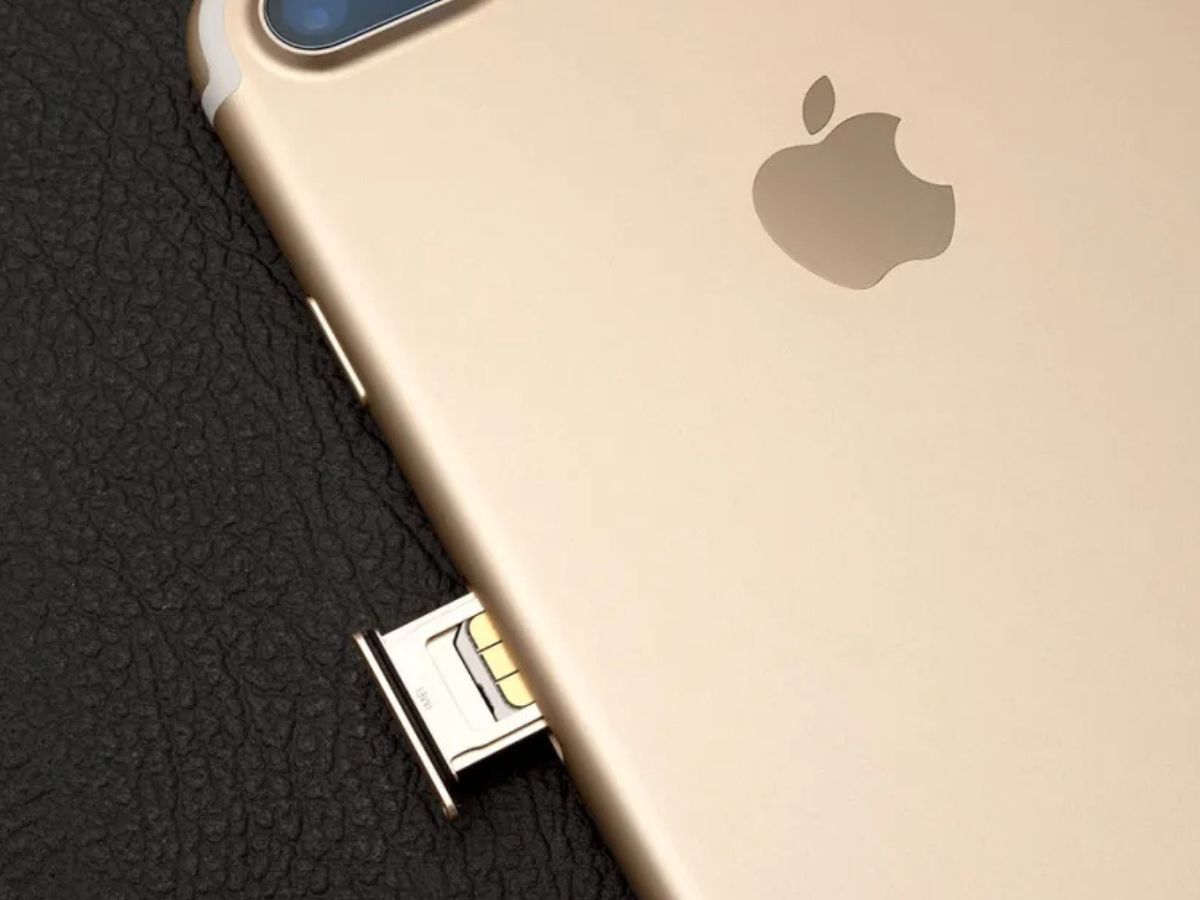
Step 1: Locate the SIM card tray – On most iPhones, the SIM card tray is located on the right-hand side of the device. You may find a small hole or a slot. Use the SIM eject tool provided with your iPhone or a paperclip to gently push into the hole or slot.
Step 2: Remove the SIM card tray – When you apply gentle pressure, the SIM card tray should pop out. Carefully pull it out of the device. Be mindful not to force it or bend any of the pins inside the tray.
Step 3: Place your SIM card – Take your SIM card and ensure it is the correct size for your iPhone model. iPhones typically use nano-SIM cards. Align the notched corner of the SIM card with the designated corner on the SIM card tray. Carefully place the SIM card into the tray.
Step 4: Reinsert the tray – Once the SIM card is in place, carefully slide the tray back into the iPhone. Make sure it is fully inserted and flush with the device. You should feel a slight click when the tray is locked into place.
Step 5: Power on your iPhone – Now that your SIM card is installed, you can power on your iPhone. It may take a few moments for the device to recognize the SIM card and establish a connection with the mobile network.
Congratulations! Your SIM card is now inserted and ready to use. You can make calls, send messages, and browse the internet using your iPhone.
Remember, if you ever need to switch SIM cards or remove the SIM card for any reason, simply follow these steps in reverse order.
Now that you know how to insert a SIM card in an iPhone, you can confidently set up your device and start enjoying all its features. Don’t forget to activate your SIM card with your mobile service provider before you begin using your iPhone.
Troubleshooting SIM Card Installation
Inserting a SIM card into your iPhone should be a simple process, but sometimes issues can arise. If you’re having trouble installing a SIM card in your iPhone, here are a few troubleshooting steps to help you resolve the problem:
1. Check the SIM Card Compatibility: Ensure that the SIM card you are trying to insert is compatible with your iPhone model. Different iPhone models support different sizes of SIM cards, such as Nano SIM, Micro SIM, or Standard SIM. Make sure you have the correct size SIM card for your iPhone.
2. Verify the SIM Card Slot: Double-check if you are inserting the SIM card into the correct slot. On most iPhones, the SIM card slot is located on the side or top of the device. Refer to your iPhone’s user manual to locate the specific slot and ensure that you are inserting the SIM card into the correct orientation.
3. Clean the SIM Card and Slot: Sometimes, dust or debris can accumulate on the SIM card or inside the SIM card slot, affecting the connection. Gently remove the SIM card from the slot and use a soft, lint-free cloth to clean both the SIM card and the slot. Ensure that they are completely dry before reinserting the SIM card into the slot.
4. Restart your iPhone: A simple restart can often resolve minor software glitches that may be causing the SIM card installation issue. Press and hold the power button until the “Power off” slider appears. Slide it to turn off your iPhone, wait for a few seconds, and then press and hold the power button again until the Apple logo appears. Once your iPhone restarts, try inserting the SIM card again.
5. Contact your Carrier: If you’ve followed the above steps and are still experiencing difficulties inserting your SIM card, it’s possible that there may be a problem with the SIM card itself or your carrier’s network. Reach out to your carrier’s customer support for assistance. They can verify if the SIM card is activated correctly and troubleshoot any network-related issues.
By following these troubleshooting steps, you should be able to resolve any issues you’re encountering when attempting to install a SIM card in your iPhone. If the problem persists, seeking professional assistance from an authorized service center may be necessary.
Remember, if you are uncertain or uncomfortable with handling the SIM card installation process, it’s always best to seek guidance from a professional to avoid any potential damage to your device.
Removing a SIM Card from an iPhone
Removing a SIM card from an iPhone is a straightforward process that can be completed in a few simple steps. Whether you’re switching to a new device or need to remove the SIM card for troubleshooting purposes, here’s a step-by-step guide to help you along.
1. Begin by locating the SIM card tray on your iPhone. The location may vary depending on the model, but it is usually found on the side of the device. Look for a small pinhole or a small compartment with a removable tray.
2. Next, take a SIM card removal tool or a small paperclip and insert it into the pinhole or the small compartment. Apply a gentle amount of pressure until the tray pops out slightly.
3. Once the tray is partially popped out, carefully pull it out from the device. Be cautious not to use excessive force to avoid any damage to the SIM card or the tray.
4. After removing the tray, you will see the SIM card on it. Gently lift the SIM card from the tray, making sure not to touch the metal contacts as they are sensitive and can affect the functioning of the card.
5. If you need to replace the SIM card with a new one, ensure that it is compatible with your iPhone model and that it is properly aligned with the SIM card tray. Place the SIM card back into the tray with the gold contacts facing down.
6. Once the SIM card is securely placed in the tray, insert the tray back into the iPhone, aligning it properly with the slot. Push the tray gently until it is fully inserted and sits flush with the side of the device.
7. Finally, power on your iPhone and wait for it to recognize the newly inserted SIM card. Once the iPhone establishes a connection with the cellular network, you can start making calls, sending messages, and accessing mobile data.
Remember, it’s essential to handle the SIM card with care and avoid touching its metal contacts. This will help prevent any damage and ensure smooth functionality. If you encounter any issues or difficulties while removing or installing a SIM card, it’s always recommended to consult the device’s user manual or reach out to the manufacturer’s support for further assistance.
Now that you know how to remove a SIM card from an iPhone, you can confidently make the necessary changes or troubleshoot any SIM-related issues on your device.
Conclusion
In conclusion, understanding the proper way to insert a SIM card into an iPhone is crucial for optimal functionality. By following the simple steps and paying attention to the orientation of the card, you can avoid any potential issues and ensure a seamless user experience. Remember to power off your device before inserting or removing the SIM card to prevent any damage and make sure to handle the card with care, avoiding any bending or scratching. With the correct insertion, your iPhone will be ready to connect to your cellular network and take advantage of all the features and services it has to offer. So, next time you need to change your SIM card, refer back to this guide and insert it with confidence into your iPhone!
FAQs
1. What is a SIM card and how does it work in an iPhone?
2. How do I insert a SIM card into my iPhone?
3. What are the different types of SIM cards compatible with iPhones?
4. Can I use a SIM card from a different carrier in my iPhone?
5. What should I do if my iPhone is not recognizing the SIM card?