
Are you in need of a webcam for your online meetings or video conferences but don’t have one readily available? Look no further than your trusty iPhone! With the advancement of technology, your iPhone can now be used as a webcam, providing you with a convenient and versatile solution. By utilizing the camera capabilities of your iPhone and the right apps, you can turn your phone into a high-quality webcam in just a few simple steps. Whether you’re using an iPhone for work or personal use, this article will guide you through the process of setting up your iPhone as a webcam, ensuring you’re always ready to connect and communicate effectively with others.
Inside This Article
- Section 1: Setting up your iPhone as a Webcam
- Section 2: Connecting your iPhone to your computer
- Section 3: Choosing the right app for webcam functionality
- Section 4: Adjusting settings and optimizing video quality
- Conclusion
- FAQs
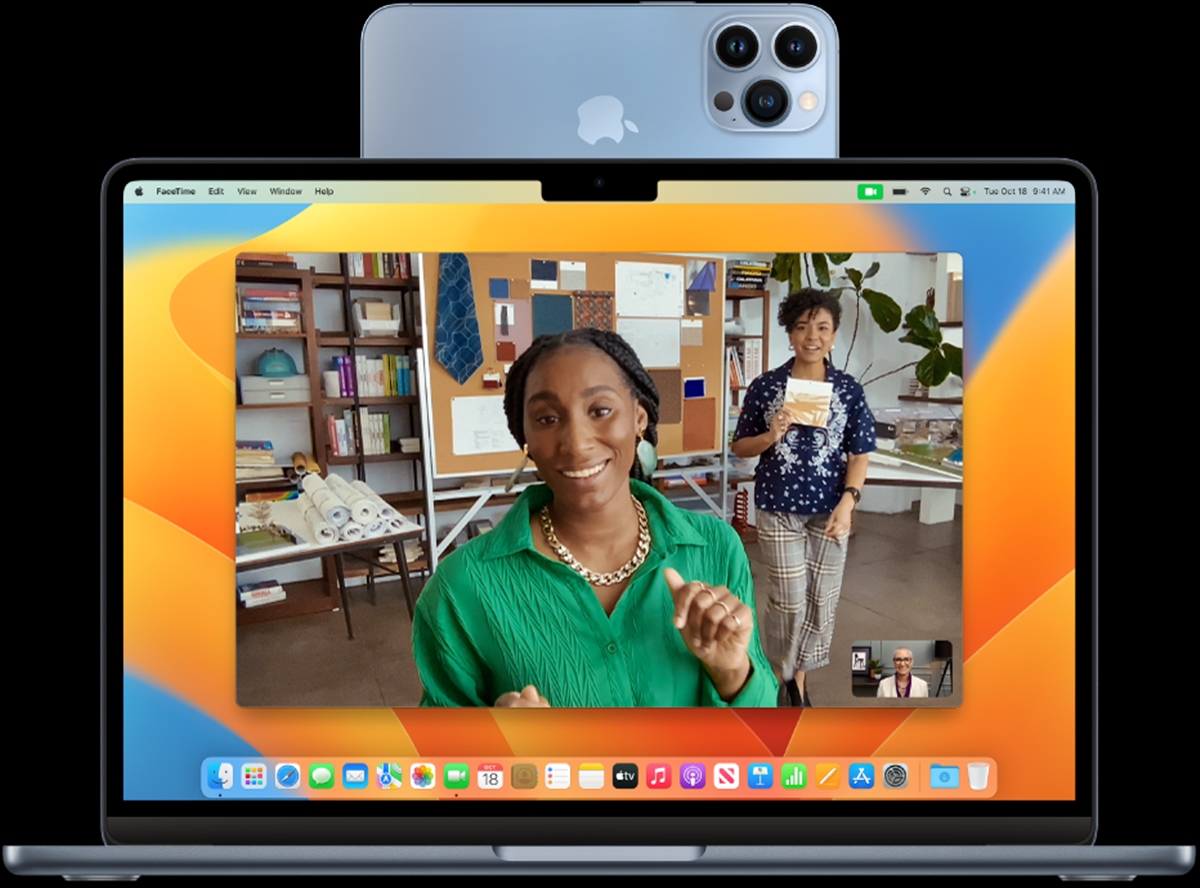
Section 1: Setting up your iPhone as a Webcam
Smartphones have become an essential part of our lives, and their capabilities reach far beyond making phone calls and sending text messages. With the right apps and configuration, you can transform your iPhone into a high-quality webcam for your computer. Whether you’re attending online meetings, video conferencing with friends, or streaming content on platforms like YouTube or Twitch, using your iPhone as a webcam can greatly enhance your video quality and overall experience.
Setting up your iPhone as a webcam is a relatively straightforward process. Here’s how to do it:
1. First, you’ll need to download a webcam app on both your iPhone and your computer. There are several apps available, such as EpocCam, iVCam, and NDI HX Camera, each offering their own set of features and capabilities.
2. Make sure that your iPhone and computer are connected to the same Wi-Fi network. This is crucial for establishing a stable connection between the two devices.
3. Launch the webcam app on your iPhone and follow the on-screen instructions to set up the connection. Typically, this involves enabling the app’s webcam functionality and granting necessary permissions.
4. Once the connection is established, you’ll be provided with an IP address or a QR code. Note down the IP address or scan the QR code using your computer’s webcam app to pair the devices.
5. Once the pairing is successful, you can select your iPhone as the webcam source in your preferred video conferencing or streaming application. This can usually be done within the app’s settings or preferences section.
6. Finally, adjust the positioning and angle of your iPhone’s camera to get the desired framing. You can use a tripod or a phone stand to keep your iPhone stable during video calls or streams.
With your iPhone now set up as a webcam, you can benefit from its superior camera quality, autofocus capabilities, and other camera features that are often better than traditional webcams. Plus, you’ll have the convenience of using your familiar iPhone interface for controlling camera settings and capturing high-quality videos.
Keep in mind that while using your iPhone as a webcam can provide excellent video quality, it may also have an impact on battery life. To ensure uninterrupted usage, consider keeping your iPhone connected to a charger during longer video sessions.
Section 2: Connecting your iPhone to your computer
Once you have set up your iPhone as a webcam, the next step is to connect it to your computer. This will allow you to use the webcam functionality seamlessly during video calls, online meetings, or live streaming. Here are the steps to connect your iPhone to your computer:
1. Start by ensuring that both your iPhone and computer are connected to the same Wi-Fi network. This is crucial for establishing a reliable connection between the two devices.
2. On your computer, open your preferred video conferencing or streaming app. Examples include Zoom, Skype, Google Meet, OBS Studio, or any other app that supports external webcams.
3. Connect your iPhone to your computer using a USB cable. Make sure to use a certified cable for optimal performance.
4. On your iPhone, when prompted, allow access to your device by tapping “Trust” or entering your passcode.
5. Once connected, your iPhone will appear as an available webcam option within the video conferencing or streaming app. Select your iPhone as the video input source.
6. Test the connection by starting a video call or streaming session. Ensure that the video feed from your iPhone is displayed properly on your computer screen.
7. Adjust the positioning and angle of your iPhone to capture the desired view. Using a tripod or a phone holder can help stabilize your iPhone and ensure a steady video feed.
8. Enjoy using your iPhone as a webcam for all your online communication and streaming needs!
Connecting your iPhone to your computer opens up a world of possibilities, allowing you to utilize the excellent camera capabilities of your iPhone for professional video calls, virtual meetings, content creation, and more. With a seamless connection, you can ensure high-quality video and audio during your online interactions.
It’s important to note that different video conferencing or streaming apps may have varying steps to connect your iPhone as a webcam. However, the overall process remains quite similar, and these general steps should guide you in establishing the connection successfully.
Section 3: Choosing the right app for webcam functionality
Now that you have set up your iPhone as a webcam and connected it to your computer, it’s time to choose the right app to utilize its webcam functionality. There are several apps available for this purpose, each with its own set of features and compatibility options. Let’s explore some popular options:
1. EpocCam: EpocCam is a highly rated app that turns your iPhone into a high-quality wireless webcam. It offers both Wi-Fi and USB connectivity options, allowing you to use your iPhone as a webcam on various platforms such as Skype, Zoom, and OBS. EpocCam also provides manual focus, exposure, and camera selection options for enhanced video quality.
2. iVCam: iVCam is another popular app that transforms your iPhone into a webcam. It supports both USB and Wi-Fi connections, making it compatible with Windows and macOS systems. iVCam offers HD video quality, customizable resolutions, and the ability to use your iPhone as a microphone as well. It works seamlessly with popular video conferencing apps like Zoom, Microsoft Teams, and Google Meet.
3. DroidCam: If you’re an Android user, DroidCam is a reliable option for turning your iPhone into a webcam. It connects via Wi-Fi or USB, and you can use it with software like Skype, Google Meet, and OBS. DroidCam offers features like video resolution adjustment, camera selection, and fine-tuning settings for a smooth webcam experience.
4. Reincubate Camo: Reincubate Camo is a versatile app that works with both iPhones and iPads. It provides a high-definition webcam experience with options for manual focus, exposure, and audio support. Camo is compatible with macOS and Windows, as well as popular video conferencing platforms like Zoom, Microsoft Teams, and Slack.
5. iCam: iCam is a user-friendly app that turns your iPhone into a webcam for Mac. It offers reliable connectivity options via Wi-Fi and supports video streaming to applications like Skype and FaceTime. iCam also provides motion detection and alert features, making it a handy app for home security purposes.
Remember to check the compatibility of the app with your specific operating system and the video conferencing platform you intend to use. Additionally, consider the features, ease of use, and overall user reviews while choosing the right app for your webcam needs.
Section 4: Adjusting settings and optimizing video quality
Now that you have set up your iPhone as a webcam and connected it to your computer, it’s time to fine-tune the settings and optimize the video quality for a seamless webcam experience. Here are some tips to help you get the best out of your iPhone as a webcam:
-
Choose the right position: Position your iPhone in a stable and secure stand or mount, ensuring that it is at the desired height and angle for your video calls. Experiment with different positions to find the most flattering and comfortable setup.
-
Check your lighting: Good lighting is crucial for clear and crisp video quality. Make sure you are well-lit by positioning yourself in a well-lit room or using additional lighting sources such as lamps or ring lights. Avoid backlighting that can cast harsh shadows on your face.
-
Adjust exposure and focus: Most webcam apps offer exposure and focus controls, allowing you to manually adjust these settings for optimal video quality. Experiment with different settings to find the best balance between brightness and clarity.
-
Set the video resolution: Depending on the app you are using, you may be able to adjust the video resolution. Higher resolutions like 1080p or 720p can result in clearer and more detailed video, but they may also require a stable internet connection and sufficient bandwidth.
-
Frame yourself properly: Position yourself in the center of the frame, with your face clearly visible. Avoid cropping off any important parts of your body or having too much empty space around you. This will help make your video calls more engaging and professional.
-
Audio settings: While this section is about video quality, it’s essential to ensure your audio settings are optimized as well. Use a high-quality microphone or headset for clear and crisp audio, reducing background noise as much as possible.
-
Test and adjust: Before important video calls or meetings, take the time to test your setup and make any necessary adjustments. Check the video quality, audio clarity, and overall appearance to ensure you present yourself in the best possible way.
By following these tips, you can optimize the video quality of your iPhone webcam and deliver a professional and engaging experience during your video calls and meetings. Remember to regularly check for updates to your webcam app to take advantage of any improvements or new features that may enhance your experience even further.
Conclusion
In conclusion, using your iPhone as a webcam can be a game-changer for online meetings, video calls, and live streaming. With the right apps and setup, you can transform your iPhone into a high-quality webcam that offers superior video and audio quality.
By leveraging the power of your iPhone’s superior camera capabilities, you can elevate your online presence and make a lasting impression. Whether you’re a professional, entrepreneur, or simply someone who wants to enhance their video communication, utilizing your iPhone as a webcam opens up a world of possibilities.
Remember to research and choose the best app that suits your needs, ensure a stable internet connection, and set up your iPhone securely for optimal results. With these steps in place, you’ll be ready to connect, communicate, and collaborate in a whole new way!
FAQs
1. Can I use my iPhone as a webcam?
Yes, you can use your iPhone as a webcam for your computer or laptop. There are several apps available that allow you to turn your iPhone’s camera into a webcam. This can be useful for video conferencing, live streaming, or even just capturing high-quality videos.
2. What are some popular apps for using iPhone as a webcam?
There are several popular apps available for using your iPhone as a webcam. Some popular options include EpocCam, iCam, and iVCam. These apps utilize your iPhone’s camera and connect to your computer or laptop through Wi-Fi or USB.
3. How do I set up my iPhone as a webcam?
Setting up your iPhone as a webcam is relatively simple. First, you need to download and install a webcam app on your iPhone and the corresponding software on your computer or laptop. Once both devices are connected to the same Wi-Fi network or through USB, launch the app on your iPhone and the software on your computer. Follow the app-specific instructions to establish the connection and start using your iPhone as a webcam.
4. Can I use my iPhone as a webcam for video conferencing?
Yes, you can use your iPhone as a webcam for video conferencing. Many video conferencing platforms, such as Zoom and Microsoft Teams, allow you to select your iPhone as the camera source. This way, you can have better video quality and take advantage of your iPhone’s advanced camera features during your video conference calls.
5. Are there any limitations to using an iPhone as a webcam?
While using an iPhone as a webcam can be convenient, there are a few limitations to be aware of. One limitation is that the video quality may not be as good as dedicated webcams. Additionally, using your iPhone as a webcam may drain your iPhone’s battery quickly, so it’s recommended to keep it connected to a charger during use. Lastly, some webcam apps may have a delay in video and audio, so it’s important to test different apps and find one that suits your needs.