
Are you tired of poor network signal and dropped calls? Wi-Fi calling on Android might be the solution you’ve been looking for! With Wi-Fi calling, you can make and receive calls and send messages over a Wi-Fi network instead of relying solely on cellular networks. This feature is especially handy in areas with weak cellular coverage or when you’re traveling internationally.
In this article, we’ll guide you through the step-by-step process of setting up and using Wi-Fi calling on your Android device. Whether you have a Samsung Galaxy, Google Pixel, or any other Android phone, we’ve got you covered. Say goodbye to the frustration of bad network connections and enjoy seamless communication with Wi-Fi calling!
Inside This Article
- Enabling Wi-Fi Calling on Android
- Checking Device Compatibility
- Activating Wi-Fi Calling
- Making Wi-Fi Calls
- Conclusion
- FAQs
Enabling Wi-Fi Calling on Android
Wi-Fi calling is a convenient feature that allows you to make and receive calls using a Wi-Fi network instead of relying solely on your cellular network. This can be particularly useful in areas with weak or no cellular signal, as well as when traveling internationally to avoid expensive roaming charges.
To enable Wi-Fi calling on your Android device, follow these simple steps:
Step 1: Checking Device Compatibility
Not all Android devices support Wi-Fi calling, so it’s important to check if your device is compatible. Most newer Android devices from major manufacturers like Samsung, LG, and Google support this feature. However, the availability of Wi-Fi calling may vary depending on your carrier. You can check with your carrier’s website or contact their customer support to confirm if your device supports Wi-Fi calling.
Step 2: Activating Wi-Fi Calling
Once you have confirmed that your device is compatible, you can proceed to activate Wi-Fi calling. The steps to activate Wi-Fi calling may vary slightly depending on your Android version and carrier. Here are the general steps:
- Open the Phone app on your Android device.
- Tap on the menu icon (usually three dots or lines) to access the settings.
- Select “Settings” or “Call Settings”.
- Look for the “Wi-Fi Calling” or “Advanced Calling” option and tap on it.
- Toggle the switch to enable Wi-Fi calling.
If you don’t see the Wi-Fi calling option, it’s possible that your carrier has not enabled it for your device or you may need to update your device’s software to the latest version.
Step 3: Making Wi-Fi Calls
After enabling Wi-Fi calling, you can start making calls over Wi-Fi. When you’re connected to a Wi-Fi network, your Android device will automatically switch to Wi-Fi calling when you make or receive a call. The person on the other end of the call won’t even know that you’re using Wi-Fi calling.
It’s important to note that for emergency services, Wi-Fi calling may not be available or reliable. In such cases, your device will switch back to the cellular network for emergency calls.
Wi-Fi calling is a valuable feature that can improve your call quality and coverage in areas with weak cellular signals. By following these steps, you can easily enable Wi-Fi calling on your Android device and enjoy the benefits it offers.
Checking Device Compatibility
Before you can start using Wi-Fi Calling on your Android device, it’s important to check if your device is compatible. Not all Android devices support Wi-Fi Calling, so it’s essential to confirm whether this feature is available for your specific device.
The easiest way to determine if your Android device supports Wi-Fi Calling is to check your device’s settings. Here’s a step-by-step guide on how to do it:
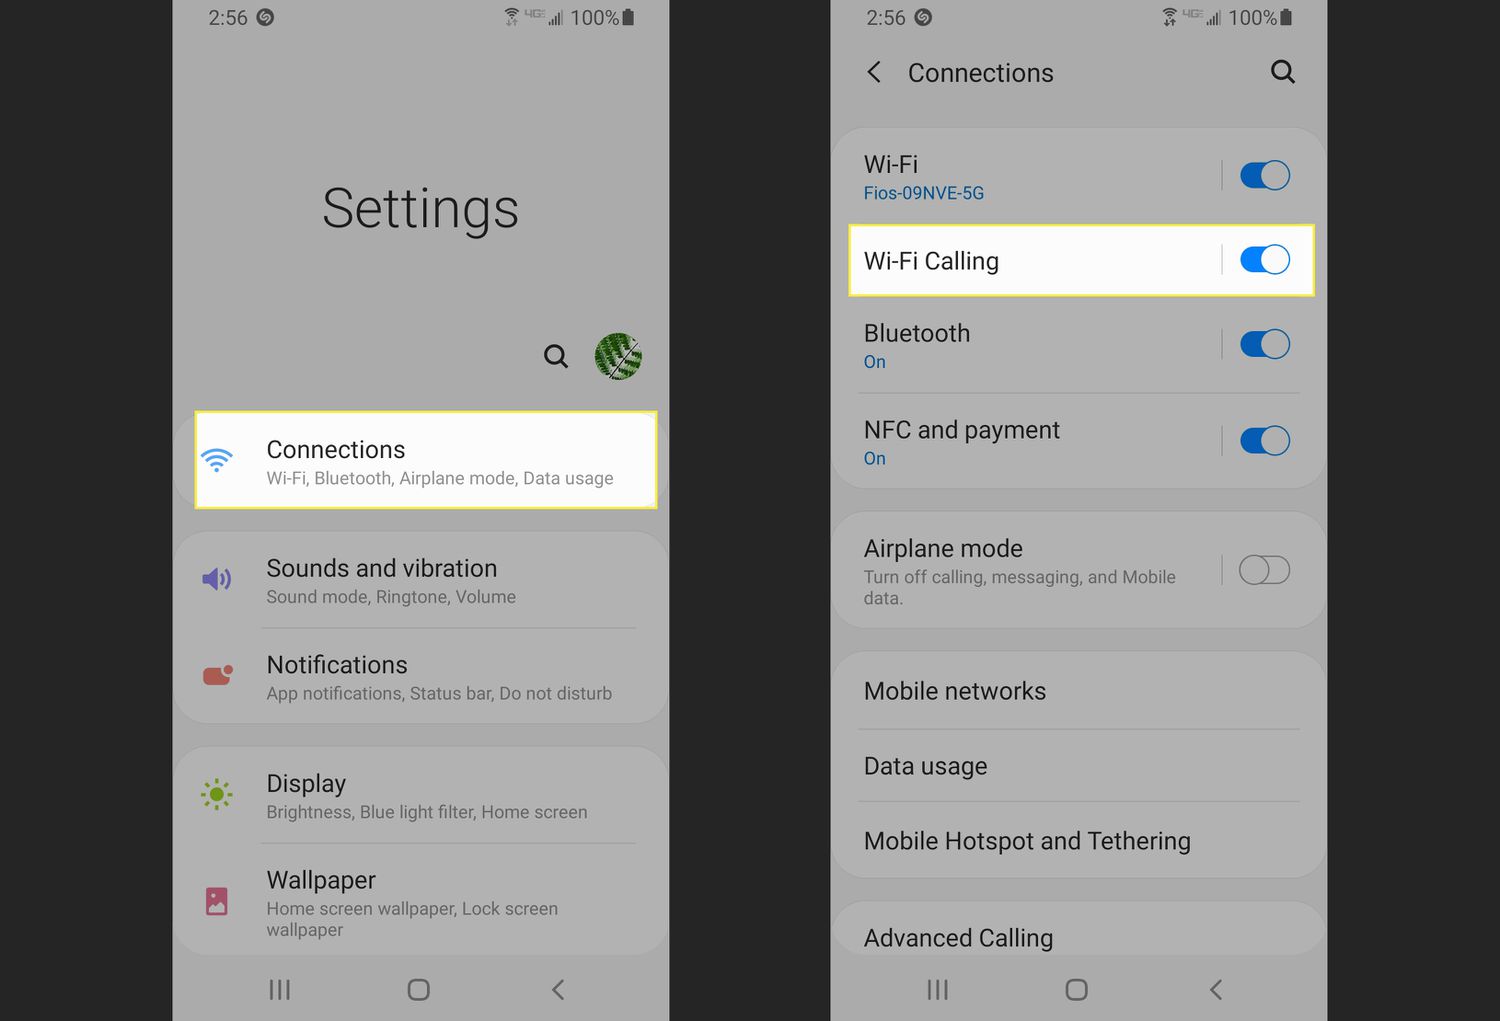
- Open the “Settings” app on your Android device.
- Scroll down and look for the “Network & Internet” or “Connections” category. The naming may vary slightly depending on your device.
- Tap on “Wi-Fi Calling” or “Advanced Calling” or a similar option.
- If you see the option to enable Wi-Fi Calling or any related settings, it means your device supports this feature.
If you cannot find any mention of Wi-Fi Calling in your device settings, it’s likely that your Android device does not support this feature. However, it’s always a good idea to double-check with your mobile carrier as they might have additional requirements or restrictions.
Remember that even if your device supports Wi-Fi Calling, you will still need to activate it with your mobile carrier before you can start using this feature. So, make sure to contact your carrier and inquire about the specific steps to activate Wi-Fi Calling on your Android device.
Checking device compatibility is an important first step to ensure you can take full advantage of the benefits of Wi-Fi Calling on your Android device. So, before you proceed to activate Wi-Fi Calling, make sure your device is compatible with this feature.
Activating Wi-Fi Calling
Activating Wi-Fi Calling on your Android device is a straightforward process. Follow these simple steps to get started:
1. Open the Phone app on your Android device. It’s usually represented by a green phone icon.
2. Tap on the three-dot menu located at the top-right corner of the screen to open the menu options.
3. From the menu, select “Settings” or “Call Settings” depending on the options available on your device.
4. Look for the “Wi-Fi Calling” or “Advanced Calling” section and tap on it.
5. Toggle the switch to enable Wi-Fi Calling. You may also need to agree to the terms and conditions before activating it.
6. If prompted, enter your emergency address. This information helps emergency services locate you in case of an emergency call.
7. Once you’ve enabled Wi-Fi Calling, your device will connect to a Wi-Fi network for making calls when the cellular signal is weak or unavailable.
8. You can also manage other settings related to Wi-Fi Calling, such as preferred network and calling preferences, from the same Wi-Fi Calling menu.
It’s important to note that Wi-Fi Calling availability may vary depending on your mobile carrier and device model. Some carriers and devices have specific requirements for enabling Wi-Fi Calling, so make sure to check with your carrier and consult your device’s user manual for any additional instructions.
Making Wi-Fi Calls
Making Wi-Fi calls on your Android device is incredibly easy and convenient. Follow these steps to start making calls using Wi-Fi:
1. Ensure that Wi-Fi calling is enabled on your device. Check the settings menu or the phone app’s settings to confirm if Wi-Fi calling is supported.
2. Connect to a Wi-Fi network. Make sure you are connected to a stable and secure Wi-Fi network with a strong signal. This will ensure optimal call quality and reliability.
3. Open your phone app. Launch the phone app on your Android device. The layout and design might differ slightly depending on your device’s manufacturer and the Android version you are using.
4. Dial the phone number. Enter the phone number you wish to call using the keypad. Remember to include the necessary country and area codes, if applicable.
5. Press the call button. Once you have entered the phone number, tap the call button to initiate the call. Your Android device will automatically establish the call using Wi-Fi instead of cellular network if Wi-Fi calling is enabled and you are connected to a Wi-Fi network.
6. Enjoy your Wi-Fi call. Once the call is connected, you can talk and communicate just like you would on a regular phone call. The call quality is typically excellent when using Wi-Fi calling, as long as you have a strong and stable Wi-Fi connection.
7. Monitor your Wi-Fi signal strength. Keep an eye on your Wi-Fi signal strength during the call. If the signal weakens or becomes unstable, it may affect the call quality. Consider moving closer to your Wi-Fi router or accessing a more reliable Wi-Fi network if necessary.
Remember, Wi-Fi calling allows you to make and receive calls over the internet, which means you can save on your cellular minutes and have the flexibility to make calls even in areas with weak cellular network coverage. It’s a great feature to utilize, especially in situations where you have access to Wi-Fi but weak cellular reception.
Keep in mind that some cellular carriers or network providers may have additional charges or fees for using Wi-Fi calling. Therefore, it is recommended to check with your service provider for any specific requirements or charges associated with Wi-Fi calling.
Conclusion
Wi-Fi calling is a valuable feature for Android users that allows you to make and receive calls over a Wi-Fi network. It provides a reliable and cost-effective alternative to traditional cellular calls, especially in areas with weak network coverage. By enabling Wi-Fi calling on your Android device, you can stay connected even in situations where cellular signal is limited.
With the step-by-step instructions provided in this article, you should have no trouble activating and using Wi-Fi calling on your Android device. Whether you’re at home, in the office, or traveling abroad, Wi-Fi calling offers a seamless calling experience with improved clarity and stability.
Take advantage of this convenient feature and enjoy uninterrupted communication wherever you are. So, next time you find yourself in an area with poor cellular coverage, remember to enable Wi-Fi calling on your Android device and keep the conversations going.
FAQs
**Q: What is Wi-Fi calling on Android?**
A: Wi-Fi calling is a feature on Android devices that allows users to make and receive phone calls over a Wi-Fi network rather than a cellular network. It provides a way to stay connected even in areas with weak or no cellular signal.
**Q: Do I need a specific Android device to use Wi-Fi calling?**
A: Not necessarily. Wi-Fi calling is available on most Android devices, but it ultimately depends on your carrier’s support for the feature. Make sure to check if your carrier and Android device are compatible with Wi-Fi calling.
**Q: How do I enable Wi-Fi calling on my Android device?**
A: The steps to enable Wi-Fi calling may vary slightly depending on your Android device and carrier. However, the general process involves going to the “Settings” menu, selecting “Network & Internet,” then “Mobile network,” and finally enabling the “Wi-Fi calling” option. If you don’t see this option, it’s possible that your carrier doesn’t support Wi-Fi calling on your device.
**Q: Can I make international calls using Wi-Fi calling?**
A: Yes, you can make international calls using Wi-Fi calling as long as your carrier supports it. However, it’s important to note that additional charges may apply for international calls, so it’s best to check with your carrier about any potential fees before making international calls using Wi-Fi calling.
**Q: Will Wi-Fi calling consume my mobile data?**
A: Wi-Fi calling primarily uses your Wi-Fi connection to transmit calls, so it doesn’t consume your mobile data. However, some carriers may deduct a small amount of data from your mobile plan for authentication purposes or to support certain features. It’s advisable to check with your carrier to understand any potential data usage associated with Wi-Fi calling.